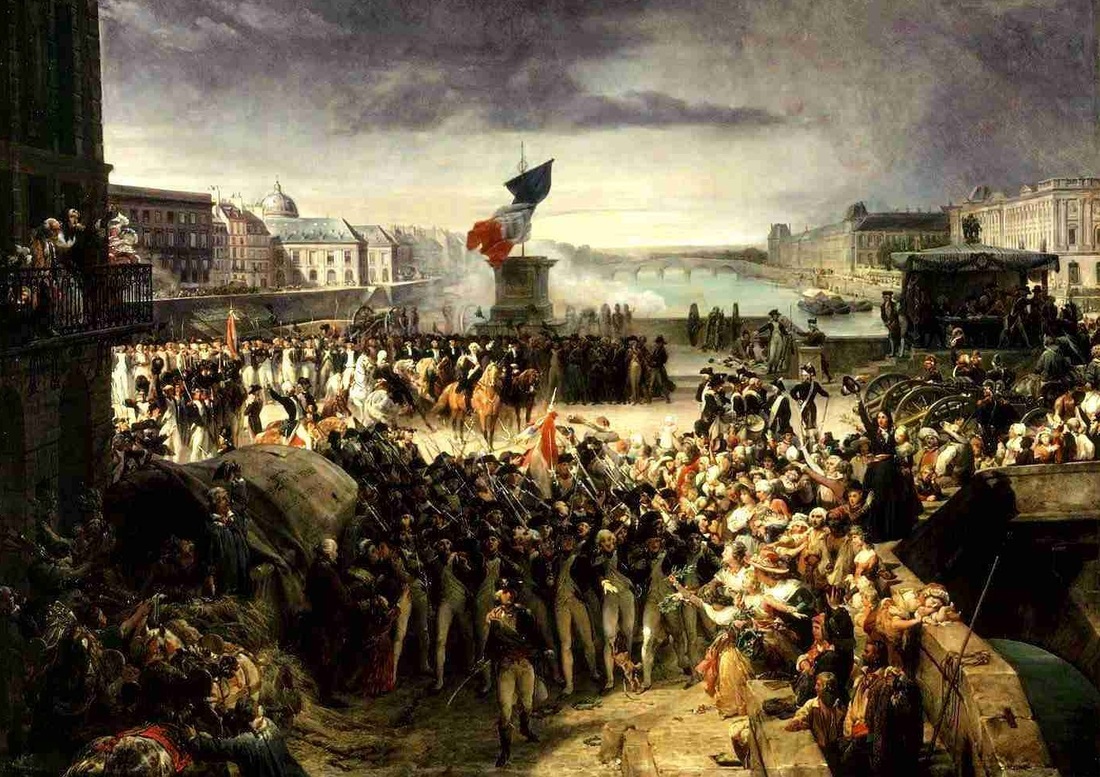
 The Levée en masse, or military conscription adopted by revolutionary France. The painting depicts the one in 1789. Now that I have built some troops, it's time to paint them. We generally prefer to play with painted miniatures at the club, so me and the nefarious Russians are in a situation quite similar to that of the Napoleonic armies at the time: both sides attempting to press enough troops into the battle lines, so that we can get ready for a battle! This mass conscription calls for a painting process that balances speed and efficiency with a final result that looks appealing enough on the table. Keeping in mind that I want to finish quite a few troops this year, I set out to test a painting method that will be quick yet satisfactory. The method I ended up using is quite basic and far from as revolutionary as France in the late 1700's, but I hope it can be helpful if you are new to painting in general. I don't tend to use any paint brand more than others, so the specific paints mentioned are all over the map. Always feel free to experiment with new paints, until you find the ones you like. You are even likely to find out that you like different things from different brands, ending up with just as mixed a painted collection as mine! Step 1: Priming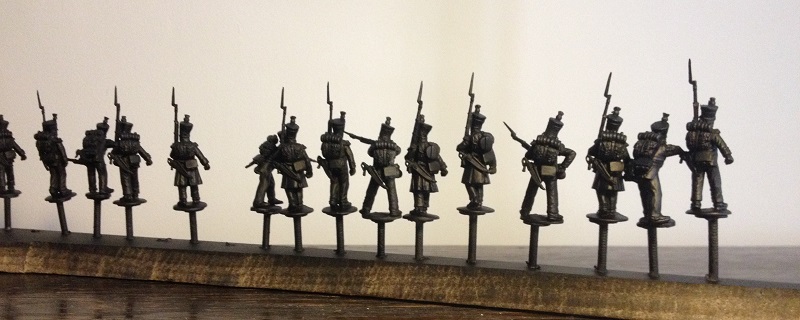 (these pics are from the next batch of flank companies, because I forgot to take pictures of the fusiliers! Don't mention this to anyone, please) A good end result starts with a good foundation. You should always start with a coat of primer paint, which is made to stick better to materials like plastic or metal. A normal acrylic paint will rub off much easier than a primer, so the primer has two functions: it gives you an even paint layer to start out with, and your miniatures won't be as damaged from handling. Primer is usually applied with a brush or from a spray can. I often use a light grey primer from Vallejo when I brush on the primer, and a light primer will give you "brighter" colours. However, a black primer coat will give you shadows on your miniatures for free, as you'll see later on. A spray can will coat a ton of miniatures quickly, but you can apply primer with a brush even if the weather is horrible outside, and you should not spray indoors. So there are good sides to both methods, and no real wrong choice. When I started painting my French I happened to have an old can of black primer around, and the weather was lovely, so I decided to use it. Again, I glued the miniatures on nails with big flat heads and drilled holes in a piece of wood, for easy spraying. Step 2: Basecoat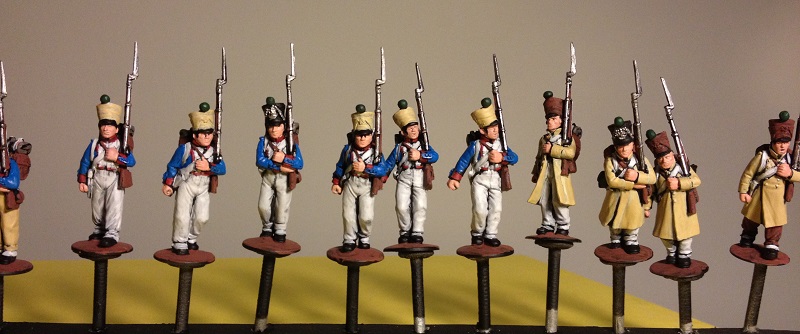 The first step is by far the most time consuming one. In this step, I try to cover as much as possible of the model with a flat coat of paint. This does not necessarily mean a single coat of paint! Some colours will not give you an even cover if you just paint it once over a black primer, for example the flesh colour or the grey/white. Especially not if you water out the paint a little bit, which you should definitely do to avoid smudging all the details! A thick coat of drooping paint is not what we're after here. Don't stress out if there's some black primer showing through after the first or even second coat, just let it dry and give it another coat until you are satisfied. If you work with several miniatures at once, the first mini will probably be dry enough for you to give it a second coat as soon as you've finished the last one. For this step it's not so very important that you get everything completely tidy, as there will be more layers that will even things out. What you do want to get is a decent coverage, and if you can leave some black in the recesses, that's an added bonus. In this case I start out with the areas that I want to end up as white or light grey. That means the the pants, belts, turnbacks (the folded pieces at the back of the uniform), musket straps and backpack straps, which all get a coat of Vallejo Grey Primer mixed with a dab of pure white. The grey primer will coat black much better than if you tried to paint it white directly. I came up with the simple trick of first applying the coat of mostly Grey Primer and a dab of white, to get an even coverage over the black primer. Then I give it a second coat, with a little bit more water, and some more white paint. This way I get a good coverage over the plack primer, and the difference in the two coats means that I get a bit of depth in the paint, practically for free! You shouldn't try to go directly to painting pure white acrylic paint over black, that way lies madness. I then gave the great coats and the beige shako (hat) covers a coat of Vallejo's "Highlight British Tanker" brown. The wood on the muskets, the backpacks and the bases got a coat of darker brown (Rotbraun by Lifecolor), as well as some other shako covers and pants. The rolled up greatcoat on the backpacks got a layer of dark gray. The uniform jackets were tricky to get a nice colour. I tried a "Royal Blue" kind of dark blue colour, but it just wouldn't be visible enough. Sometimes you simply need to go for a lighter shade than the "real" one when you paint miniatures, as a tiny object will look different from a big object when painted in the exact same shade. Anyone who has painted walls at home and compared the colour swaps with the final result will have experienced this, after all. In this case I went with a much more "cartoony" Magic Blue from Vallejo Game Color. It's not perfect, but at least I can see it! Finally, the cuffs and collars were painted red, and the metal parts of the muskets and shako decorations were strangely enough painted metal (Citadel's Runefang Steel). The pompons on the shakos were painted green, indicating them being from the first fusilier company. Step 3: Washing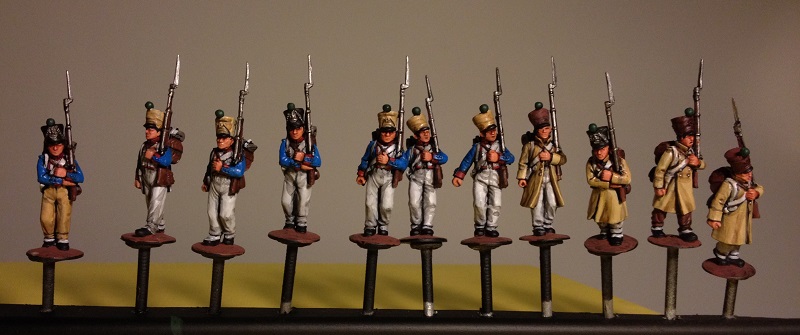 Let's jump from the most time consuming step to the quickest one! A wash is a paint that is diluted with a lot of water, as well as some extra material to decrease the surface tension, so that the wash doesn't bead up. We'll use the shadows we got for free from the black primer, together with washes, to get all the shade we need for the details and colours of the uniforms to be visible at a distance. I used three different washes on these: one for the skin tones (Reikland Fleshshade from Citadel), a black wash for the white, blue, black, dark brown and metal parts (Strong Tone from Army Painter) and finally a brown wash for the beige and red parts (Soft Tone from Army Painter). You can apply a wash very liberally. The only thing to keep in mind is to not douse the miniature completely in it: used your brush to remove the extra fluid if it starts to pool too much. Since we're painting several miniatures at once, you can soak up the wash with your brush and just apply it on the next mini instead. I aim for two things when I apply the wash: first, I want to get a pretty even coat to cover the entire area painted in that colour. This way I avoid the wash creating lines when it dries up, which you might get if you just put a small spot of wash on the mini. Secondly, I want the wash to pool up a little bit in the depressed areas to give a nice darker shade in the areas that would be naturally shaded, like in the fold of the uniforms or between the fingers. The washes don't need to be perfect, as there will come more layers for tidying things up. I'll finish this step by going over the miniatures again with the black wash after the first layers have dried. I pick out some places that I want to accentuate more with the darker shade, like where the cuffs and the deepest folds of the great coats. This contrast will make the details much more visible on the tabletop, at some distance. Step 3: Reapplying the Base Colours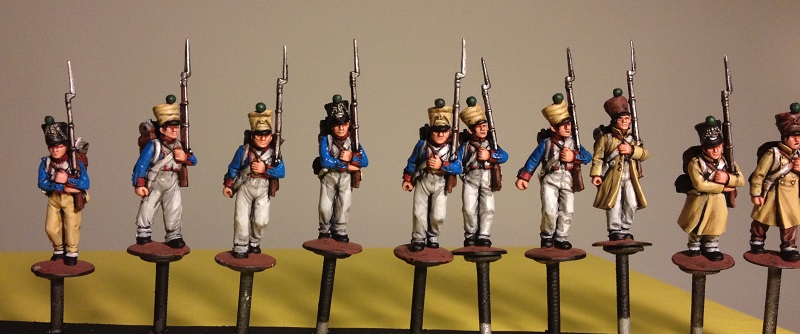 From this step on I'll actually be careful when painting! I go back to the paints that I used for the base coat, and apply a watered down layer again, taking care not to get the paint in the recesses. I want to keep the shadows that I got from the black primer and the washes. This new coat doesn't have to cover the entire area like the first coat, and you have the original paint as a guide, so it can be applied much faster than the first basecoat. I use more white in my white-grey mix, and I try to generally clean up some of the messes that I left in the first steps. Step 4: Highlights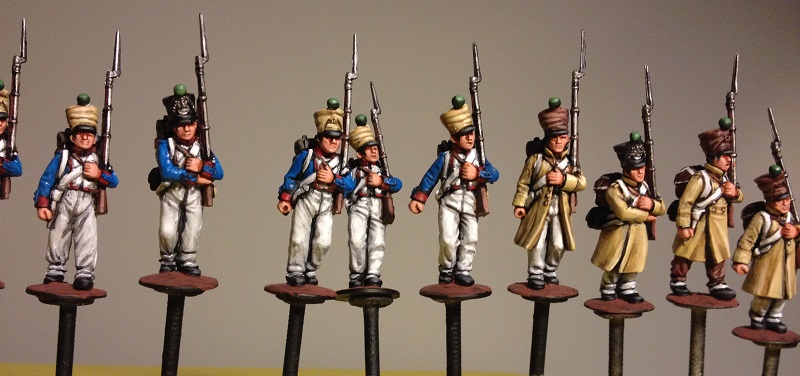 The miniatures are more or less ready to deploy on the tabletop already, depending on your bar for tabletop quality, but you can get a a nice finish effect with relatively little effort compared to the first steps. Painting highlights means that you apply a lighter shade of the basecoat paint on raised areas, where sunlight would naturally hit the soldier. To get a lighter shade, I mix the dar browns with the beige paint, the beige paint with some white, the red with some orange, the light gray areas get a coat of pure white, and so on. Remember that this coat should only hit the very top of the raised parts, which can be seen clearly here on the trousers, great coats and shako covers. As you might have noticed, I've left the black parts (shakos, shoes) untouched until this step, where I just apply a bit of dark grey as a highlight. The metal parts get a highlight of silver, and they start to look proper dapper indeed. Step 5: Final Details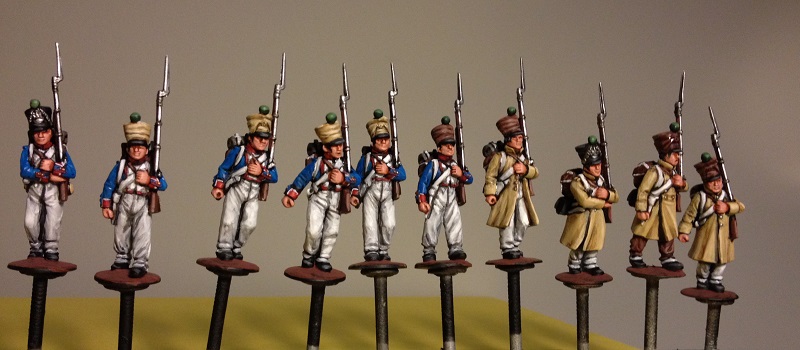 Finally, there are some fine details that can be filled in for that extra flair. I use a thin brush to paint the piping, or thin lines, on the cuffs of the uniform. These are different between light infantry and line infantry, and my line infantry cuffs get wite piping and brass buttons. Unlike the cavalry, the line infantry usually had the same colours on the cuffs no matter which regiment they belonged to. 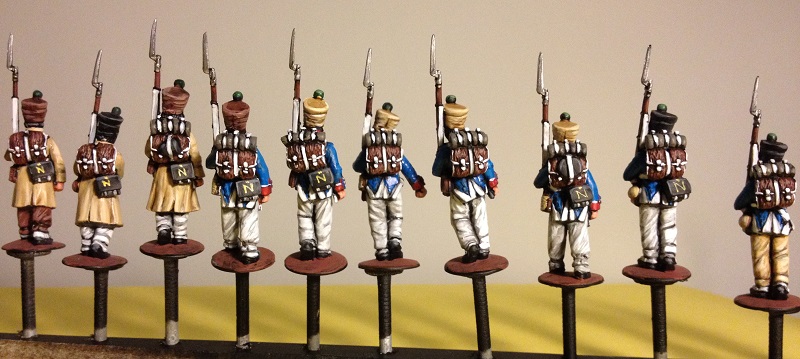 The backpacks get a white lining and white straps, which I just apply as straight white righ out of the pot, without highlights or shading or such. The cartridge boxes get a yellow "N" with a few dots on top, which are supposed to look like a crown. Close enough! During this step you can also look back at the overall results, and you might find that paint has overflown somewhere, especially white. This can often be tidied up easily with some dark wash or even black paint. Quick note about French uniformsThe more I read about it, the less nervous I get about getting the perfect shade of my uniform colours. You see, there are many factors that would mess up the uniforms of the Grande Armée. First of all, uniforms were never produced at a single, centralized factory. The regiments had to secure the cloth for their uniforms and interpret the regulations, and the quality and colour of the cloth could vary a lot depending on the skills (and honesty!) of the contractors involved. The cloth might have been bought from producers in France, but it could also have been procured from whatever stocks were available at the moment. Sometimes it was simply looted from some foreign supply center during a campaign. And if the dye or cloth quality was especially bad, it would be up to guesswork to figure out the original colour after a few rain showers! Colours like blue, green and red quickly changed appearance, and even more so as the British trade blockades made some dyes hard to get. The second factor was the soldiers themselves. French soldiers would have their pay docked for gear replacement if the gear was replaced quicker than the expected lifetime of each item. As a surprising coincidence, this expected lifteime could be long enough that some poor sods in the lines would end up owing the state for the privilege of serving! This meant that a soldier had a vested interest in scavanging his own replacements, rather than paying it to the regiment in the form of salary deductions. All kinds of clothes and cloth, both civilian and military (friend or foe!) could end up in the backpack of an economically minded fusilier. The third factor was the combination of pride, bureaucracy and experiments that fuddled the uniform issue on a larger scale. Some regulations were heeded by some regiments, while others saw them as more of a suggestion. Old beloved uniforms could be kept with the practical reasoning that it would be wasteful to discard them while they were still servicable. Some officers would simply impose their own fashion ideas on their regiments, and some regiments were ordered to wear new test uniforms in other colours to evaluate, befuddling both friends and foes in the din of battle. For me, thit means that I'm happy with a bit of diversity in my units. And if you paint in big batches you won't even be slowed down by this, as you can paint your first batch with grey greatcoats, the second with beige ones, and so on. Afterwards, just mix them in your units, and you have a rough and tumble set of campaign veterans! 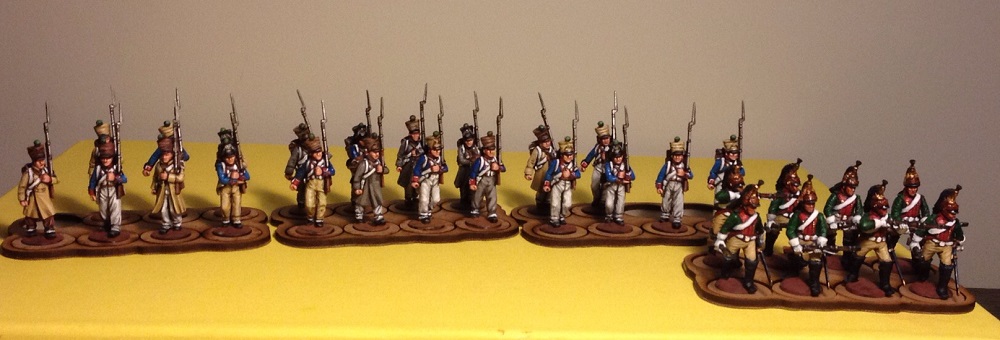 My little army this far, waiting to be reinforced and have their bases painted Weird stuff I had to look upThe small things hanging on a string on the side are (I assume) the improvised canteens. These were not issued by the French army as a part of the uniform, but popular for carrying water or stronger spirits. Sometimes these would be wine skins, or proper canteens, often protected by straw. I painted mine light brown. The long strange thing hanging on the right on the belt is the bayonet scabbard. I've seen these in both white and black, so I went with white. Right or wrong? Please tell! À plus tard,
Jonas
11 Comments
Shirty
8/9/2016 22:07:59
Splendid, I will take up a few of the tricks u use! And sorry about being a little picky, but the Levée en masse was introduced 1793! ;)
Leo The Gaul
9/2/2017 15:16:04
Very nice write up! Will definitely follow these when i do my next french units!
Matthias Grünsfelder
22/7/2017 16:24:57
Very nice introduction in painting miniatures, as I will change from 54 to 28 mm minis in my next project. So all your tipps are really helpful to me. Thanks a lot.
Scott
5/1/2018 02:09:07
Thank you for posting this. This is a technique I also have been using for some armies on and off for a few years, but reading your description of how you do it not only is a good refresher, but you pointed out a couple good ideas that I'll use now (how you do the white's is especially useful). Thanks!
Greg
17/10/2019 09:37:13
Great man thanks
Jonas Svensson
17/10/2019 14:03:20
Thanks! I've since switched to a much darker shade for the uniforms. I'm currently using Vallejo's Dark Prussian Blue, and I think it's a much better fit.
Jonas Svensson
17/10/2019 14:04:44
I also always give the miniatures a coat of matte varnish in the end, and both gloss and then matte varnish if they are metal. That takes away unwanted shine as well.
Duane Moore
18/10/2019 02:21:32
Hi, I wanted to thank you for all the great information. Is there a way to “join” the blog? Duane
Jonas Svensson
18/10/2019 15:31:38
Hi Duane! Great to see you liked it. Do you mean "join" as to follow it, or to write something yourself? If you're interested to talk, just send a message to [email protected]. :)
Justin
8/11/2019 01:26:24
finally someone explains why it is feesable to paint the trousers and greatcoats in different colors! Thank you! Leave a Reply. |
"Glory is fleeting,
|
 RSS Feed
