|
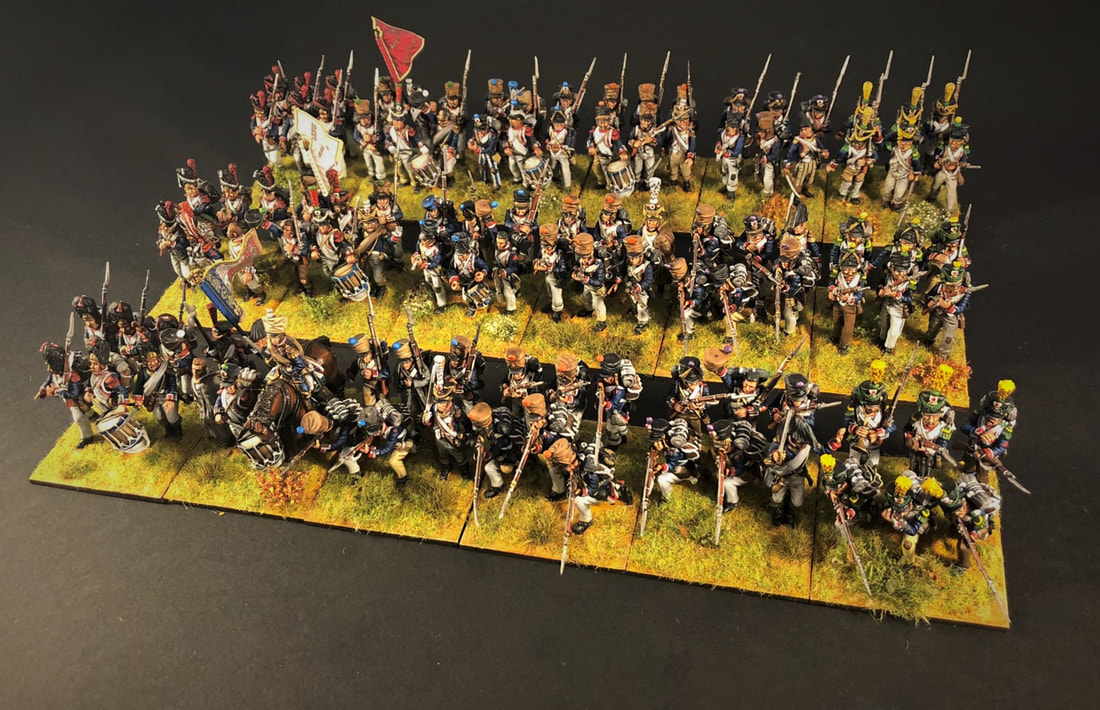
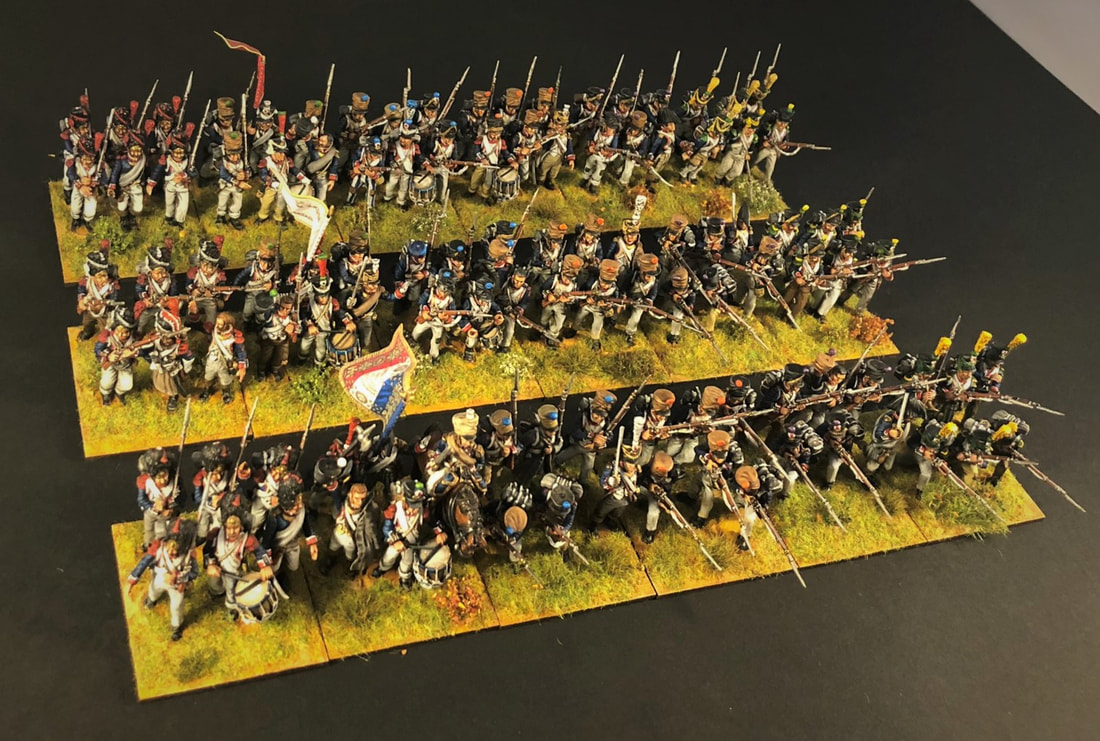
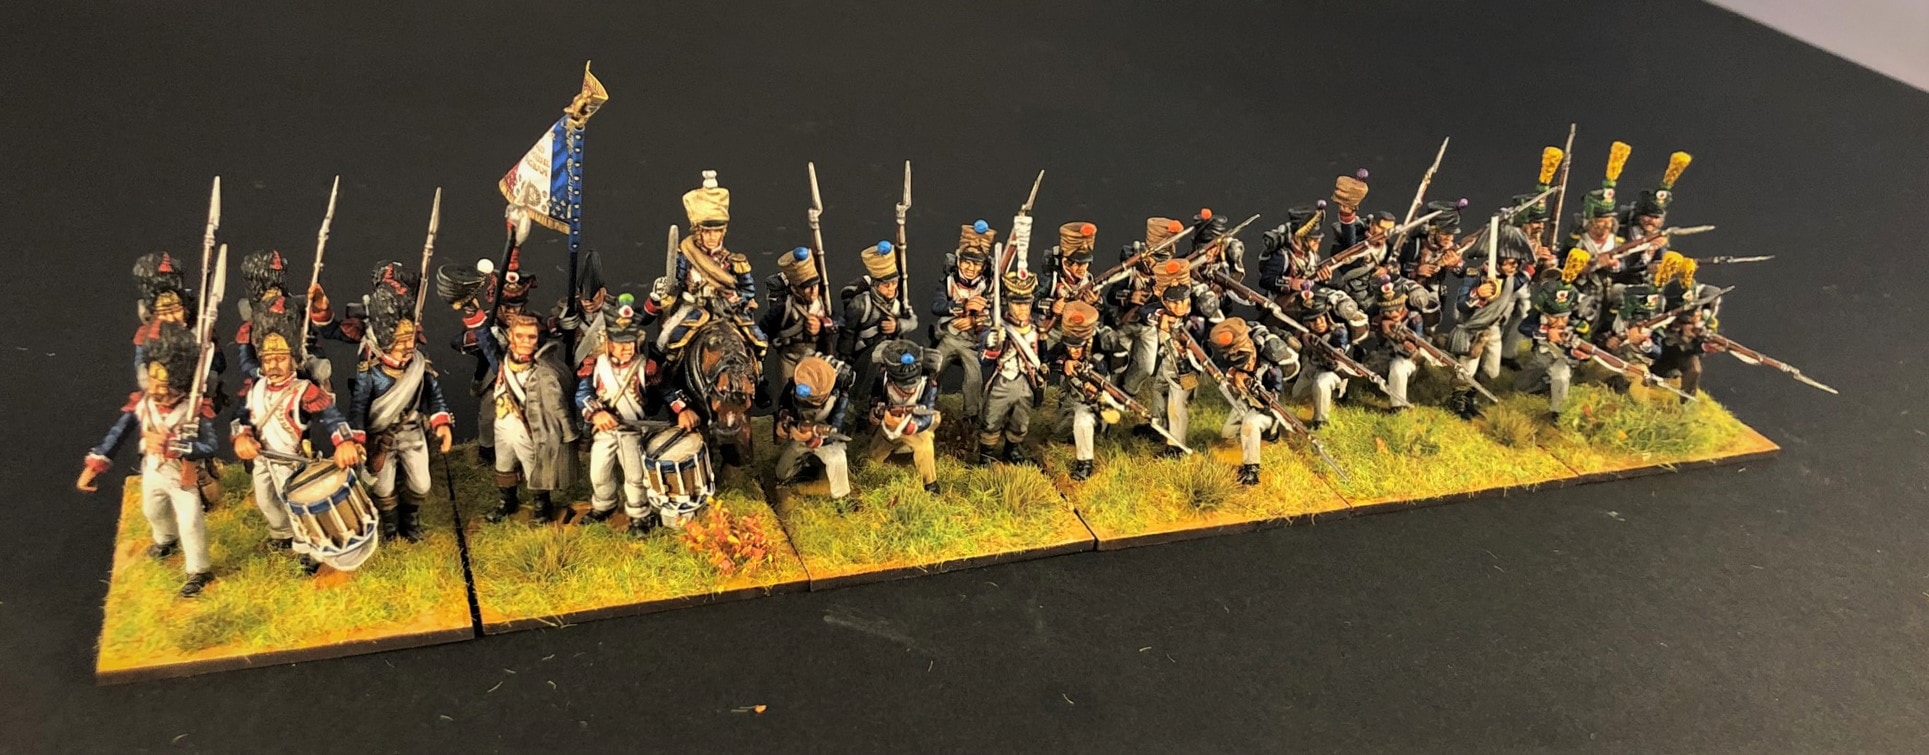
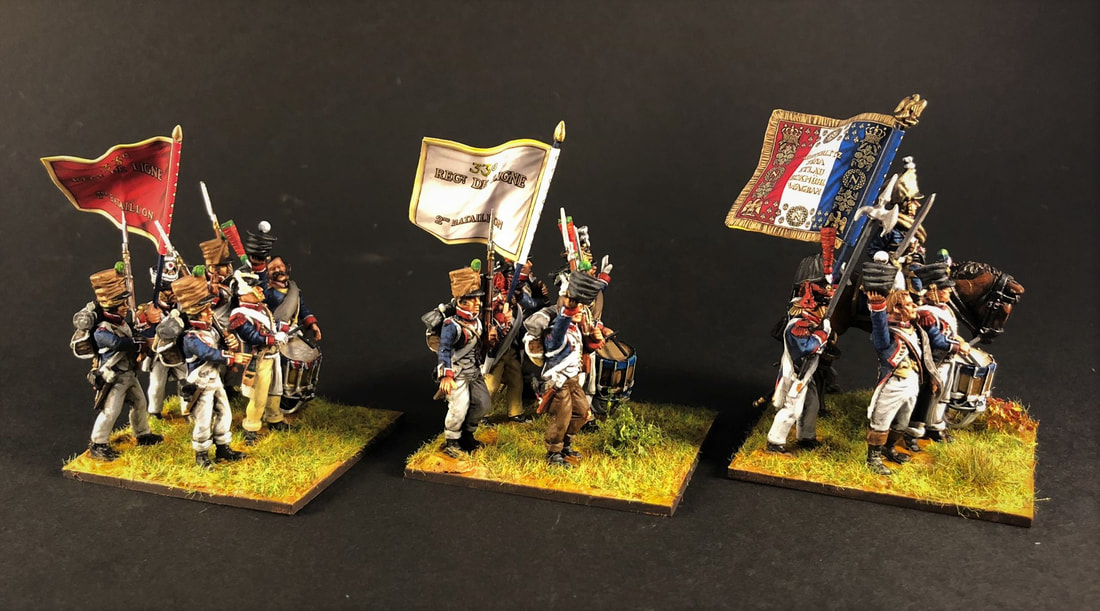
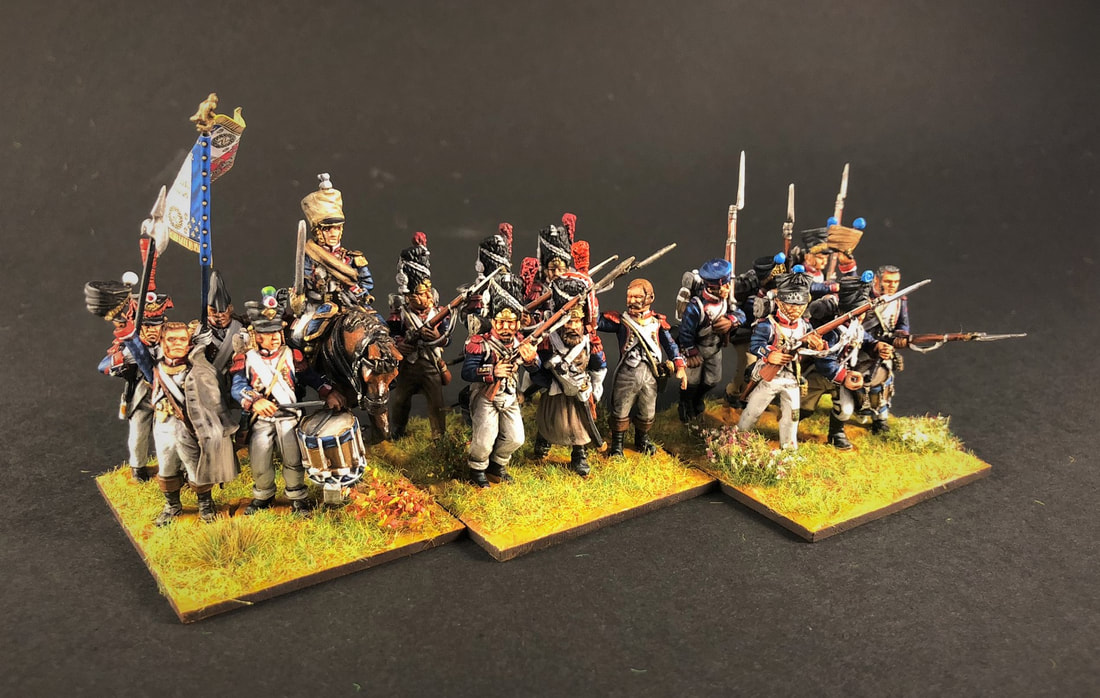
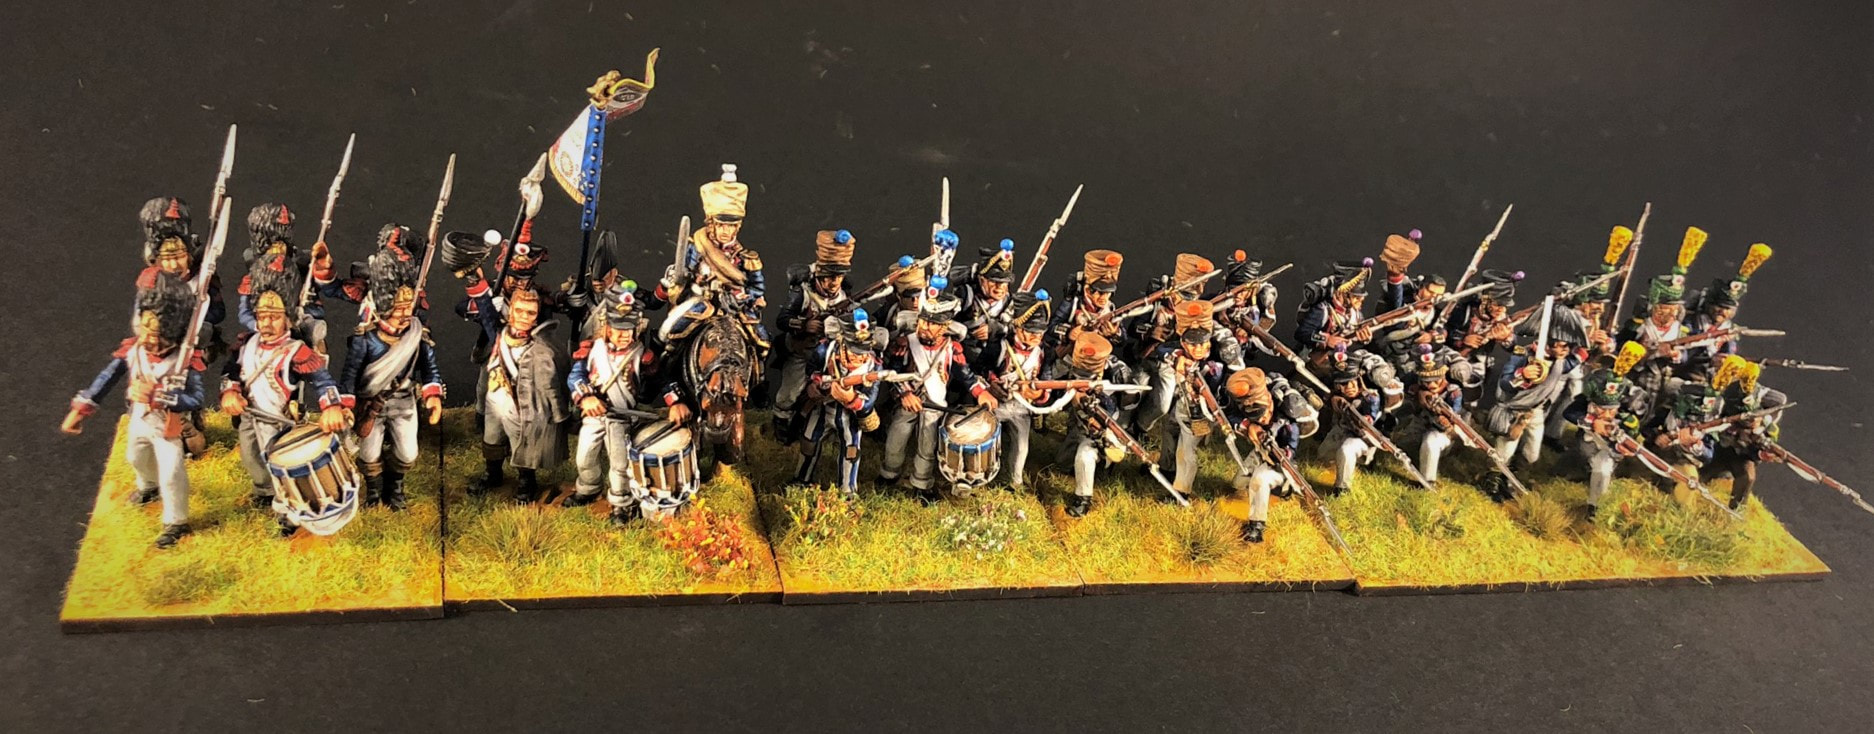
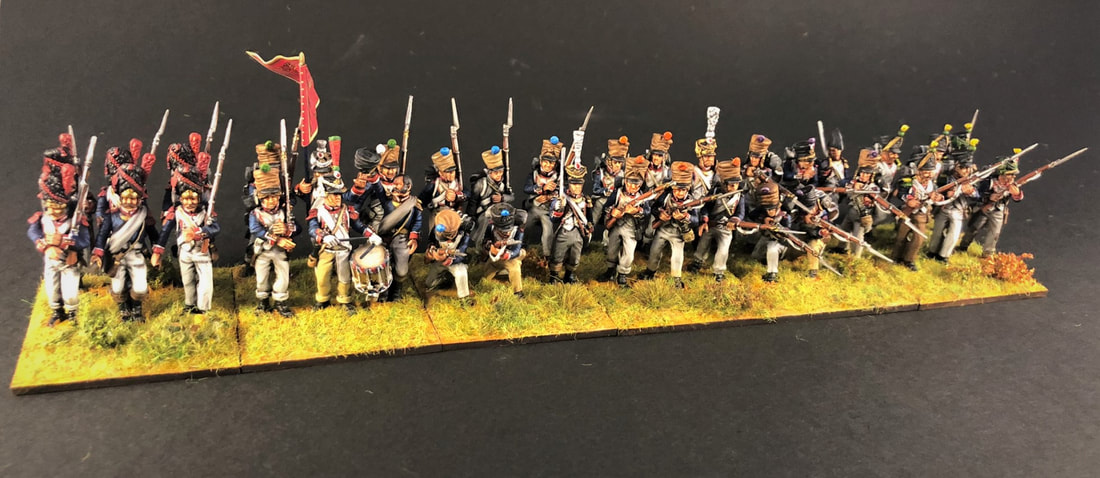
By Jonas 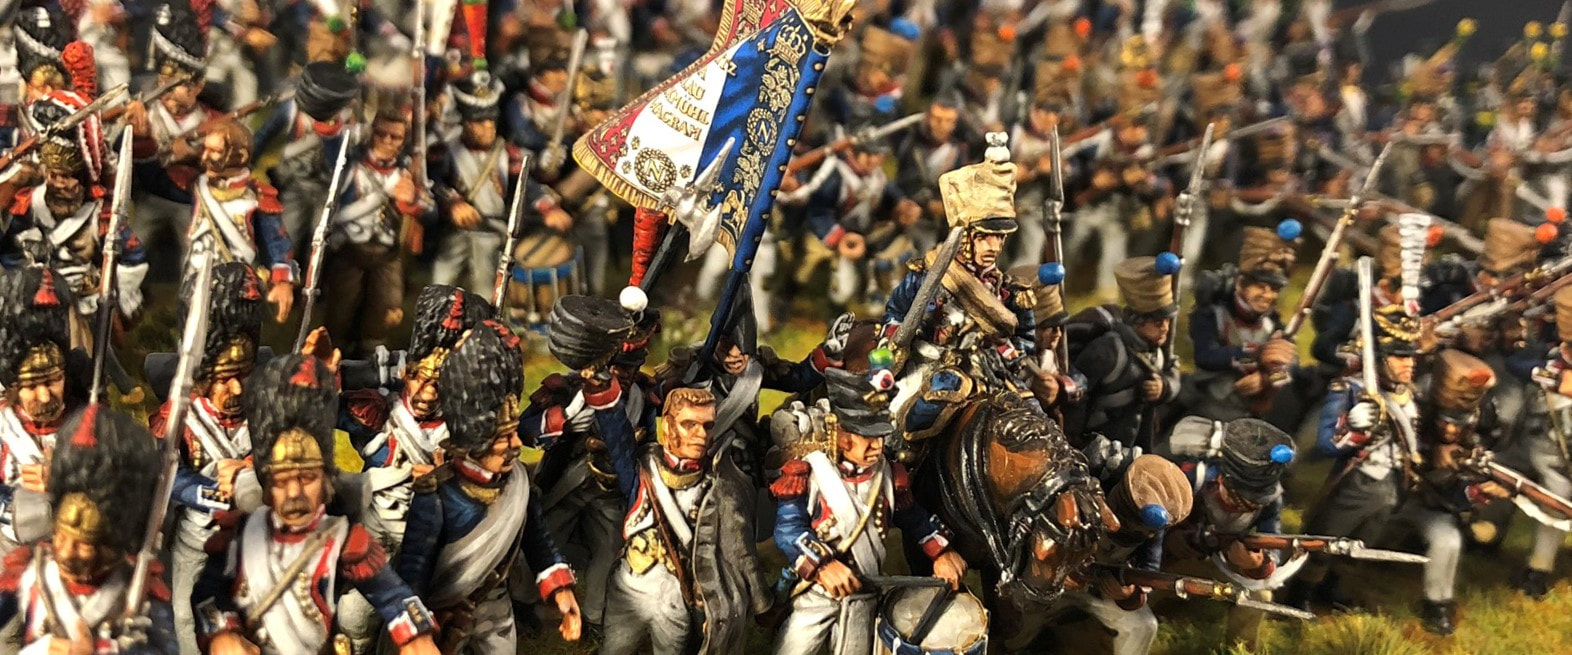 Victrix French Line Infantry First out of the gate for the big battle army are these Victrix miniatures. I got them in a big second hand bundle back in 2017, and at that point I planned to turn most of them into foot dragoons. Some of those conversions might still happen, but my focus for the year was set: paint up all extra plastic Frenchmen in my closet, and round them up into proper battalions. After painting up about a hundred of them now, I'd say these models are decent enough. Pros: the variety of poses, with marching, shooting, kneeling men, are nice if you prefer some action in your miniatures. The heads are better sculpts than Warlord's plastics. And there's a lot of options for officers, port-aigles and plenty of drummers in the mix. Cons: The mix of men in very different poses makes the overall look a bit strange. It helped that I had two boxes, so I could form up the kneeling men mostly together and the marching men in the same companies and so on. The kits are fiddly, with several small parts. This goes especially for the bayonets, and these men have quite a few broken ones already. Overall it's obvious that these are Victrix's older kits. I recently bought their new Viking kit, and it's much better in quality. It used to be that these Victrix kits were the best option IMHO if you wanted pre-Bardin plastic miniatures in 28mm, but with Perry's new 1807-14 boxes I'm not so sure. But they still have the advantage of giving you tons of options, especially in the many command miniatures included, and I'm really looking forward to new Napoleonics sets from Victrix given how much they've improved lately. That said, let's take a look at how I built my battalions. 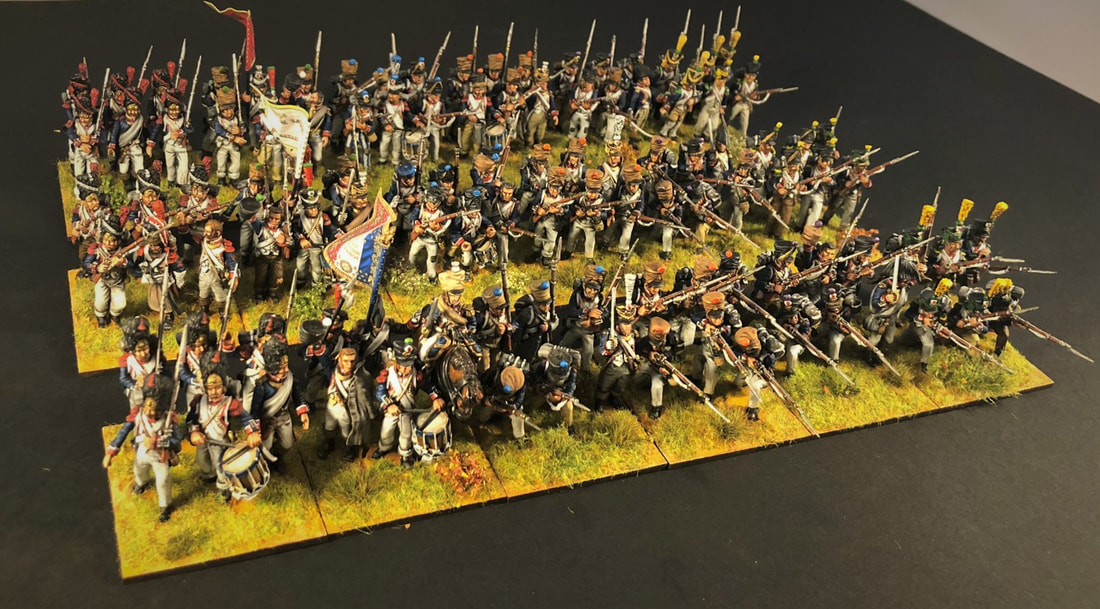 My Approach to Big Battalions : Unit SizeThere are tons of different ways to represent a French infantry battalion on the table. When I started painting up my unused plastic French infantrymen I could kick the proverbial can down the road when it came to organization. However, the day eventually arrives when you must glue the minis to their bases and finally commit to a basing standard. The initial choice of 36 man battalions was easy for me. Starting in 1808, the French divided their battalions into six companies and I wanted each company to be represented by one base. That left me with either 24, 36 or 48 miniature battalions. While I can see the practical point of 24 man battalions (cheaper and quicker to paint!), they are just not large enough for my personal taste. 36 men is where it starts to look like a mass of troops to me. And while 48 men battalions would look even better, there's a point in not going completely overboard. I bet it looks great though! Base SizesNext up comes the dreaded base size decision. I like Napoleonic miniatures to be quite densely packed, as lines would historically fight pretty much elbow to elbow. In practical terms 15mm of base width per miniature is about as tight you can base most 28mm miniatures. With two ranks, my six man bases will then be 45mm wide, making for a nice 27cm wide battalion when formed in line. This is also compatible with some popular rulesets that care about base width, such as General de Brigade. This will be much tighter than my Sharp Practice units, as they are based on 20mm sabot bases. 15mm looks better to me, but it's really hard to pull off well with sabot bases. Next up is base depth. I was thrown a curve ball here, as we managed to order the wrong bases! I planned to have 40mm or 45mm deep bases, but received 50mm deep ones. At first it felt really strange to have bases that are deeper than they are wide, but after some dry fitting I started to like it. First of all it allows kneeling poses to actually fit on the base. It'll keep the miniatures from scratching against opponents when charging into base-to-base contact, and it creates some distance between the companies when formed in column. All that at the expense of making a column a few centimeters longer. So in the end I decided not to place a new order, and instead go with this slightly unusual basing style. As soon as I hade put the tufts and static grass on them I was happy with my decision, and now I would not switch back to smaller bases. Mixing Minis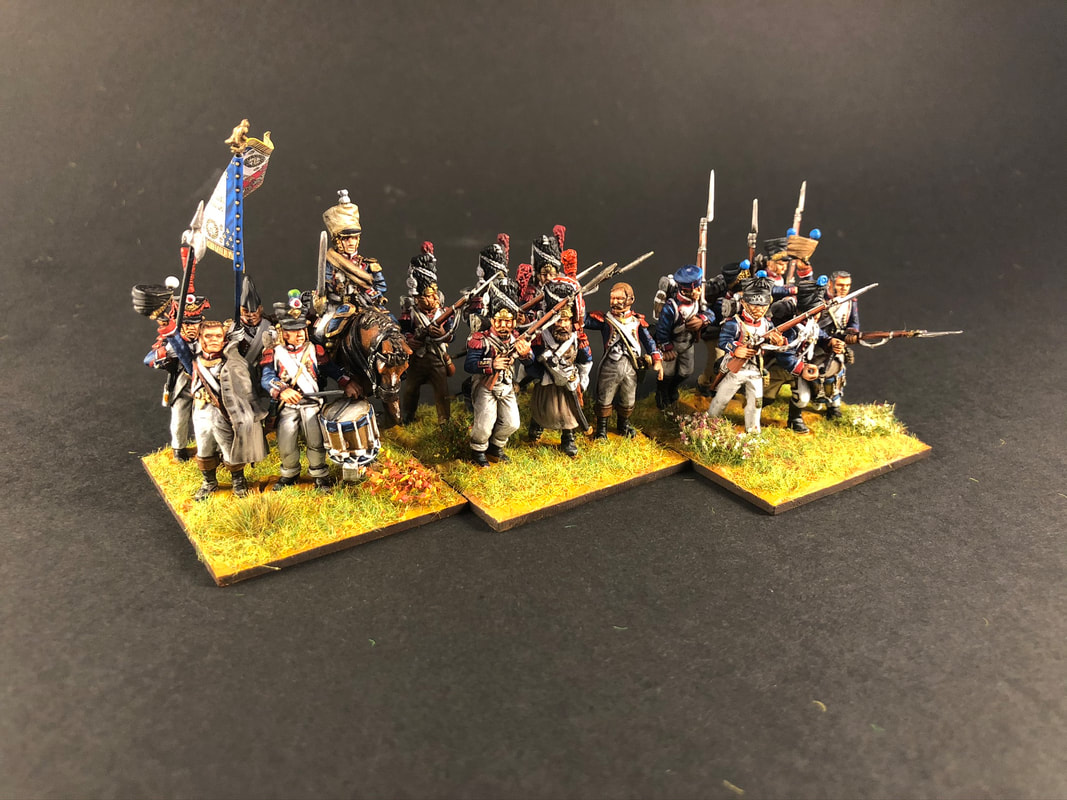 If you frequent any online tabletop community, you've seen the question "does minis from maker X match with maker Y?". Personally, I don't hesitate to mix miniatures quite a lot. When painting up these I was a few miniatures short once I had assembled the Victrix box, as some bodies where snatched away for a future... dragoony... addition to the army. So if you peek carefully you'll find a few Warlord and Perry minis in there, including a spare drummer and a sapeur marching along the grenadiers. I also wanted the Chef de Battalion to stand out, so I took a mounted Calpe general and stuck him in the first battalion. In my experience this works quite well unless the miniatures vary wildly in style. So don't be afraid to try out new ranges and support several manufacturers whenever you can. Company Composition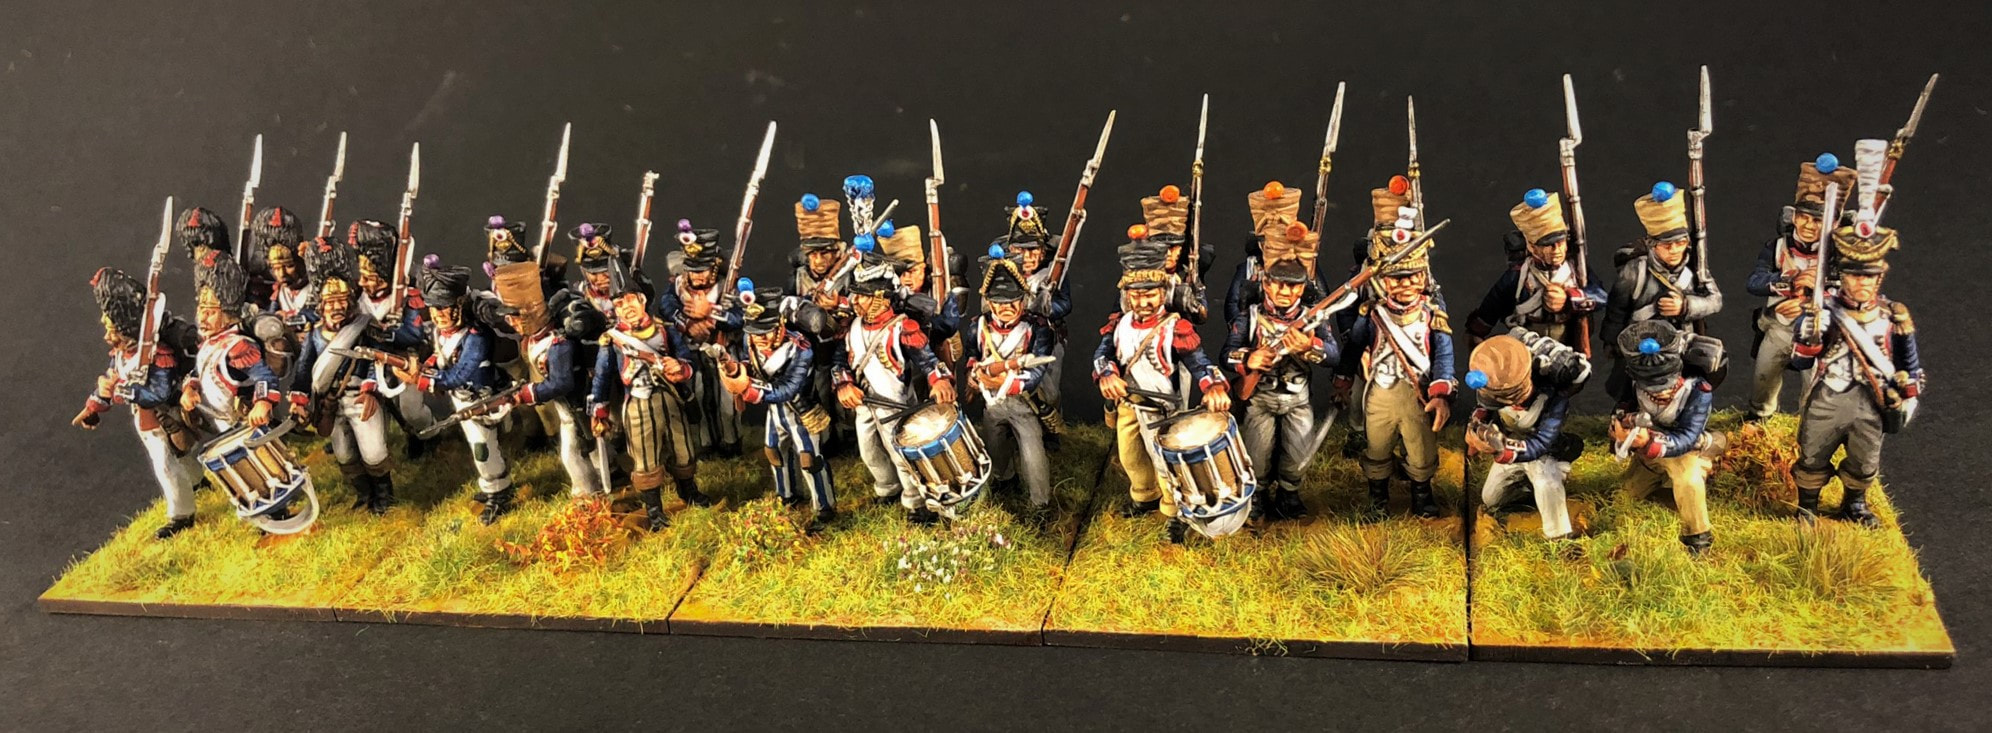 Often when you buy a French battalions you'll get a single command group, a lot of fusilisers to build the centre companies, and then some voltigeurs and grenadiers for the flank companies. However, each company would have their own drummers and officers, leading their men forwards and sending commands back and forth along the line. These are rarely represented on the tabletop. Since the Victrix boxes comes with a large ratio of officers and drummers, I was more or less forced to use all of them to make the minis last for three battalions. But once I started dryfitting the minis, I really liked the look of drummers spread out in the battalion, not just a single drummer next to the flag as you'll often see. So for the rest of the battalions I plan to continue this style, adding captains, lieutenants and NCOs as well as musicians across the companies. Flags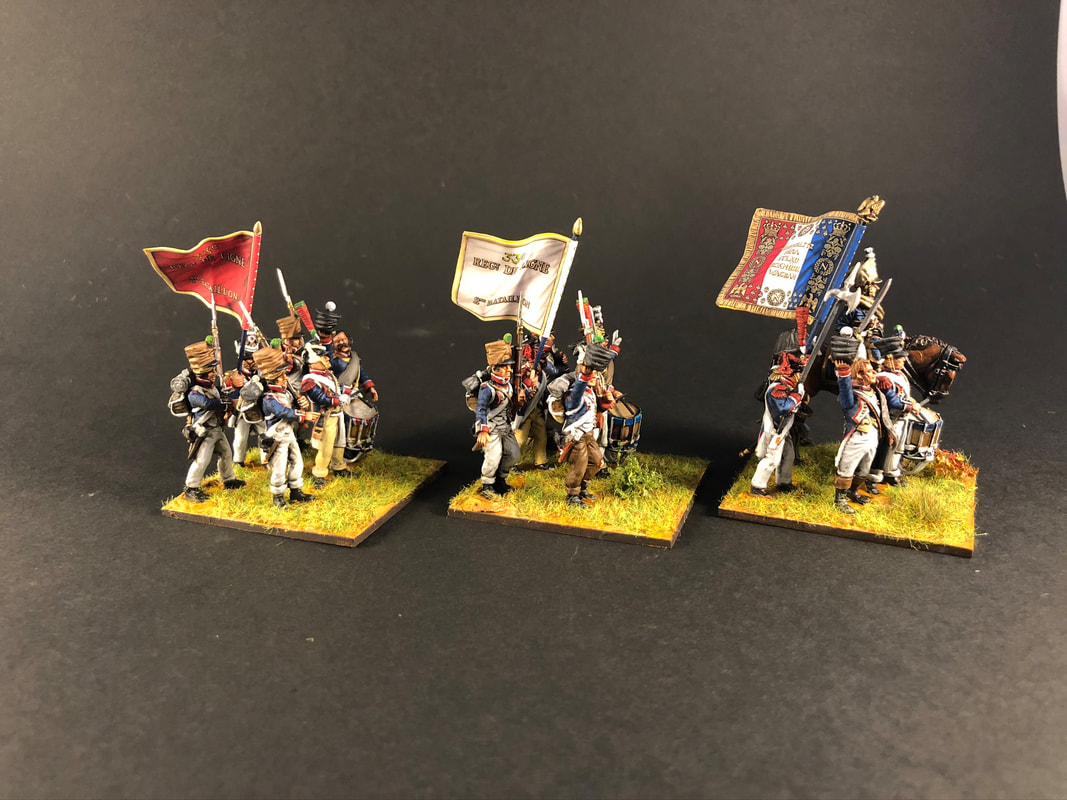 The flags are from GMB Designs. I waffled back and forth a lot before settling on a regiment, but ended up deciding on the 33rd line regiment. In 1812 they were part of Friant's 2nd Infantry Battalion, of Davout's I Corps. Friant was an excellent divisional commander and the 33rd would be in the thick of the fight at Borodino as part of the assault on the Semeyonovskoye village and the Bagration flèches. There they famously formed square and repelled several Russian infantry and cavalry countercharges, temporarily forming a safe haven for Murat himself inside their square. The flags are the 1812 pattern, with a white fanion for the 2nd battalion and a red fanion for the 3rd. There's a lot of debate regarding whether or not the French army went into Russia with the old, lozenge flags or the new, tricolor ones. I based my choice on the captured French flags that were on display in Russia, which were all tricolor as far as I know. The GMB flags don't come with the regemental numbers, as you buy them based on the battle honours. Painting the numbers can be tricky, but it helps to first paint them in a dark brown, and then paint a thinner yellow line so that the brown forms the outline of the numbers. At first I thought my lettering looked crooked, but once you fold the flags a bit it's much less noticable. Next StepFirst up I have several more battalions to finish and base, including troops from Warlord and Calpe Miniatures. My aim is to be able to represent a division, more or less, before the end of Summer. I also really want to add regimental guns to my infantry. In 1812, Napoleon doubted that his infantry was fierce enough to attack without artillery support. With his artillery formed in huge deadly that could blast a single point of the enemy's line, the solution was to supplement the infantry regiments with small 3-pounder guns, most of them taken from Austria in 1809. Each regiment was equipped with four guns, so 12 total in the 2nd Infantry Divsion. These will be on top of the regular foot and horse artillery regiments of the division. I plan to have one model represent two guns, so means I need to get six guns. So I guess I'll be raiding some Austrian arsenals! Picture Gallery(click for larger pictures)
1 Comment
|
"Glory is fleeting,
|


 RSS Feed
