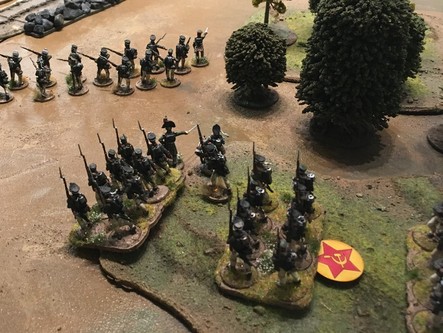
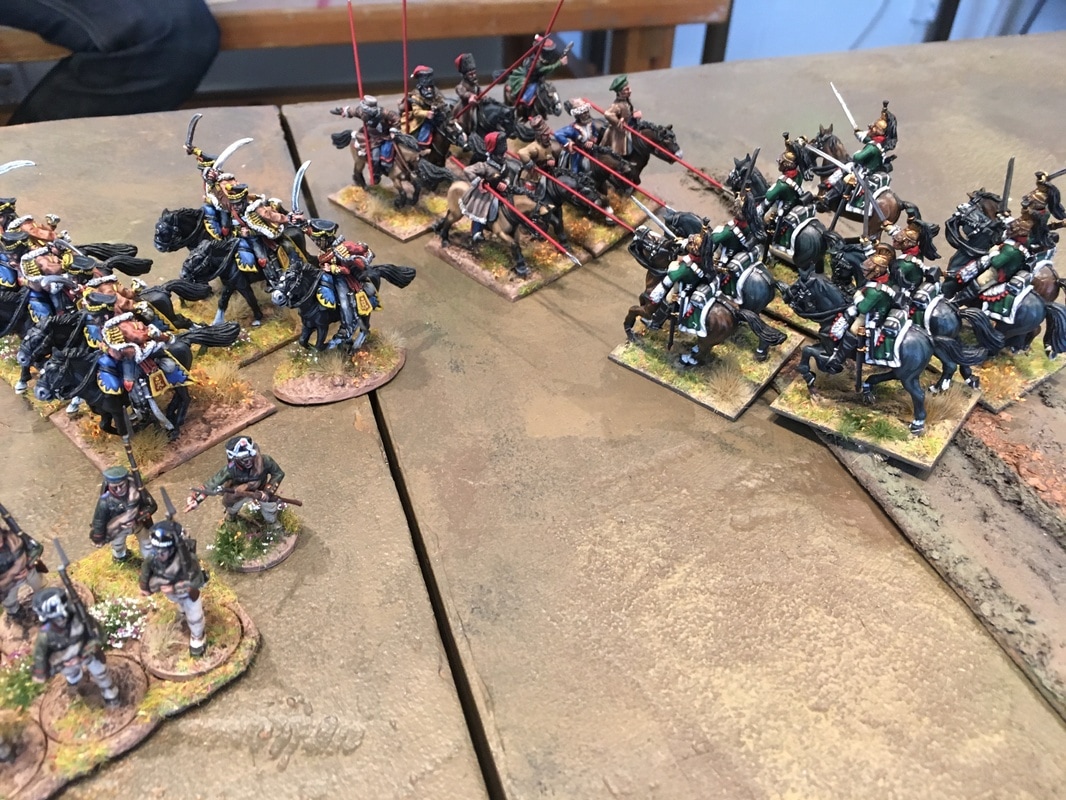
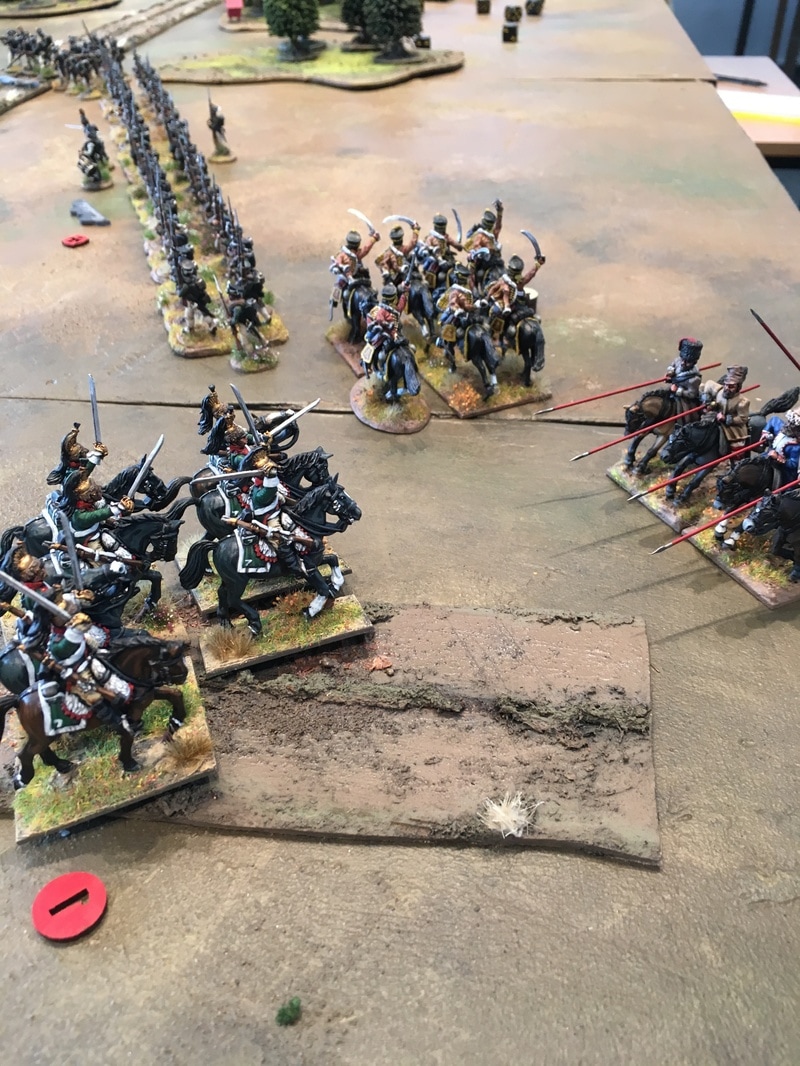
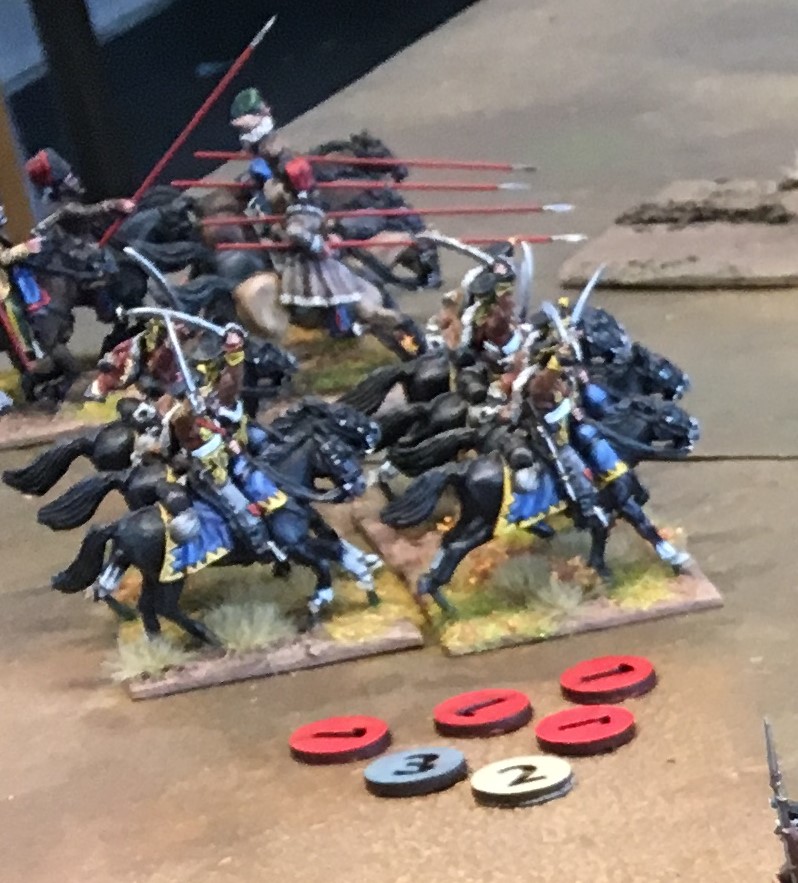
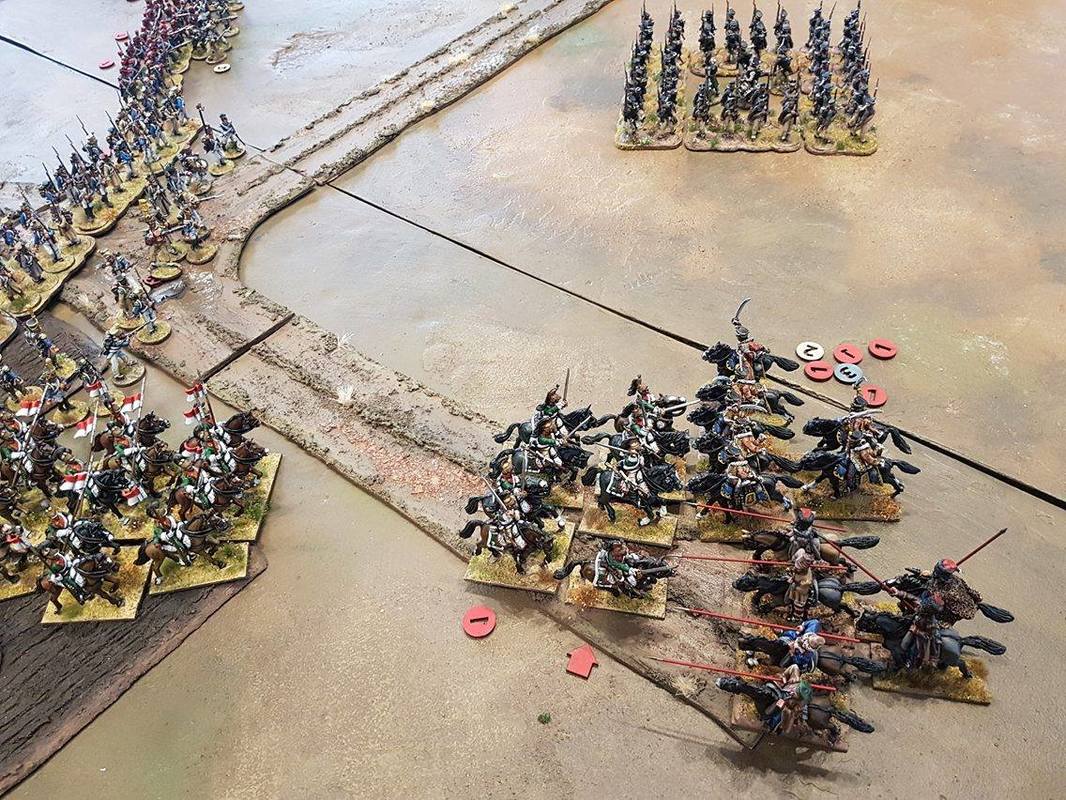
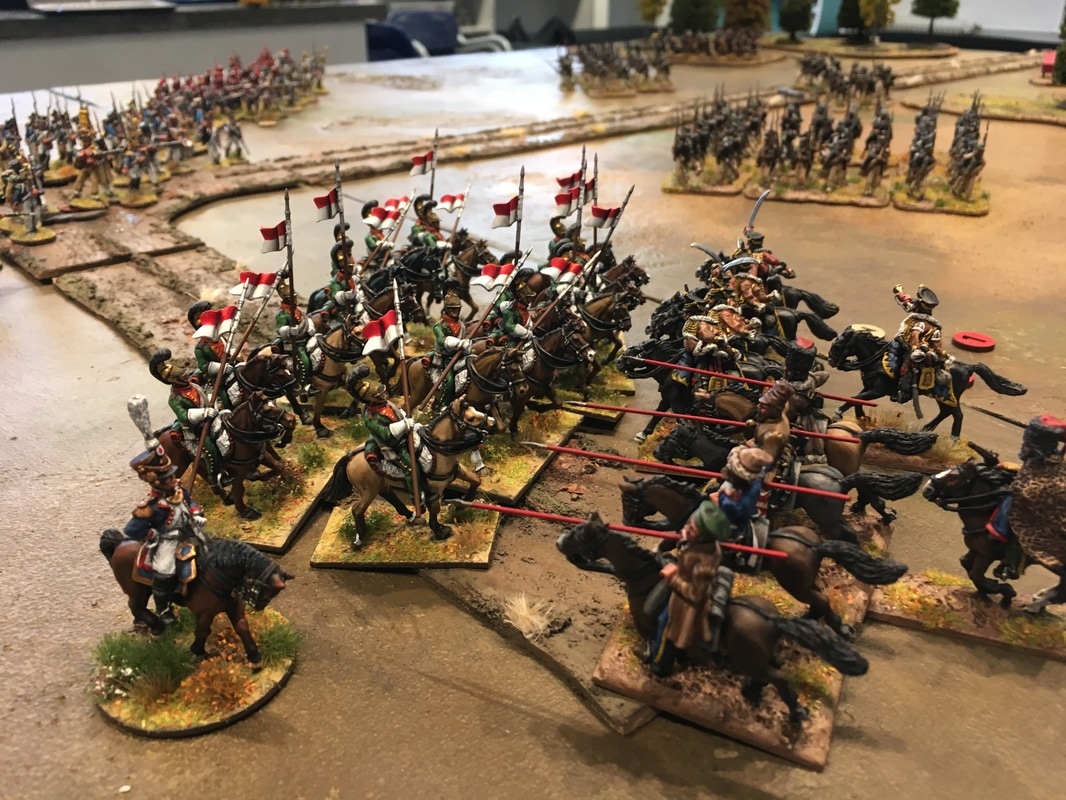
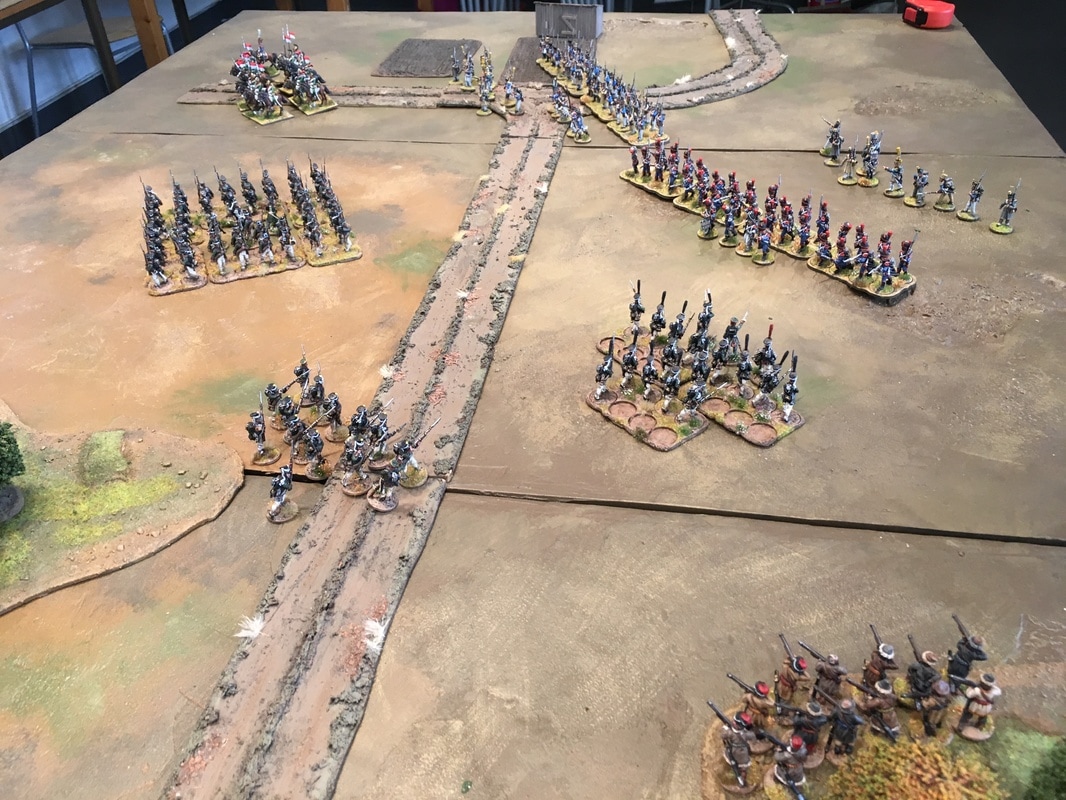
 Ok, not that kind of escalation, we're still a ways from Borodino After two games with Zach as the Russian general, Shirty was happy to return to give the humbled French another lesson in slavic grit. Even better, this game was one of those great moments of tabletop wargaming when both sides have painted up a whole bunch of new miniatures! The French thought that the addition of two lance-armed Chevau-léger units and some Carabiniers would be enough to incite fear in the Russians. However, the Russians turned up with two new cavalry units of their own, as well as some dismounted Cossack skirmishers and even more line infantry. Now it's starting to look like the invasion in Russia for real! Will these bigger forces give us more tactical options, or will the ruleset be bogged down as we start to go beyond the suggested force sizes? It was time to escalate things, Kriget Kommer style. Scenario - Encounter at the Forest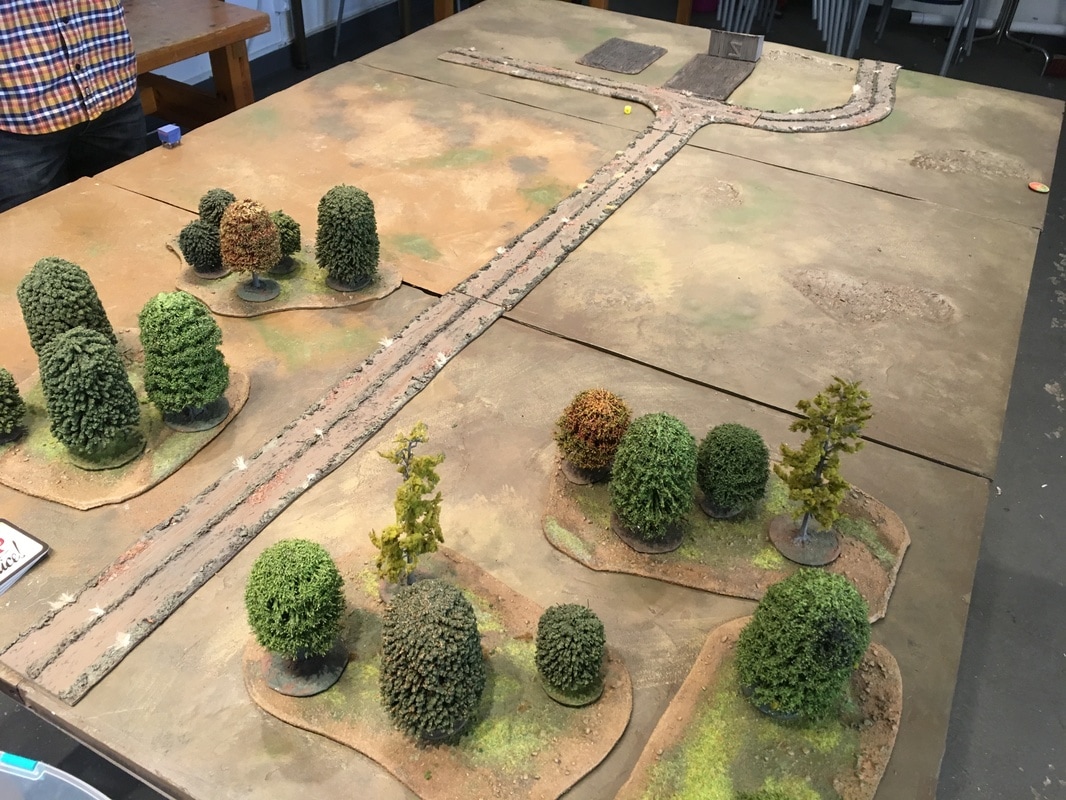 On my to-do list: a less shamefully anachronistic French deployment point marker We wanted to focus on testing the two increased forces with as few distractions as possible. Instead of rolling for scenario we simply picked "Encounter", and made an open table with few terrain features. The forces would meet each other at the outskirts of a forest, with a road that forks at a deceptively innocent looking shed. In the Encounter scenario you roll for which third of the table edge you deploy from, and the Russians entered by the blue beehive, but with a second, movable, deployment point in the woods that the sneaky Cossacks provided. The French would deploy at the French Foreign Legion marker. I know. I've ordered more suitable deployment markers for them. The Russian Force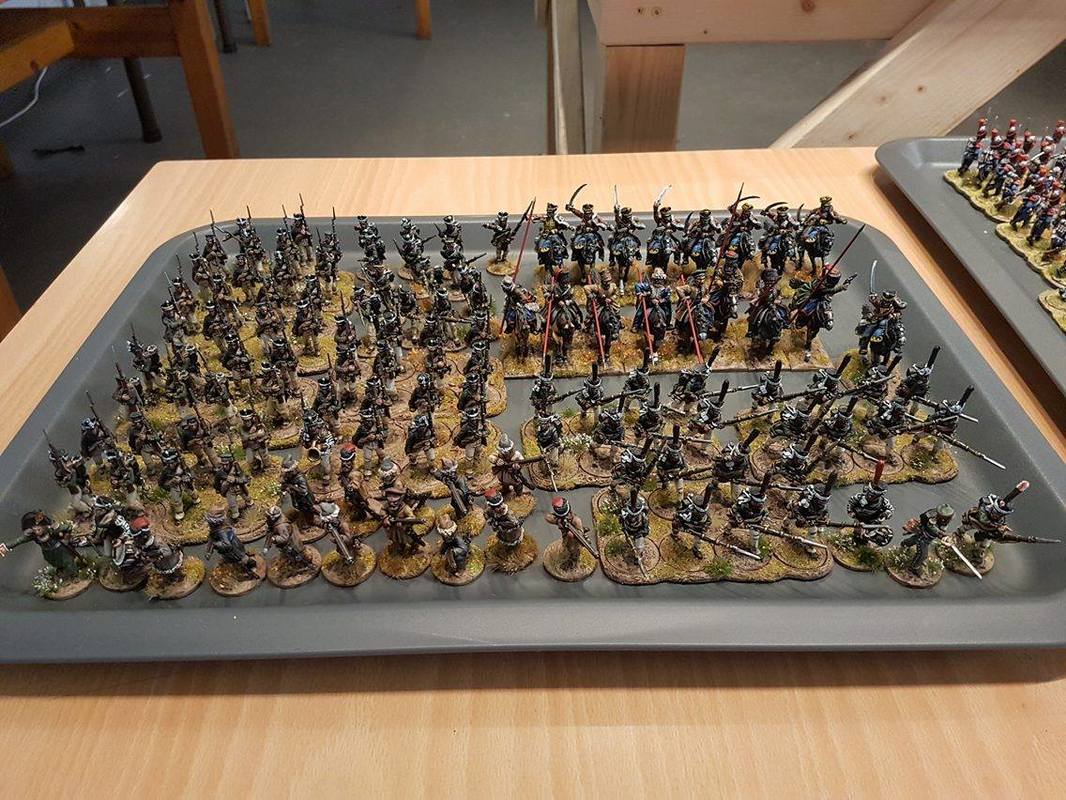 The Russian force has two regular infantry formations. The first one is made of 6 units of line infantry, and the other consists of three units of Grenadiers. The regular ranked up formations are supported by two types of skirmishers, both Jäger skirmishers (who are "proper" skirmishers) and foot Cossacks, who are irregular skirmishers. Each type have two units on their formation. Finally, the Russians have two units of light cavalry, both Hussars and Cossacks. The latter are irregular cavalry rather than scouting cavalry, and give the Russians a Mobile Deployment Point at the start of the game. The French Force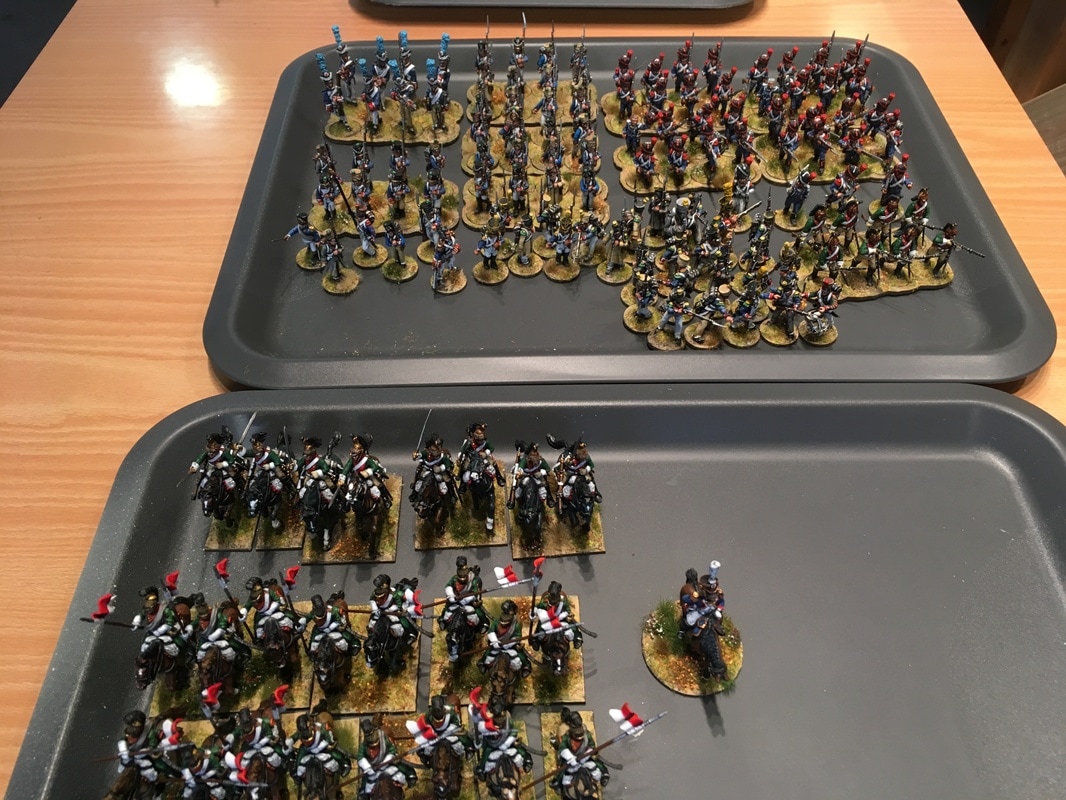 I didn't take a proper picture of the French force, so here it is picture with a few additional troops that didn't hit the table. 4 units of Carabiniers, led by a lvl 3 leader. Carabiniers are the equivalent of Grenadiers for light infantry, so this is pretty much as good as my French infantry gets without being from the imperial guard. 4 units of Fusiliers, led by a lvl 2 leader. Bog standard line infantry. Two formations, each with 2 units of skirmishing Voltigeurs, each led by a lvl 2 leader. These will act as skirmish screens for my two ranked up infantry formations. 2 units of Chevau-léger lancers. In a possible contradiction in the rules, these are Scouting Cavalry (which are worse in close combat than regular troops), but lancers are also specifically listed as the same quality as regular troops in close combat. However, no lancers are noted as being armed with lances in the rulebook. So we figured out that these are simply scout cavalry that fight as well as regular troops in close combat, which seems to fit the descriptions I've read of lancers in historical accounts. So in gameplay terms we treat them as Dragoons that can't dismount to fight as skirmishers, but instead they can deploy further away from a deployment point. However, I think it would be nice to have some more special rules for lancers. 1 unit of mounted Dragoons. These are cavalry that are expected to get stuck in, but can also fire with slightly less accuracy than musket troops if they stand still, or dismount to fight as skirmishers. We were both short on cavalry leader models, so each of our cavalry units had an "invisible" lvl 1 leader, and each of our cavalry wings were led by an additional lvl 2 leader. The battle beginsAs in last battle, the French starts pouring onto the field. Since their deployment point is towards the corner, they need to fan out quickly or get surrounded. 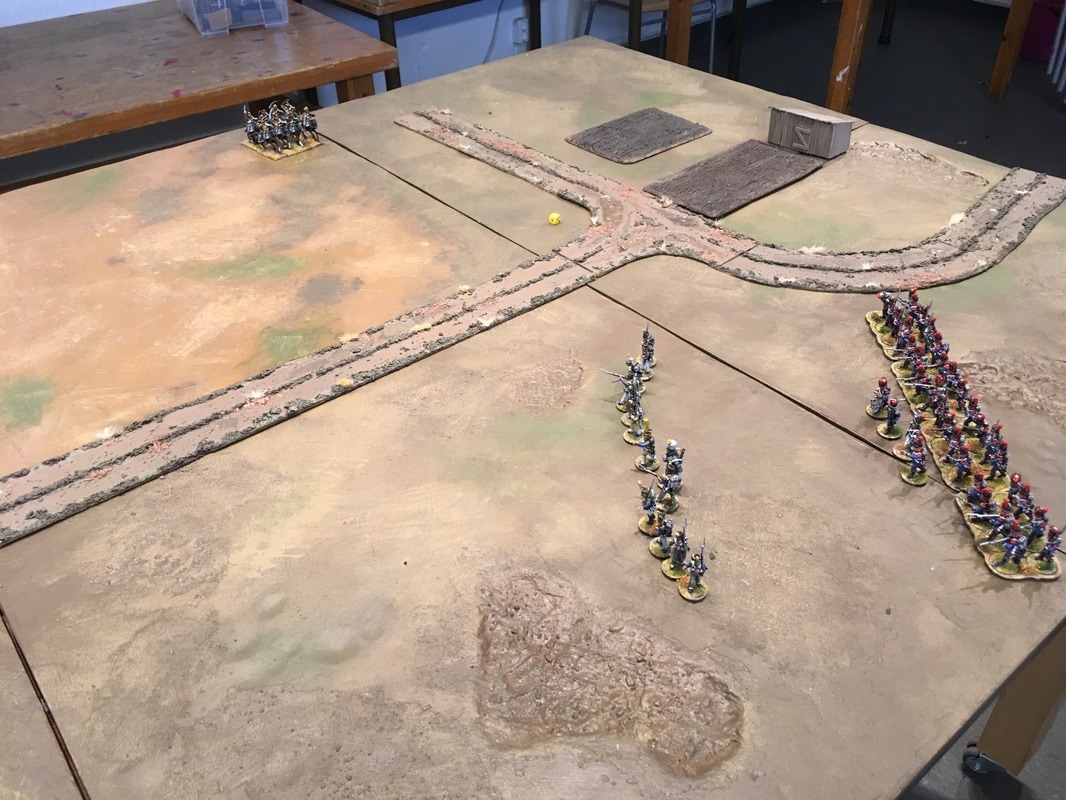 The table looks so empty before you fill it with soldiers A lone unit of Russian Hussars look on as the Carabiniers deploy in line, screened by skirmishing Voltigeurs. 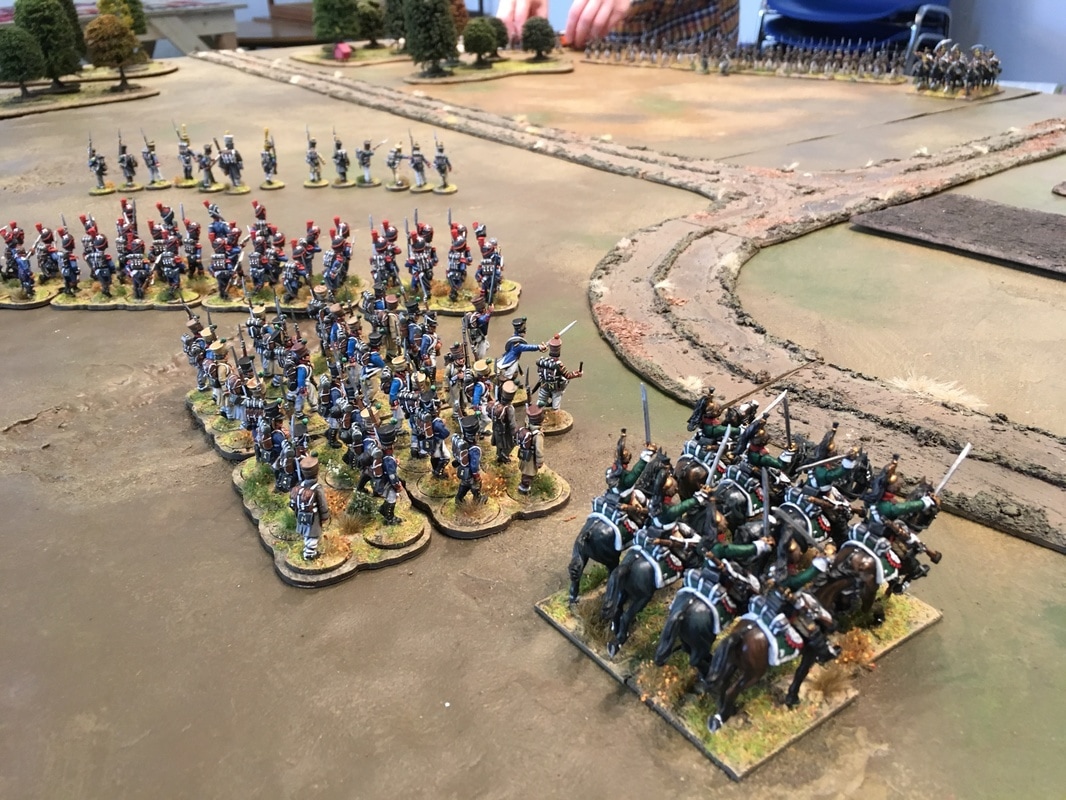 A long line of Russian line infantry back up the Hussars. The French deployment area is so cramped that the Dragoons and Fusiliers have to deploy in column, to be able to squeeze through the space left by the Carabiniers. 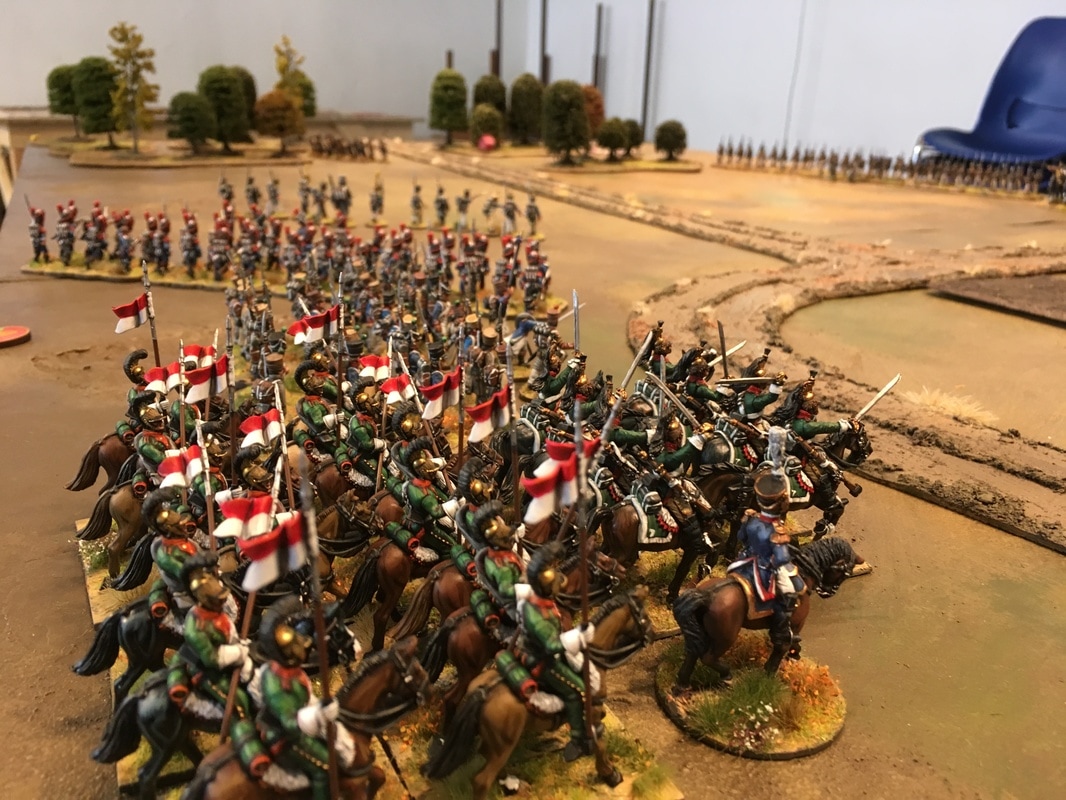 Finally, the lancers make their debut on the table, hemmed in behind the rest of the force. In the distant edge of the forest you can see the Russian skirmishing foot Cossacks turn up. They are irregular skirmishers, which means that they don't have all the perks "true" skirmisher have, but irregular skirmishers still get +1 to hit at long range if they fire from cover. First actionsThe battle lines are drawn pretty much immediately. The Russians have one long line of regular infantry and cavalry, which faces the weaker French infantry and their cavalry. The French Carabiniers and their skirmishers are facing the rest of the Russians, with their Grenadiers and supporting skirmishers. 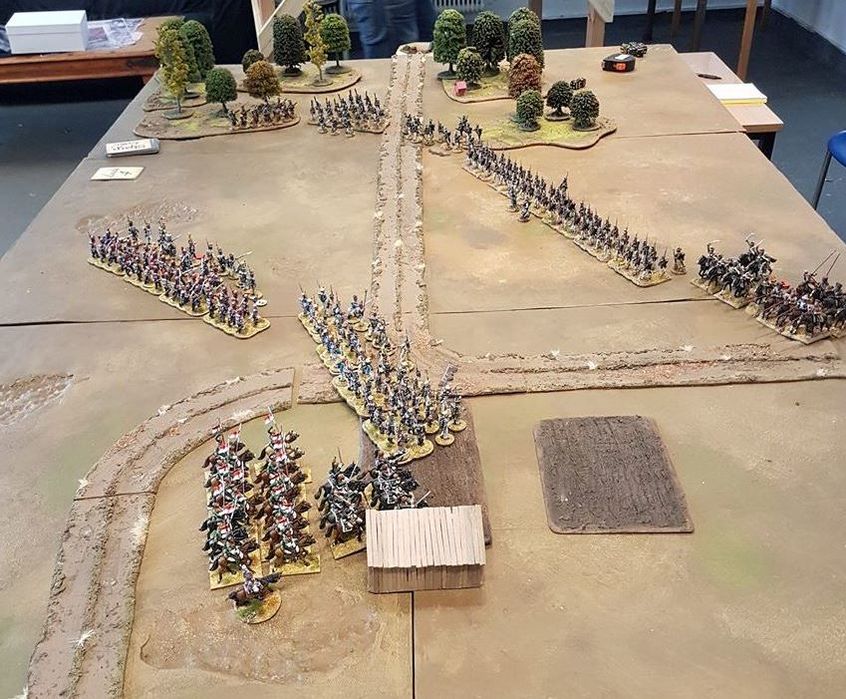 Even a casual glance will tell you one thing: that shed was built in a really bad place for the French! Unable to fan out, the cavalry has to slow down and squeeze by in column. To dissuade a sudden attack by the Russian cavalry, and with no enemy skirmishers in the way, the French Voltigeurs open up at long range and start to land some shock-causing volleys on the Hussars. It might not sound like much, but shock can really complicate an attack in Sharp Practice, as the shock will reduce the number of attacks in both musketry and in close combat. But worse, shock reduces the distance your units move, which means that a charge might not hit home, leaving you stranded in close musketry range. 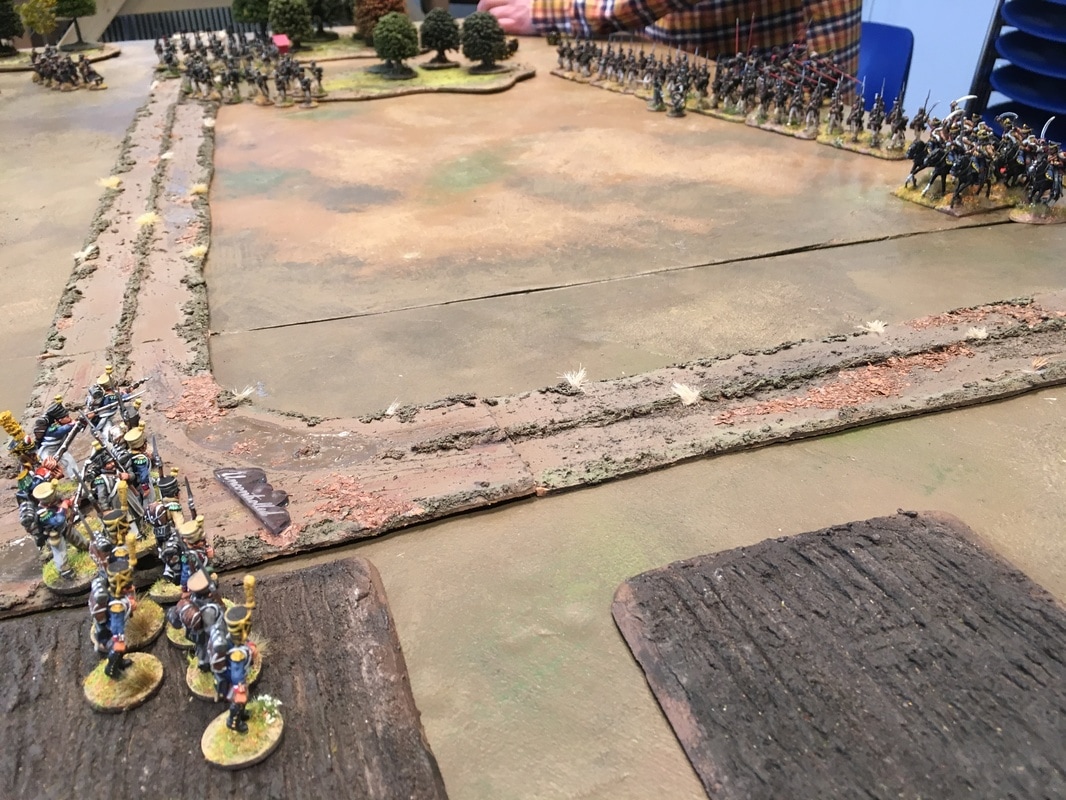 The French skirmishers open fire  The Russian Hussars take a few hit, while their skirmishers by the forest return the favour on the French left flank The cavalry clash beginsWhen the Hussar start taking a beating, they turn and move into cover behind the Russian infantry lines. The Dragoons are smelling blood, their eyes focused on the remaining irregular cavalry at the tail end of the Russian lines. The French general, thinking "when have ever an impetuous charge on Cossacks failed?", seizes the opportunity. With spurs dug in, the Dragoons charge across the field! For the Emperor! Their charge hits home, but both sides roll badly. Close combat is normally pretty deadly in Sharp Practice: you'll usually roll somewhere between six to ten dice per unit in combat, with 5s causing kills and 6s causing both a kill and a point of shock. But this time both sides are mostly unharmed, with the Dragoons barely scraping in a narrow victory. The Cossacks are pushed back, but they manage to remain on the table, facing the attackers. Instead of routing the enemy horsemen as they expected, the Dragoons are now facing a mostly unharmed unit, as well as the distraught Hussars who move up to support a counter-charge. C'est Magnifique!And then, in another first time event, the Russian regulars lines up in a square! This way, they wíll be protected from the French cavalry if the combined Russian cavalry units would be humbled by the heavier Dragoons. However, they are now immobilized and will not be able to bring their superior numbers to use against the French infantry line. Proper Napoleonics, ladies and gentlemen! 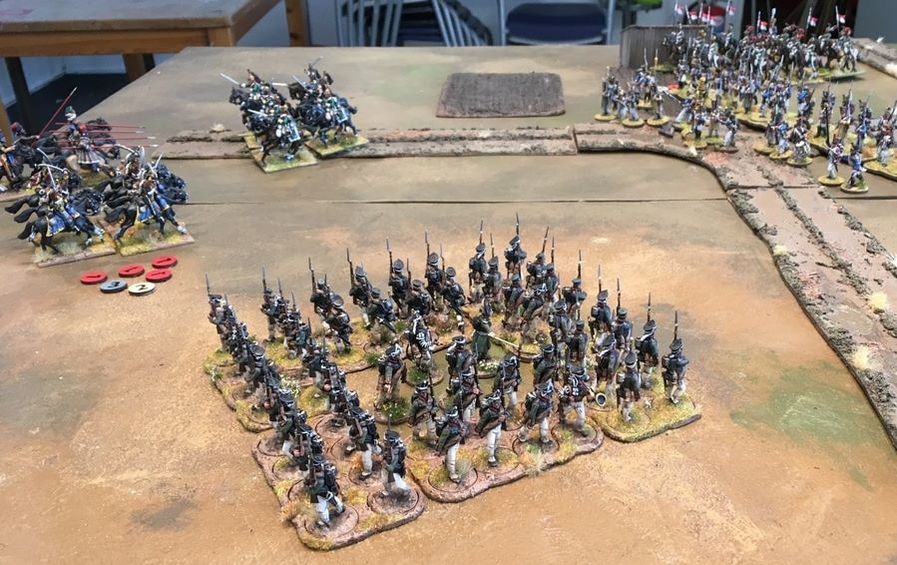 Note that the French lancers are still stuck behind the shed, unable to help their mounted comrades. At this point Russian musketry has knocked out several French infantry leaders, which has left their units stuck and unable to move out of the way for their own cavalry. Cavalry clash, concludedNow it was the Russians turn to unleash their riders. The Cossacks and Hussars smash into the French Dragoons, and the time of low die rolls is over. The rash Dragoons are outnumbered, outfought, and cut down to a man! However, the cheers among the Russian horsemen are interrupted when the French Lancers finally snake their way between infantry, and counter-counter-charge the counter-chargers. Their deadly steel lances find their marks, and the Russian cavalry is eliminated, with riders and mounts strewn across the battlefield. This leaves the French equestrians finally in control of their flank. But will they be able to make a dent in the neat infantry square in front of them? Or even dare to try? 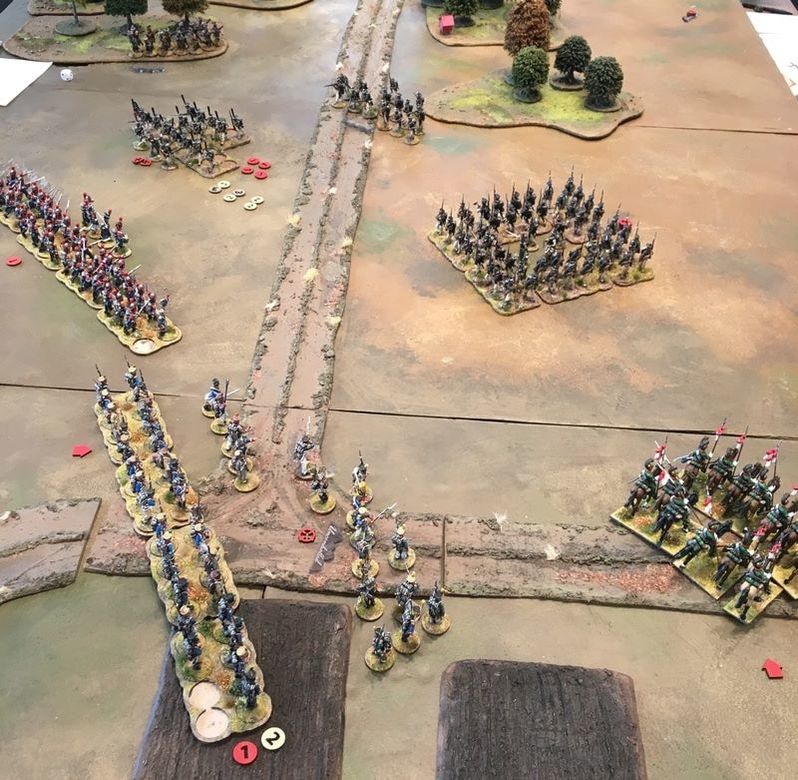 The battlefield position after the cavalry combat A contest of elitesAs the back-and-forth of the cavalry progressed, the other side of the battlefield saw two groups of elites facing each other. One one side, the Russian grenadiers who excel in close combat, and supported by plenty of skirmishers. On the other, the French Carabiniers who have a numerical advantage in regular troops, but half as many skirmishers. 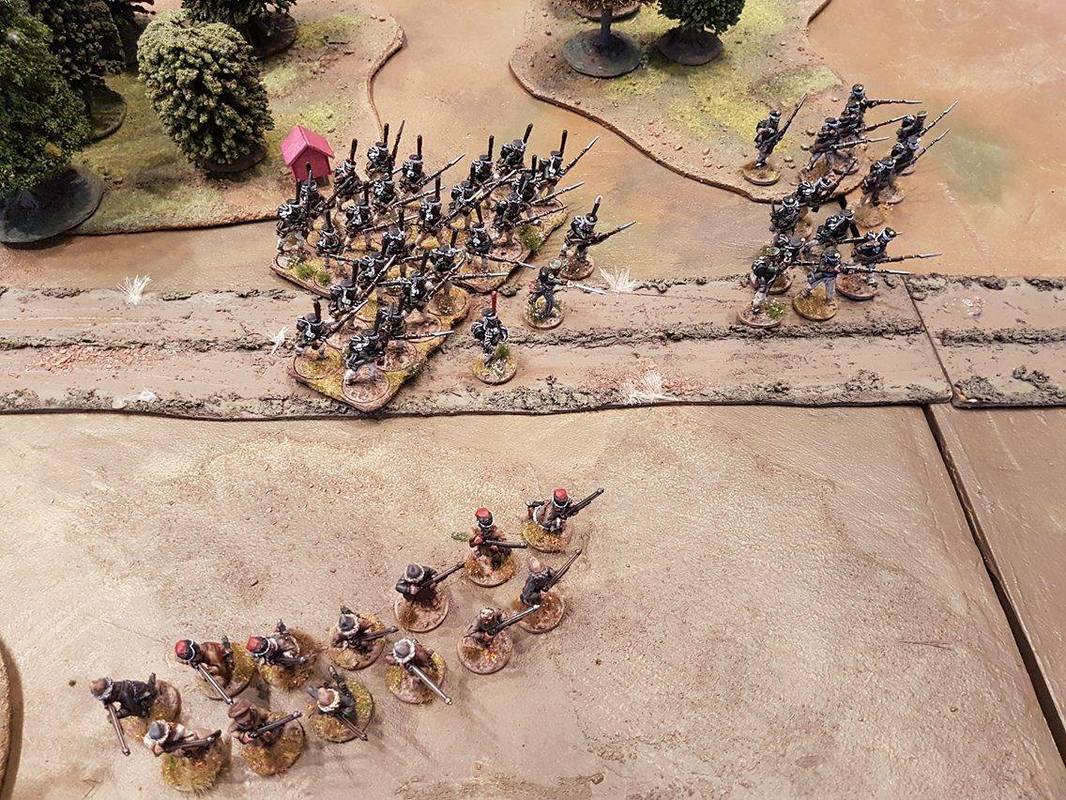 The Russian Grenadiers march out of the forest, flanked by plenty of skirmishers Initially the contest unfolded in the Russians favour, with the French leaders again getting knocked out by pot shots from the skirmishers in the woods and unable to activate their units. Their saving grace was that the nimble Voltigeurs did their job well, and their skirmish screen kept the French lines from taking too many casualties. Skirmishers count as having one level higher of cover, and if you fire through them at the units they screen, those units get the same benefit. With pressure mounting on their other flank, the Russians move forwards, aiming to even out the odds by beating the French in hand-to-hand combat. But they have to get across the killing field that is the 12" close range of muskets, and their movement roll is unfortunately not enough to make contact. 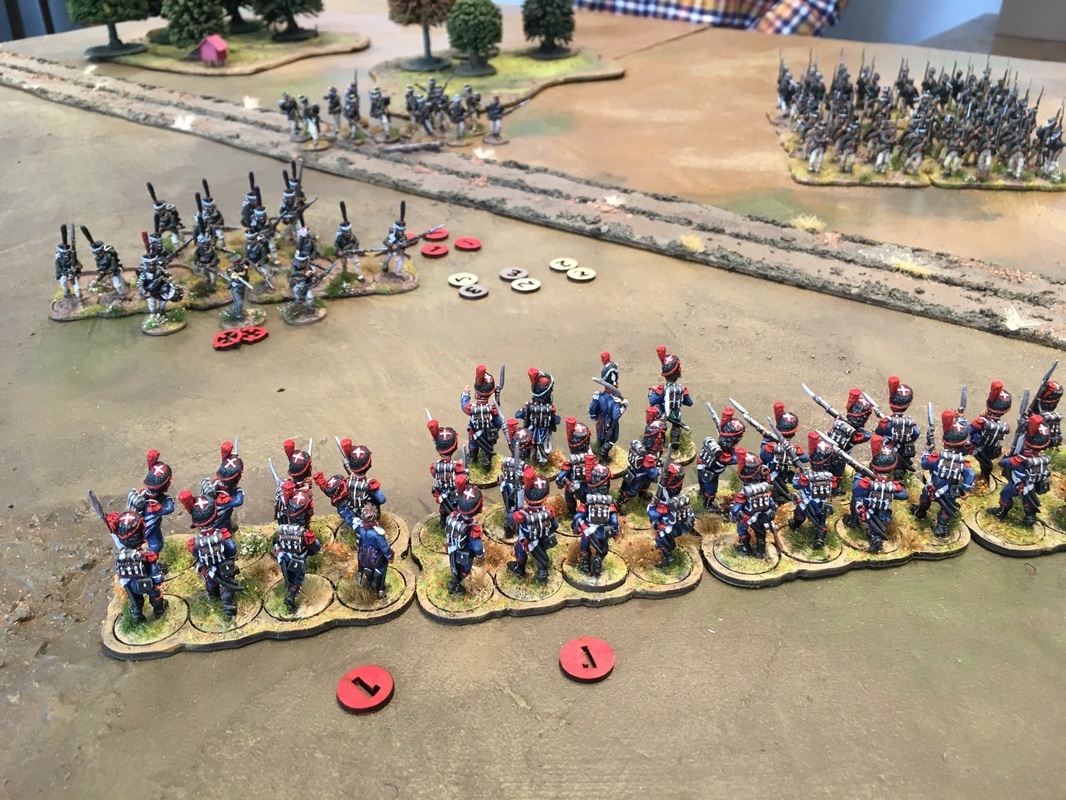 The row of Russian Grenadiers are looming in when the French light infantry captain finally woke up. He pushed his men forward, and the line shoved their way trough the skirmish screen, opening up a last minute volley at close range. Yet again, the devastating effect of a first fire volley in the open (32 men firing, 3+ to hit, 3+ to shock) was demonstrated. The reeling Grenadiers, almost losing a third of their men and with a wounded officer, find themselves with so much shock that they are unable to get to grips with the French. With the tide turning against the Russians, a last salvo breaks the willpower of the Russians. The remaining skirmishers and the besieged infantry square are no longer a threat to the remaining Frenchmen, and the battle is called. 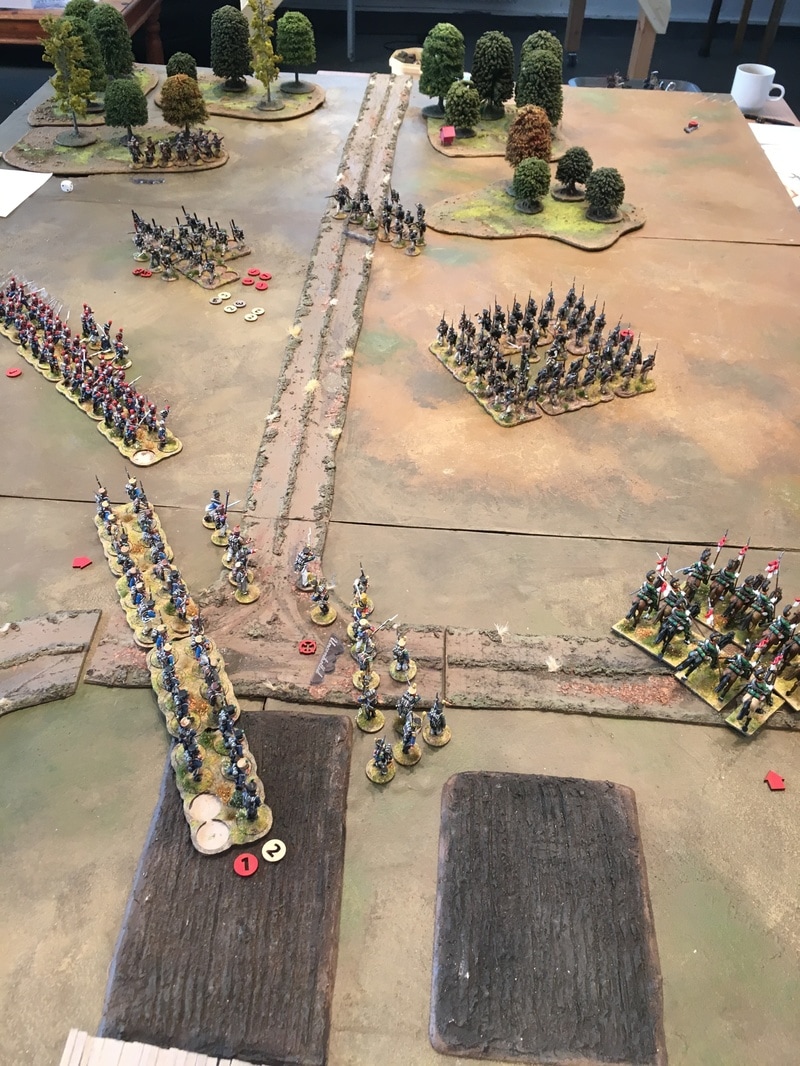 Lessons from the gameFirst of all: never ever underestimate a first fire volley at close range. Especially since the activation system means that sometimes one side can get in two volleys in a row before the other side can retaliate. In this case, the volleys at the end simply eradicated the poor Grenadiers. Secondly: skirmish screens are really good. The French line infantry spent quite a lot of this battle stranded, with knocked-out leaders, unable to do anything. Still, the incoming fire from the Russians, both from skirmishers and line infantry, didn't manage to really harm them. Each formation lost a few men here and there, but all of them were still in fighting shape. A line formation that has a skirmish screen is quite likely to get into close range without that many casualties or shock. Thirdly: cavalry is fun! And more cavalry is more fun! It can be hard to manouver them, but they are actually quite threatening in close combat, especially as soon as you have two units at the same time. We had read a lot of posts online about cavalry being ineffective in SP2, but we really haven't seen that in the latest battles, and especially not now that we have 2-3 units per side. I'm excited to see what happens once we get three or four unit formations... Fourth: the game actually got even better with these larger forces. With both sides having two ranked formations, several skirmisher units AND cavalry, it felt a lot more tactical. And this size was actually great for our experimental simplified NCO rules, as you had a suitable number of leader cards. We did not have a whole bunch of command cards piling up every turn, as we had when we tested the new NCO rules with smaller forces. Fifth: if we go for even bigger games, we might need to look into multiple deployment points, as it's really hard to squeeze in more than a dozen units within the allowed distance from your deployment point. Speaking of escalationAnd larger games would not come as a surprise. After this game, a quick note appeared on our group chat, informing me of a guy selling some Napoleonic French.  It turned out to be a bit of a small army, with two boxes of Warlord French, one box of Perry French, one box of Warlord's Vistula Legion, a box of Chasseurs-a-Cheval, some officers and two line artillery 6-pounders.
I'm still thinking about what I'll end up painting them all as, but this should be a start on the light infantry Chasseurs, a bulked up formation of line Voltigeurs, more Voltigeur skirmishers, and maybe even the start of a small Polish contingent? Please share your ideas of how to best use this unexpected infusion of infantry! /Jonas
4 Comments
I was asked to write up a blog post about the various markers we use in our games. Both Sharp Practice and Chain of Command are skirmish games where you have quite a lot of tactical options, which we like. However, all those special effects can require a bit of bookkeeping on the table to keep track of everything. The rulebook has some guidelines, but I think there are actually a lot more markers that you'll end up wanting than what the book mentions. If you are looking into picking up Sharp Practice, here are what we've found to be strictly necessary, what will be helpful, and finally, some things that are simply there if you want to go the extra yard.  These Russians have unloaded muskets while busy firing uncontrolled volleys, with four points of shock divided between the two units, with a leader that is knocked down. And that's in the initial turns of the game! Sourcing your markersYou can make your own markers, but these days there are so many affordable MDF shops that it's hardly worth it, unless you have some serious artistic talent. A lot of our markers are MDF markers that I got from Supreme Littleness Designs together with the sabot bases. They sell a large number of different markers, and I prefer the small sized ones. I personally prefer to get MDF markers and paint them myself compared to acrylic markers, but that's simply because I prefer the look and I think they fit better with painted miniatures and terrain. We also have some acrylic markers bought from Too Fat Lardies. 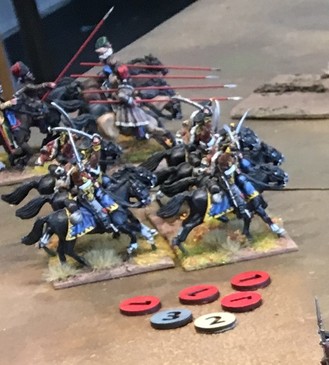 These poor Hussars have gathered a lot of shock. With numbered markers it's much easier to tally the total amount of shock at a glance. Markers you'll needSome effects are just all over the place, and impossible to keep in your head:
 Don't underestimate the number of markers that you'll be dishing out once firefights begin. In some battles we've seen single volleys handing out a dozen or more shock markers! Markers that are nifty
 "Somebody tell Tsar Alexander!" One of our Chain of Command markers have to make do until we make flashy Napoleonic themed deployment points. Flashy extrasOnce you have the basics down, you can start to get creative. The first, and most obvious one, is to model your own deployment points. This is a nice way to make your force more unique, and there are tons of miniatures, from casualties to camp followers to smug Aide-de-Camps who can fill this role. Once the Brits hit the table, I might have a use of all those British casualty figures that come with the Perry cavalry sprues... Another popular way to make your table more cinematic is to make three dimensional markers for volleys. One way is to simply use a bit of MDF board and glue some cotton on, to make the image of your unit being engulfed in gunpowder smoke. In my latest order from Warlord Games I went one step further, and picked up a blinking LED volley marker. Excessive? You bet! But it's a very evocative way of endulging in some historical battlefield decoration. So that's it. Needless to say I'm looking forward to make more elaborate markers to kit out our games, and especially to make some themed deployment points for my French. If you have some great ideas for home-made markers or deployment points, please share!
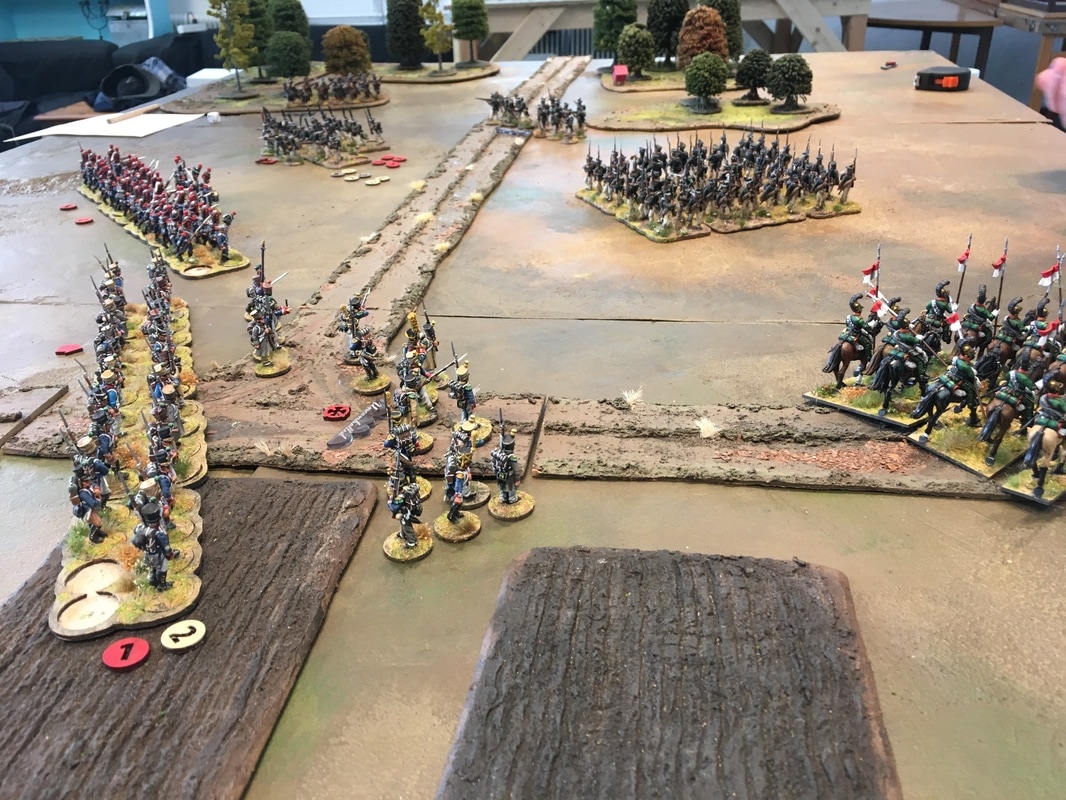
/Jonas  The French CorneredZach wanted revenge after the French slipped through his grasp in the last battle, so we arranged for a second battle. Initially we planned to roll for scenarios, but after trying to set up the Rescue Mission and realizing that it would be a bad fit for our forces, we decided to play a straight up meeting engagement instead. Evidently, the Russians were alarmed by a certain French captain who had not only beaten one of their skirmish forces, but also slipped through their net despite their best efforts to catch him. Now, on a small road outside Vitebsk, the French captain runs into yet another Russian search party. Will he prevail and add another trophy to his growing list of achievements, or has his luck finally run out? This was the first battle where we used the points system, and we used the PDF Russian list and the French Peninsular list from the rulebook. Needless to say, I'm not completely happy with the French list for representing France in Russia 1812. In the list, French veteran company troops are worse than the Russian line troops! But until my own French 1812 list is vetted by the club, I use the one from the book. The battle was fought before the French light infantry and lancers were finished, so the forces are similar to our first games. Experimental rule: Simplified Leader Activation 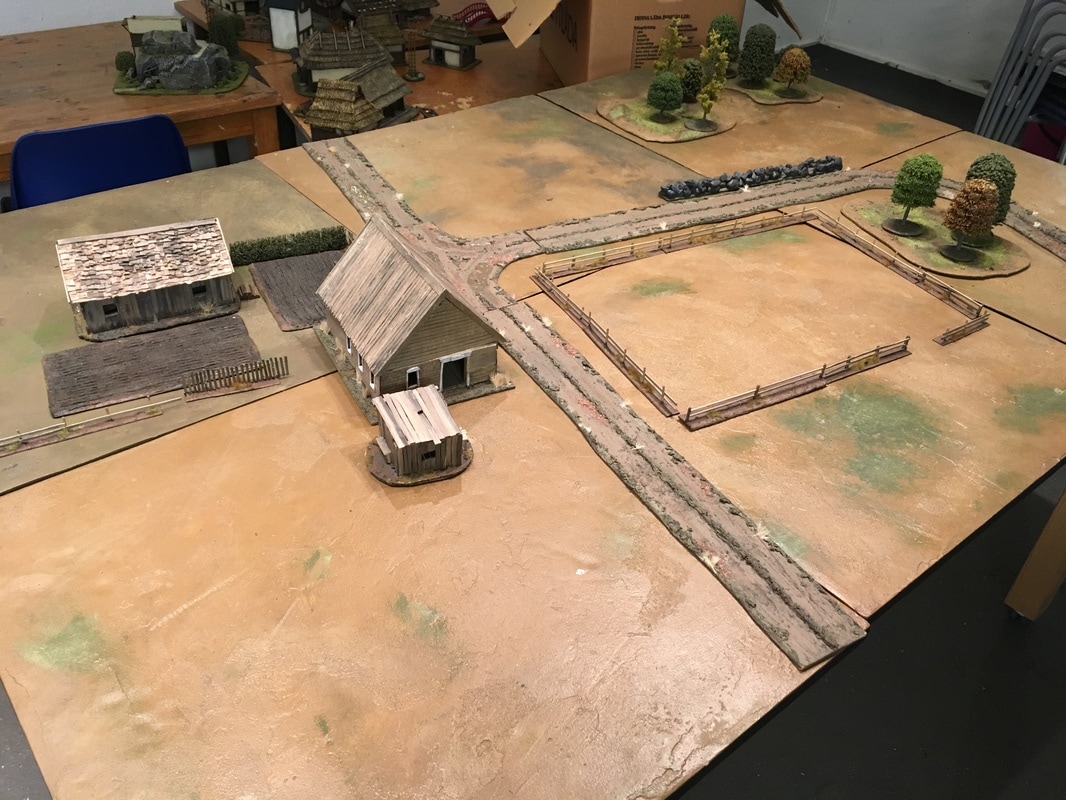 A peaceful farmhouse on a small road outside Vitebsk We set up a simple crossroad with a small farming household and some woods, where our two forces would meet. French Force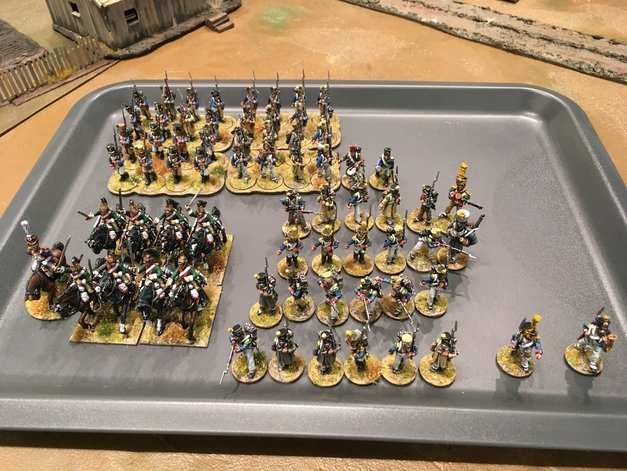 The French force has a formation of four Fusilier units. With them are a large formation of 4 groups of skirmishing Voltigeurs, led by a single NCO. These two formations are bolstered by a single unit of mounted Dragoons. Russian Force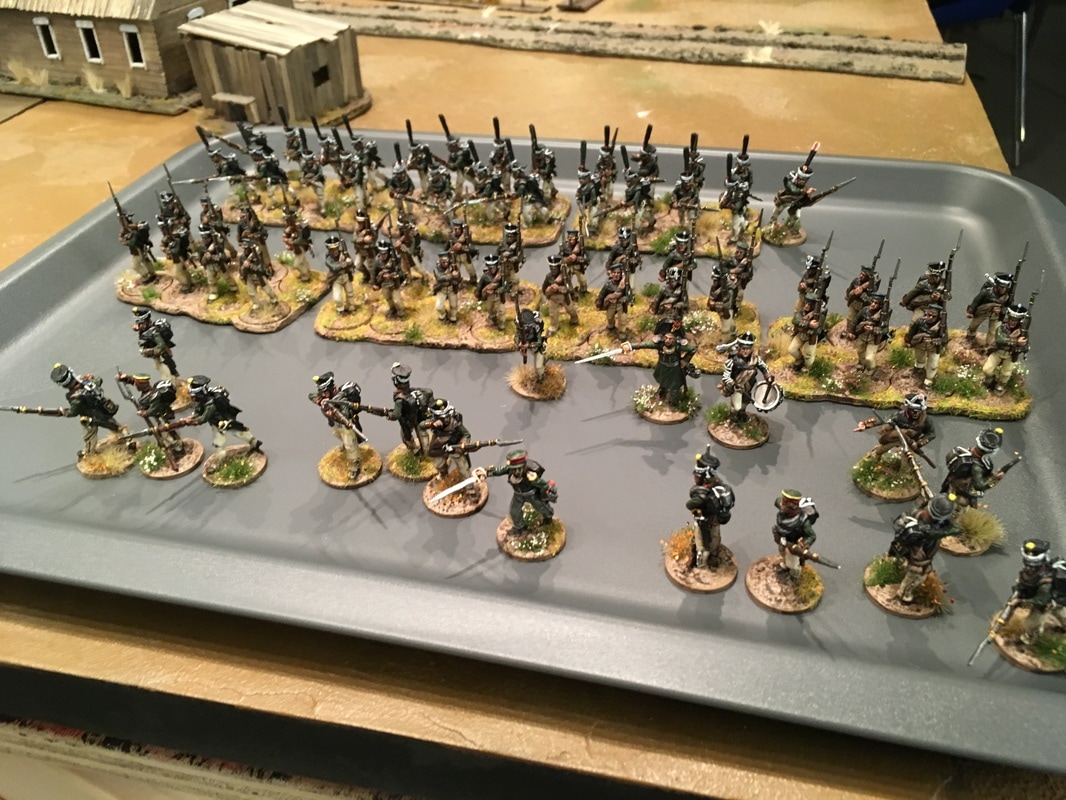 The russian has one large formation of four units of line infantry, and one formation of grenadiers. They are fronted by a formation of two units of skirmishing jägers. Build-upThe French quickly took initiative, and rolled onto the field with their entire force. The Fusiliers marched on in a line, covered by a huge cloud of skirmishers. On their left flank, the lone Dragoons started looking for vulnerable units to prey on. The Russians were caught by surprise, and scrambled to meet them. The Grenadiers and skirmishers advanced straight for the French force. while the line infantry formed up a column and started marching towards the unprotected French right flank.  French force advances 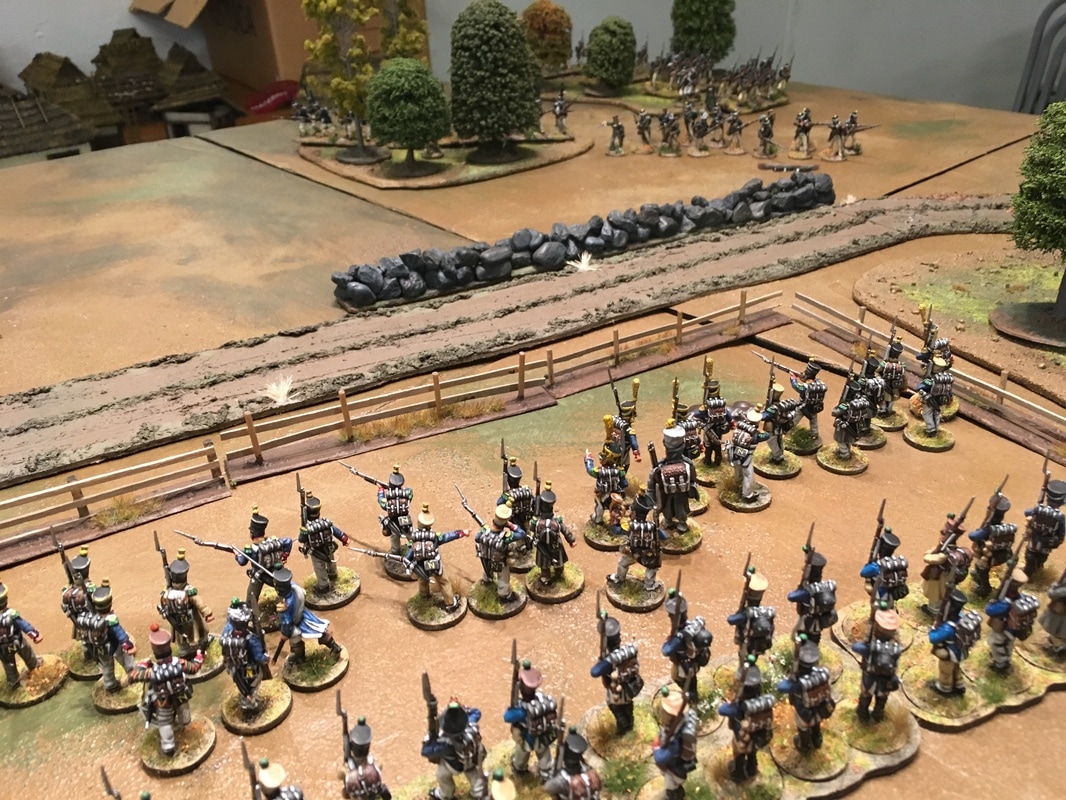 The two forces comes into view of each other The skirmishers get within range to open up on each other. Skirmishing troops get +1 to hit at long range with muskets, and troops with the "First Fire" rule get an additional +1 to hit with their first salvo. Our skirmishers only have to roll 4+ to hit on the first volley, and 5+ on consecutive rounds. Meanwhile, line infantry quickly ends up needing 6+ to hit if they try to fight a long range battle. However, skirmishers also counts as being in one level of cover extra, since they are spread out and utilize whatever they can find to hide behind. This means that losses are few in the initial firefight, but the leader of the Russian formation is knocked out! If Zach wants to activate him, he needs to roll a 5 or 6 to wake up. This takes a while, so the Russian skirmishers are temporarily out of action.  We use a lot of counters for Sharp Practice. You want to be able to see how many shock markers a unit has, if it is firing uncontrolled volleys or not, and if the unit has loaded weapons or not. And in this case, the leader is knocked out, which means more markers! The Battle Heats UpThe Russian Grenadiers are not worried that the skirmishers halt, and move up to the solid stone wall by the road. From the heavy cover they start firing on the French skirmishers on close range, and the both sides are embroiled in a firefight. 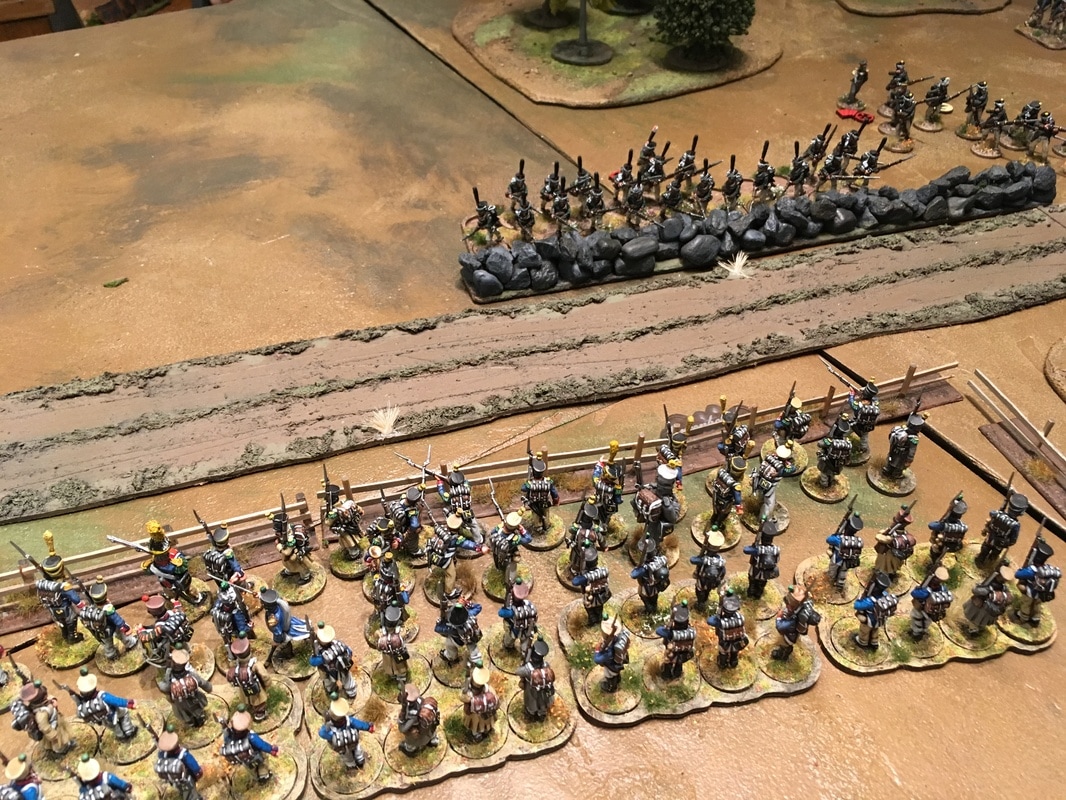 A firefight erupts across the road At this point the French Fusiliers are in a bad spot. The skirmishers are in a large formation, they can't easily be manouvered to the sides. The Fusiliers could push forward and move the Voltigeurs to their back, but then they are in light cover, against a formation in heavy cover at close range. Instead of a decisive action, the French stands still, exchanging fire with the Russians. A combination of deployment mistake and static battle plan? This doesn't sound good! Meanwhile, at the crossroads: 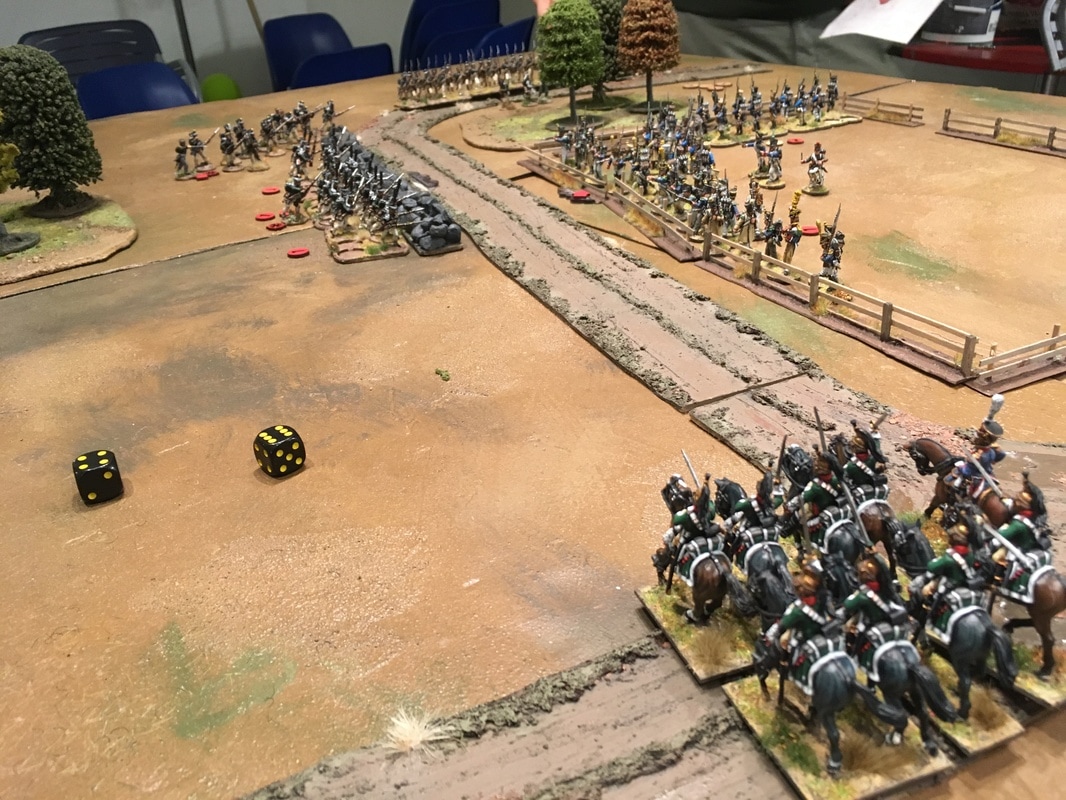 "Full speed ahead, mon frères!" After two battles of being useless, the French Dragoons are chewing at the bit to prove their worth. And what's more tempting than the flank of an already engaged infantry group with unloaded muskets? It's time to recover their lost honour! Slowly trotting forward, they change facing at the crossroads and line up. You can only change speed one "step" up per turn with cavalry, so they are spurred on to a canter, but not gallop. To make sure that they make contact, the French player spends two command flags to use their special rule "Tally Ho!". This gives them an extra die for movement, and two extra dice in the Fisticuffs if they get into contact. With the extra die and +3 inches per die for moving at canter, the Dragoons crash into the surprised Grenadiers! 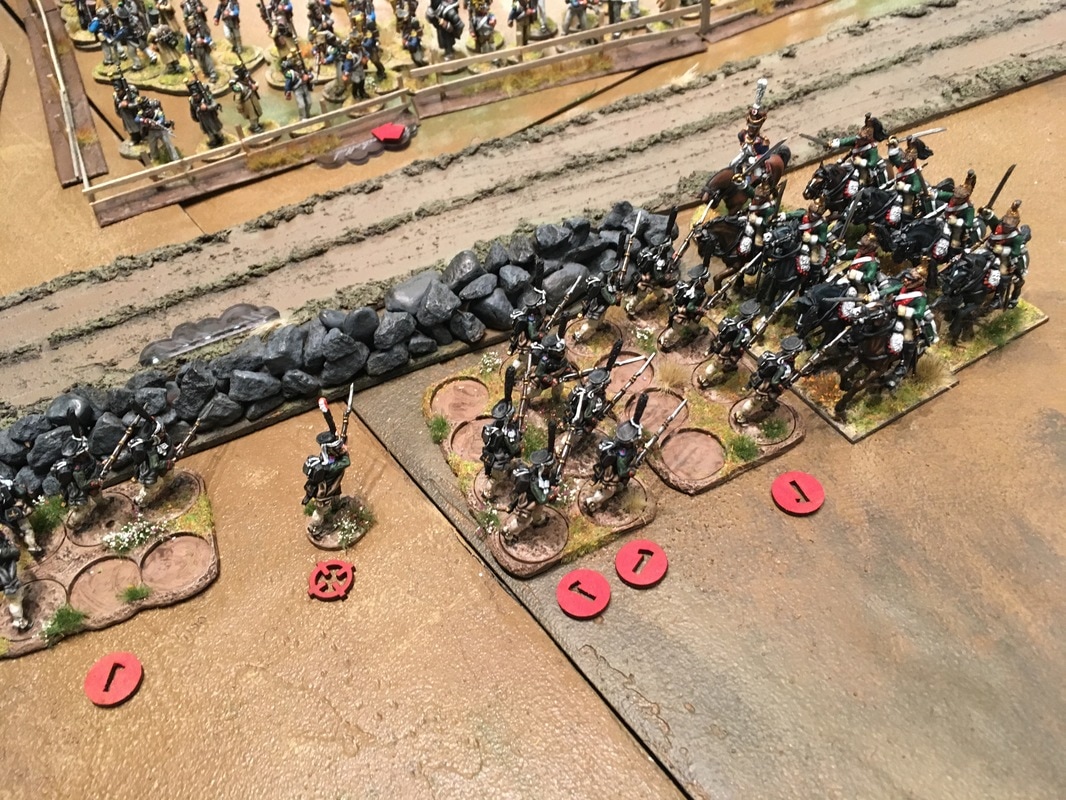 The Dragoons are only one unit against the Grenadiers, who are supported by the unit next to them. Even though they are Agressive (extra dice in close combat), the flank charge removes enough dice from the Russian side for the Dragoons to overpower them. While losses are few, the Grenadiers are pushed back, and have to leave their heavy cover. Meanwhile, the intrepid Russian column has fanned up into a line, and are advancing through the woods. The French Fusiliers hurry to form up to face them head on, but they are very close now! 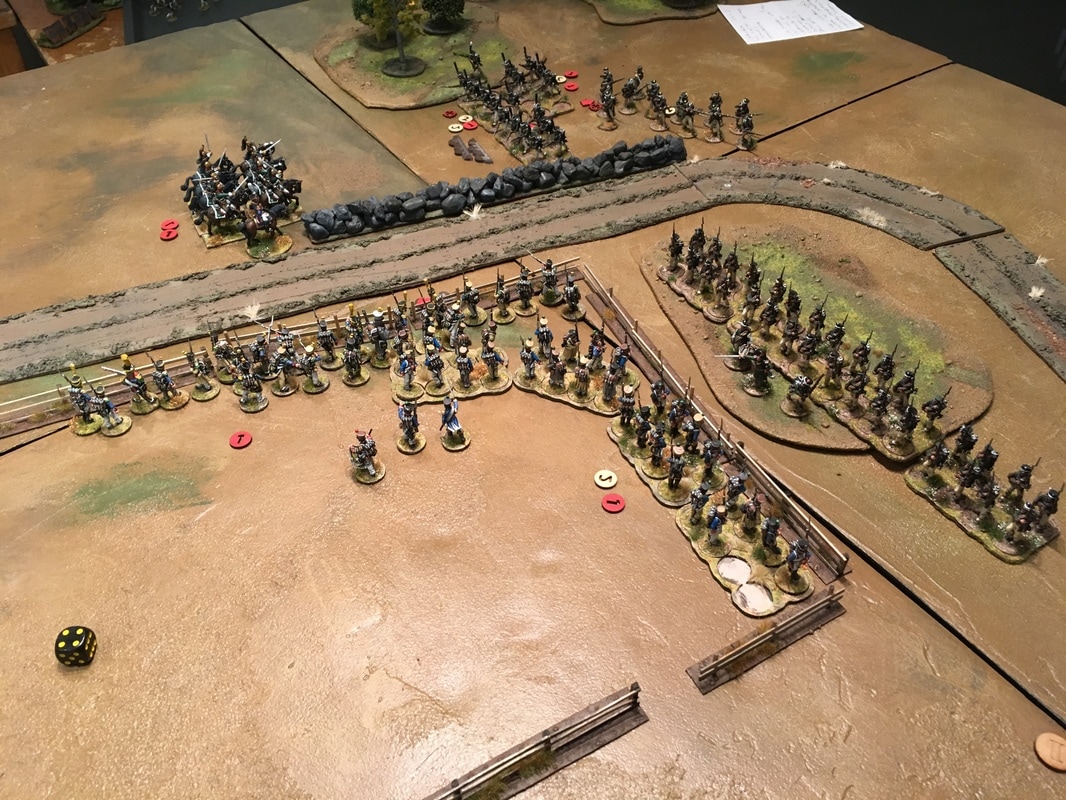 The Dragoons are now in a much worse situation, and it's do or die as they continue their attack on the Grenadiers. But at this point they have formed up in a line, and while they are badly mauled and not really in combat shape after the Fisticuffs, the Dragoons are killed to a man! Only the officer survives, and retreats from the battlefield in a frantic panic. This angers the Voltigeurs, who fires upon the Grenadiers until they are forced to retreat due to accumulating too much shock. 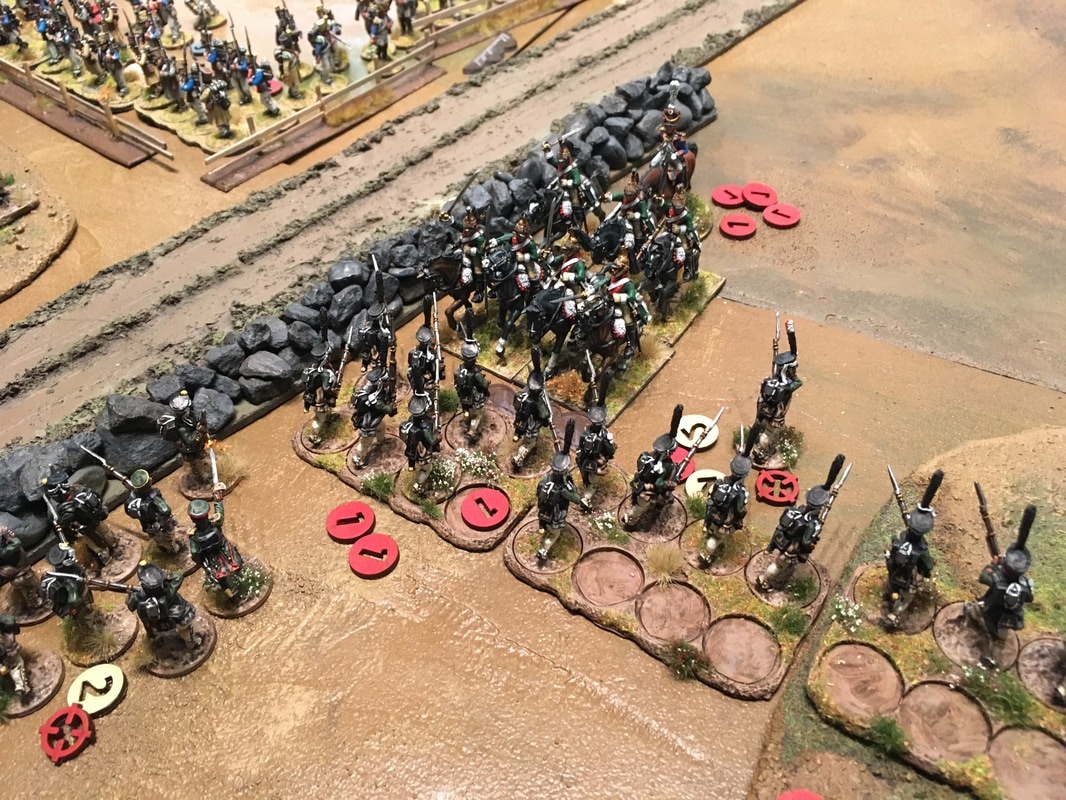 Meanwhile, the Russian troops open up a devastating volley on the French! Casualties are high, and before the French can reply in kind, a second volley riddles the French captain with musket balls, and he falls dead to the ground. Quel dommage! 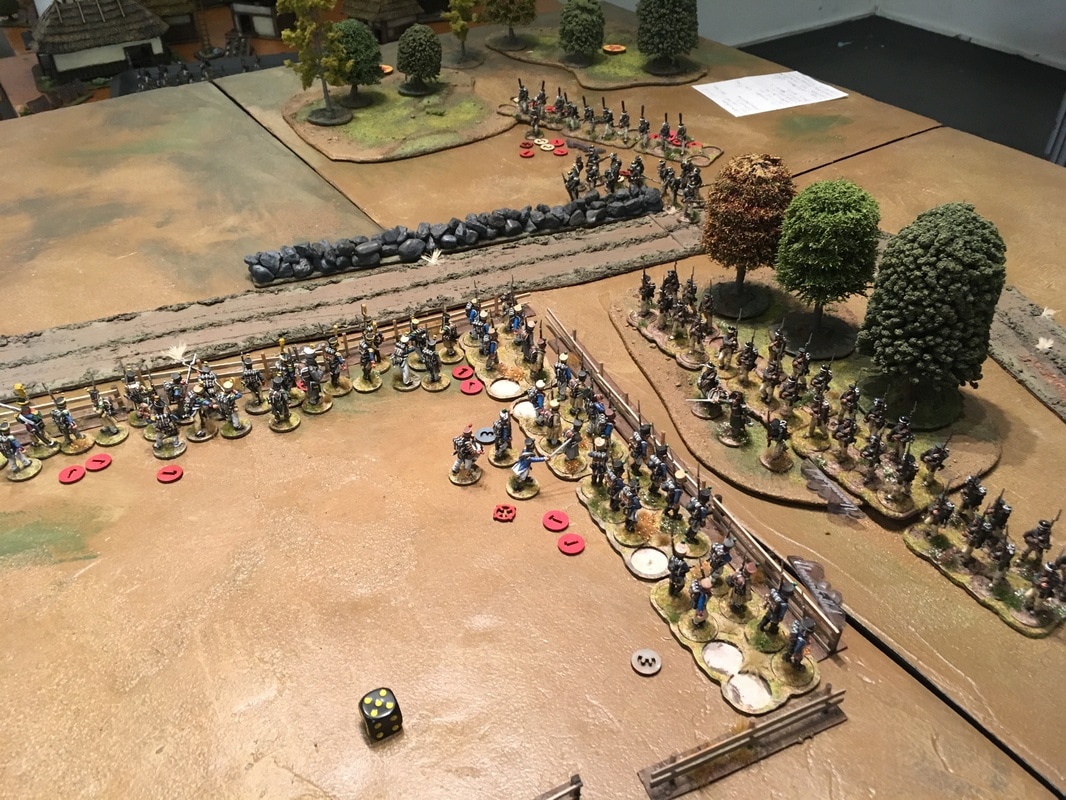 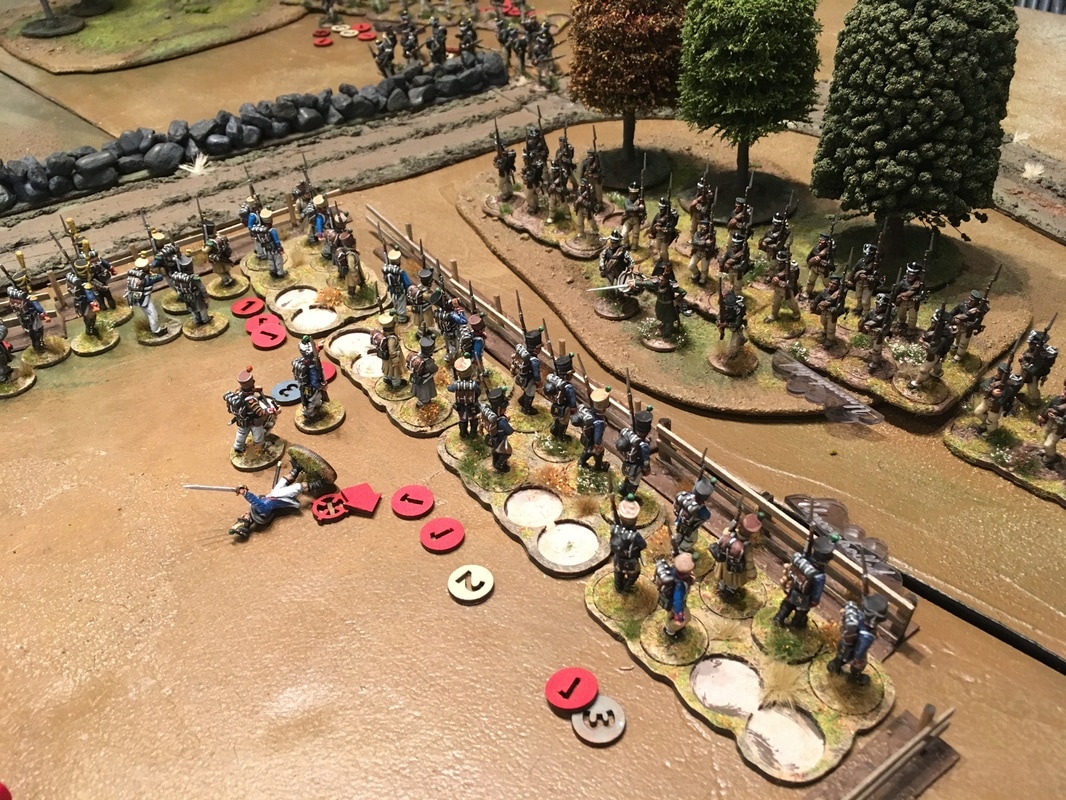 The French captain meets his end! AftermathWith the French losing their captain and with only their skirmishers in fighting shape, the players agreed that it was a good spot to call it a day and break off for lunch. The Russians had prevailed, and put an end to the French rampage across their countryside. At least for now...
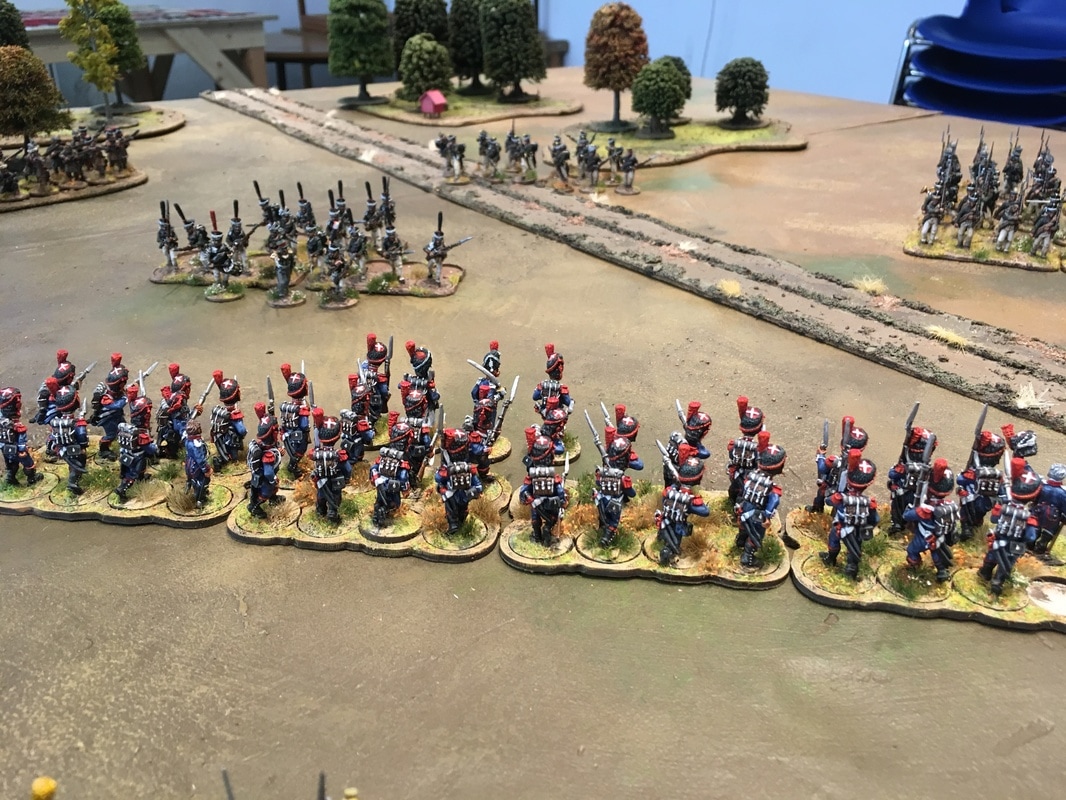
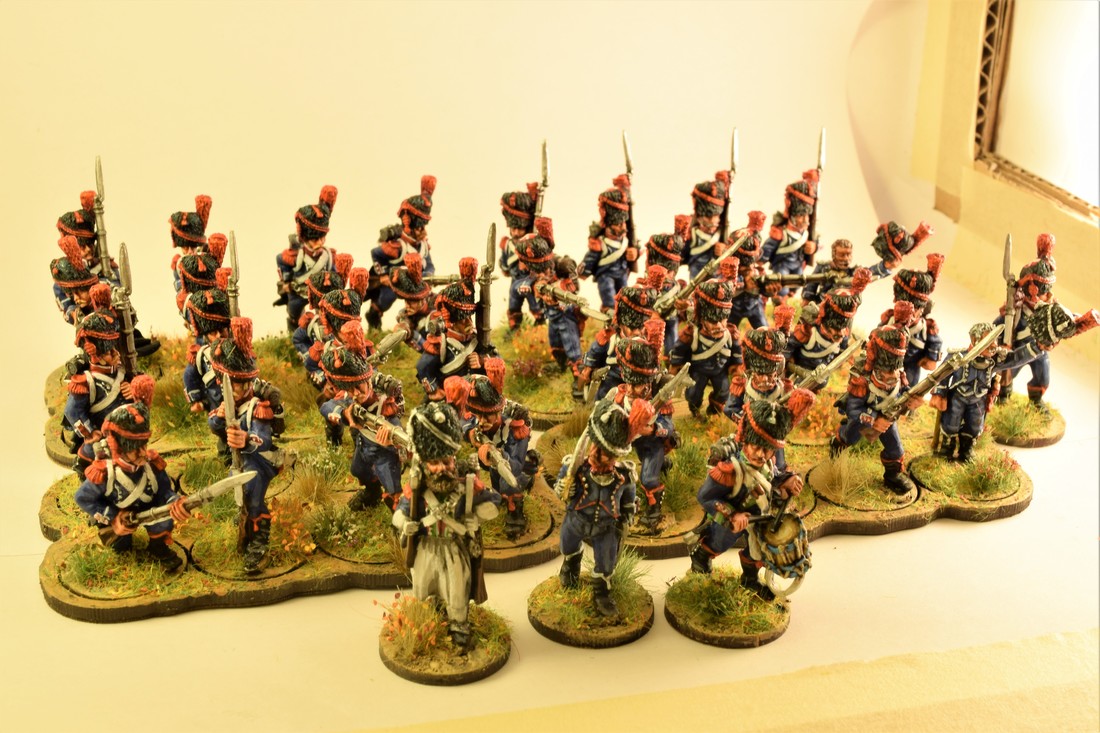
We learned a lot from this battle. First of all, skirmishers should not operate in such large formations! If they had been organized as two formations, they could have manouvered much more efficiently, and maybe try to flank the Russians or get in the way of the marching column while still keeping the Grenadiers in check. Secondly, getting a first volley at close range with ranked infantry against other ranked infantry is very lethal. It's likely to put you in a position where your opponent is weakened enough by the shock and losses that they can't claw their way back into the fight. Thirdly, if the Dragoons had two units instead of one, the Grendiers would probably have been wiped out, not pushed back. Even in perfect conditions, a single cavalry unit is pretty limited. But at the same time, it practically removed three units from the battle through their sacrifice. So cavalry, while they have their weaknesses, are far from useless. Finally, it's more fun to have two ranked up units than one! Only fielding one unit of Fusiliers made the French force needlessly static. With more units you can manouver more, and do interesting things like flanking. So bumping up the armies in size a bit so that both have more than one "core" unit is probably for the better. Overall a fun game with the balance shifting back and forth. Now it's on to add more troops, so that we can fight bigger battles! /Jonas 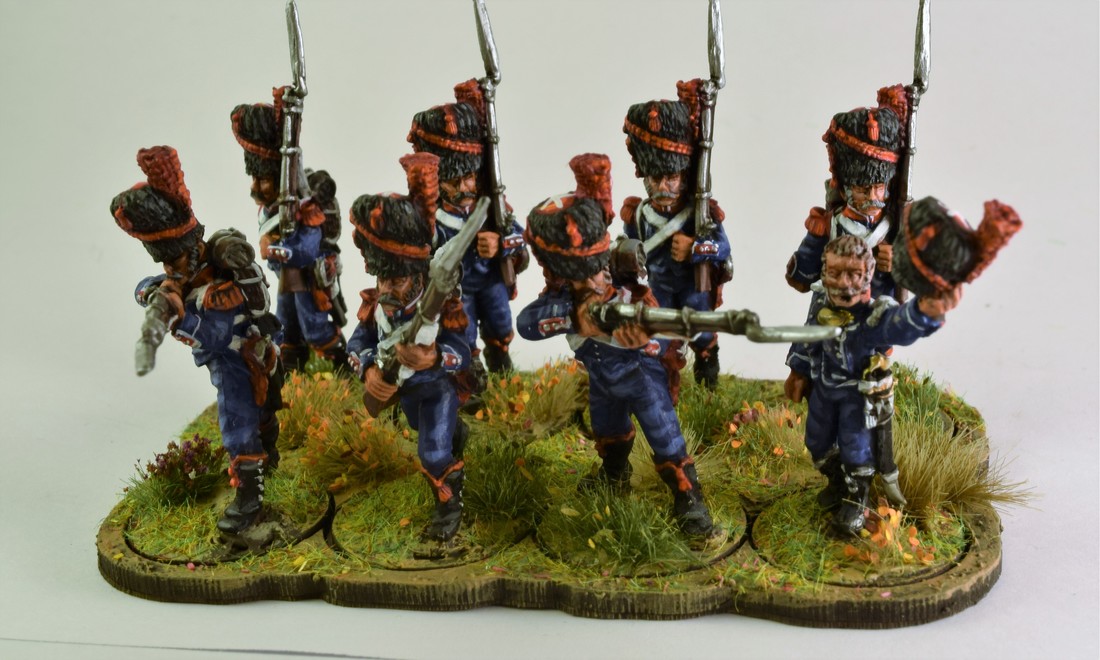 A unit of French Carabiniers from Wargames Foundry I enjoyed the two first units of Carabiniers from Front Rank, and what's not to like about spiffy blue uniforms and bearskin hats? But to form an elite formation for my SP2 force, I needed more than 16 men. So next up I got two packs of 8 Carabiniers from Wargames Foundry, to bulk out the formation. I managed to find a pack of the parade style uniform, with plumes and the Hessian boots, and in the end they ended up looking very similar in both size and proportions. Main differences compared with the Front Rank ones:
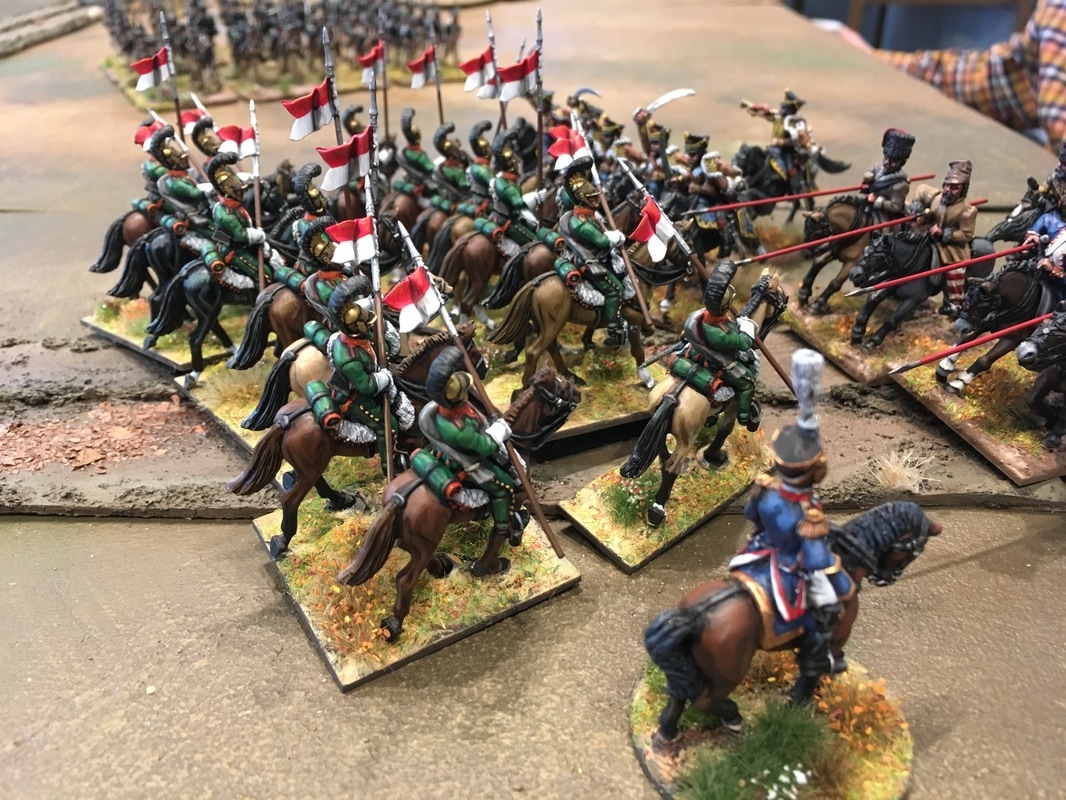
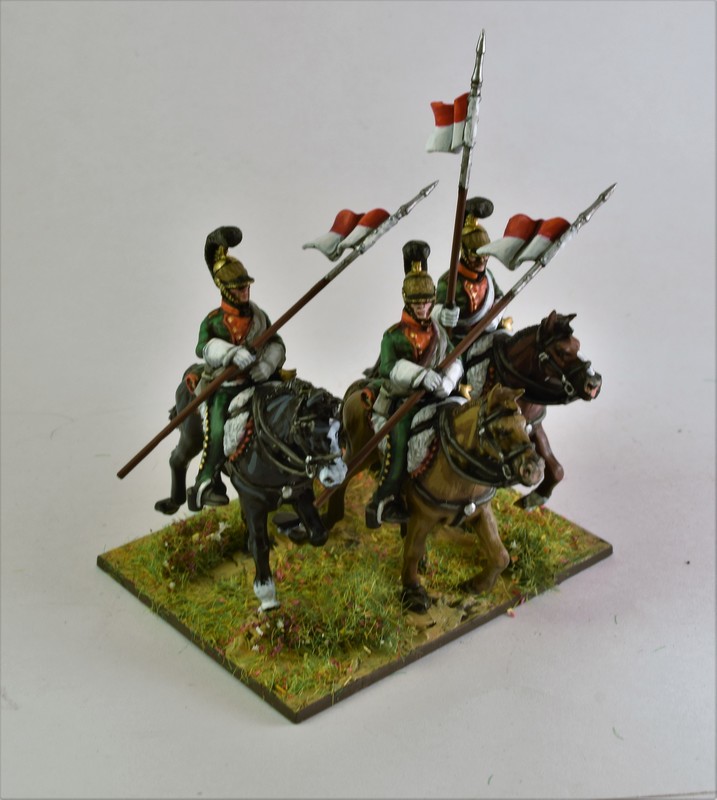
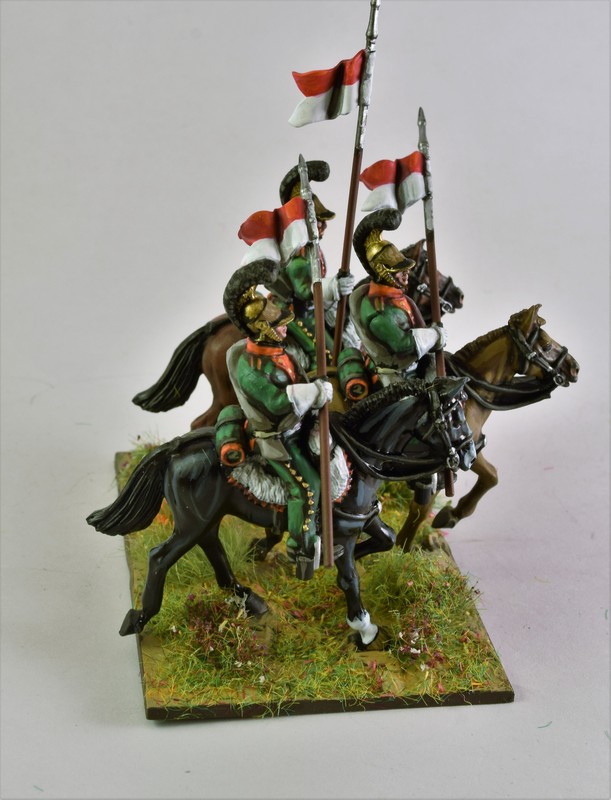
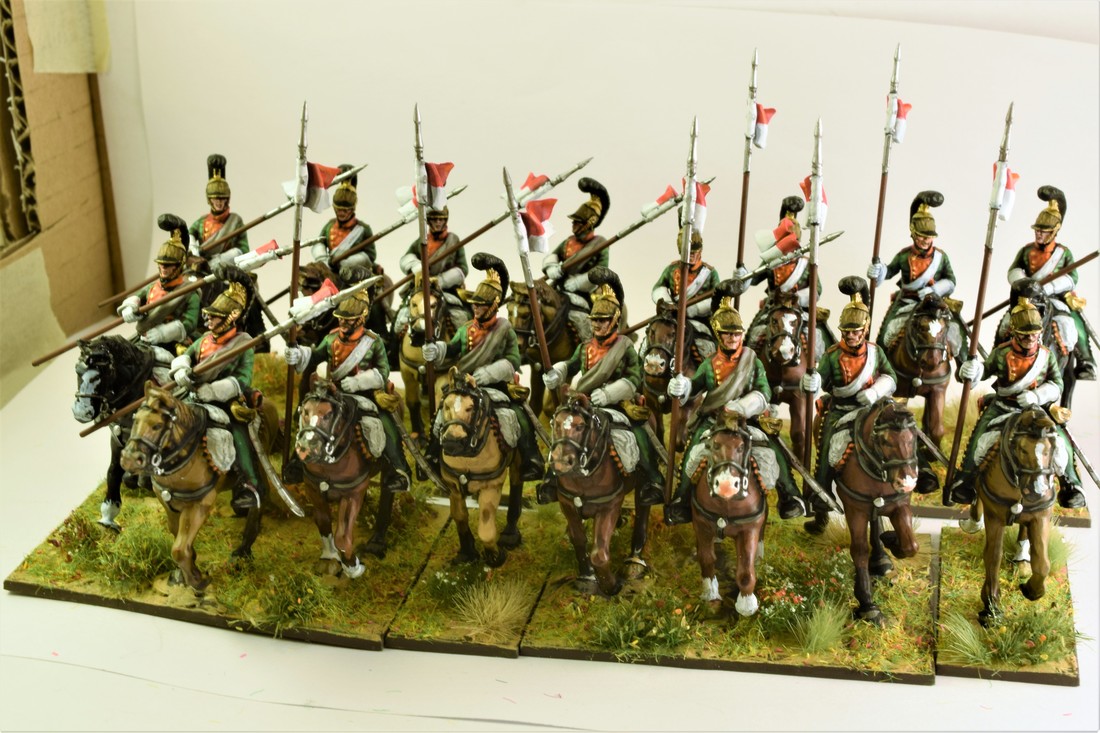
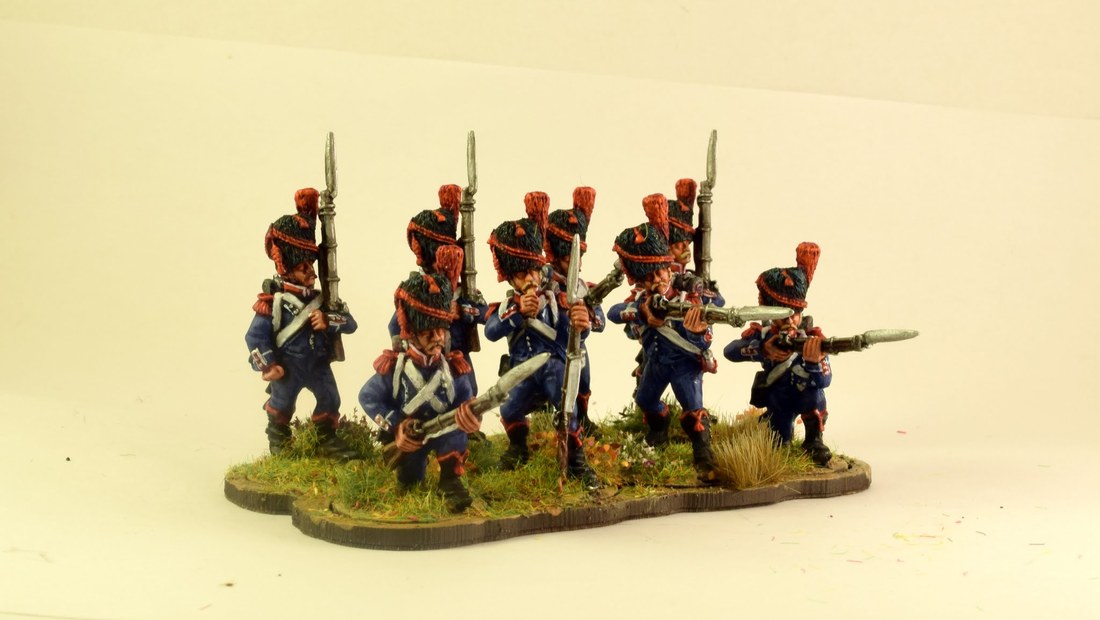
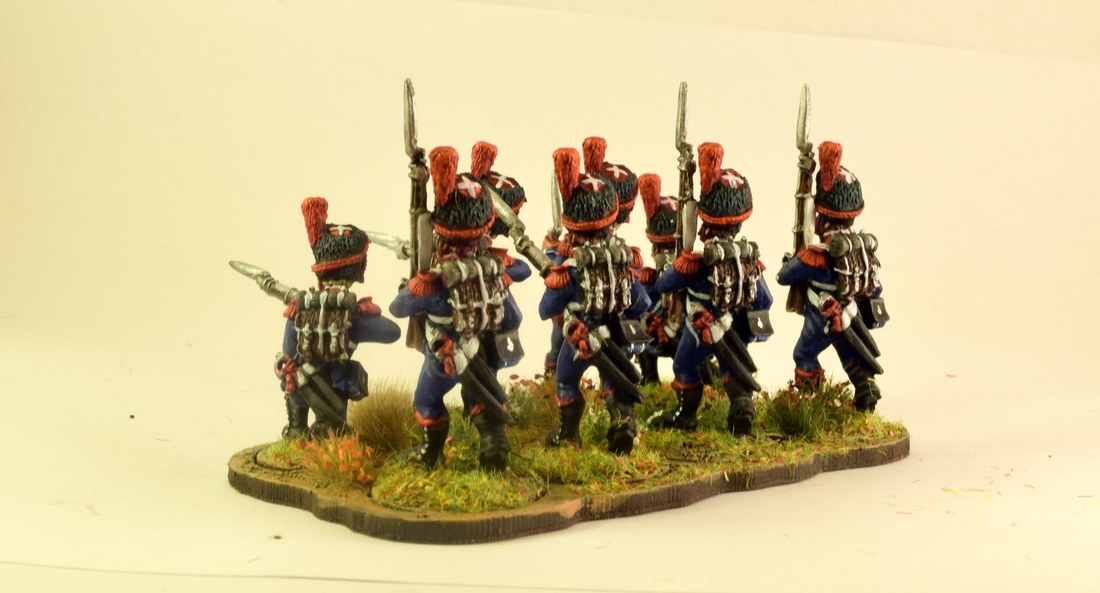
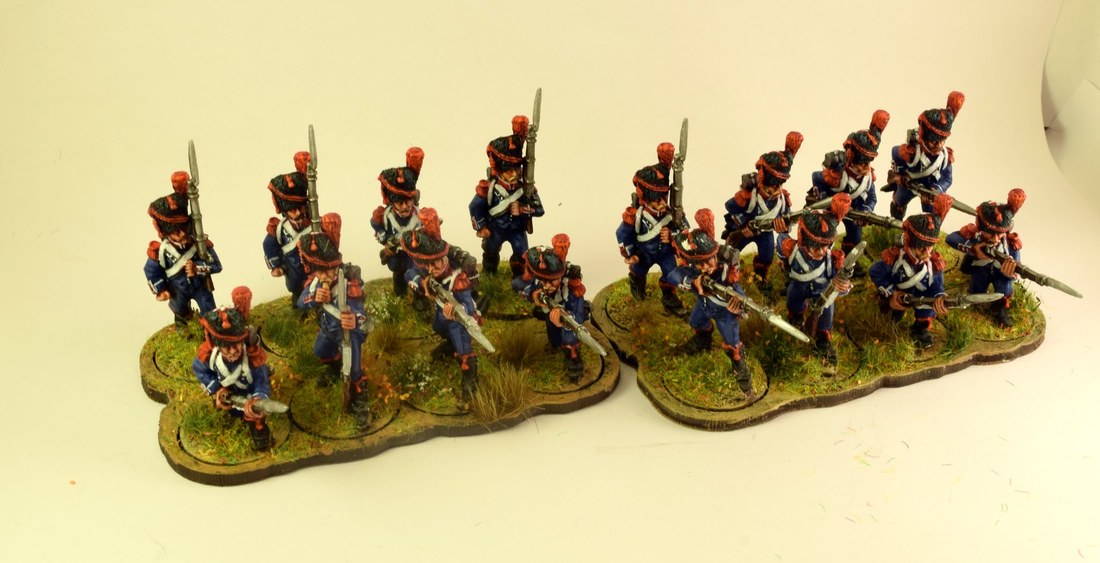
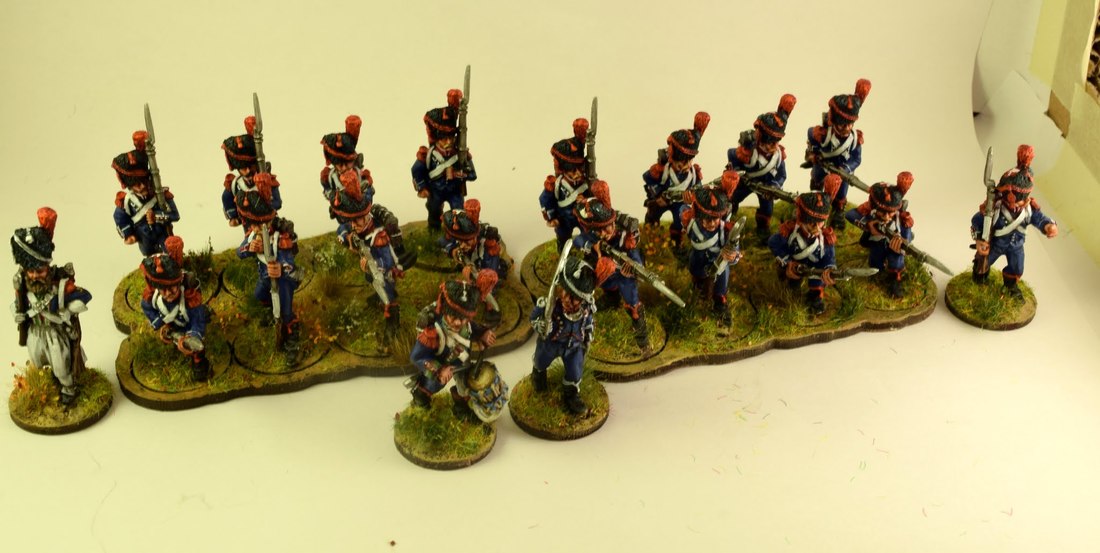
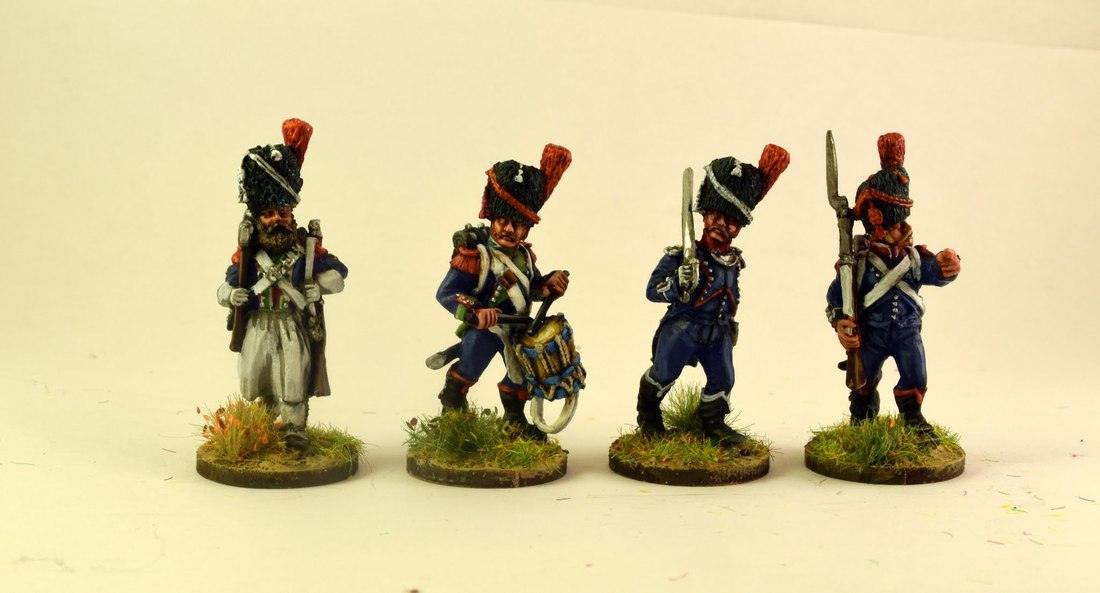
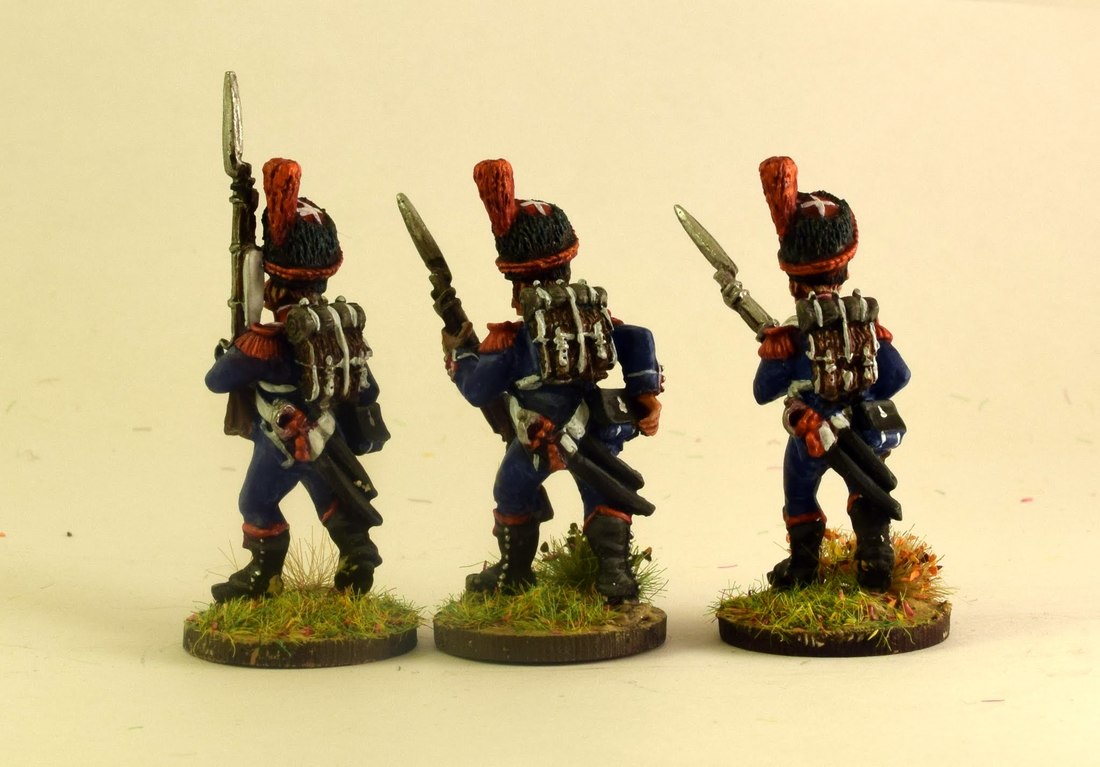
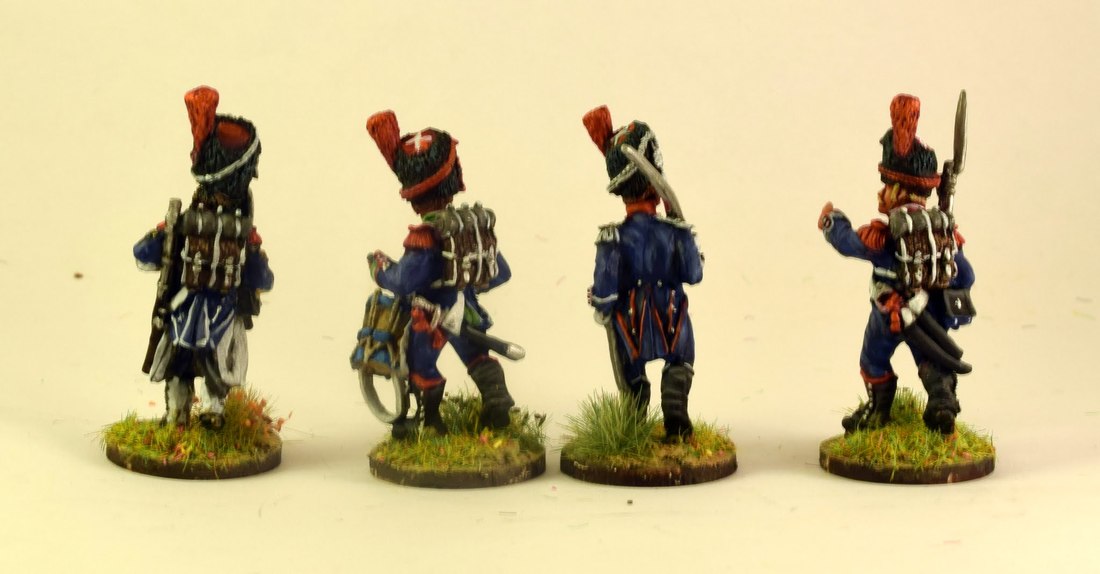
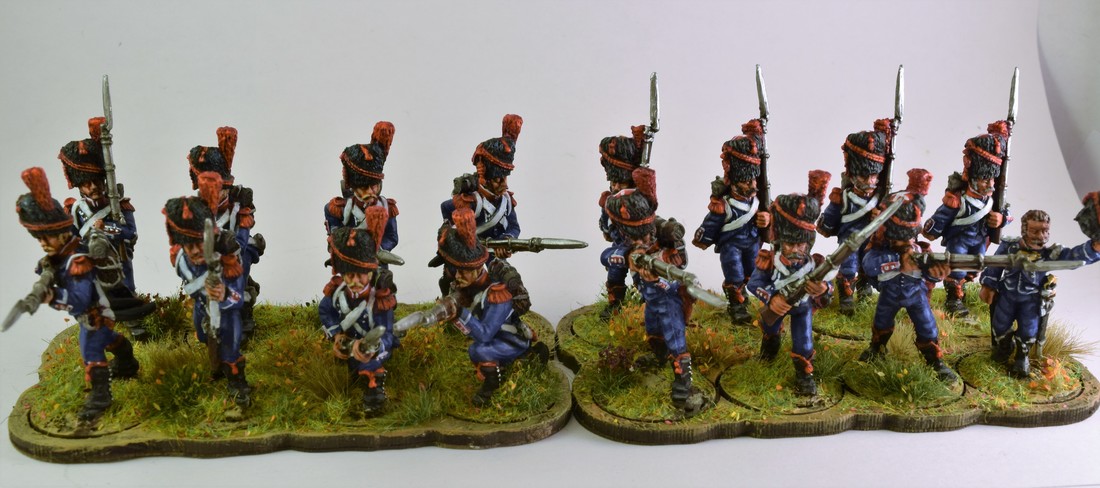 Front Rank on the left, Foundry on the right Other than that they look very similar, and it's hard to even tell them apart when they are put in the same formation. I'd say the foundry miniatures have slightly finer details in some parts, but it's hard to tell from even a short distance. They're roughly the same price, so the main difference is that you can choose the exact miniatures from Front Rank while Foundry sell theirs in 8 figure packs, where most packs are single-pose miniatures more aimed at large units. After fielding the entire formation in a game, I must say that I'm pleased with how they add an extra spot of colour with their blue and red uniforms, compared to the more drab fusilisiers in their greatcoats. A good start to the light infantry, and now they only need a little bit of of a Chasseur (the light infantry equivalent of fusilier company) backbone! /Jonas  The entire formation of Carabiniers ready for action. I need a bigger photo box! (and better lighting) 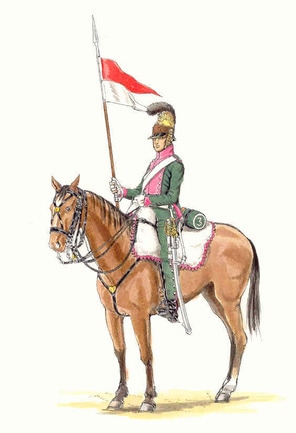 French Chevau-Légers LanciersMy second addition to the cavalry wing is a unit of French lancers. These nimble cavalrymen started out as Dragoons, but were ordered to add the lance to their arsenal after the Uhlans, especially of Polish origin, impressed the Napoleonic era by showing how efficient a long metal pointy stick could be. Six French Dragoon regiments were turned into Chevau-Léger (light horse) lancers before the invasion of Russia. The Grande Armée in 1812 had two visibly different types of lancers - the French style ones with a crested bronze-coloured helmet, and the Polish style lancers with the square topped Czapka helmet. Note that some non-Polish lancers, such as the 2e régiment de chevau-légers lanciers de la Garde Impériale (or second Imperial Guard Lancers) wore Polish style uniforms, despite these Red Lancers being Dutch. The added reach and impact of the lance meant that the lancers, despite their light horse classification, were a threat to most other cavalry except the armoured Cuirassiers. They were deadly in pursuit and their weapon could strike an infantryman from beyond the reach of his bayonet. With their distinct white and red lance pennons, they're a very colourful addition to a French army. Warlord Games lancersI got 8 sprues of lancers with 2 lancers on each sprue. The sprue has extra epaulettes to make one of them into an elite company member, and two lances that are either held upright or sideways across the chest. You also get one arm with a sabre and a loose musketoon: the first rank of the lancers would carry lances, pistols and sabres, and the second rand sabres, pistols and musketoons or carbines. Since these are my first 16, I decided to go with lances for everybody. My unit is painted up as the 2nd Chevau-Léger regiment, which had orange collars and turnbacks. It was tricky to get an orange that is visibly different from the red on my Dragoons, and in the end they might be a little bit too similar. But if you doubt their allegiance, there's a tiny little "2" on the sides of the saddle bags. I went with the 2nd regiment since they were at Borodino, in a heavy cavalry brigade under the capable Montbrun, and I thought that their orange facing colour would look good with the green uniforms. 1st to 6th lancer regiments had green coats and breeches, and the 7th to 9th had blue, with each regiment using different facing colours. So there's a lot of colour options if you get some lancers for your force, and as always you can get some colour guidance at Napolun. 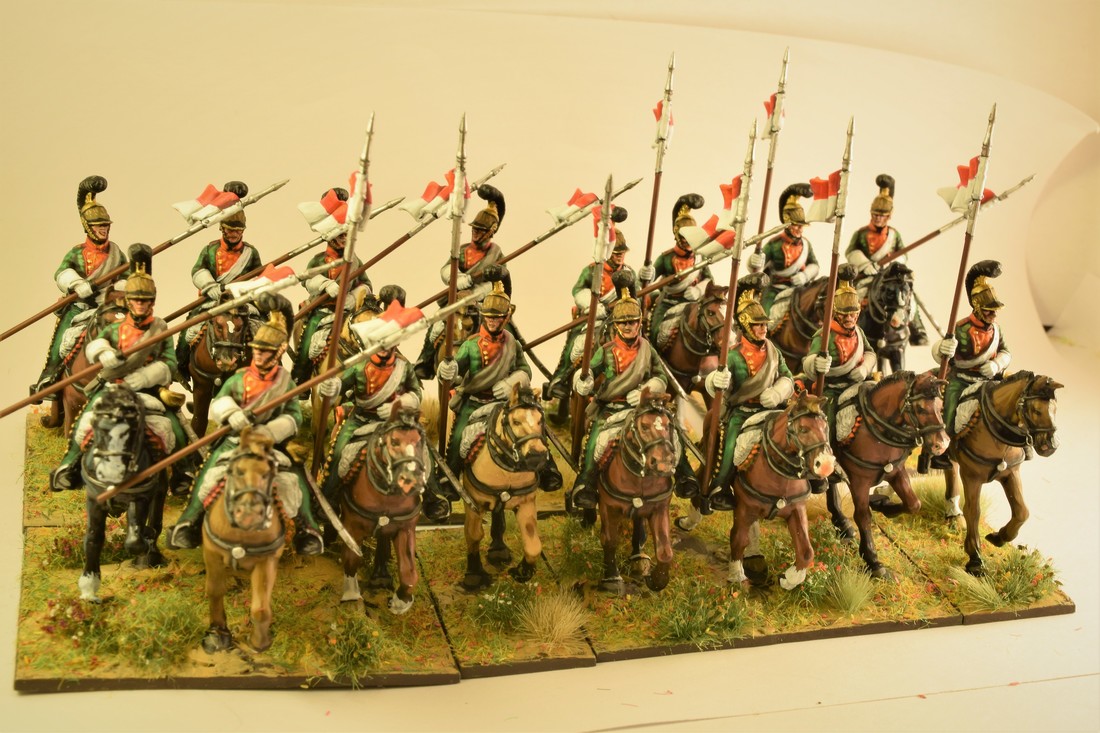 French lancer formation The good:
The bad:
VerdictI'm happy with how these lancers turned out. If I do more I'll probably scrap most of the sideways lances, and just use the ones pointing upwards for both practical and aesthetical reasons.
I saved a few pounds on getting these during the sprue sale, but I also missed out of getting the command group that comes in the box, so now I need to get those anyway. I'm honestly not sure if I should get just a command group, from Perry or Front Rank or similar, of if I should spring for a whole box of lancers from Warlord. That way I'd get one unit more and some extras, plus the command group, and it's not that much more expensive than buying a metal command group from some other company. Either way: lancers are good, lancers are cool, and these are a good budget option for any French players who wants a light cavalry with a little bit more "oomph" to them. That's it for today. Now, where is the closest group of Russians so I can try these bad boys out?! /Jonas  French Cuirassiers ruining someone's day Now that I have finished a basic core of French infantry, I'm looking at expanding the cavalry. When I started to look into the subject, I realized just how little I knew about French cavalry in the Napoleonic era. First of all, there's just so many different kinds of cavalry! And they change over time with new equipment, new uniforms and organization. How could I translate all those things into a small skirmish force? Needless to say, I realized that I had to read up a bit and then make some choices. Helpful booksI started out with two books that cover cavalry. The first one is the excellent Swords Around A Throne by John Elting. It's just a great source overall for everything in the French army, and the cavalry chapters are just as good. My second source was a second hand bargain, complete with a smell that said that it might have spent many years in some library cellar: Napoleon's Cavalry and Its Leaders by David Johnson. It puts a lot of emphasis on describing the generals and marshals who led the French cavalry formations, but in a way where descriptions of smaller scale events both on and off the battlefields are covered as well. It was a surprisingly easy read and takes care to flesh out the characters, instead of listing dry facts. Finally, since we're mostly aiming at the invasion of Russia 1812, I also picked up The Battle of Borodino by Alexander Mikaberidze, to get some more detailed information about the campaign. It's like the oppositve of Johnson's book, spending a ton of time with details and evaluating different sources. Not as fun a read, but plenty informative on the many parts of the battle that were cavalry played a big role. Revisiting my cavalry plansWhat have I learned this far? First of all, cavalry differed not just in where it was deployed, but at what time during an engagement, for what purposes, and how they would get involved with the enemy. Basically, I don't think that having a small skirmish force with 4-5 different kinds of cavalry at the same tiny spot is all that realistic, historically speaking. The second issue is that if you want an historical French Napoleonic cavalry skirmish force, you're not guaranteed to be able to include everything you want. Basically, the problem is that cavalry regiments were organized into cavalry brigades which tended to have one or two types of cavalry, and each corps would have different types of cavalry brigades. Personally I see the extreme variety among cavalry types and regimental uniforms as one of the big draws of doing French cavalry. But if I wanted to have my troops come from the same corps, as I first planned, my options are suddenly more limited. For example, I initially wrote that I planned to have my troops come from Grouchy's III Reserve Cavalry corps, and I painted up my first dragoons as a regiment from that corps. But the rest of that corps was one regiment of Hussars, some regiments of Chasseurs-a-cheval, some Bavarian and Saxon Chevau-légers, aaand... Dragoons. A lot of Dragoons. If I want some Cuirassiers (which I really want after reading David Johnson's book), or French lancers (which I'm painting right now), I'm going to have to give up that idea. Finally, some of the uniforms really differ a lot. Especially for Hussars, but also for most other troops. And some of the colour combinations just appeal to me more than others, and the idea of forcing myself to paint a less appealing uniform just to fit into the right brigade doesn't sound so fun to me, once I realized just how many hours of painting are in front of me.  Polish lancers ruining some Russians' day This was the point where I decided to give in to the sweet temptation of hedonism. In an unprecedented show of disregard to all that's holy, I'm going to mix regiments that are not even in the same corps. My lancers are going to the 2nd Chevau-léger regiment from Montbrun's II Reserve Cavalry Corps! *gasp* I know this drastic call must terrify you ("they were on different flanks at Borodino!"), but as there's no historical way to make a force that lets me field all the full splendour of the cavalry, I'll throw away the Orders of Battle and march on. And, maybe in some distant future, I'll have enough regiments anyway to field a small force from a single corps, or even brigade. For now, enjoyment won out over my tabletop OCD. That doesn't mean I'm giving up completely. I'm only doing regiments that fought in the Russian campaign, and at least in this first round I'm sticking to regiments that took part at the battle of Borodino. We'll see if I'll revisit this when we get some Brits who wants to fight all the Dragoons that were left in Spain. Cavalry overviewSo what am I getting first? Looking at the stuff I already had, what I got from the Warlord sprue sale, and what I just recently got when I bought a small second hand army still in boxes, I can field the following 8-man units: 3 units of Mounted Dragoons (7th regiment) 2 units of Chevau-légers (French lancers, 2nd regiment) 3 units of Hussars (not decided yet) 4 units of Chasseurs-a-cheval (also not decided) Which in itself is definitely enough for an all-mounted force in Sharp Practice 2. In addition, I'd love to extend the lancers with a second rank armed with pistols, sabres and carbines, and I also want to add Cuirassiers for some really heavy cavalry. Finally, as always, I need more officers because I always have too few officers for SP2. Here's a quick view of the madness as I built most of the horses (there's like 30 more):  I plan to work in batches of 16 cavalrymen, and for now I'm testing to paint them with the riders glued on from the start. The lancers are the smallest formation, so they got to go first. I already got to the stage where they mostly need some highlights and some work on the horses: 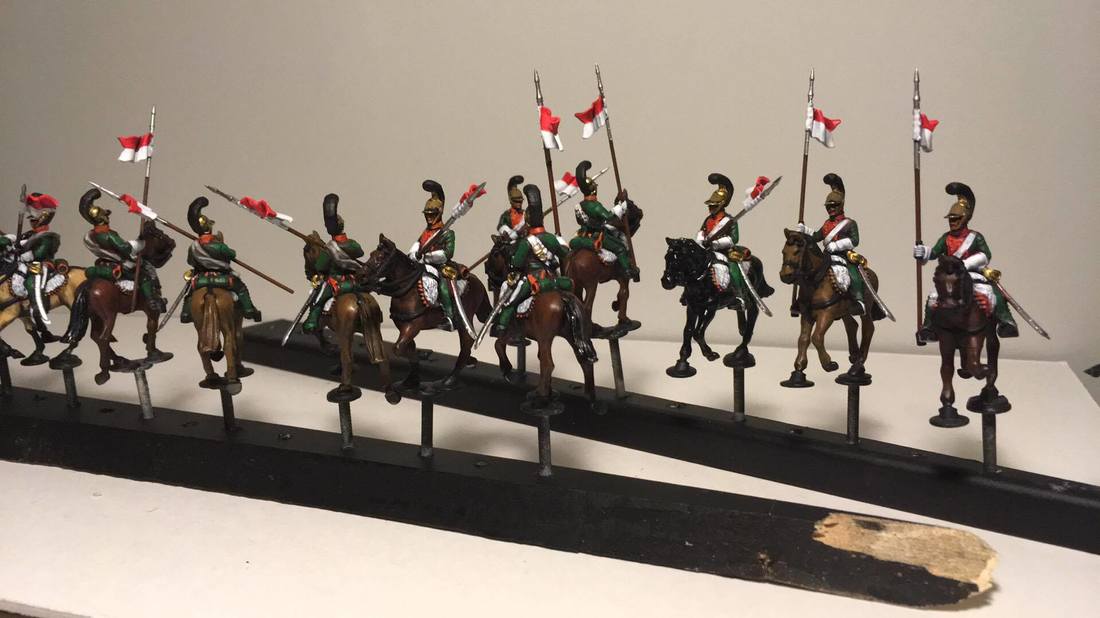 I hope I'm not going to regret this project soon.
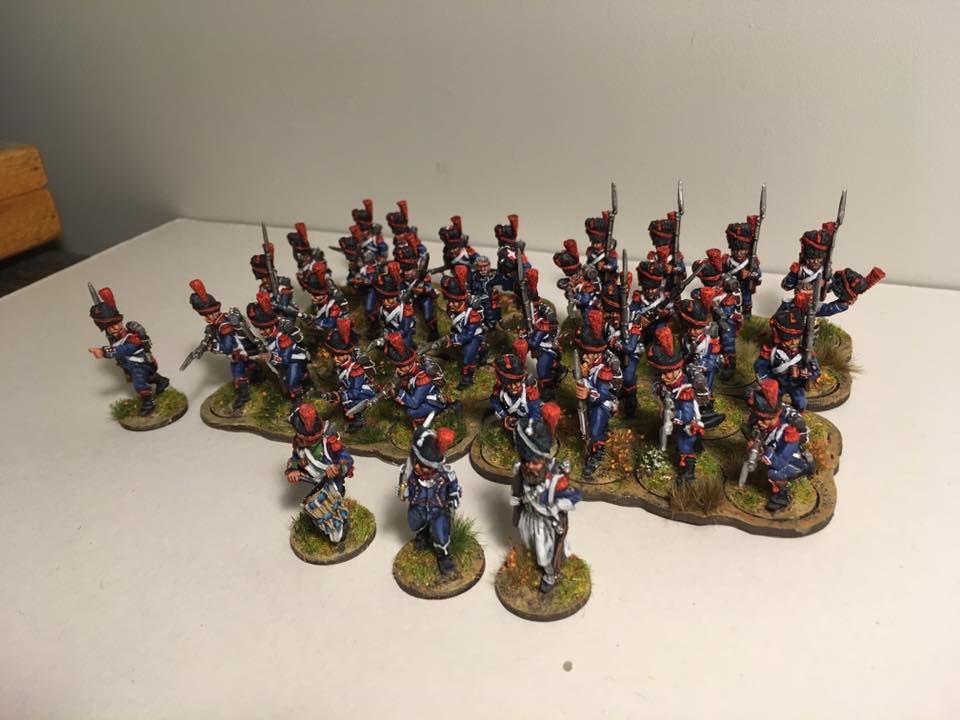
Wish me luck. /Jonas I'm always up for adding miniatures from different ranges, and I love to see how they compare. You never know when you'll find a new favourite source of plastic or metal fuel for your miniature addiction, and I don't mind a slightly varied army look. When Warlord Games had one of their recurring sprue sales at New Years, I picked up a few sprues of their French Line Infantry, as the first Perry box wasn't enough for a four unit formation of 32 Fusiliers. The Warlord sprue comes with four miniatures, one of which can be made into a Grenadier or Voltigeur. This sprue is for French units from 1806/1807 when the bicorn was replaced by the shako, and there are alternative heads for full parade dress with plumes and cords. I gave the Fusiliers simple shakos with pompons to fit in with the Perry miniatures, but decided to give the Voltigeurs a little bit of panache with parade plumes. My idea with adding some pre-1812 is both because I learned that it's more historical (as the 1812 uniform was widely introduced in 1813), but also because I like the look of them, especially the parade uniforms with plumes. Compared to our WW2 wargaming I think of this project as an opportunity to cave in to the spectacle of flashy dressed up ranks of troops. Maybe I'll get some more Voltigeurs in parade uniforms to go with these later? Fusiliers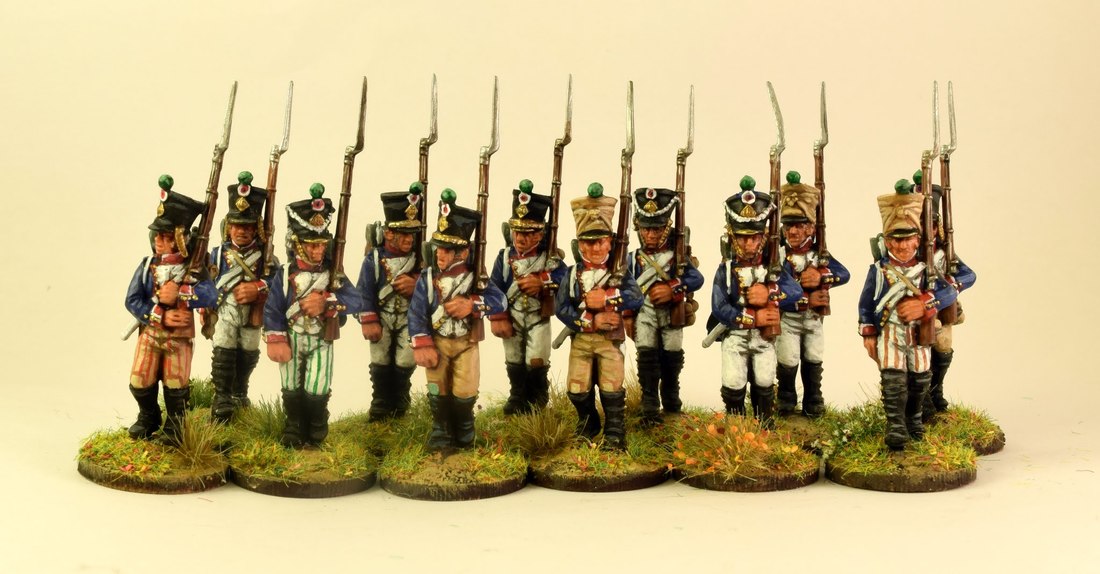 The paint job on these were honestly a bit rushed, as I realized that infantry in big blocks don't really stick out that much. Better to get them done and spend more time on showpieces like cavalry and officers. So these were mostly painted with quite rough layers and washes, and slotted into the gaps in my Fusilier formation. However, I took the opportunity to give them some extra features to show that these are experienced veteran campaigners, not raw recruits. Some of them have mended their trousers, as constant marching tended to wear out the knees. Seasoned troops would preemptively strenghten the clothing with an extra layer where they expected them to break first. The troopers where also expected to supply their own trousers, unlike the parade uniform breeches, creating an incentive to use cheaper (or looted!) cloth. So for example striped trousers or trousers in other colours than white would be seen on veteran and/or thrifty soldiers. 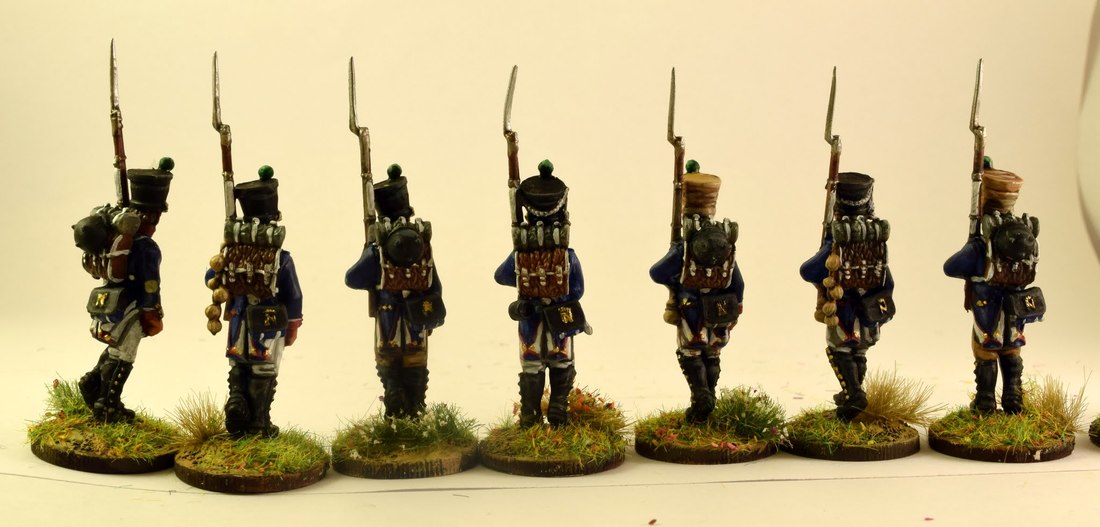 The photo badly shows it, but the Warlord backpacks added some flair that makes them look like they are on campaign: cooking pots, mugs, and even bundles of onions are attached to their backpacks. A nice addition, and the cartridge boxes comes with "N" molded on them. Voltigeurs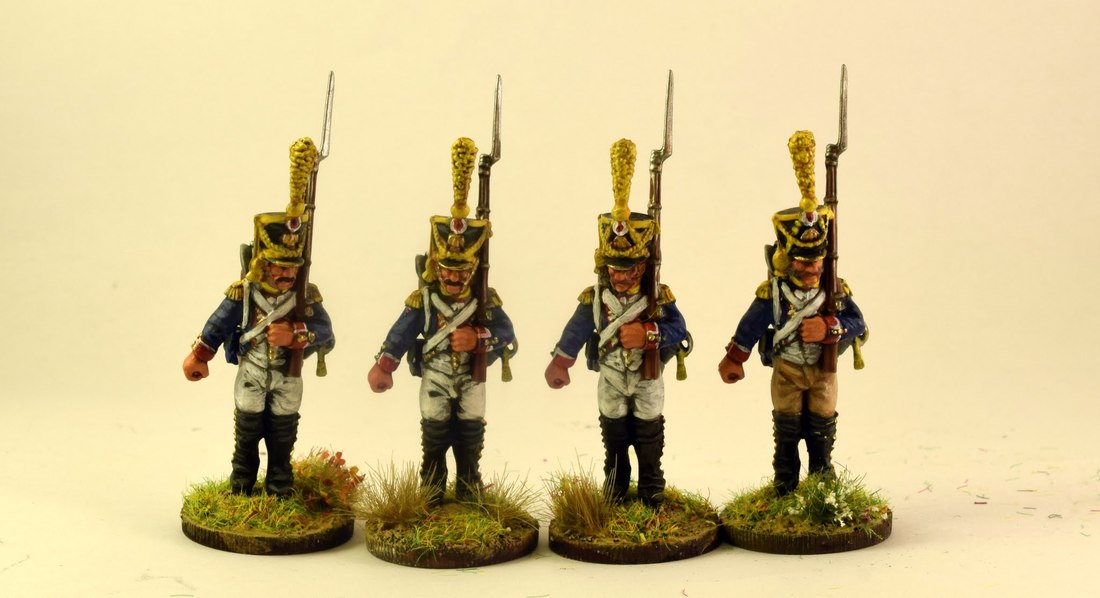 The four Voltigeurs got parade plumes. I'm honestly not a huge fan of the pose on these models, as the very tight legs make them look a bit like, well, like the need to pee. The heads also have slightly comic style proportions with huge noses and moustaches. So I much prefer the Fusiliers on this sprue. 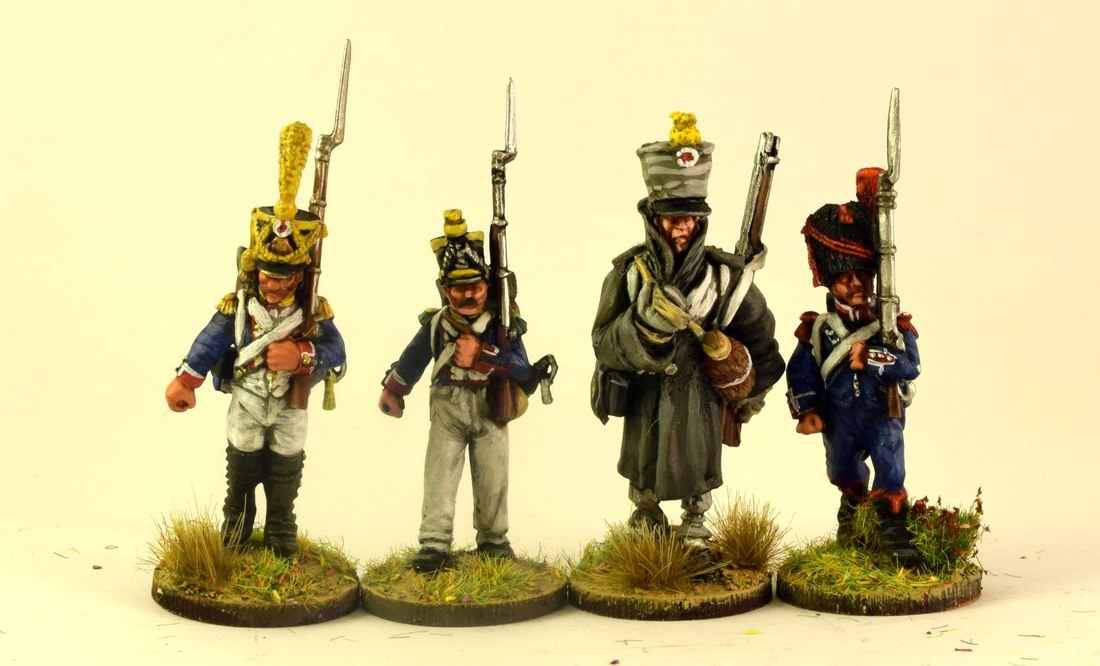 From left: Warlord, Perry, Alternative Armies, Front Rank Finally a size comparison. As you can see, the Warlord figure is quite a bit bigger than the Perry one, especially the shako. It's less obvious on the Fusiliers, who I think fit better into the unit than the Voltigeur. The Alternative Army Voltigeur is huge! He's currenly serving as a leader until I can paint up more Voltigeur officers. VerdictOverall I think the Fusiliers make a great addition to my Perry Fusiliers, with some added variety while still fitting in quite well. I'm less happy with the Voltigeurs, but they'll work as placeholders until I get more of them. Maybe they'll fit in better if I get a unit with parade uniforms. As for now, I'm happy to have filled out the gaps in the Fusiliers formation, and it's high time to finish my Light Infantry Carbiniers and get started on my mountain of cavalry miniatures.
/Jonas  Scenario and ForcesOur first Sharp Practice battle showed that the game is fundamentally fun, so we were eager to play it some more. The first chance was between Jonas, again marshalling his proud French, against Zach who would try his first game as commander of the just as proud Russian forces. Scenarios are a big part of what keeps a game fresh after you've played a few straight up fights. We decided to play the rules more or less straight off from the book, without any of the house rules we've started to think up, including rolling for scenarios. We didn't use the point cost for armies and special support etc., though. Since the French side won the previous game, we decided to just play with the very same forces, but with one French unit less. The dismounted Dragoons got a well deserved rest by the coffee brewer. Russians 4 units of line infantry 3 units of grenadiers 2 units of jäger skirmishers French 4 units of line infantry Fusiliers 3 units of line infantry skirmishers 1 unit of mounted Dragoons The Russians got some additional NCOs, while the French got fewer NCOs but a lvl 4 officer to lead their force compared to the lvl 3 Russian officer. First we set up the terrain. We imagined two scouting forces approaching an important crossroads, overlooked by a rather well built house that would be a perfect night shelter for weary soldiers: 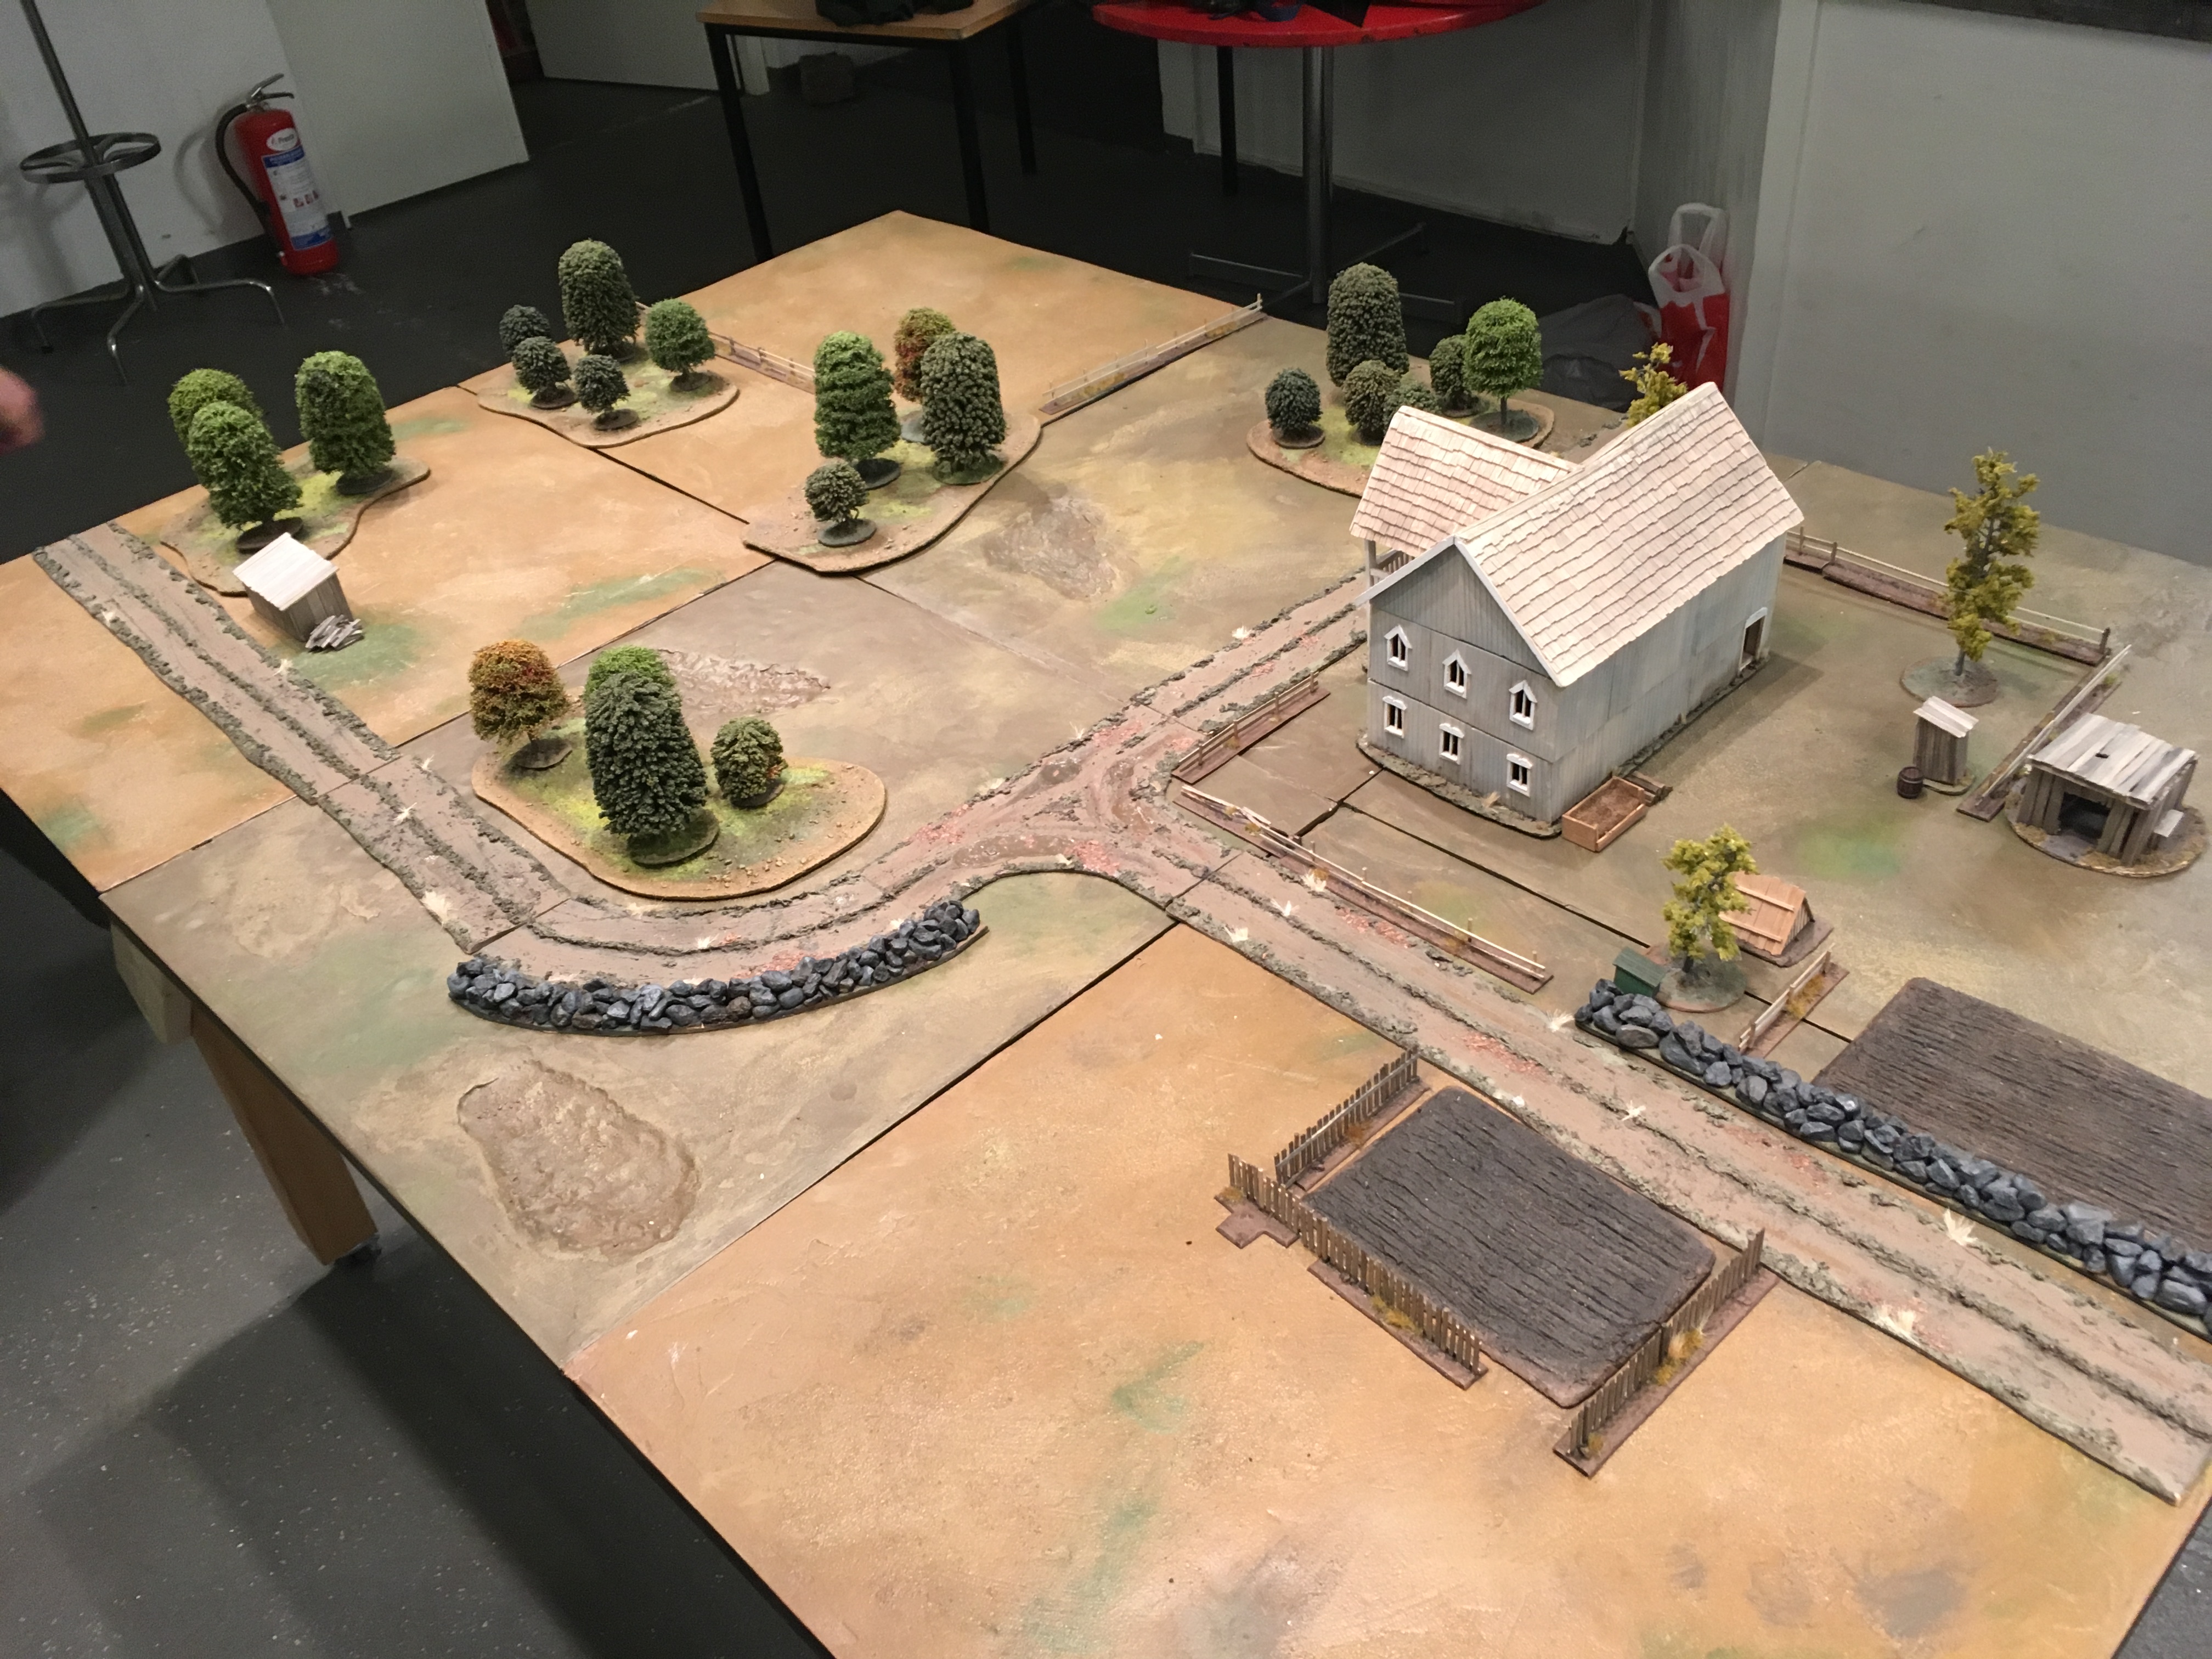 Well, the rulebook thought otherwise! Rolling for scenario, we came up with the Escort Mission. The French force was tasked with making sure that an escorted model (maybe an Aide de camp who got their horse felled?) got from one short edge of the table to the other, in this case the upper walled-off left square on the picture. Once the scenario had started the Russians would roll for where they'd enter, and then try to capture the French VIP. Deployment and initial movesThe French were allowed to deploy all their troops first, and then make half a D6 moves, which was 1. But since the table was pleasantly sans-Russes, the French units could deploy quite far from the deployment point (as there were no enemies within line of sight). The French deployed wide with a big four-unit formation of Fusiliers on the left, supported by a single unit of skirmishers, a formation of two skirmishers on their right flank, and a single unit of Dragoons on the left flank. Still lacking a Dragoon officer, they were led by a mounted infantry officer! The Horror! 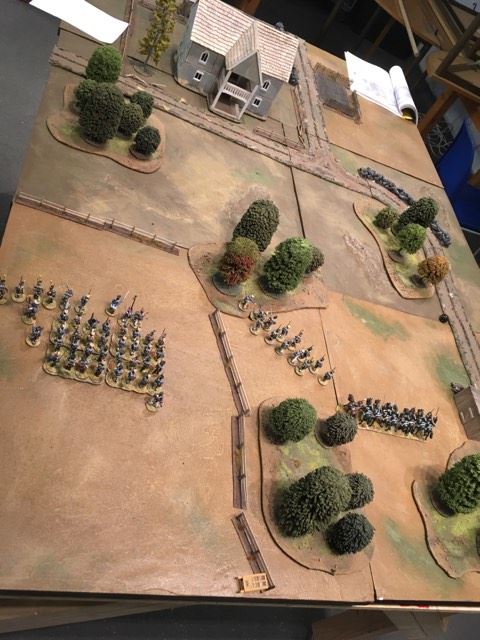 French forces hurdle forwards across the table. The VIP moves with the large four-unit formation of Fusiliers to the left. The Russians rolled for entry point, which would be by the curved stone wall next to the fork in the road. After that, turn 1 begun, with both generals kept in check by a stern yet fair impartial judge who helped supervise the Chip drawing. 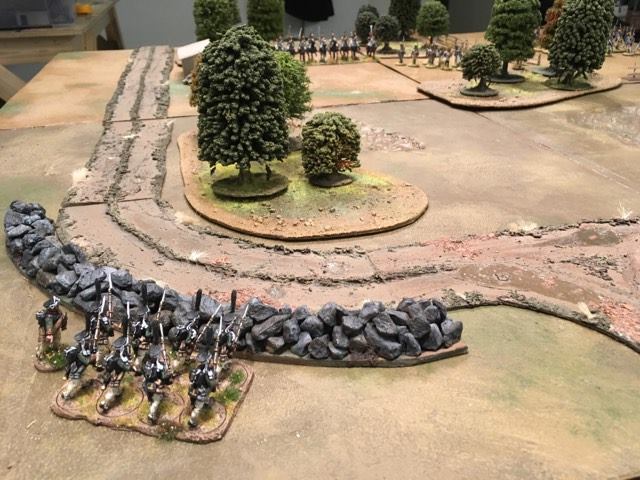 The Russians got the initiative, and moved a single unit of Grenadiers onto the table to intercept the French. Then disaster struck! Three command flags were rolled, which causes a random event, that affects the leader or unit that acted most recently. The Grenadier NCO had stumbled in the sand bunker, so eager to gain the first glory, and had strained his ankle. -1 to all movement distances for him! Otherwise the first turn proceeded unusually efficiently. With all French forces deployed, they used their activations to march forward, closing in on the first (of several) fences to climb over on their way to freedom. Meanwhile, the Russians started to deploy into a deadly firing line by the fork in the road. 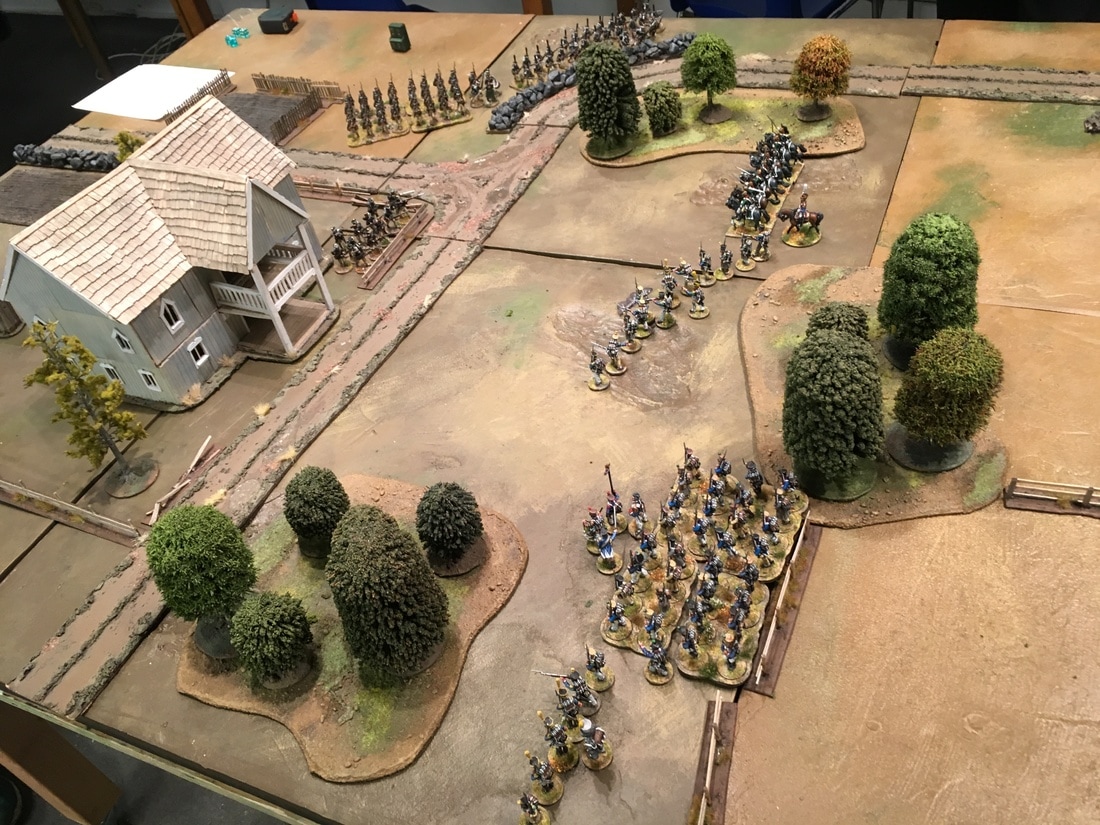 We thought we were supposed to play with 5 command flags per side, but this turn showed that four was plenty enough for the size of our forces. So we cut them down to four after this initial turn, which was definitely enough. SkirmishingThe Russians formed up next to the house, with the line infantry and skirmishers drawing a bead on the approaching French. The Grenadiers form up and started to climb over the ungainly stone wall. The French answer by diverting the larger formation of skirmishers for a shooting duel with the Russians, and the Dragoons hide behind the woods, ready to pounce if any Russian troops would advance too close. Meanwhile, the French line infantry gets clear order to leg it towards the table edge, as soon as their Gallic legs can manage. 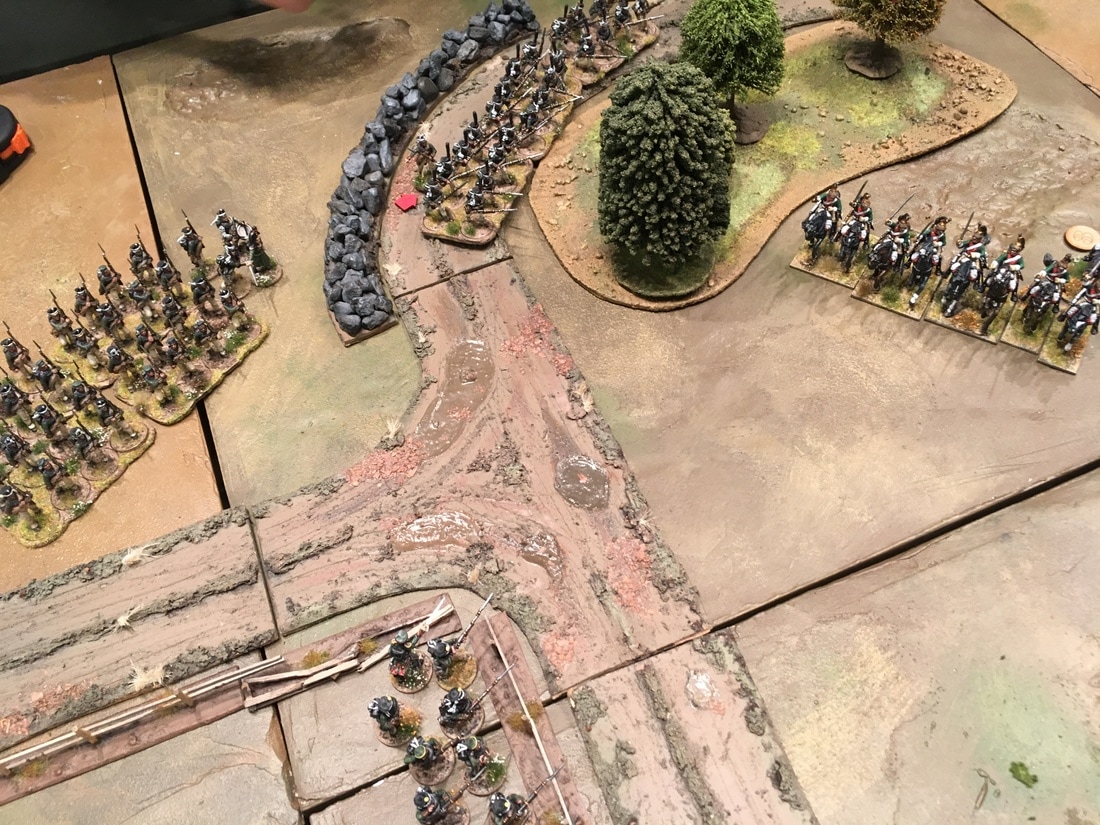 The French gamble on the ability of three lone units to hold off the Russian force long enough to slip through the net on the other side of the house. The vanguard of Voltigeur skirmishers open up on the Russian skirmishers behind a fence, but with little to show for. A series of volleys leave the Russians with two fallen troopers, but no impact on morale. 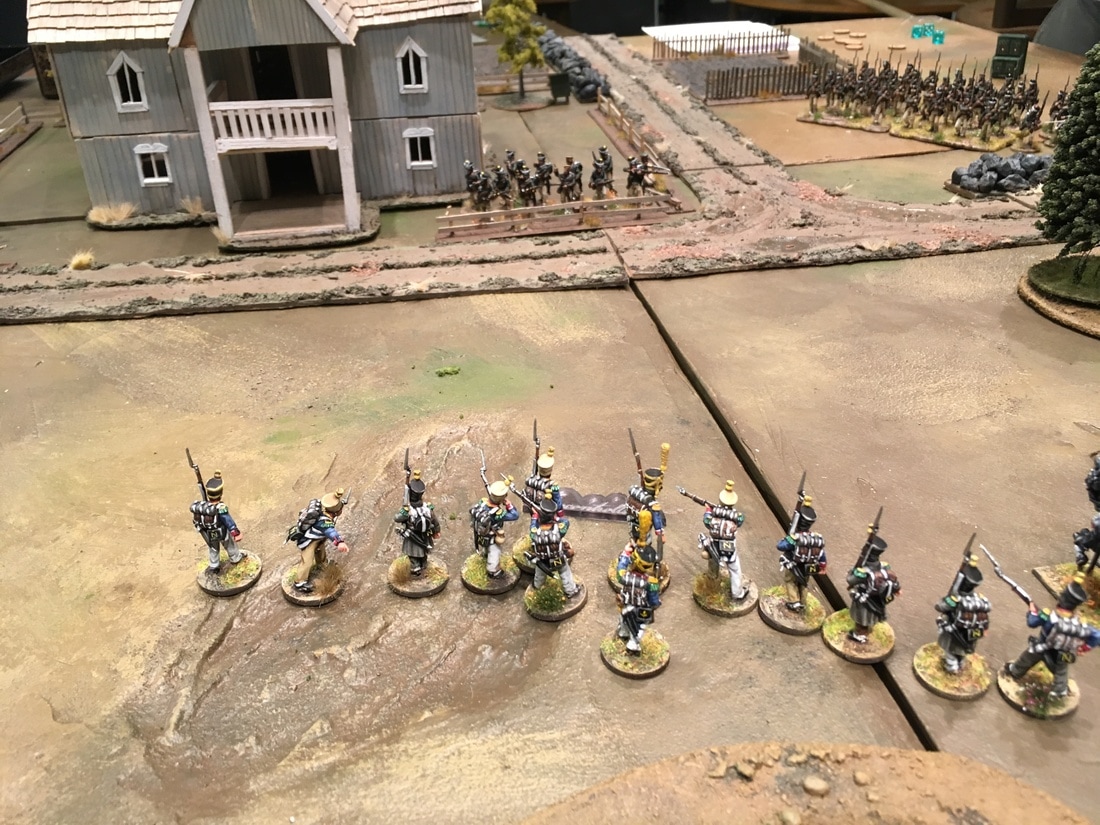 The Russian reply is quick and deadly. With a loud roar the grenadiers rush through the woods covering the Dragoons, and crash into them. The surprised cavalrymen barely have a chance to turn around before they are cut down to a man. For the exchange of a single fallen grenadier, the entire French unit is wiped out. 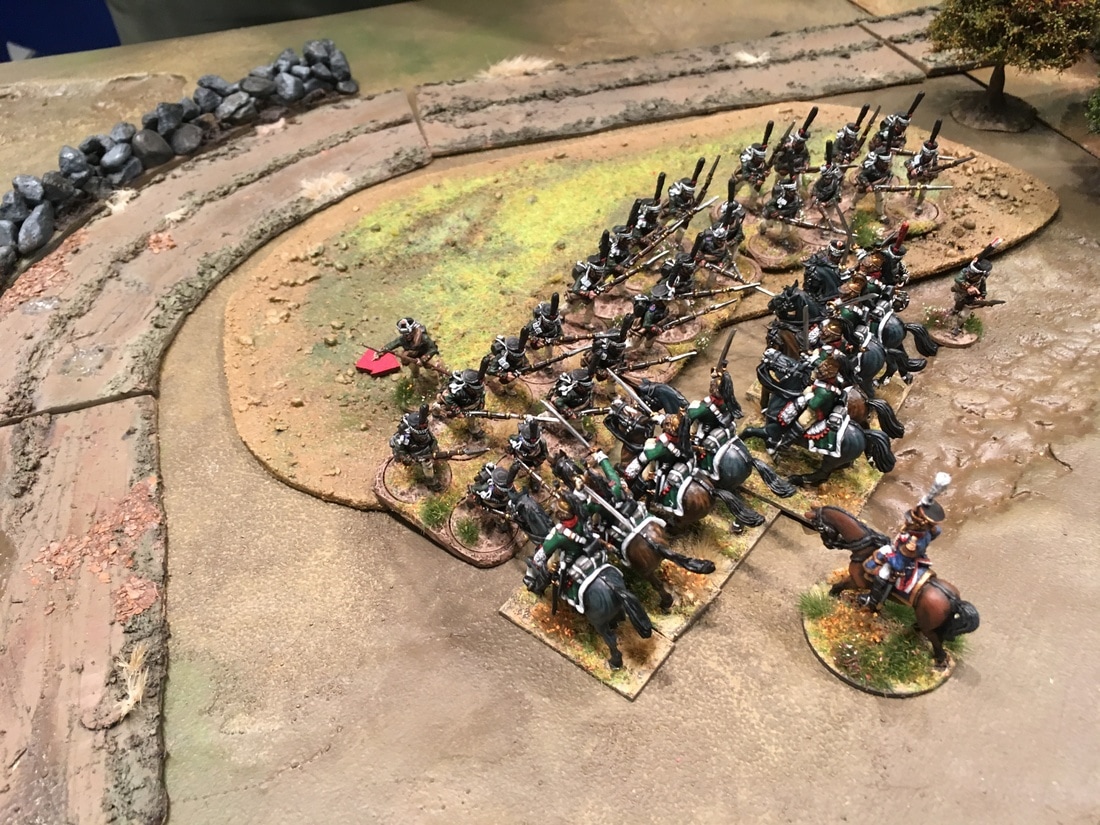 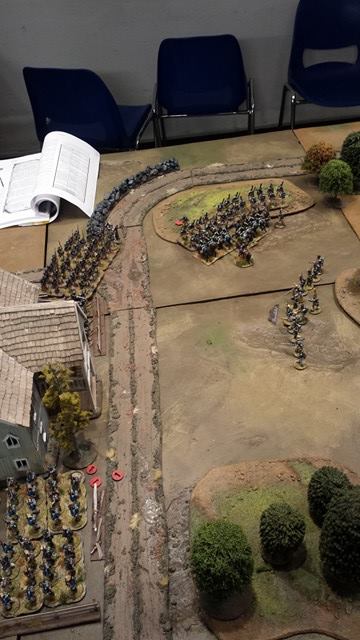 To make matters worse, the hard pressed voltigeurs are clearly outmatched by the Russian skirmishers today. Their losses are few, but they rack up a lot of shock, caught in the open while the Russians hide behind a fence. After exchanging a few volleys it's too much for the French skirmishers, who are forced to retire. Their sole solace is that the Russians are carried away with their uncontrolled fire. Failed rolls to control them means that they stay behind their fence firing fruitlessly at the rapidly retreating Frenchmen instead of pursuing the remaining Fusiliers. 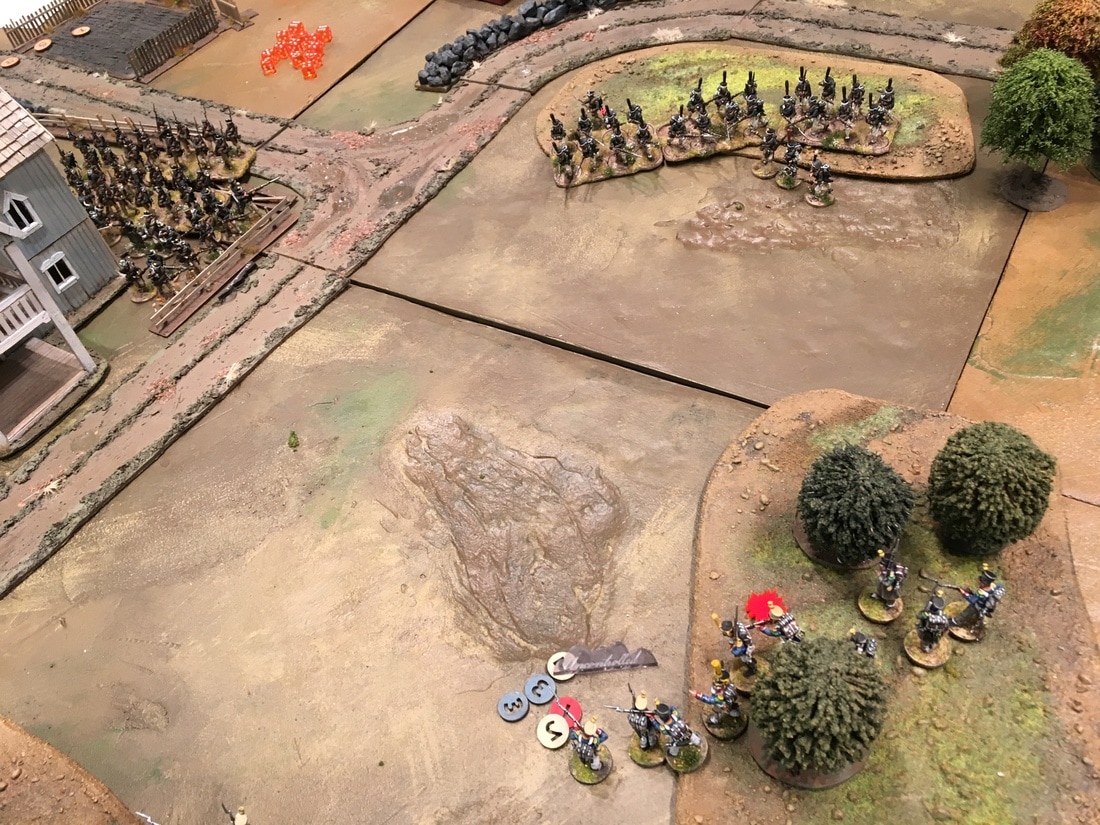 But clearly somebody is still in good spirits, despite the rapidly crumbling flank. The French side is boosted by a series of fortunate events. First, under the oversight of the impartial judge, I swear to mon dieu, we draw a single French command flag followed by the Tiffin, that ends the turn. So the Fusiliers graciously decide to sod those other guys who are busy dying to protect them, and run towards the building, climbing over more fences. Then, after activating at the start of the next turn, we draw another random event! The Fusiliers, obviously happy to be out of Russian sight, gets to move again as they loudly sing La victoire est a nous. Now it's all down to a chase for the table edge! 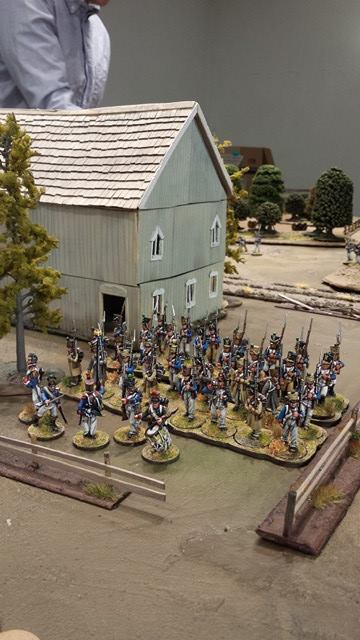 With his Skirmishers shooting at the back of running Frenchmen, and the Grenadiers on the other side of the field (possibly looting Dragoon pockets), it was up to the Russian line infantry to turn heel and put up a chase. What followed was a nerve-wrecking series of turns. The Frenchmen, clearly singing too much, got thirsty due to a random event, which made them walk slower! But then, just as the Russians saw their chance, the dust kicked up on the dry roads caused them to become just as thirsty. In the end, the Russians were marching within a few yards from the French, harried by the last French skirmish unit who tried to put shock markers on the Russians to slow them down. The French had the choice to either continue for the table edge, with exposed flanks, or file up for a melée. The fate of the VIP hung on a single outhouse, dividing the two forces. Who would get to move next? Would the thirst be enough to stop either side from achieving their goal? Would the French go for a fight or press on? 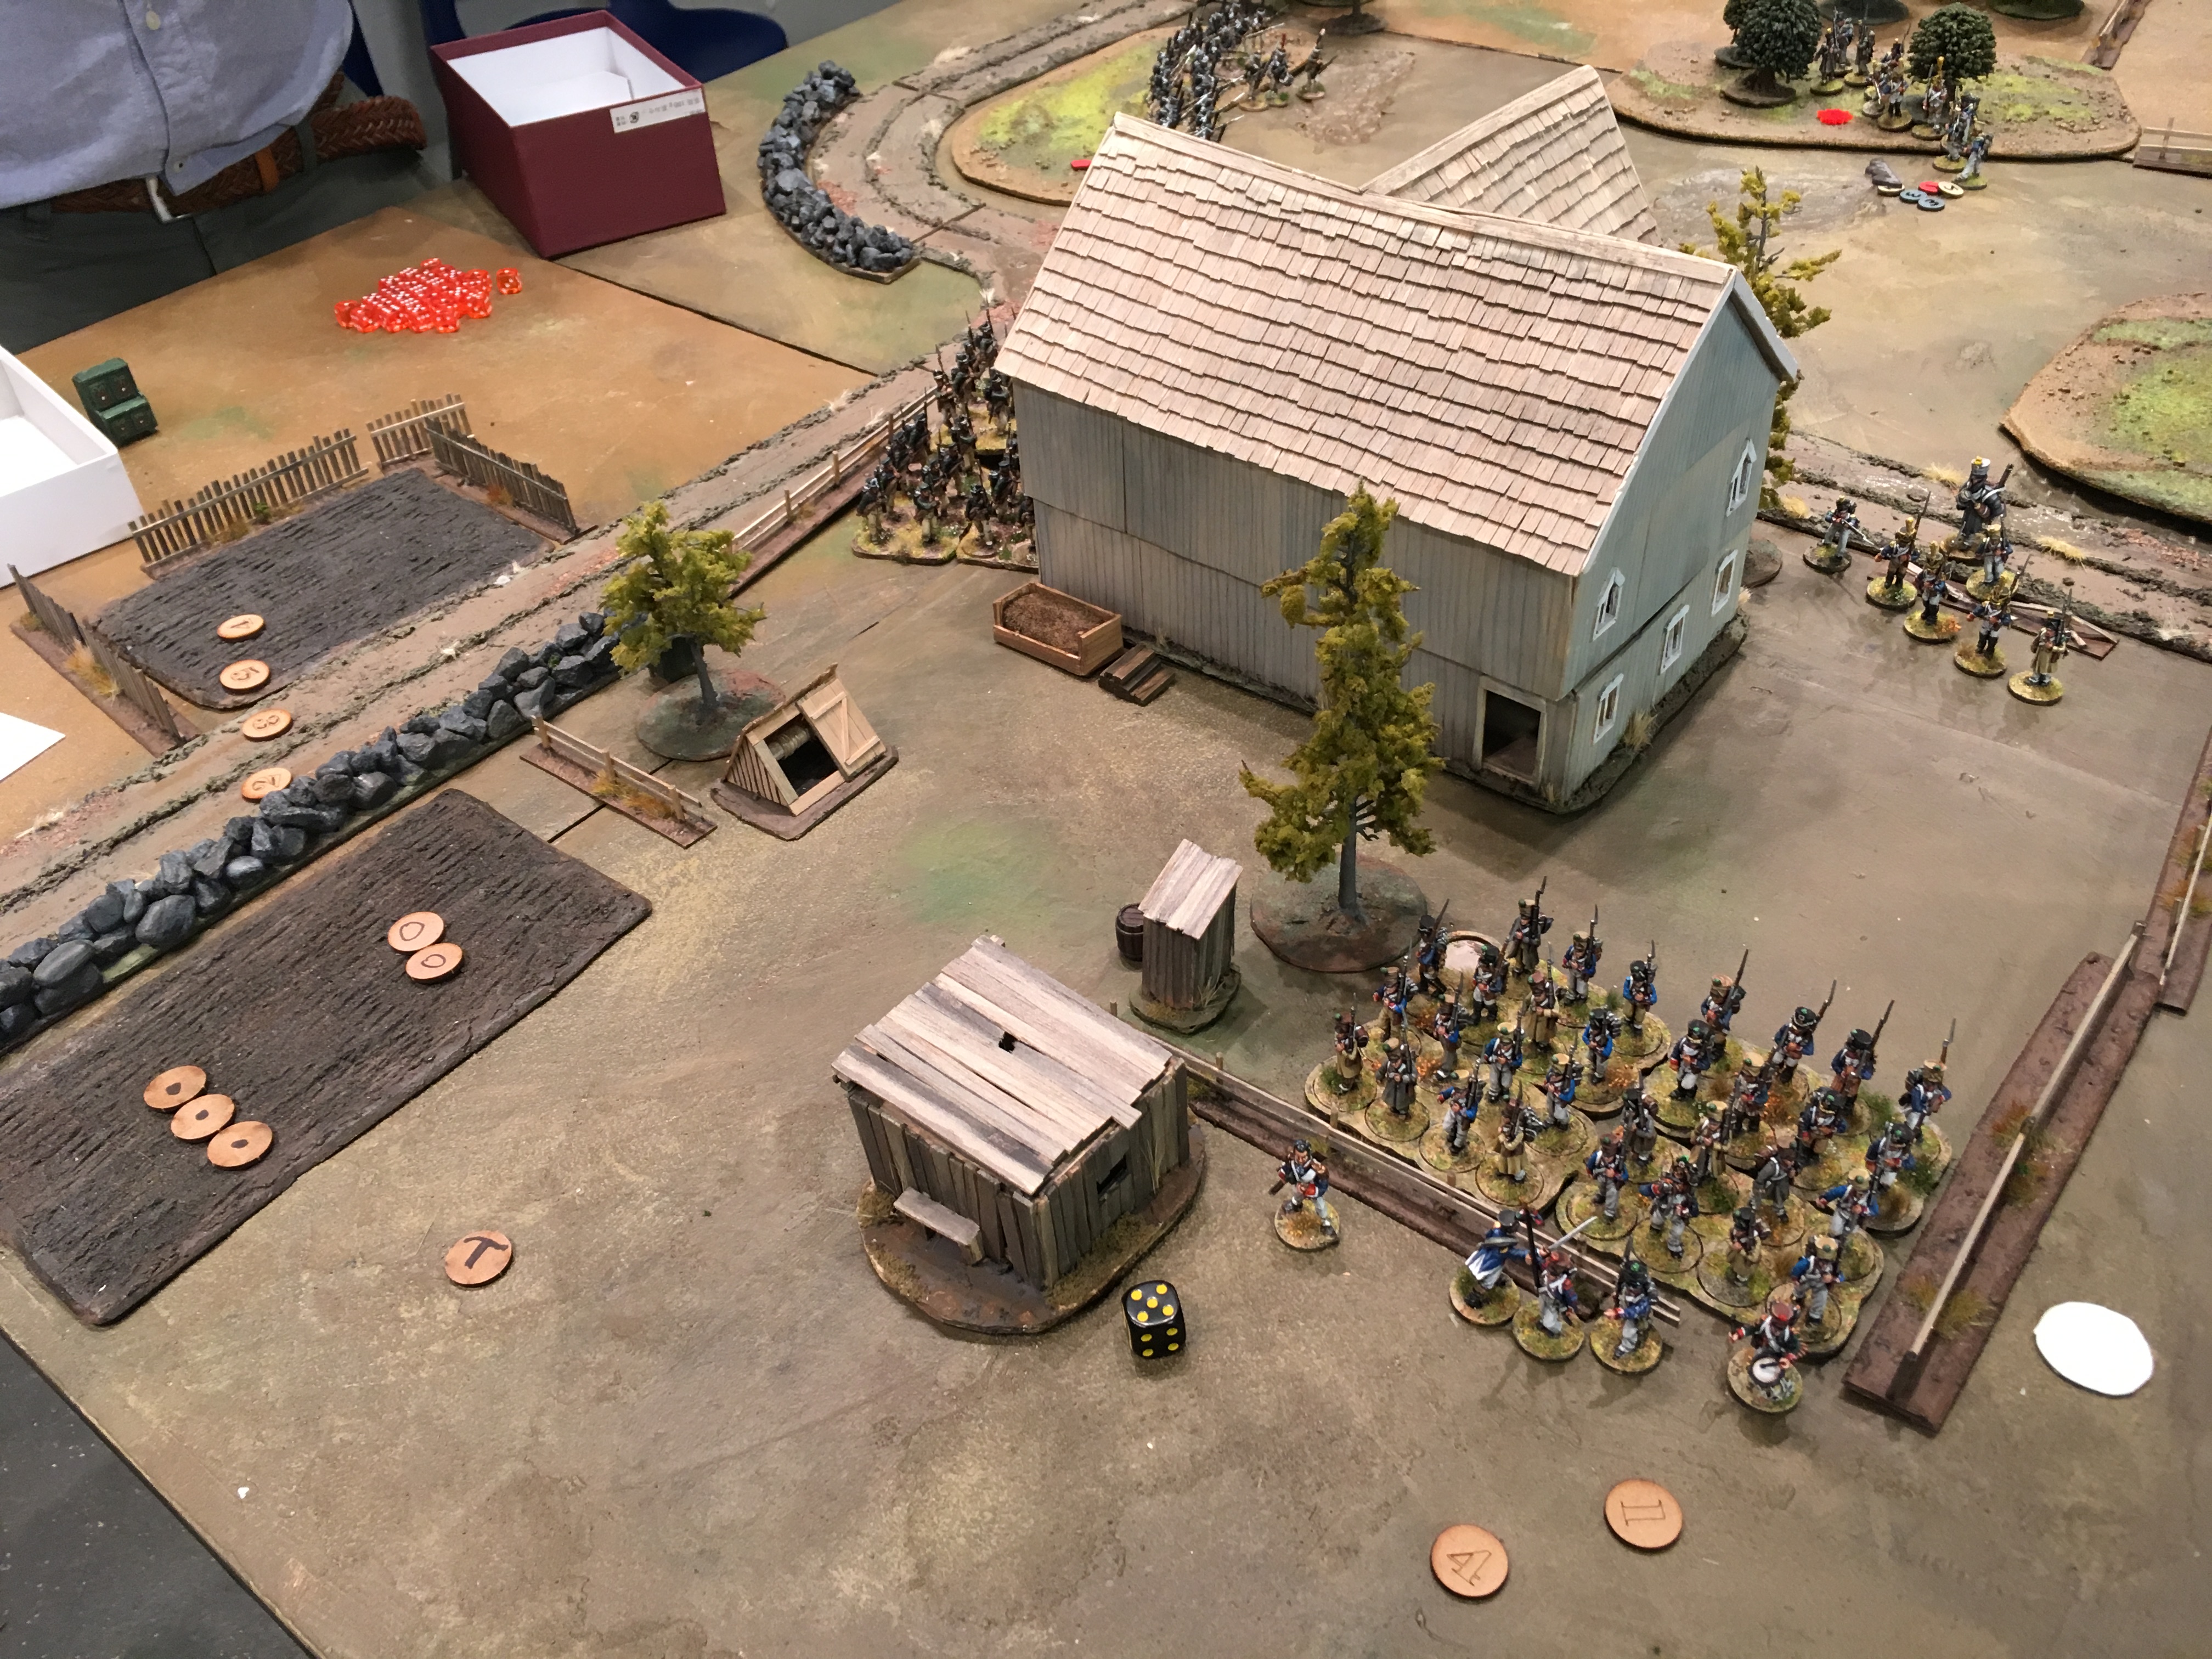  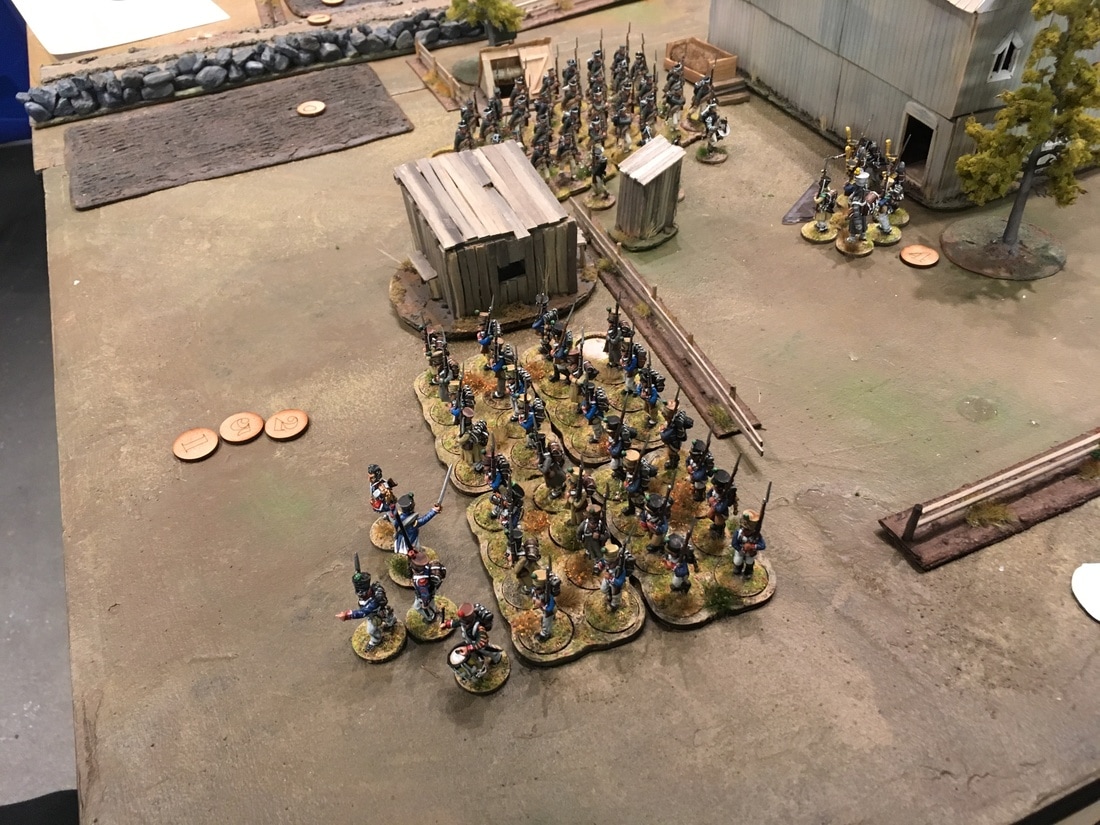 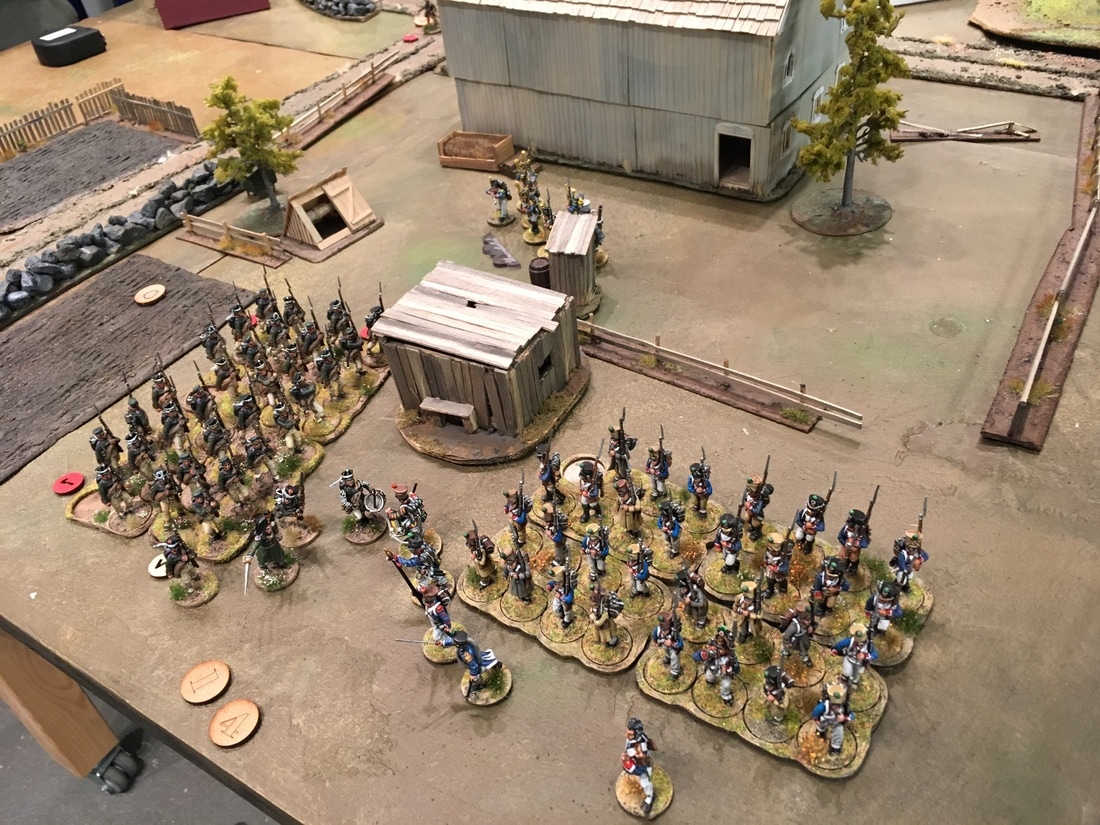  With the drummers almost falling over each other, the Chit drawn is French! They need to roll high, but take the chance and it's enough! The harried column manages to slip away from the furious Russian captain at the very end. Another French victory, and yet again, by the skin of their teeth. Hourrah! Thoughts and summaryWell, it was a fun game. Again, it felt like the addition of the NCOs mostly slowed down the game, as they rarely has anything to do when you draw them. That can probably be slimmed down pretty easily.
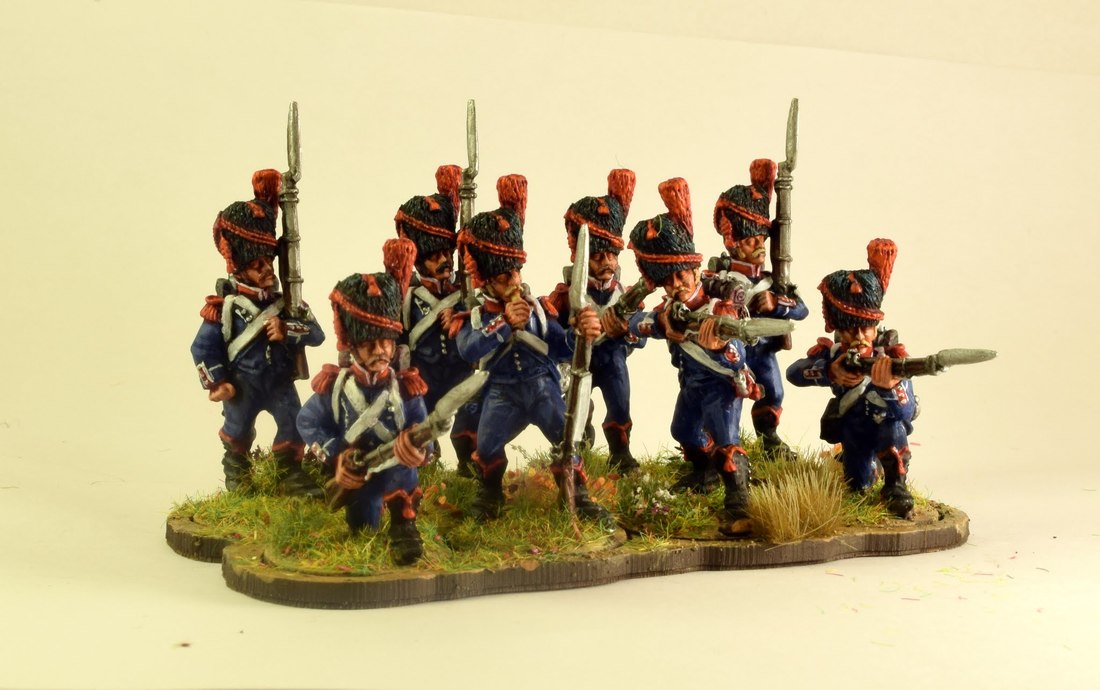
The Scenario was interesting, but in the end it was more about drawing Chips than fighting, which might also have because of the terrain. It was clear quite early on that the French could not have fought their way through the Russians, so it was bound to become a chase, where the French sacrificed their other troops to try to rush through. It was also yet again obvious that shooting is dangerous, but not deadly, but close combat is brutal and will destroy units. Overall, it gave us more ideas about what to tinker with. But more importantly, it made us want to give it another go! And I hear there are more Napoleonic miniatures on the painting tables at the club now, so who knows what's next...  CarabiniersAs mentioned before, French Napoleonic infantry regiment would normally have two flank companies: one made up by their best skirmishers, and one made up by their tallest, hardiest men. The latter were called Grenadiers for line infantry, and Carabiniers for light infantry. This is not at all confusing, as there were also Carabiniers à Cheval, heavy cavalry actually equipped with carbines (when they were not using Dragoon muskets), unlike the carabiniers on foot, who did not use carbines. Napoleonics, ladies and gentlemen! :) Either way, the carabiniers and grenadiers were chosen for height, experience, and reputation as good soldiers. Some other countries ended up pooling their grenadiers together into big formations, but the French kept theirs together with their respective regiment. They were expected to get stuck in where the fighting was the hardest, and in exchange they got better salaries and were allowed special attributes that showed their higher status such as sabres, bearskin hats, moustaches and red epaulettes. I knew pretty early on that I wanted both line infantry and light infantry for my French force. The light infantry will be collected "backwards", starting with the elite carabiniers, after which I plan to get another box of Perry infantry to paint as centre company soldiers, which were called Chasseurs. If I get carried away (I will) I'll add the skirmishing company, which were called Voltigeurs just like in the line infantry, because hey why try to maintain some kind of logic here.  These first couple of Carabiniers are from Front Rank, including command: a sapeur (engineer), a drummer, an officer and an NCO. These miniatures have uniforms from an earlier period, and more of a parade dress than one worn in harsh campaign weather. Notice the huge bearskin hats, which were gradually abandoned as they were expensive, and plumes. The campaign in Russia is kind of a breaking point in French uniforms, and even though the 1812 regulations would replace the bearskins completely for shakos, they were common enough in Russia. Since they make the unit stand out a lot, I chose to go with the bearskins. I also decided to make these elite units tidier and better dressed than the center companies, to make the distinction as visible as possible on the tabletop. With blue uniforms and not a greatcoat in sight, they really stick out next to the units I painted up before. I had quite some trouble finding out the proper way to paint the various details like shako chords and boot trimmings. I felt like every time I found a reference picture, it would be slightly different! Then it turns out that it was, indeed, that each regiment could have their slight variation. I decided to not worry about researching an actual regiment, and settled for painting all those details red. Army PlanningAfter you've spent some time on your army, chances are that you know more about what you what you want to assemble. When I started collecting my French, I imagined a small core of line infantry, and then a cavalry contingent consisting of Dragoons. Now, those plans have been radically altered. While we stick to the campaign in Russia 1812 there are more troop types on my to-do list, and I'm already looking at getting my first allies. The invasion was very much an international affair, with hundreds of thousands of soldiers from other countries, and I'd like to represent at least a little bit of that. When I'm planning and collecting I find that I easily lose track of things, especially since most of my painted miniatures are stored at our club. I made a simple graphic guide for myself, which I fill in as I paint. This way I can make sure I get the right miniatures, don't miss out on officer models, and also keep track of how far I've come with the project. French Invasion Force Squares are 8 models or a cannon with crew, circles are NCO's, and stars are officers.
Between the Warlord Games winter sprue sale and a big order from Great Escape Games, I have more or less all of these miniatures on the ol' lead/plastic pile now. Progress on painting the infantry is actually going along better than I expected, and except for the Austrians it's a matter of bulking out existing units. No, my main worry is all those big white squares filled with magnificient horses... (There might be more Hussars actually.) (Like, definitely more Hussars.)  Getting to know Sharp Practice 2For this project we decided that we would not start playing until we had enough painted troops for a game. This has the advantage of giving you some motivation to paint your troops, especially if your clubmates are approaching the goal faster than you. However, it can be a bit tough if the rule system requires a large number of troops. Thanks to a productive Autumn and the relatively small units of Sharp Practice we found ourselves with two decent forces after painting some 80 or so minis for each side. With our forces based and mustered under the absent banners of our respective nation, it was time to see what we had gotten ourselves into. This first game was very much about getting to know the ruleset basics, so we didn't bother that much with balancing the sides. We simply used whatever troops we had, and formed them into two armies of somewhat similar size. We also wanted to concentrate on learning how to use infantry first, which I think makes sense in a Napoleonic era game. Since we focused more on the game basics, this battle report won't be a linear blow-for-blow account, but rather a set of reflections on how particular events play out. Defenders of Russia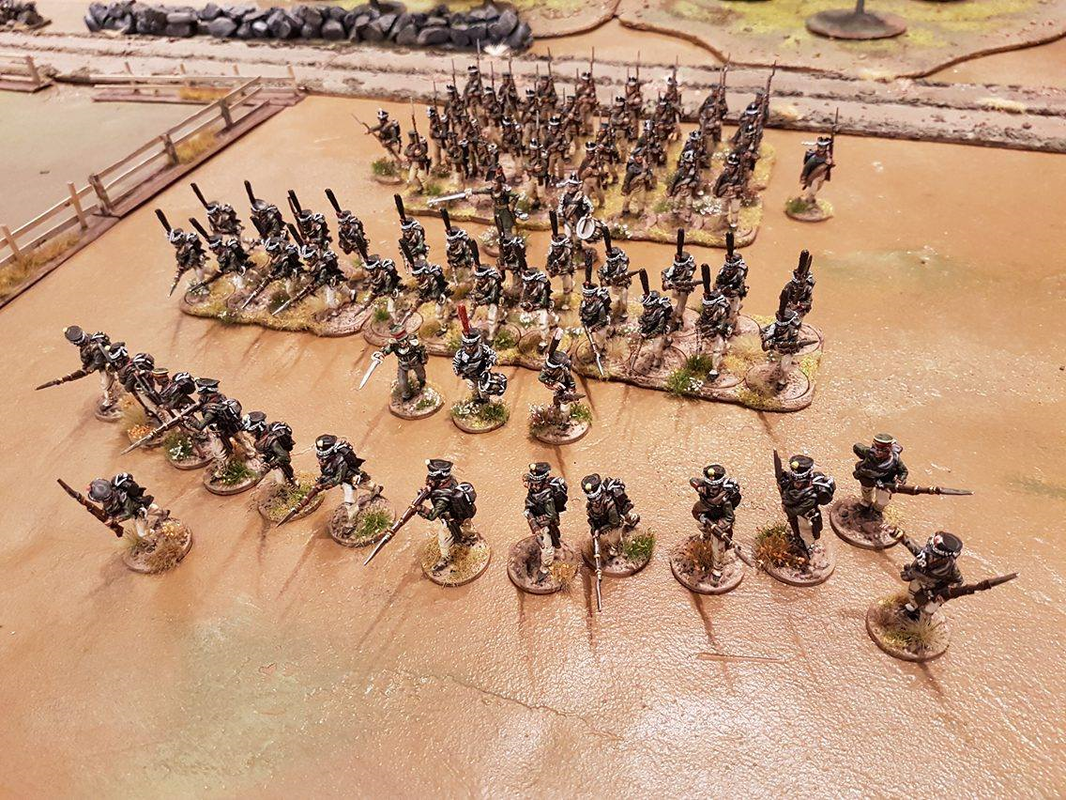 Shirty: The Russian force have a sturdy base of infantry. Only infantry! This due to three reasons:
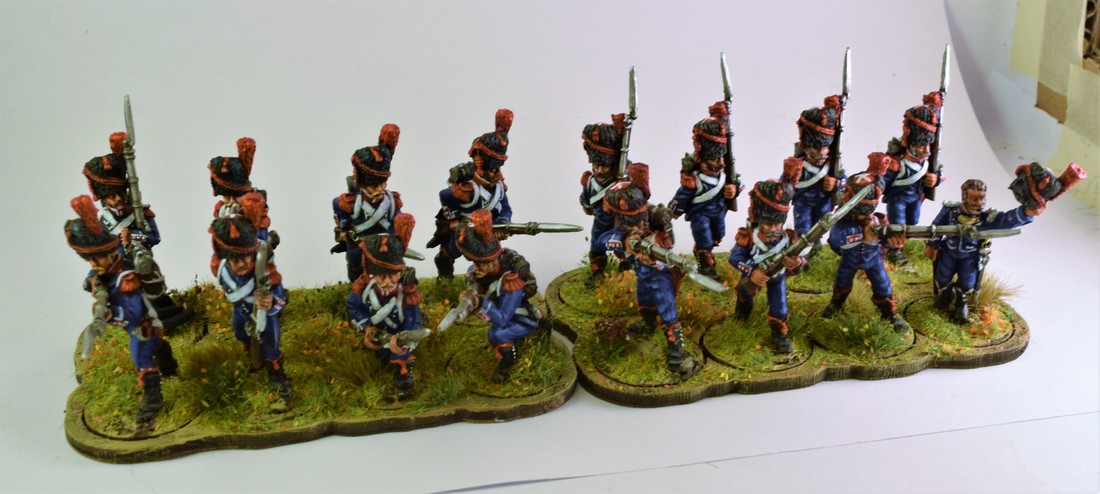
So what is my Russian force made up by? For starters a four unit strong Jäger formation in the back of the picture, enough to form a modest attack column. This formation is made up of Perry plastics. Then I have a formation of three units och Carabiniers (Jäger Grendiers). These are Perry metal miniatures. I really like metal regiments, and these have nice, fast paced attack poses and look pretty agressive. Then I have two units of Strelski (skirmishers) to add some flexibility and to have some different troop types. This is finished off with drummers for the Jägers and Carabiniers as well as two officers and NCOs for all formations, adding one extra for the Jägers to have my biggest unit in good order! Hurrah!! French Invaders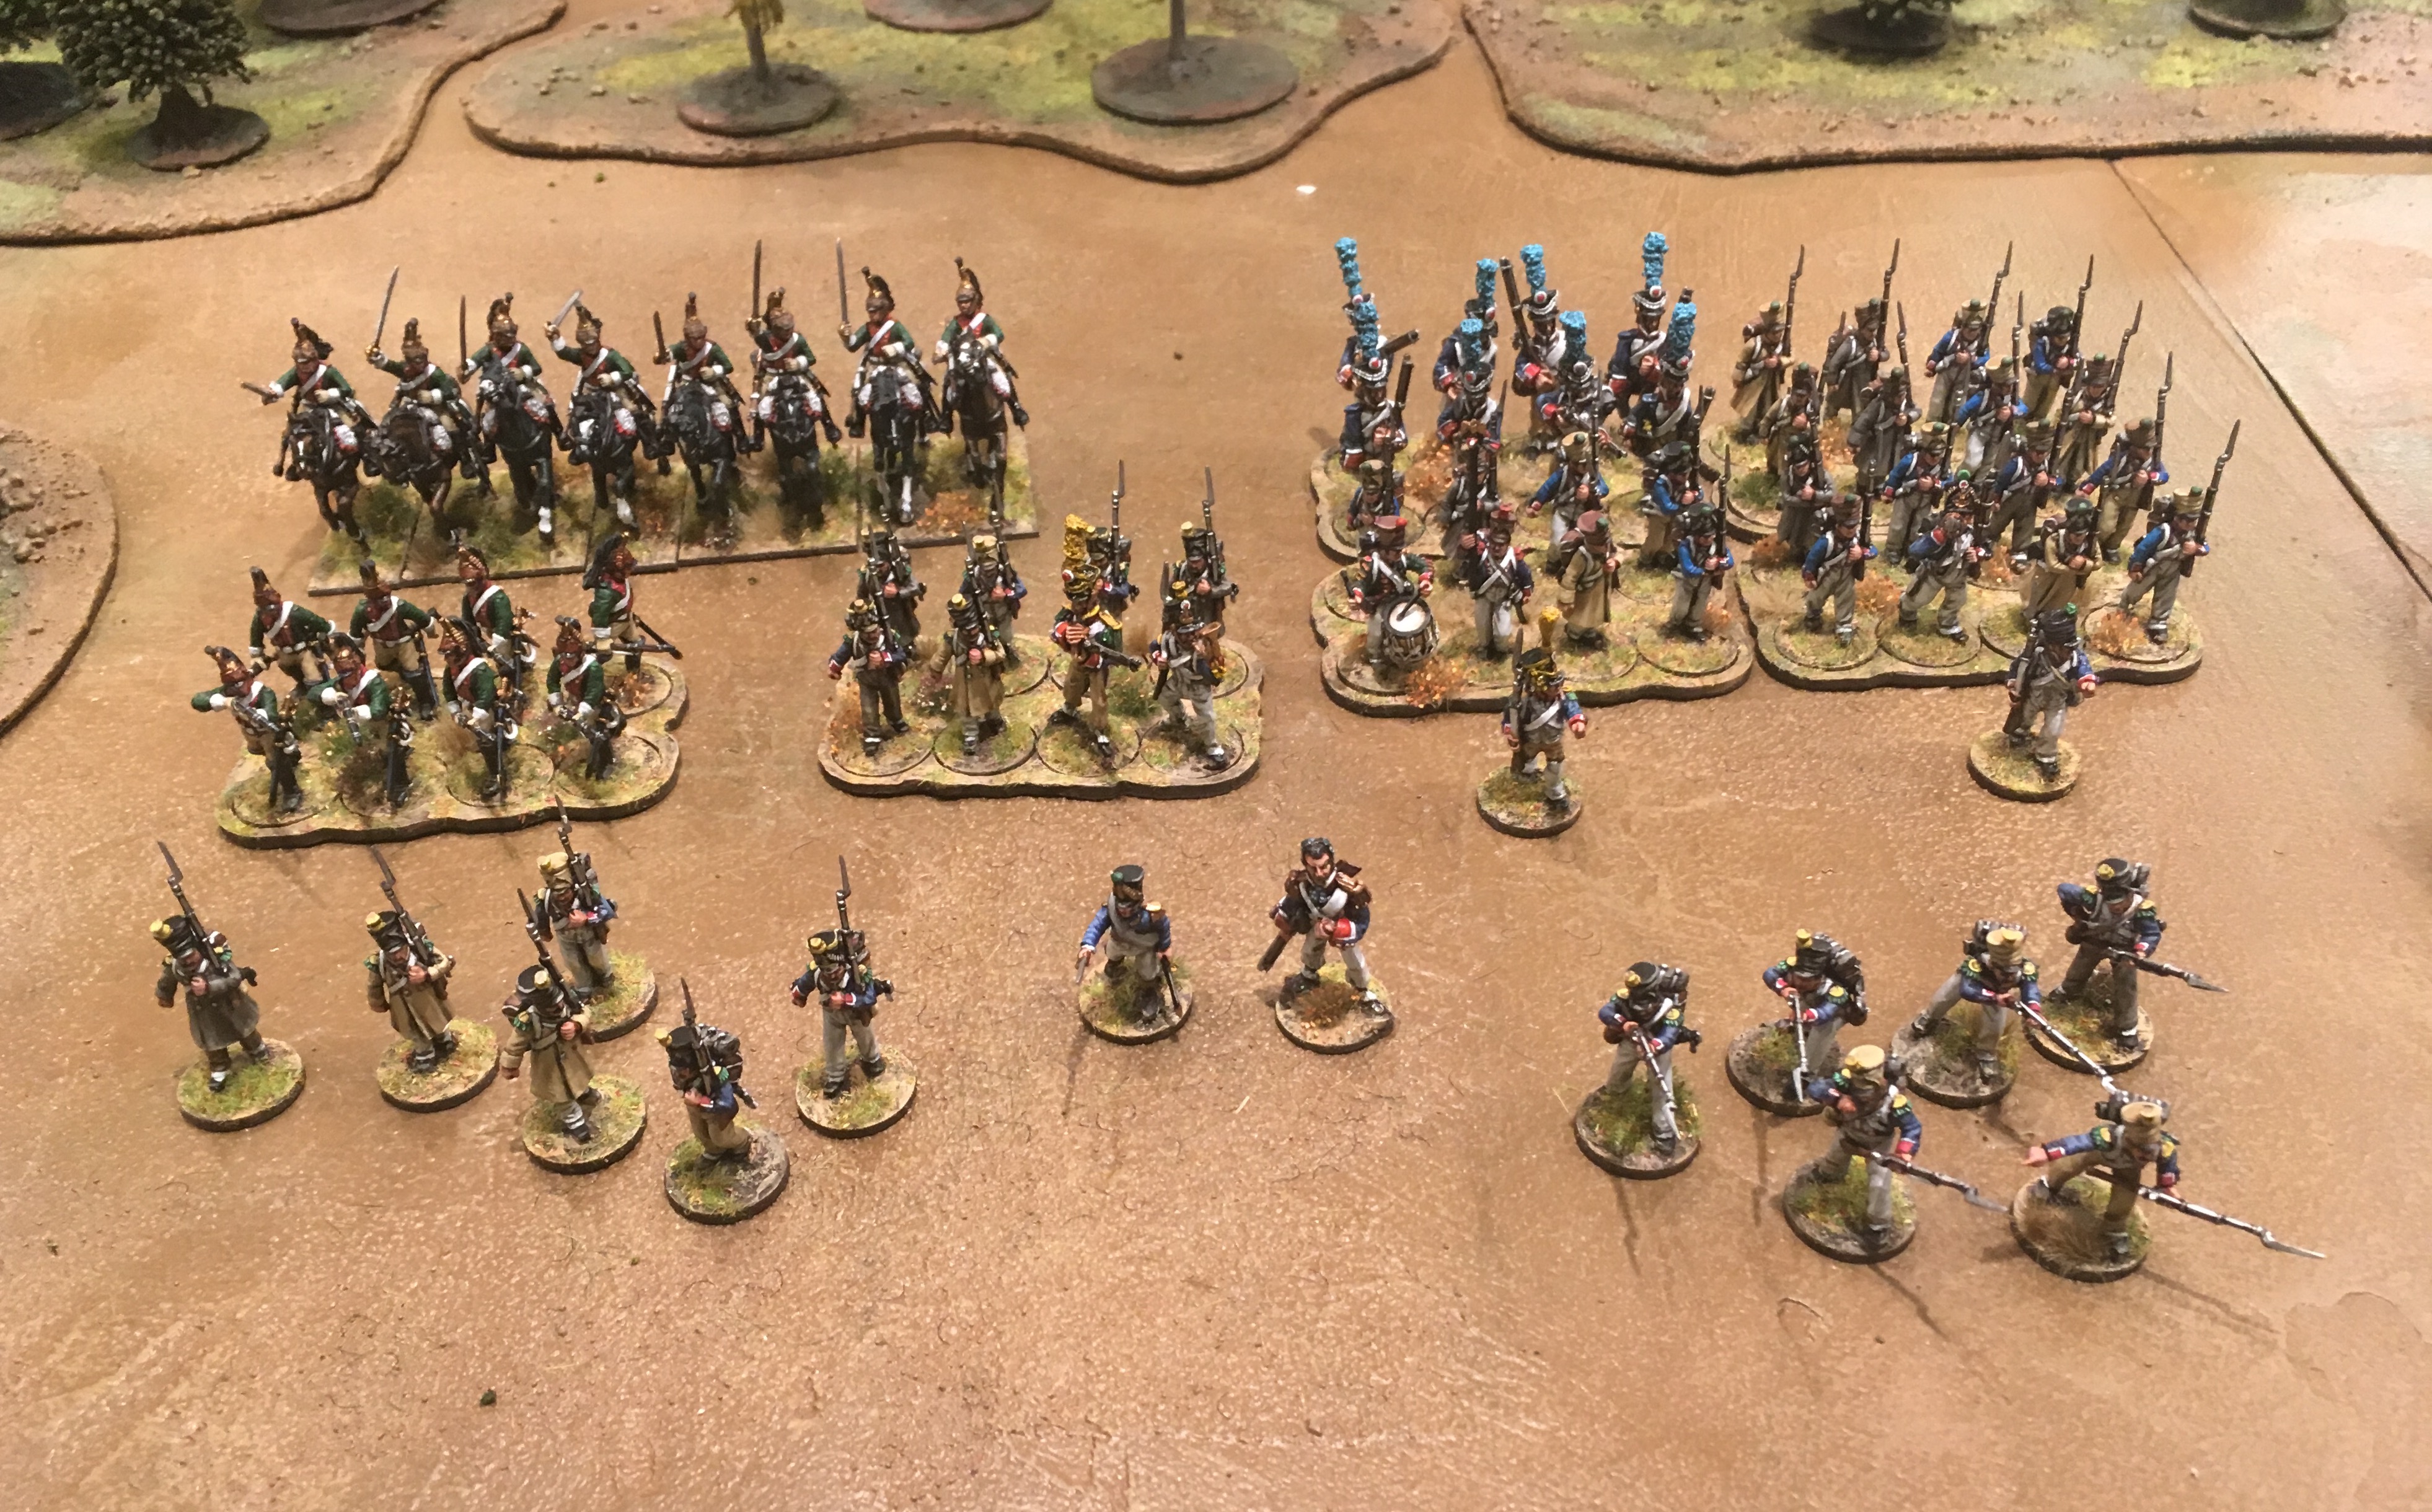 Jonas: The French force left their horse artillery 6-pounder cannon behind to keep things somewhat simple and even. Instead they also mustered around an attack column formation, four units strong, of line infantry Fusiliers. My stock of Voltigeur were a few men short to be fielded as proper ranked up units (8 men in each), so I chose to put them into three skirmish units (6 men in each, one of them was broken up after taking this picture). Finally I added a single unit of Dragoons on horseback and a dismounted unit of Dragoons in skirmish formation. That's when it hit me how relatively few officers I had painted up. In Sharp Practice, you need quite a few. Each unit that operates independently needs an officer to activate. On top of that, formations like my big attack column will often be fielded with a higher level officer, and sub-officers who help along with removing shock and thereby keeping the men in line, ready to take over if needed. I had only painted one Voltigeur officer, and no Dragoon officers at all. Oh well. The Dragoons on horseback got their own imaginary friend officer, and a cornet player got to act as a second NCO for the voltigeur skirmishers. Finally a normal foot Dragoon soldier took place as a leader for that unit, as I frantically scribbled additions to my painting to-do list. Game set-upConveniently enough we have terrain from our WW2 games, so for our first game we would have both painted troops and painted terrain! Very nice indeed. We set up a table with less terrain than our WW2 games, with a road crossing cutting through a somewhat forested area, with a few stone walls and fences to fight across. My first reaction was that it was a lot quicker to set up compared to Chain of Command, since we tend to create battlefields with more dense terrain. 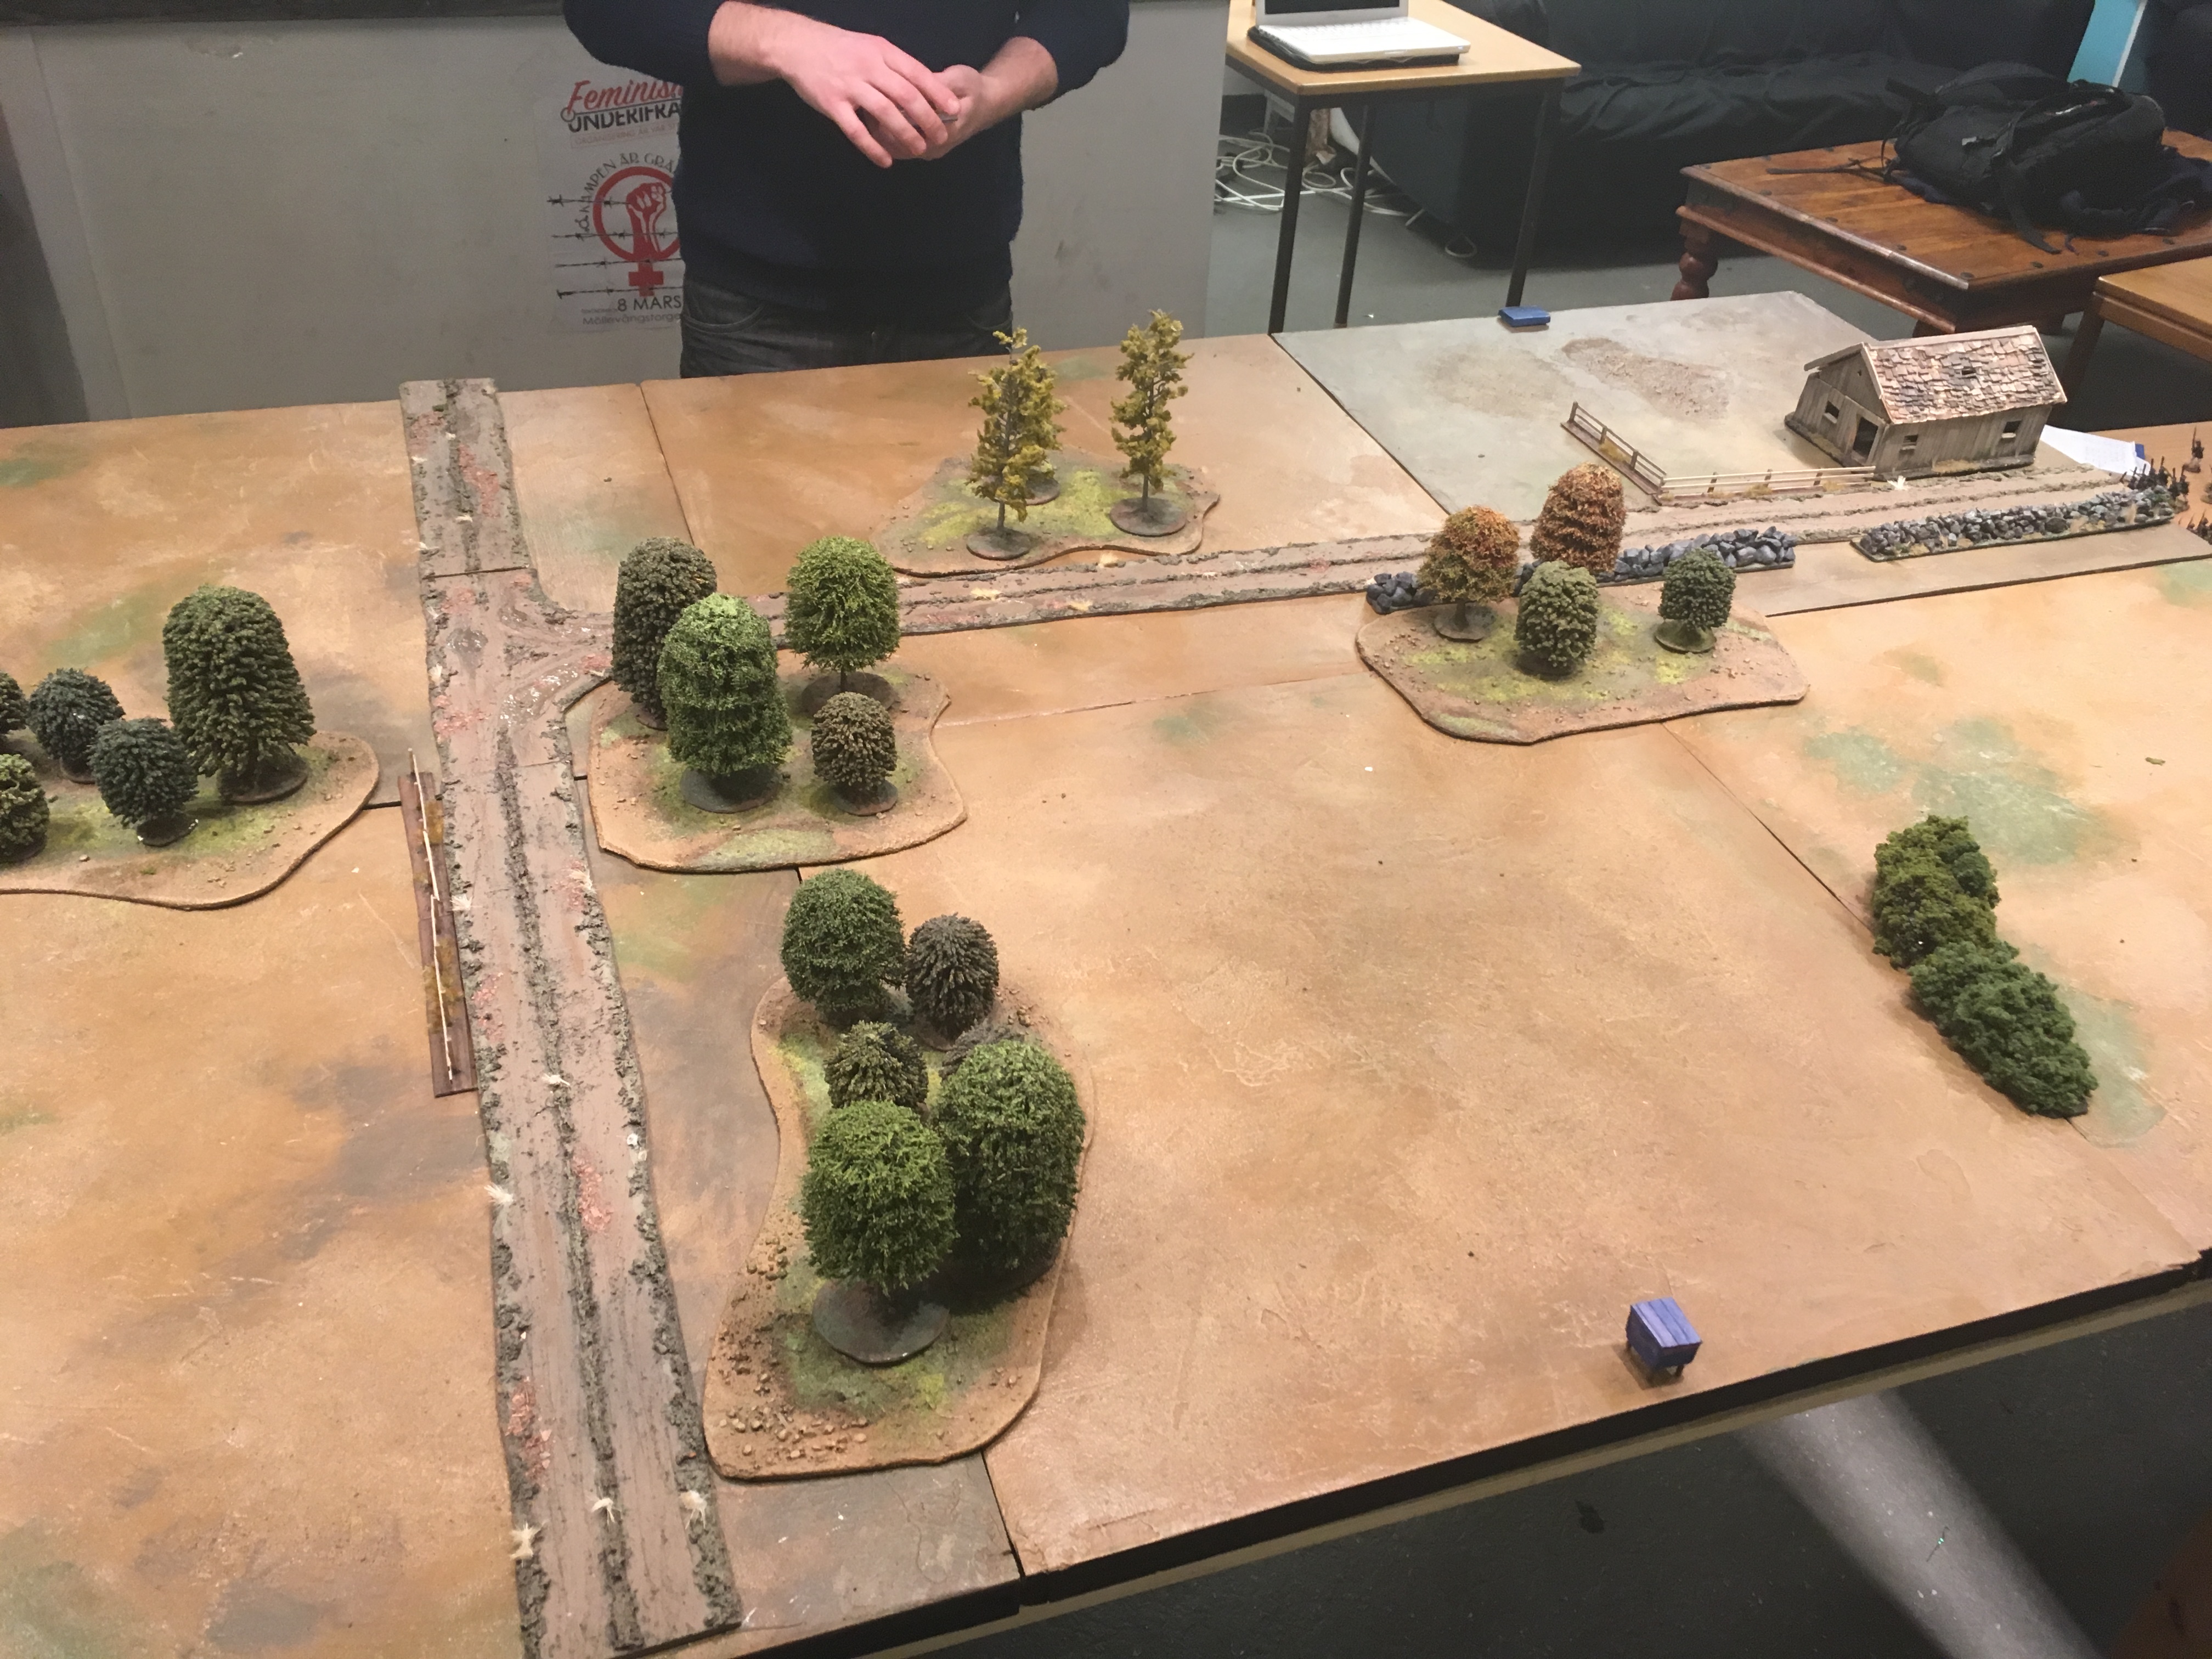 France invades Russia from the blue beehive. Russian defenders enter battle by the brave fallen patriotic bookshelf next to the peasant's house. Unit activations - men in fancy hats, moving aboutSo how does SP2 work? Each turn has activations tied to specific officers, as well as "freebies" that you get to decide how to use. These, as well as turn length, is randomized. Confused? We played with a deck of card, so I'll explain how it played out: First, we put one card in the deck for every officer. The card has a colour (red for Russians, blue for French) and a number. We each had a list to remember who's who, so Red 1 would be the officer leading the Russian attack column, and so on. When one of these cards are drawn, the player gets to use that officer and choose between a set of orders to give to the formation that they lead. A high ranking officer can do some things that a lower ranking officer can't, such as bossing around units led by their lessers. It's pretty simple once you get started. Then we put in a number of blue and red flags in the deck. The exact number depends on how big a game you play. If drawn, you can hold on to these for later in the turn, or use them immediately. Flags play an important role in that they enable you to active officers who haven't been drawn yet, and many units have special abilities that you can use if you spend flags. For example, many French units have the Pas de Charge rule where you can spend two flags when you activate a leader to get extra moves towards the enemy while removing some shock. The Russians, meanwhile, have the Stoic Serf rule that lets the commander spend two cards to remove D6 shock. A lot of strategy comes from deciding how and when to use these elusive resources. Also, drawing several flags in a row means that you get to roll on a Random Event chart. The final card is the Tiffin. When this is drawn, the turn ends. Any flag cards that you haven't used can be spent at this point, either for special abilities or to activate your lazy leaders who haven't gotten off their butts yet. Then you shuffle all the cards, and start over. There's really not that much more to it. 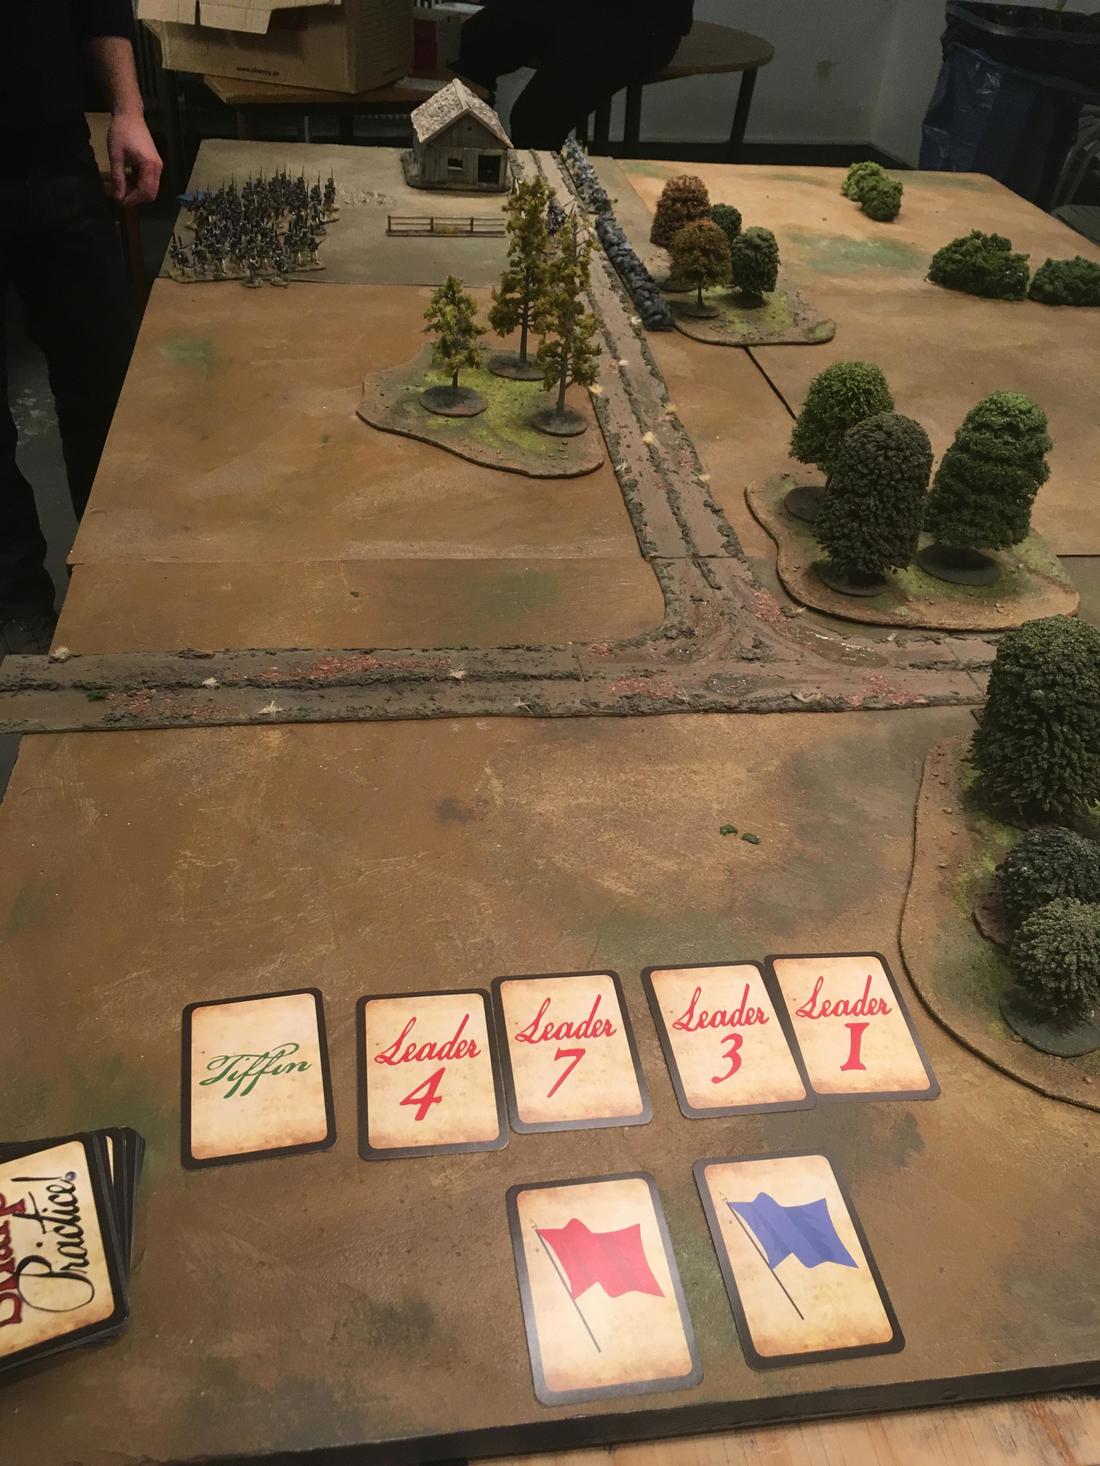 Are all the French leaders worthless? Initial signs point towards "YES!" In practice it means that turns like these are not so fun for the French! The first couple of turns saw a flurry of activity on the Russian side, with the large units deploying and moving forwards. To make things worse, the French lack of ability to put troops on the table meant that the Russians could deploy out-of-sight, with a wider deployment area than normal. At least that blue consolation flag meant that the French could plop down their first formation to counter the rapidly advancing Russians. While some individual turns were a bit harsh, I found them to even out over time. As long as you draw a single flag you can choose to activate the most tactically important formation at the end of the turn, and I prefer the back-and-forth style that involves both players. It felt engaging and exciting for both players at every single card flip. A good first impression indeed! Enemies in sight!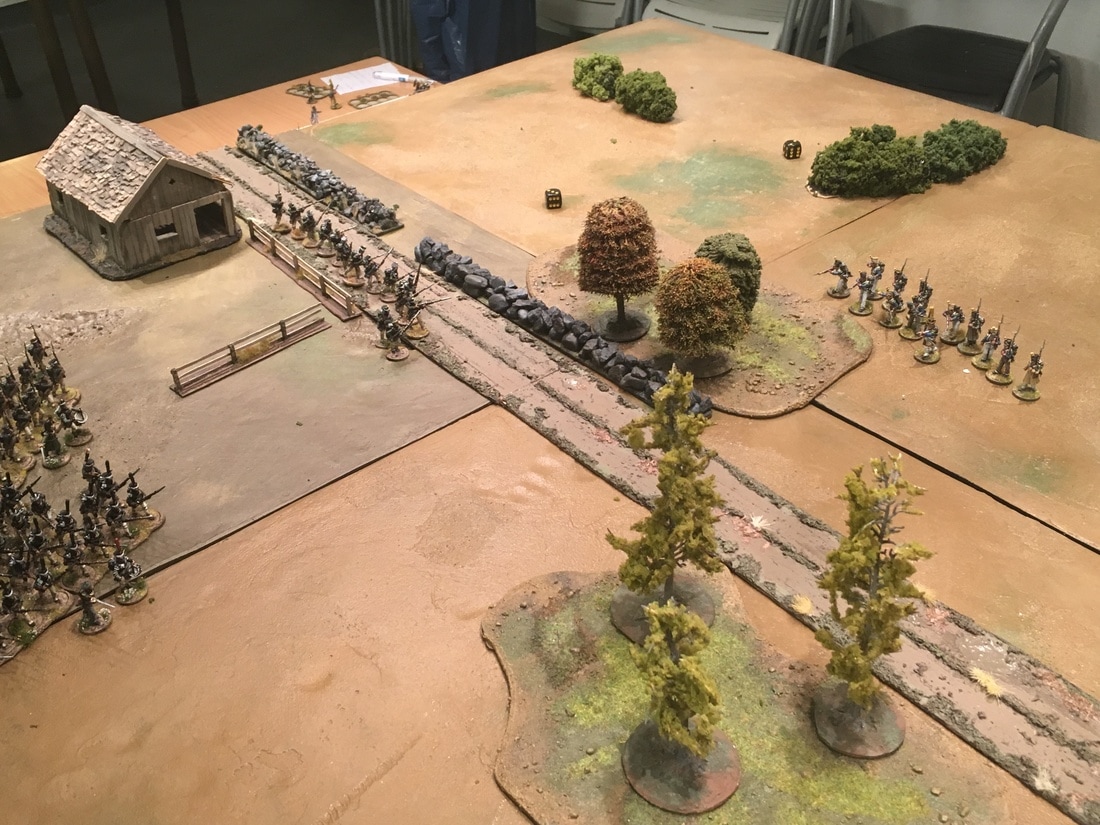 The race for the woods is on! The Russian officers, and their clearly well drilled troops, order their respective formation towards the small wood next to the road. Their skirmishers take aim for the stone wall, clearly noticing that the French are desperately pushing two units of skirmishers forward to seize the wood and slow down the Russians. The cards start to be more even, and soon both sides are completely deployed and start to close in. Even though the Russians got a good start, I didn't feel like it was impossible to catch up as the French once I got a few good draws myself. 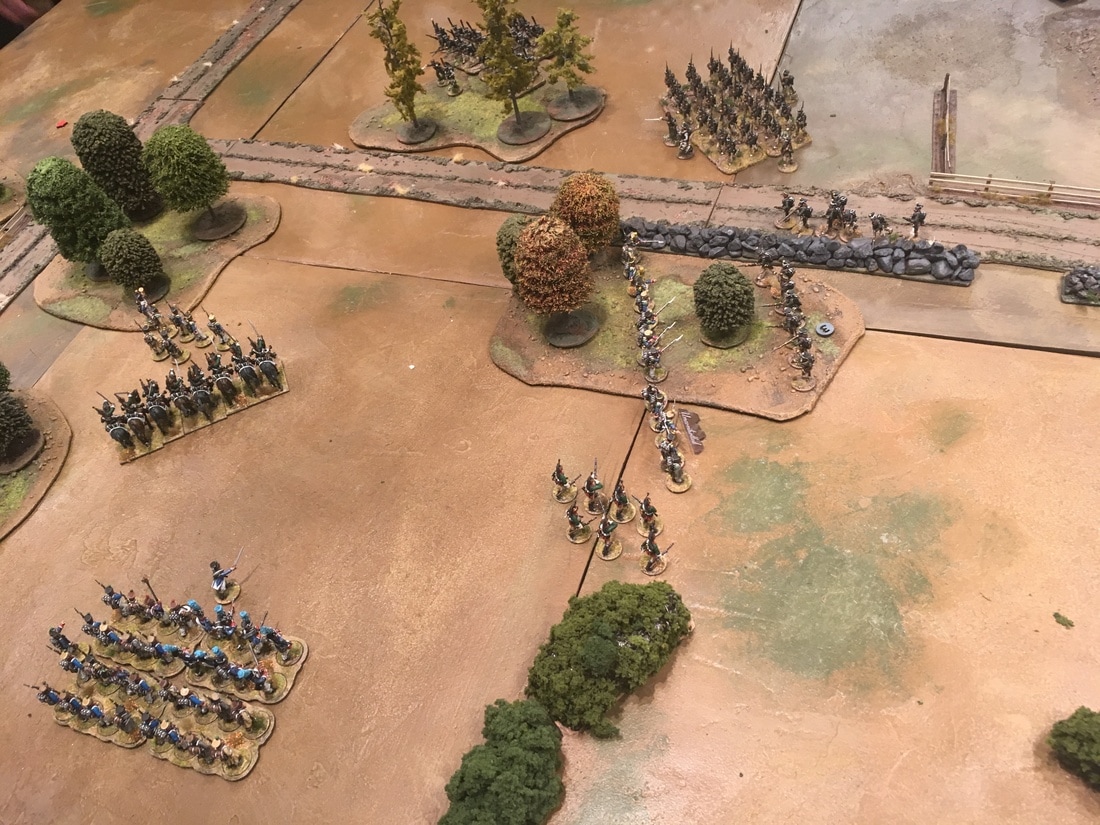 Everyone who can pile on in the skirmish fight The situation after a few turns: The French line infantry is slowly accepting the idea of marching towards the enemy. Their skirmishing buddies on both flanks are much more eager to get to grips with their enemies. The mounted Dragoons lunges forward, hoping to get into a flanking position. Meanwhile, the Russian ranked infantry are reaching a point where they can line up and advance, bringing their numerical superiority to work. But can they hold off the Skirmishers? 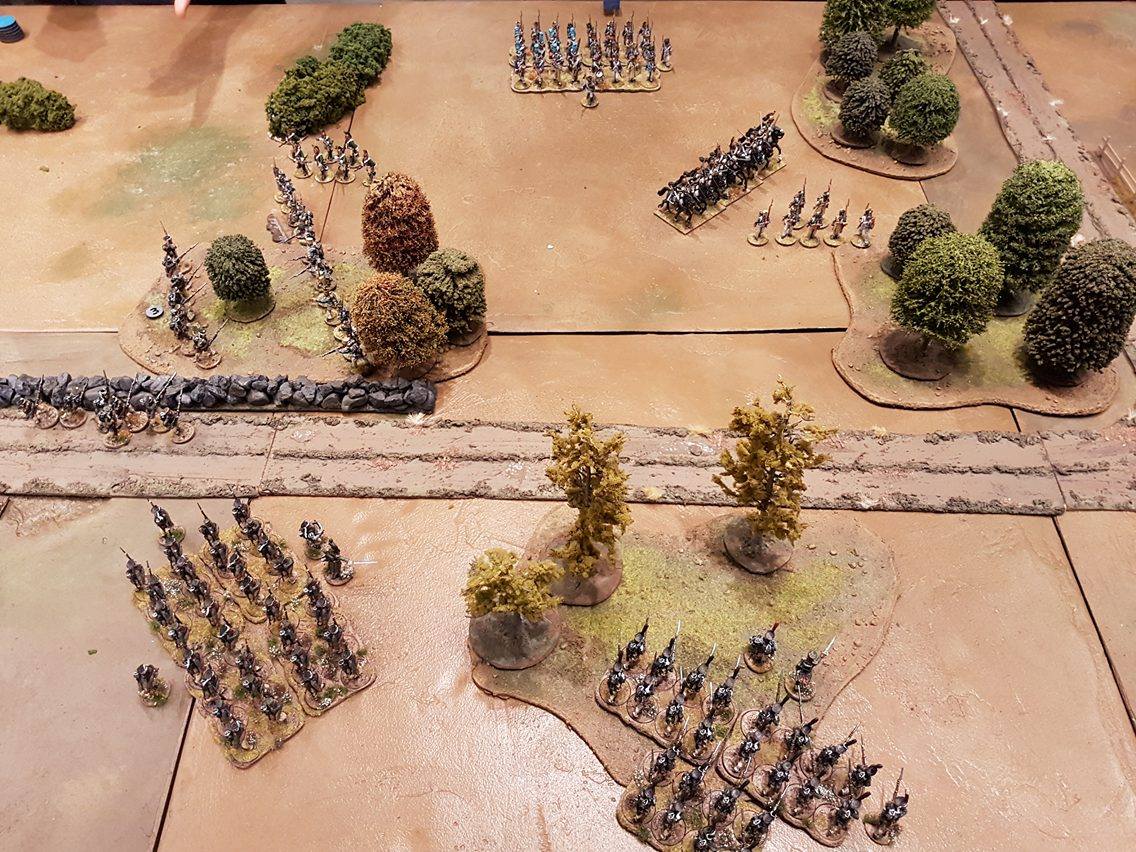 The road as seen from the Russian table edge First Blood - Skirmishing Skirmishers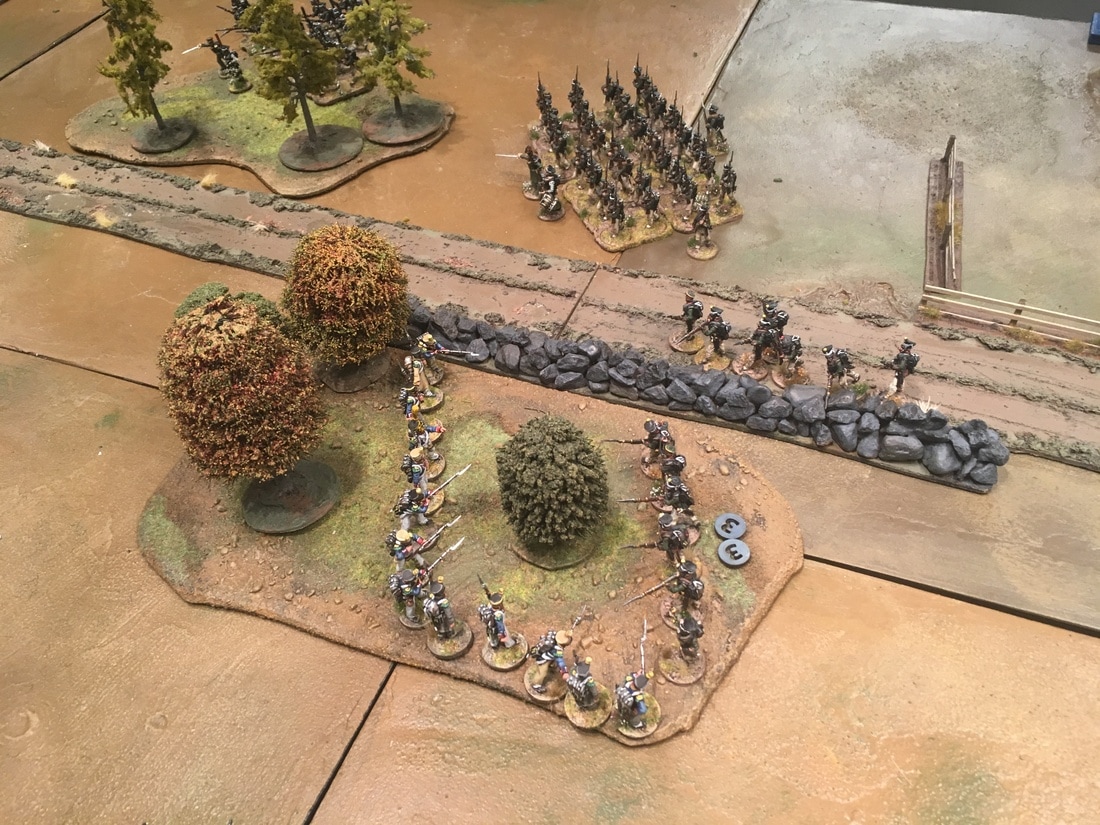 While the line infantry formations busy themselves with finding a proper line of attack and wheeling around, we'll see how skirmishing works in SP2. The French push forward, using the extra move that skirmishers get to seize the wood. The Russians answer by rushing their own troops into the fray. Desperate firefights erupt in the woods, some men barely feet away from each other as they trade fire. This is surprisingly enough quite historical, as observers would note that men drilled for musketry could end up standing a few meters from their enemies, both sides desperately reloading instead of charging in with their bayonets. 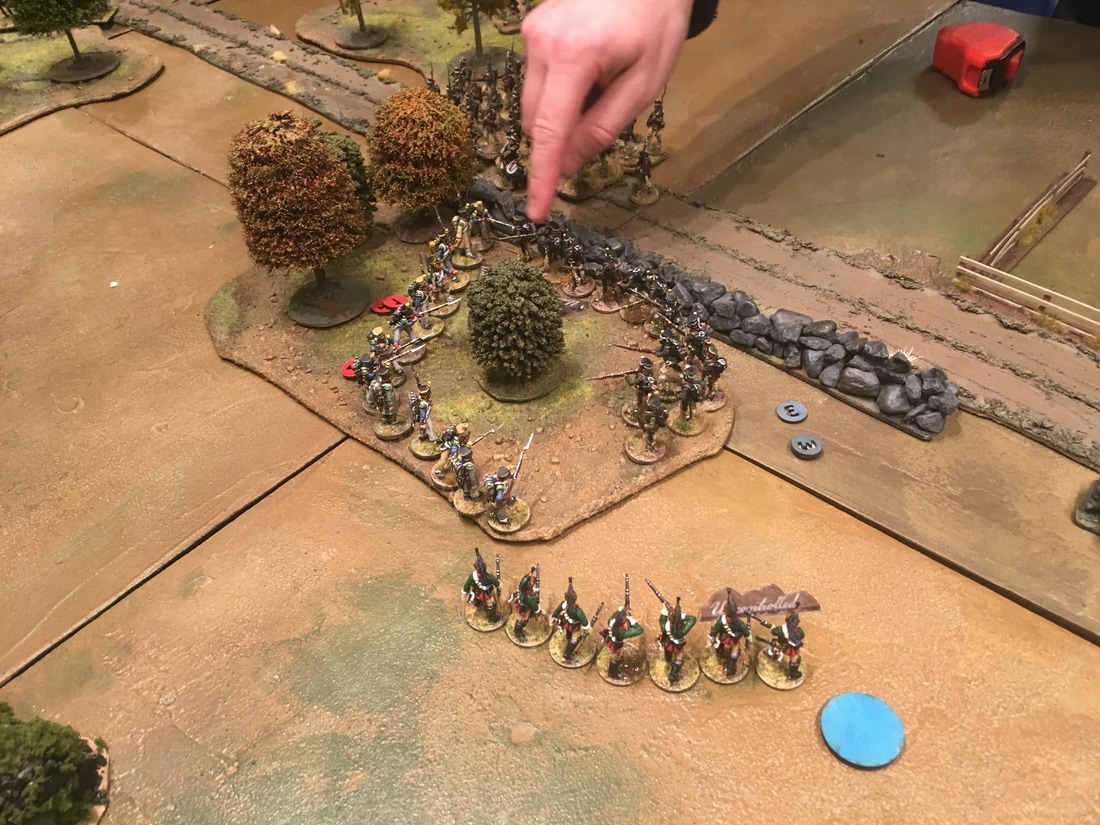 The fighting grows fiercer, as the French side are supported by the dismounted Dragoons. The Russians have more ranked up infantry, but the French advantage in skirmishers are obvious here, as the first Russians start to drop to the floor. Musketry is not all that deadly, but shock starts to add up. Notice the big blue marker next to the Dragoons: we noticed early that it is super important to keep track of which formations have acted already in the turn. So we plopped down markers next to them as their respective card was drawn. 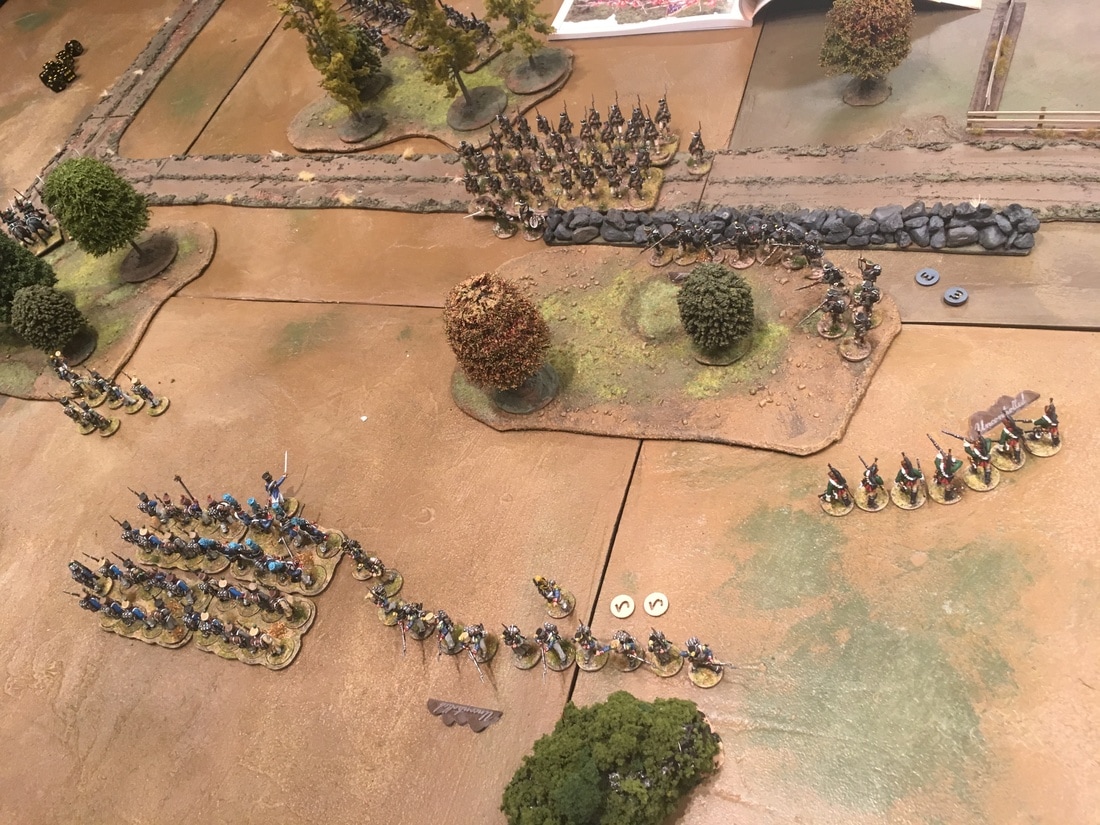 The French skirmishers decide to take a short break. Far from the shooty bit of the battle. The French Voltigeurs see a temporary setback, and decide to leg it. However, under the watchful eye of their leader they quickly rally the shock and get back into action. The extra move you get for skirmishers means that they move very quickly across the battlefield. Disaster struck the Russians when their leader wisely started to try to pull out in the face of numerical superiority. They were firing uncontrolled volleys (everyone were at this point!) which is faster, but less accurate. It also means that you have to roll on a table to get your men to listen to your command if you want them to stop firing as fast as they can. Time and again, the men next to the wall refused to jump over for the added safety of a stone wall, and casualties and shock started mounting as the French shot at them from three sides. 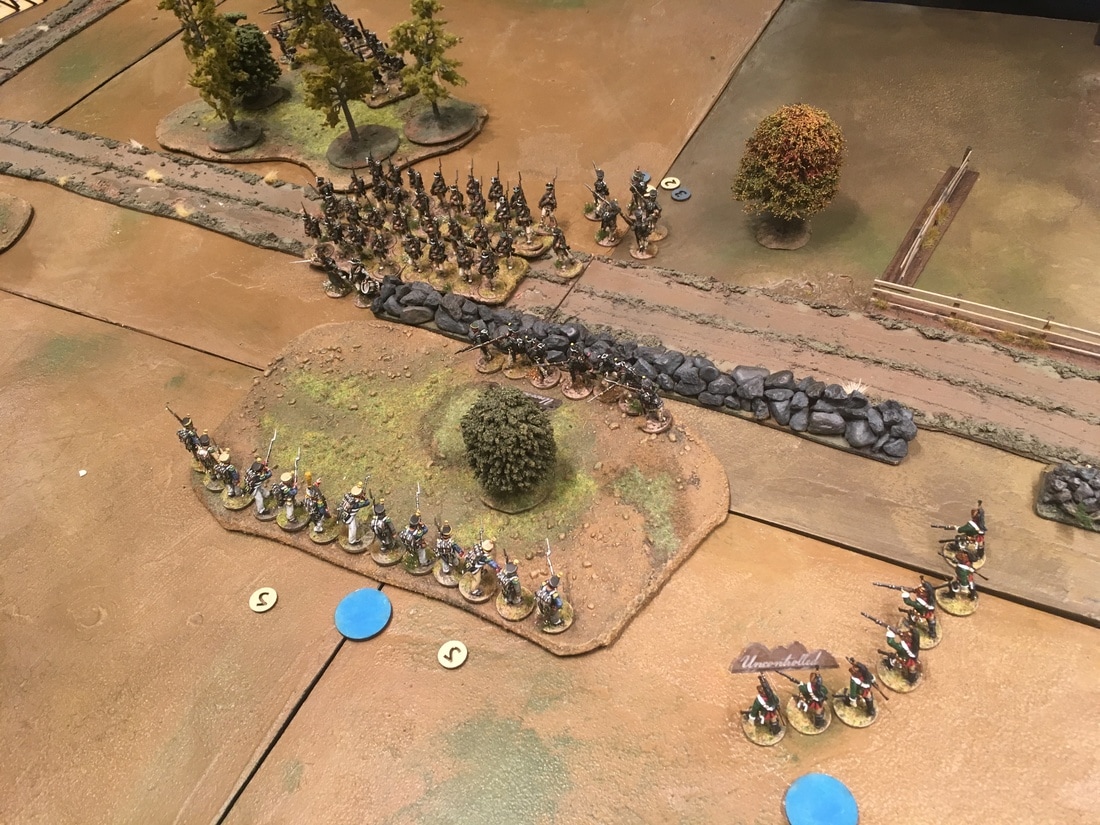 The Skirmish tide is turning The brave and entusiastic, but dangerous, zeal of the Strelski means that one unit simply soaks up too much shock, and run away. Overall there have been very few casualties in the firefight, but the units are small and the shock adds upp quickly. The remaining Russian is heavily outnumbered, and the French skirmishers move out of the way of the slowly approaching attack column while rapidly sapping the strength of the remaining Russian skirmishers. 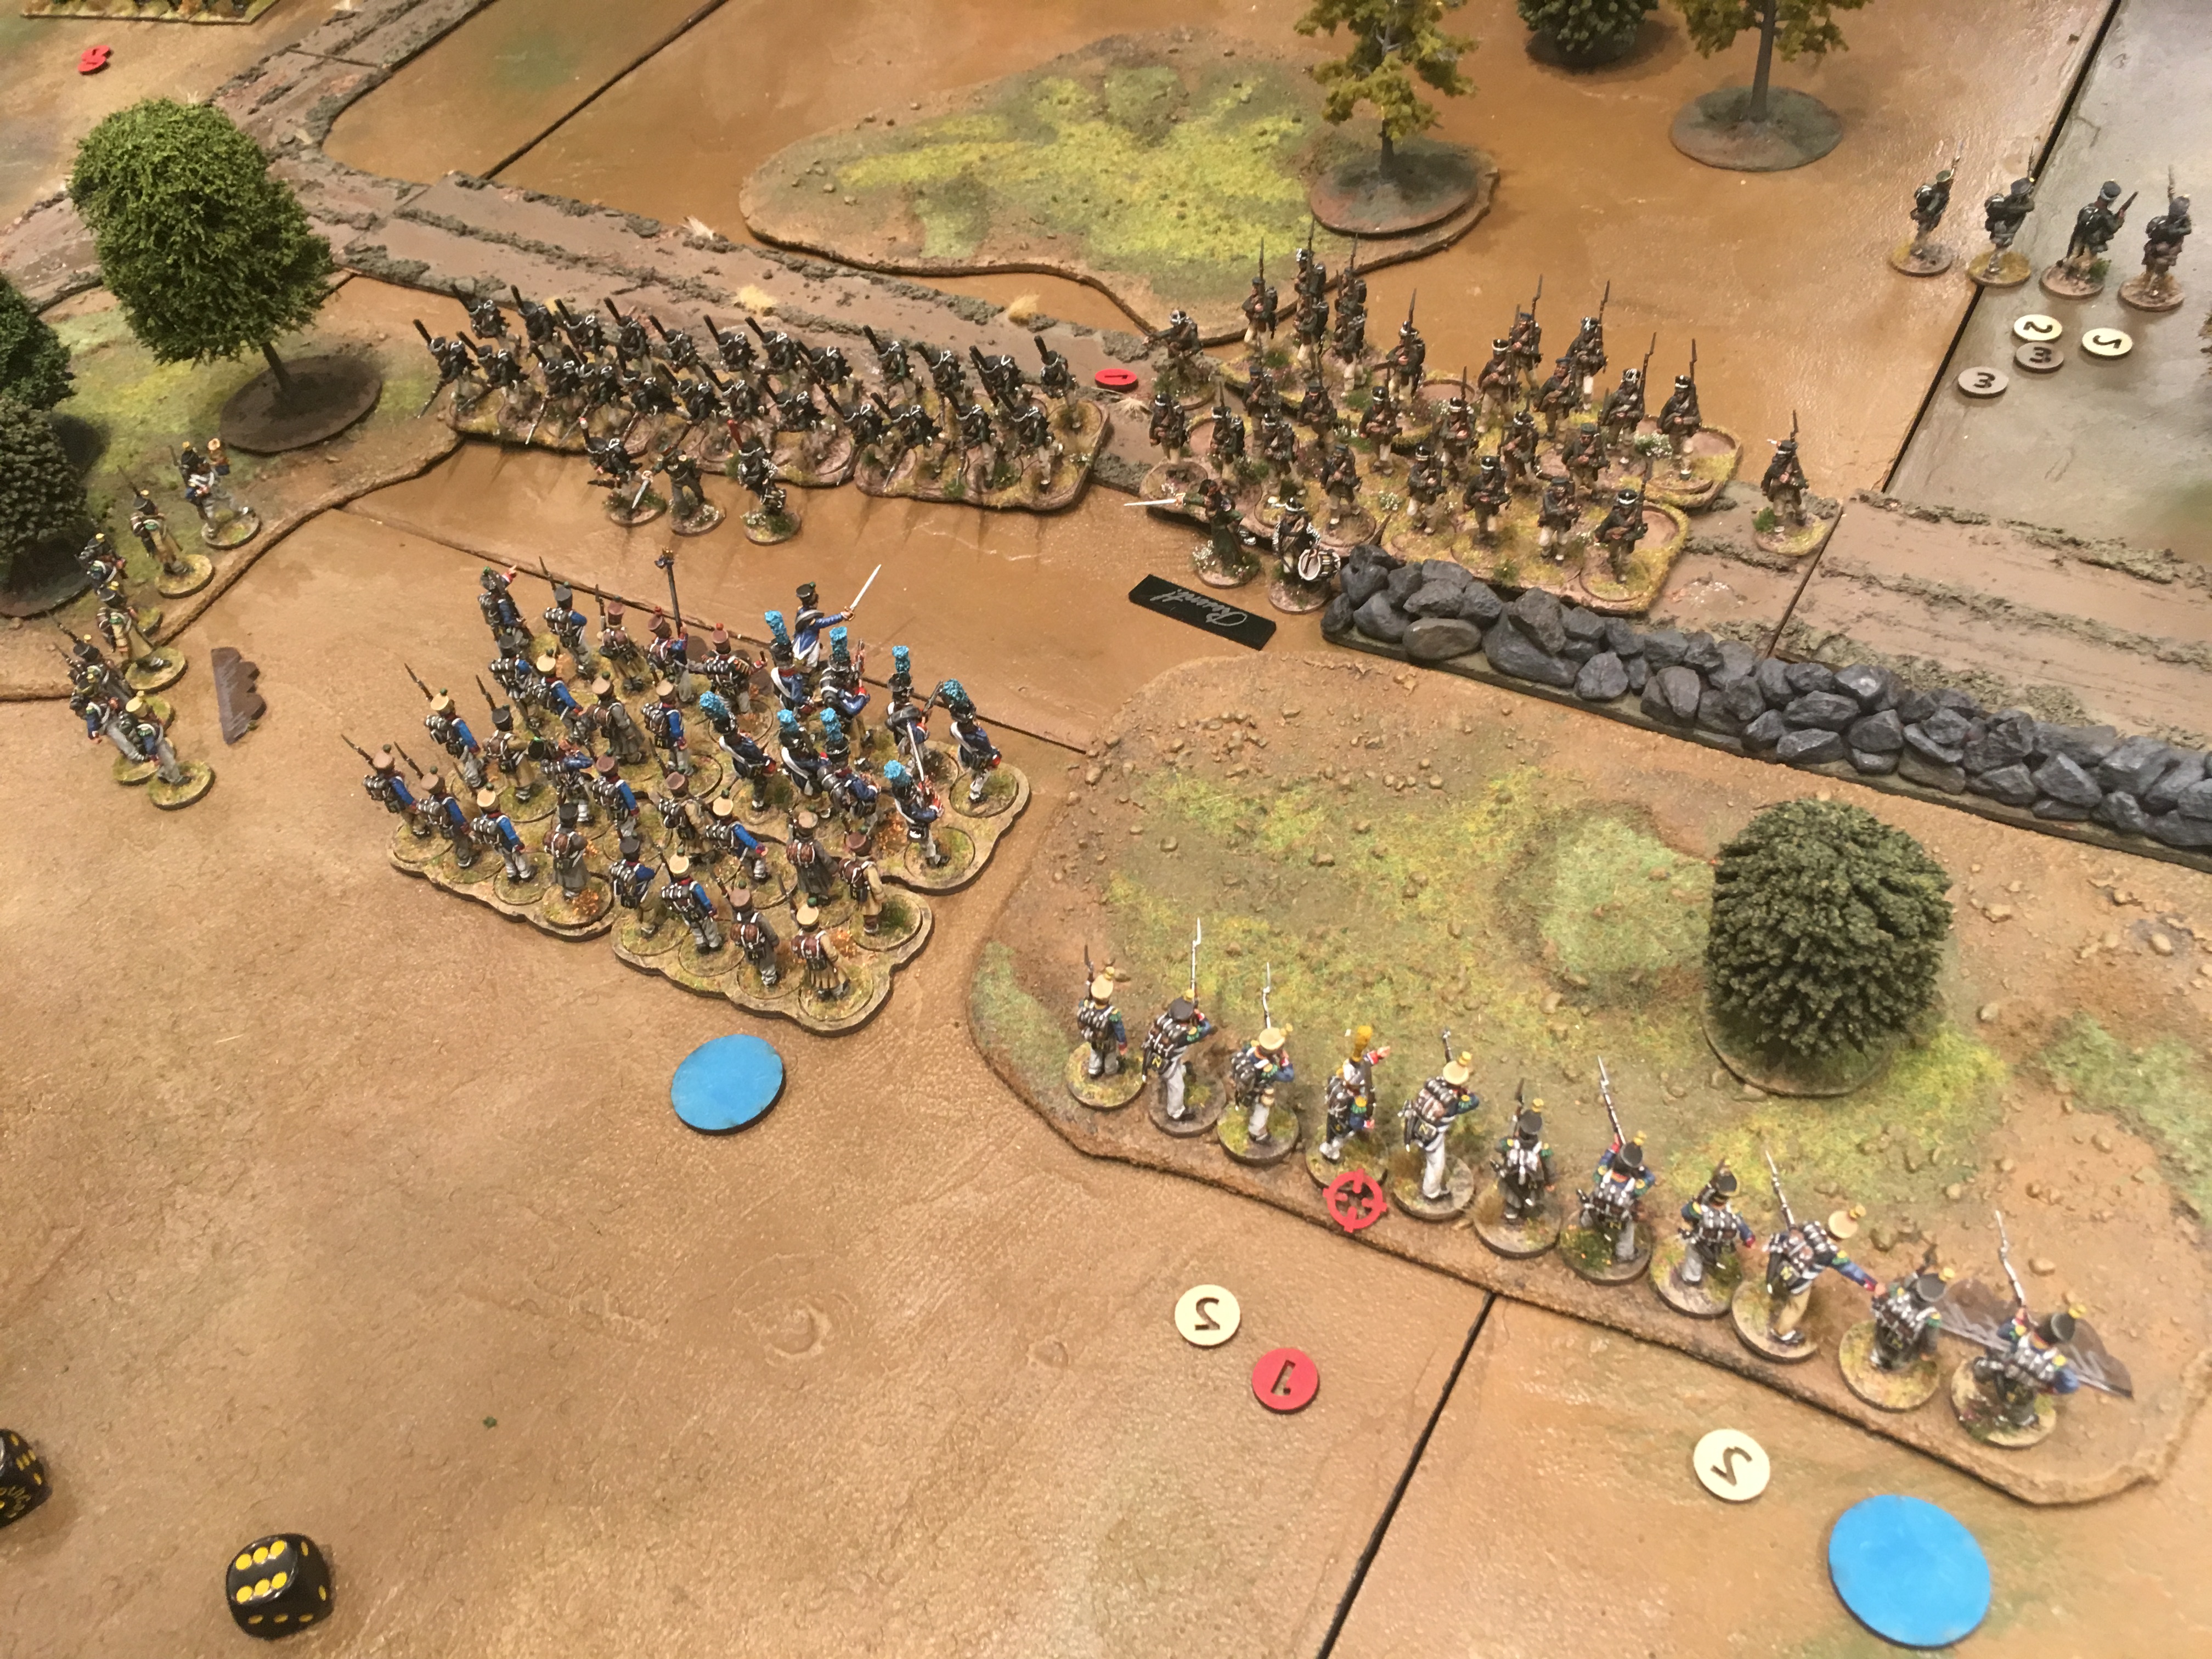 Where did all those Russians come from? The other French skirmishing unit, seen to the far left above, tried to put a dent in the approaching Russian line. But so few men can't really budge a big attack column, though they manage to graze the arm of a poor NCO, decreasing his ability to order the troops. When the ranked up troops are closing in the French skirmishers have clearly won the day, but was it enough to win the battle? Seven Russian units against four French certainly doesn't look good! But what happened to the Dragoons? You can see them at the top of the picture, faffing around. As they moved towards the flank, the Russian line got them in line of fire. The unit survived the volley, but it was clear that they were in a bad spot. So, the best way to get into safety was to speed forward, out of the Russian unit's frontage. After managing this, I started to realize just how slow cavalry are to turn around! I'd need 3-4 lucky turns of wheeling to get around, and by that point the game would very likely be over. The Russians could simply advance in another direction, and it would be long before the Dragoons would catch up. The cavalry had missed their chance to play a role in this battle, but I learned an important lesson about being careful when speeding horses around. A Clash of SteelAt this point there everything pointed towards a sudden dramatic clash in the middle. The ranked up regiments exchanged some fire, without being decisive. Then, seeing that the Jäger column were partly trapped behind a stone wall, the Russian Carabiniers boldly charged forward, bayonets aimed at their French enemies. 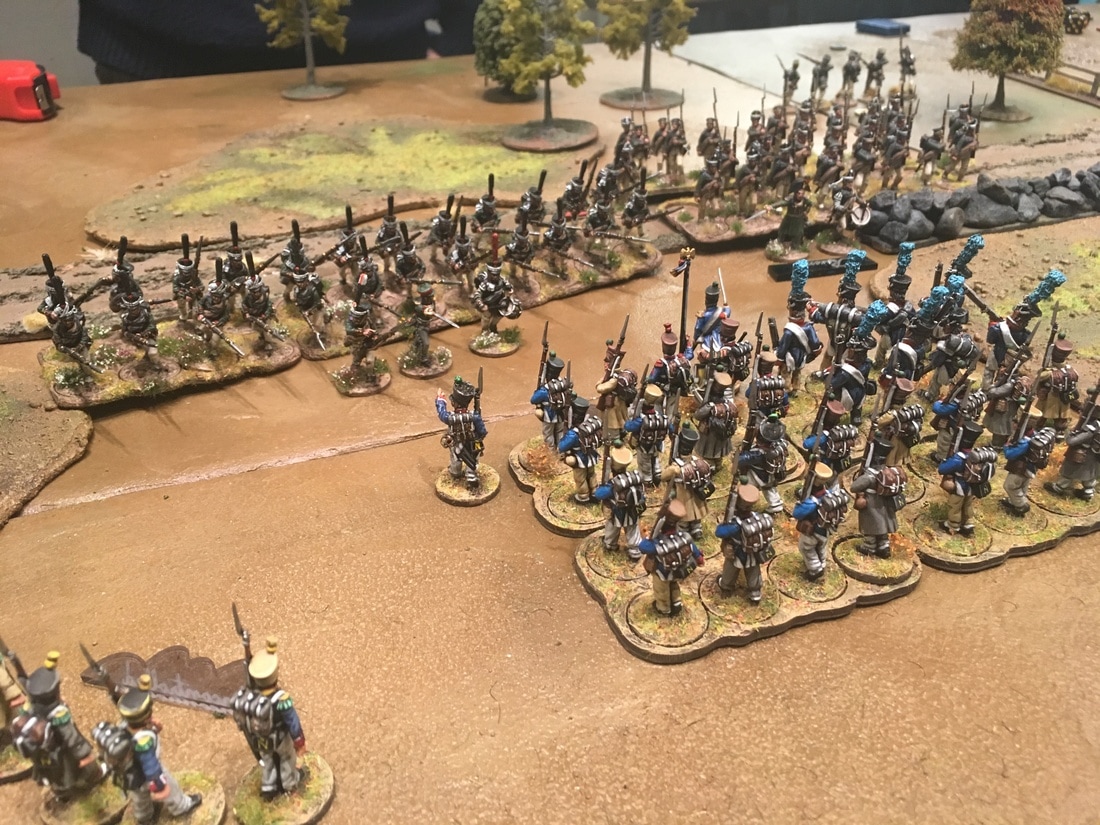 Here came the part where we felt that the rules rubbed us the wrong way. Attack columns are pretty much just bad in SP2, as far as we can understand. Three units of infantry in line formation has 50% more firepower than an attack column, but will dish out just as much pain in fisticuffs, which is the term for melee in SP2. So there's never a reason to use the attack column. The Carabiniers also have the "Aggressive" trait, giving each unit more attack dice in fisticuffs, and the French were caught with unloaded rifles. Uh oh! In this horrendous calamity, the French Captain noticed the officer leading the Carabiniers. A gentleman, here, among the lowly commoners! He immediately issued a challenge, which was gracefully accepted. 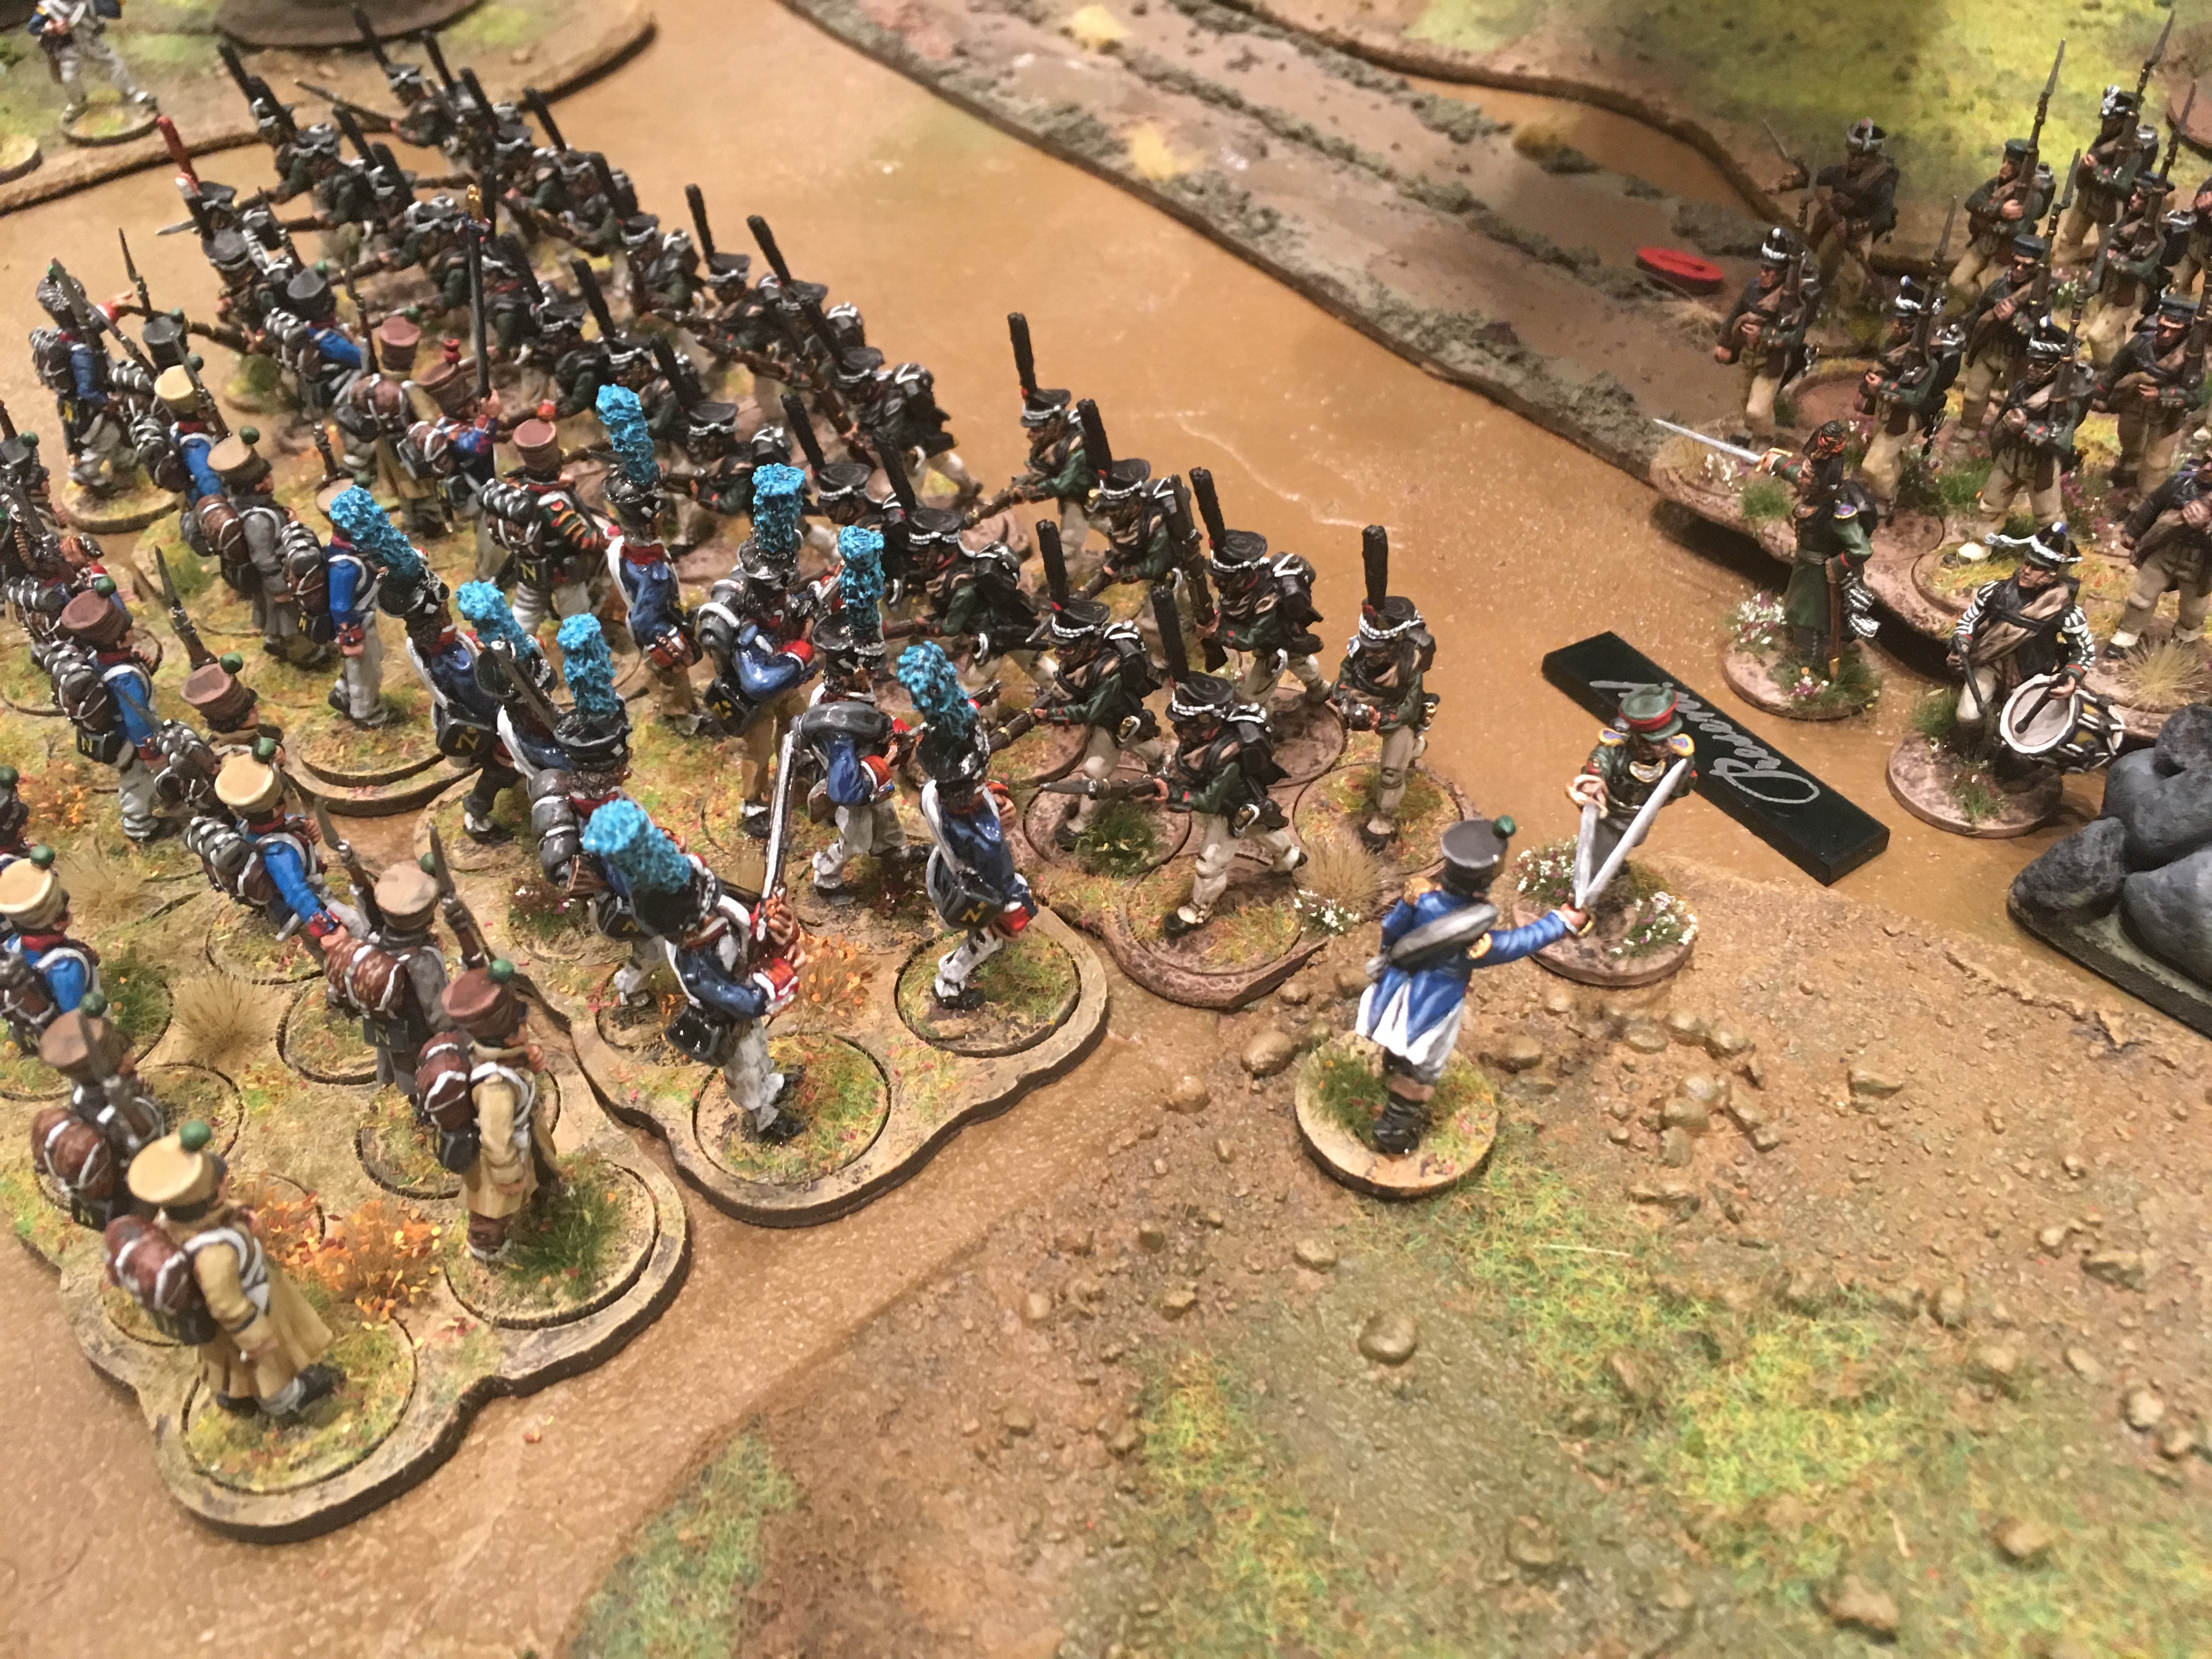 Challenges are played out as a separate "mini-game". Each combatant gets 6 dice, which are secretly divided into attack and defence dice. Then you take turns trying to attack and block, and keep repeating this until a leader withdraws or dies. In this case, there was a flurry of blows, until the Russian officer leaned back for a massive, crushing blow... and suddenly turned pale, as a frantic jab from the French captain's sword pierced his heart. The Russian was dead before his body hit the ground. The Final ConfrontationWith their leader fallen next to them, the Russian Carabiniers were determined to make the French suffer. As mentioned before, they had a clear advantage in fisticuff dice. Close combat is calculated by unit: each unit in contact get 6 dice. The two French units at the back of the column, which are supporting, only get 3 dice each. But in the initial phase the French got even fewer dice, as they had unloaded guns (-2 dice per unit), and the Russians got +2 dice per unit for having the Aggressive trait. Finally, the leaders that were not engaged in the duel could add one die per Status rank (both being the lowest, rank I). Then your roll the dice, 5's causing kills and 6's causing both a kill and a point of shock. Considering that you'll roll a whole bucket of dice, a 33% killing rate is HUGE. By a great deal of luck, the French column held the initial flurry of bayonets. Since the combat was not decisive a new combat was immediately fought, but this time the penalty for unloaded muskets had played out. And the triumphant French captain evidently caused morale to surge, because with some 18 dice I rolled... 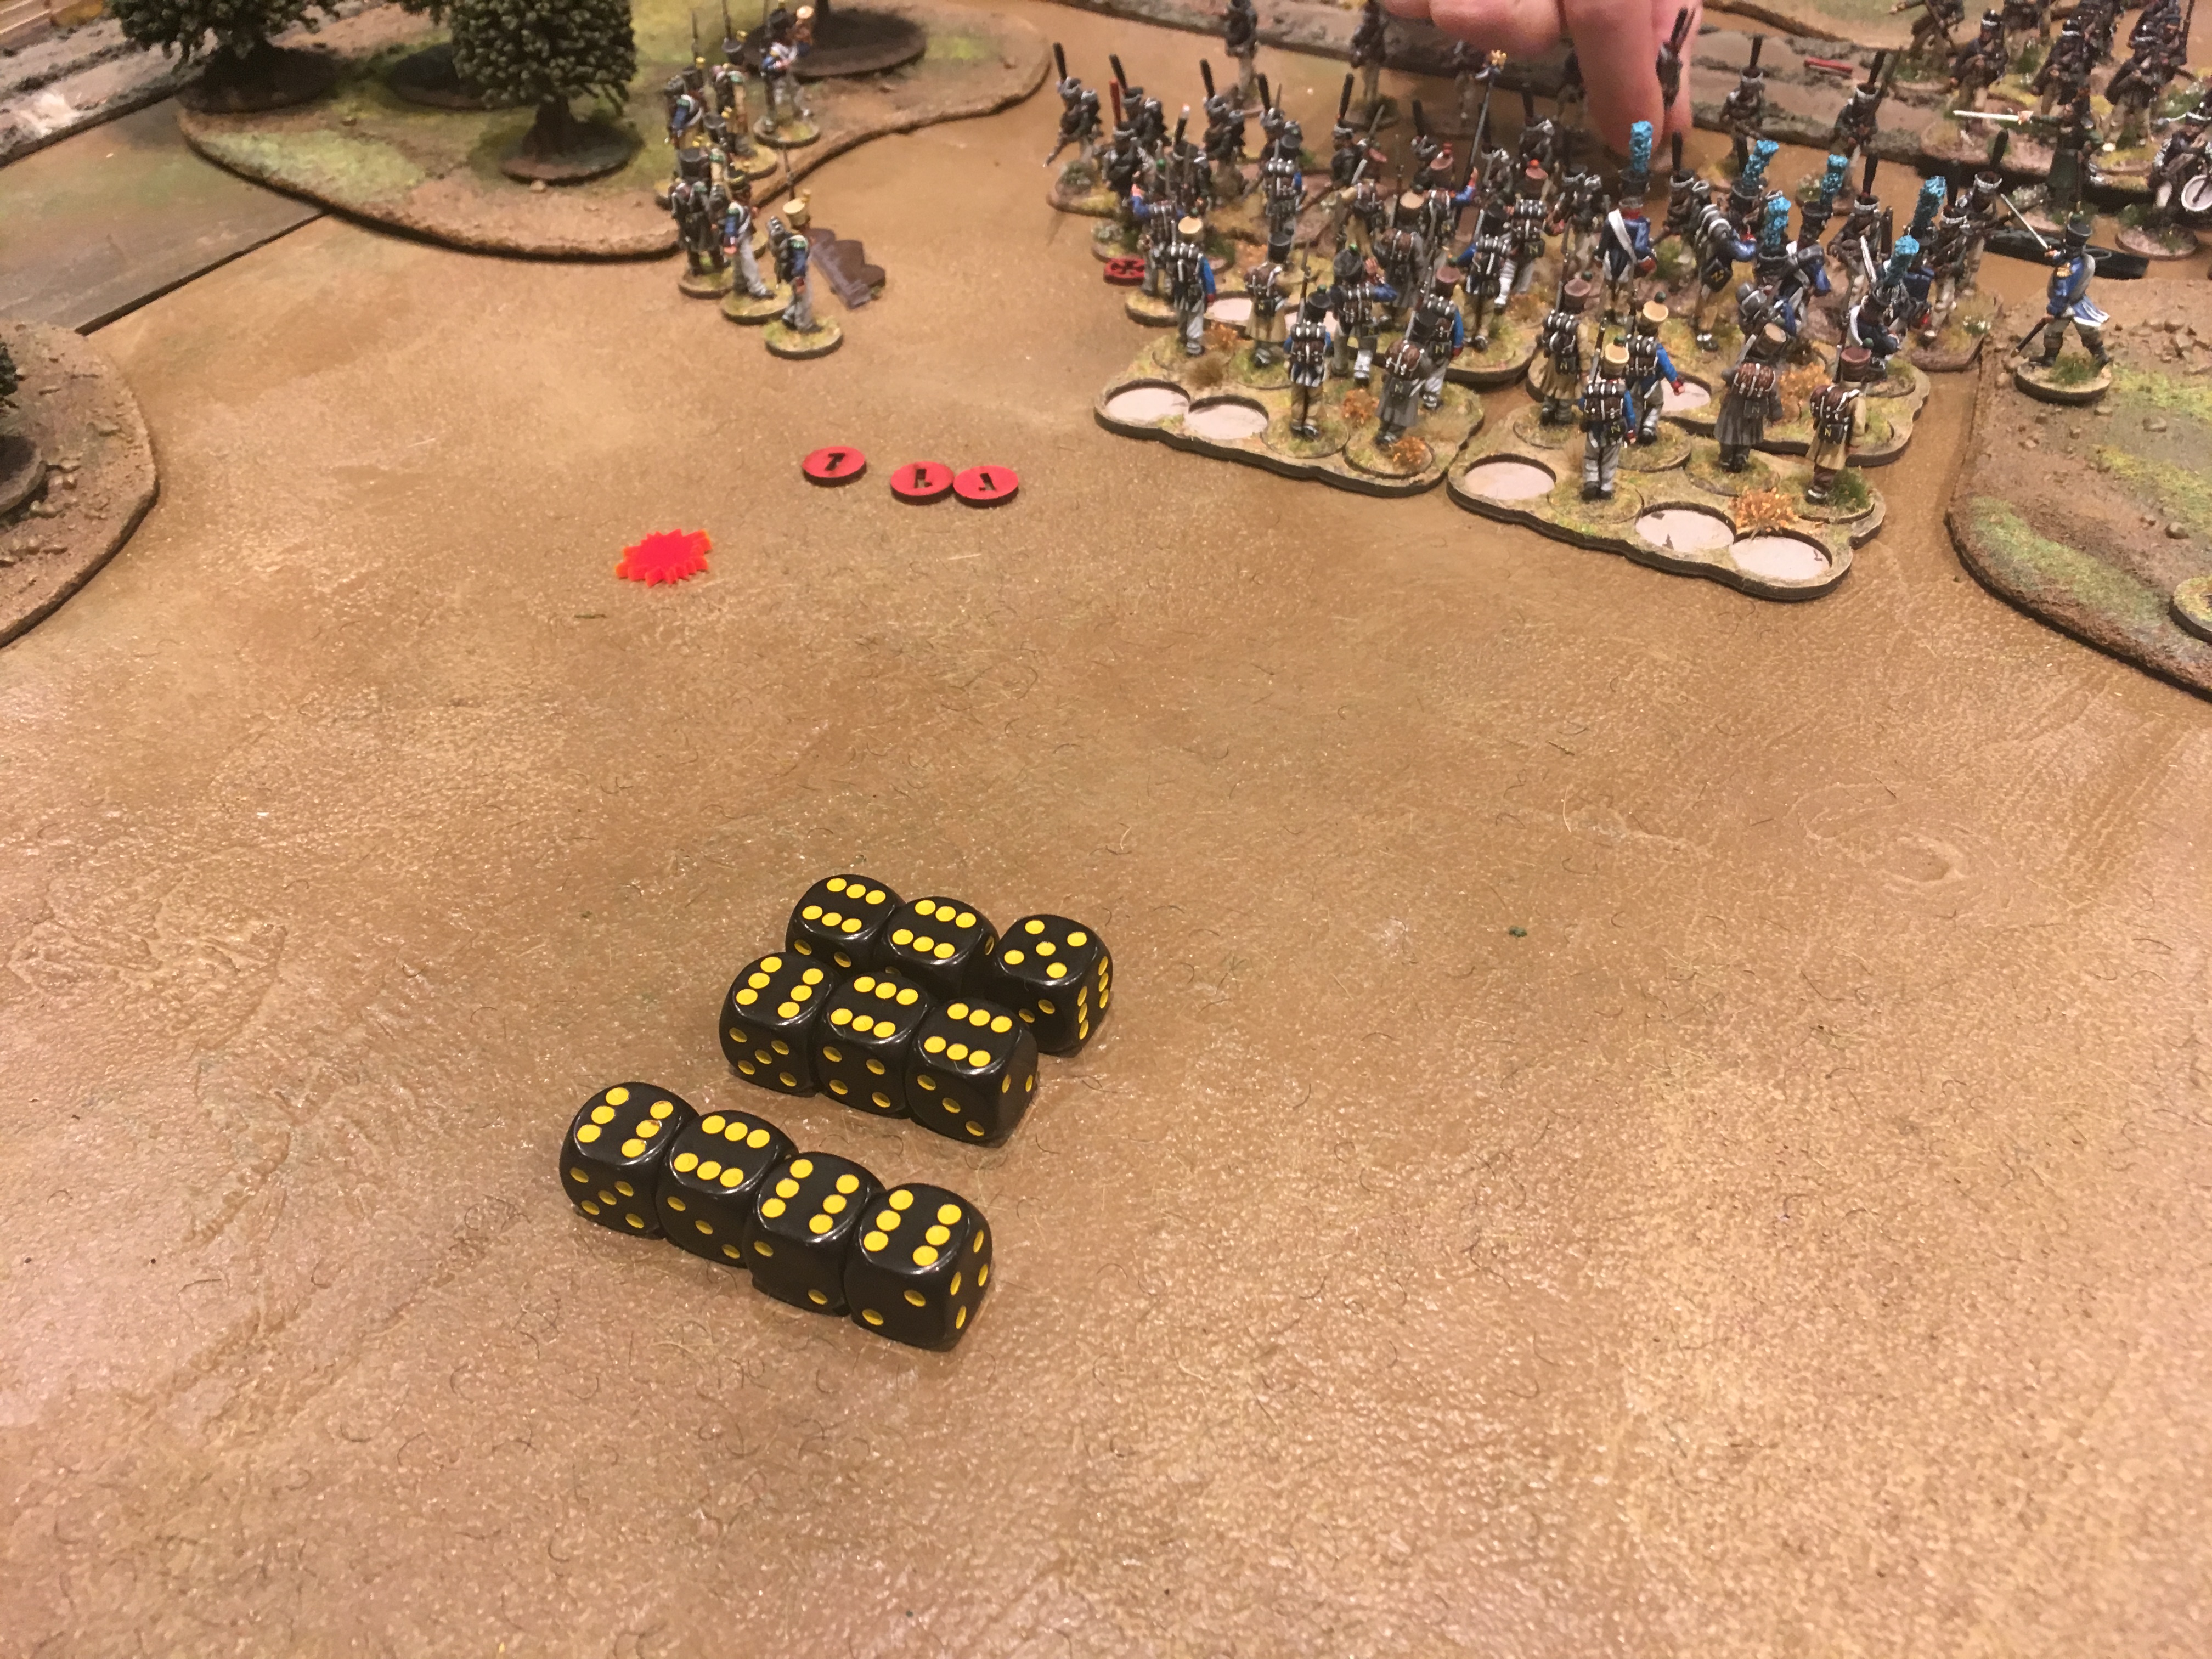 Did I mention that the French were extremely lucky this night? That's a lot of kills and shock. The Frenchmen lost many men, but the Carabiniers were broken. As they fled, the Russians only had one formation of Jägers left. They could probably give the French attack column a good whipping, but they had four units of skirmishers surrounding them, and a unit of Dragoons slowly wheeling around in their far flank. And the body of their abusive officer was already cold, so who could fault them for turning back? SummaryThe Good Stuff: Overall we had a good time. We both enjoyed the base rules, and the activation system was suspenseful but rarely felt unfair. You never know what will happen as you flip those cards, but in the end you can usually do something similar to what you plan. It's just that sometimes it's smoother, and sometimes not. The game size was nice as well. 8 man units is small compared to the vast armies of battalion scale games, but they are also very suitable for a new player, as painting batches of 8 or 16 models works great. Assembling a painted army for SP2 never felt like a daunting task. I like that it was relatively fast, even for a first game. There is less "fiddling" with movements than when we play CoC, as it is less devastating to be out in the open or in the line of fire. Yet, movement matters, and it felt "Napoleonic" even though it's not 100% historically accurate unit sizes and whatnot. Yes, I know it's unrealistic with small attack columns and so on, but it played nicely and it didn't take an entire day to get to a decive, nervewrecking combat that felt like being at a high roller craps table at the casino, betting everything on black. So as a game it succeeds, if not as as a perfect battle simulation. The Bad Stuff: The things we didn't like was mostly the rules for the attack column formation, and that close combat might be a bit too deadly. Even if you win, chances are that pretty much any formation will be so badly bloodied after a melee that they are practically useless. However, after playing the game and talking about it, we are definitely thinking that a few house rules can make the experience more suitable to our taste at the club, as the foundations are solid and the rules seem quite easy to modify. So this was definitely not our last game of SP2, and thankfully we did not just waste a whole bunch of money and a few months of painting. :P So what's next? Well, for starters, I really need to paint up more troops! I need more officers in general, and I want to expand both the infantry and cavalry. For the infantry I know I want some Light Infantry, starting with the elite Carabiniers and then maybe some Chasseurs. And I need to beef up the line infantry, with more Fusiliers and Voltigeurs. Once that's done, I have artillery to paint, and after Warlord's Holidays sprue sale, I have enough to cavalry to, well, choke a horse? And TFL released a campaign module for SP2, so we can't ignore that either, can we? I already have an officer on a horse being painted, to represent a certain yet to be named heroic captain. 2017 will definitely see more Napoleonics from me. /Jonas
|
"Glory is fleeting,
|


 RSS Feed
