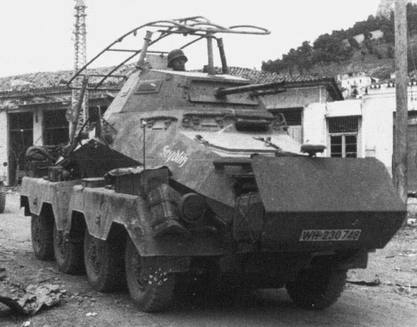
 The German armoured cars were often used for recon duty, and the schwerer Panzerspähwagen (Fu) Sonderkraftfahrzeug 232 (8-rad) (quite a mouthful), was equipped with a medium range radio with a large unusually shaped antennae to report their findings. It had a driver seat in both directions, and each pair of wheels could be steered independently. This was a development of the previous design with six wheels, and the extra wheels were added to improve off-road capabilities. The turret was armed with a 2cm automatic cannon and a MG 34 machine gun, to deter infantry and to defeat weaker enemy recon troops that it might run into. The "plow" in the front was a later addition to increase front armour. The German Aufklärungsabteilung, or recon detachment, often included armoured cars. Panzer divisions would field heavy armoured car companies that consisted of a mix of these 232 as well as the 231 (which didn't have the radio antennae), and the smaller 222 armoured cars. Since we'll be fielding panzergrenadiers in the Stalino campaign, it's only fitting that these recon vehicles get stuck in at some point.   The kit is a 1/48 scale Tamiya plastic model kit. The build was pretty fun, and the vehicle itself is unusual enough to just grab your attention. As you might notice, the decals included are representing the tank in the picture at the top, with the same name and everything! IAs usual, Tamiya included decals for other fronts and time periods as well.
Just like with the 251, I had troubles with the brush-on gloss varnish. I'm starting to think that it's just a plain bad idea to use brush-on varnish for such large, flat areas: no matter the brand, it tends to clog up and dry up into uneven blobs on the surface. But a second layer of matte varnish again managed to salvage the results a little bit. The weathering was done with Tamiya pigments. I tried a new technique of adding water to the pigments afterwards, and then smudge the watery mix into crevices and such. It's not perfect, but it sure looks it's been through a bit of mud. If I were to build another one I'd probably add some more stowage, as the pictures I've seen of the car in action has everything from helmets tied to the sides to bags of food, water buckets and tents. After all, these vehicles were moving out in front of the main forces, and would have to be more independent with their baggage as well. Finally, here's a short documentary about the 231/232 if you want to see them on the move. /Jonas
0 Comments
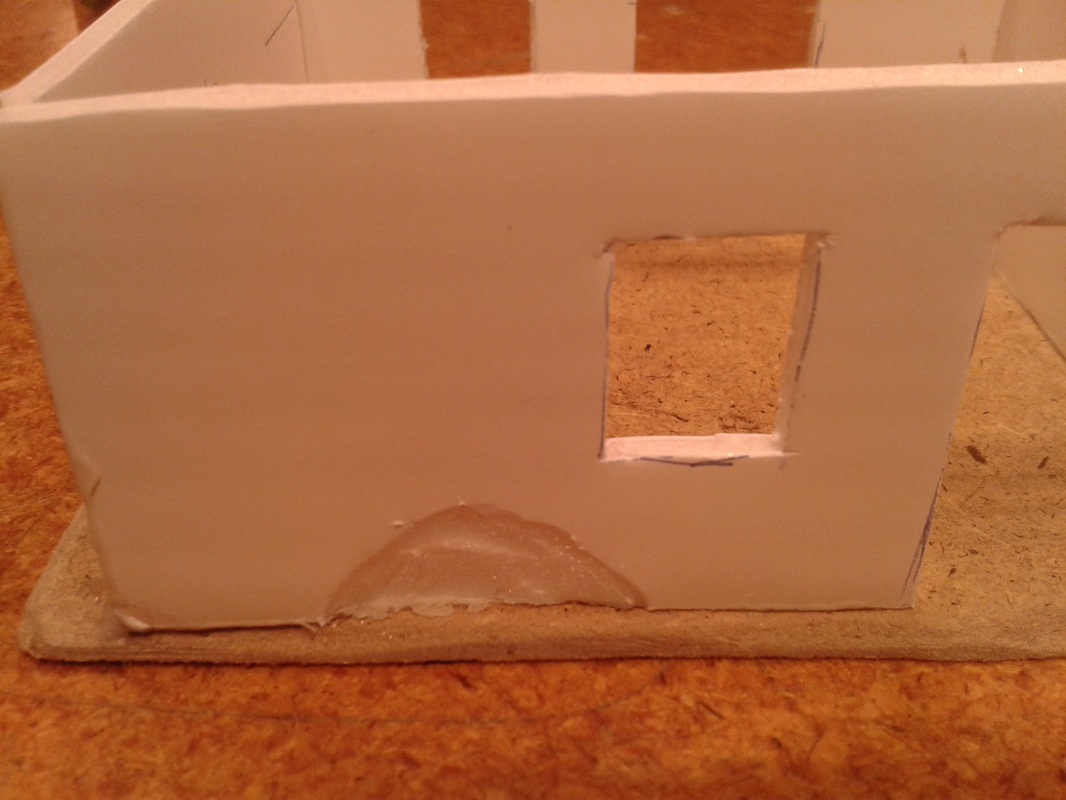
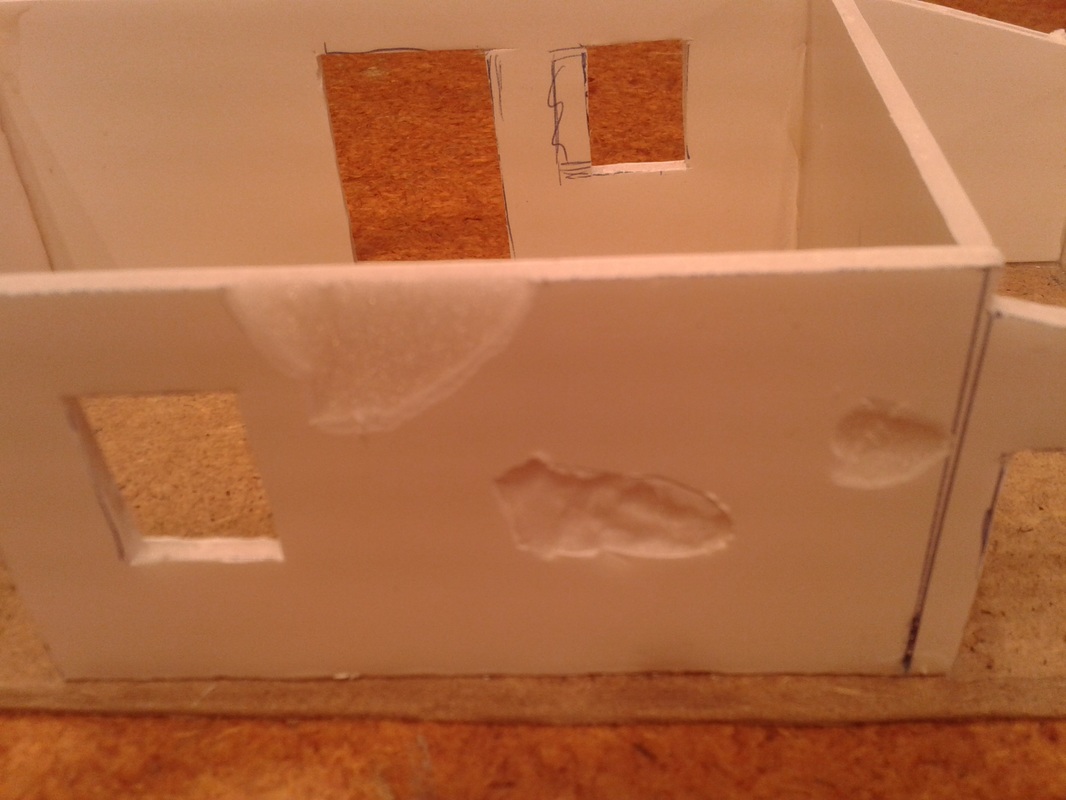
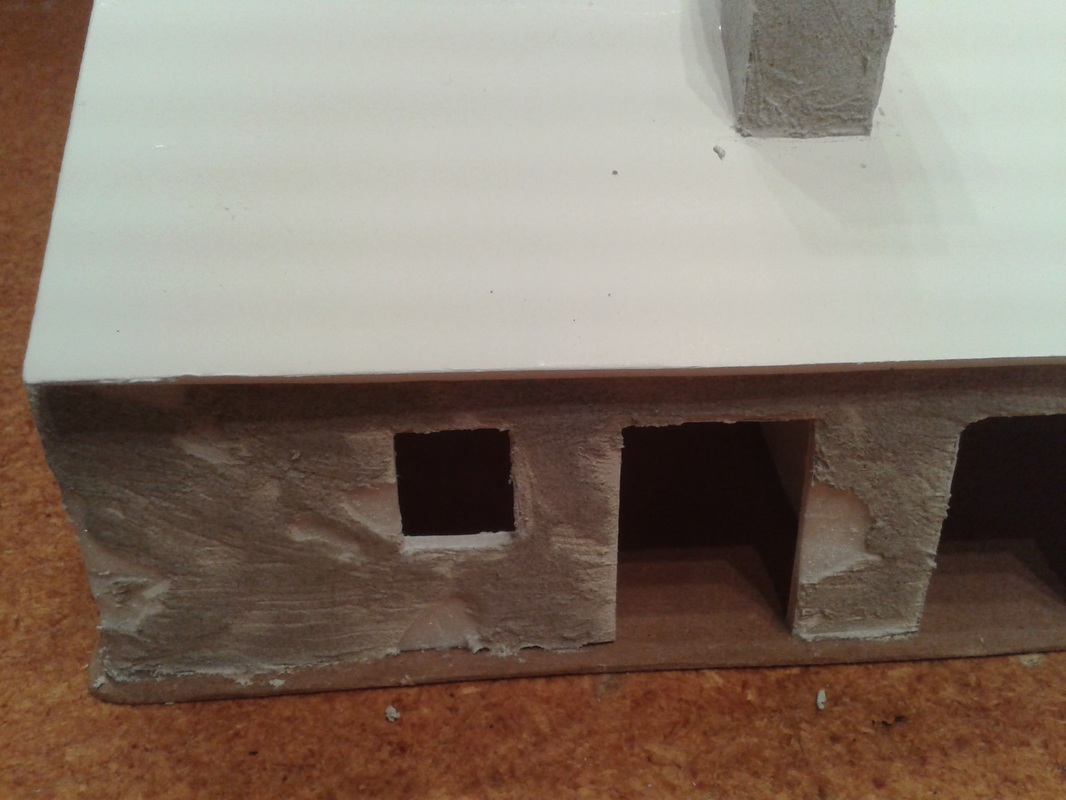
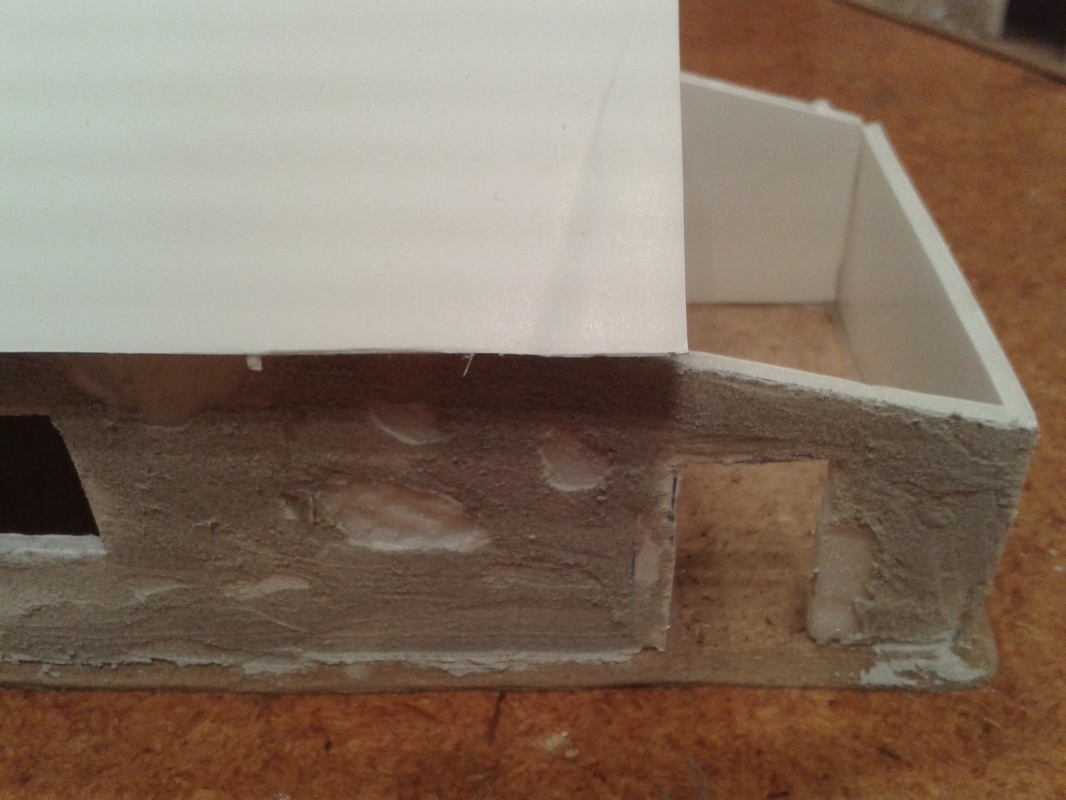
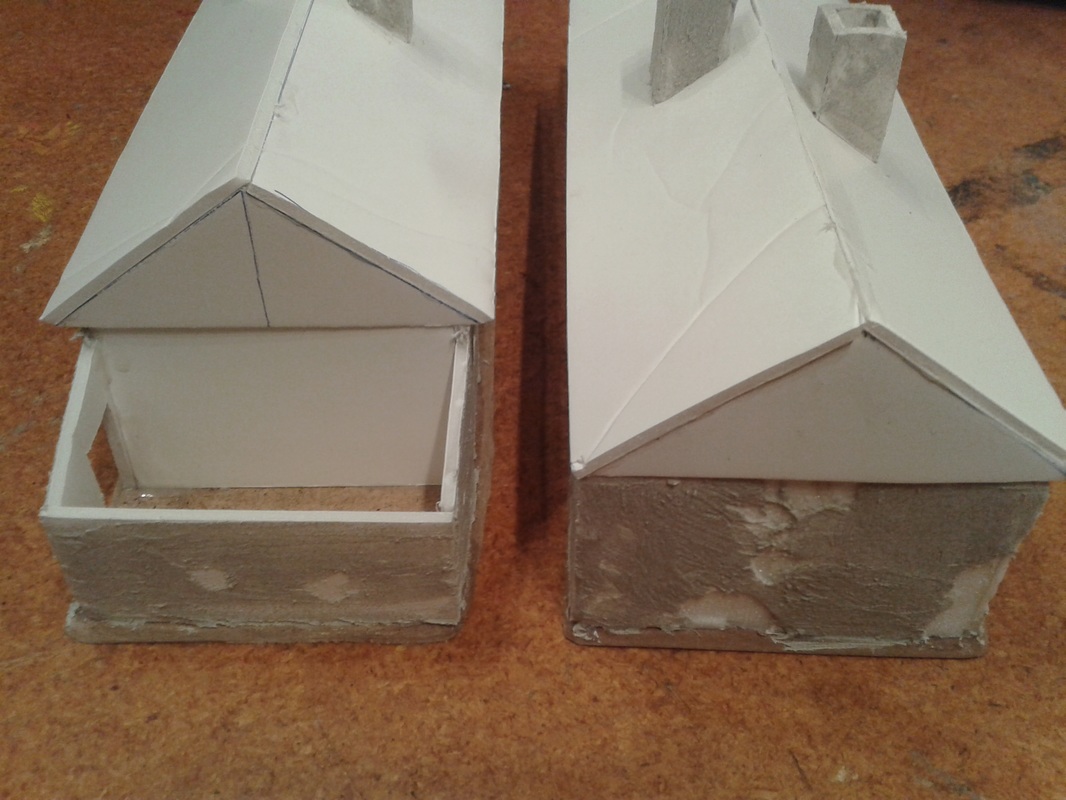
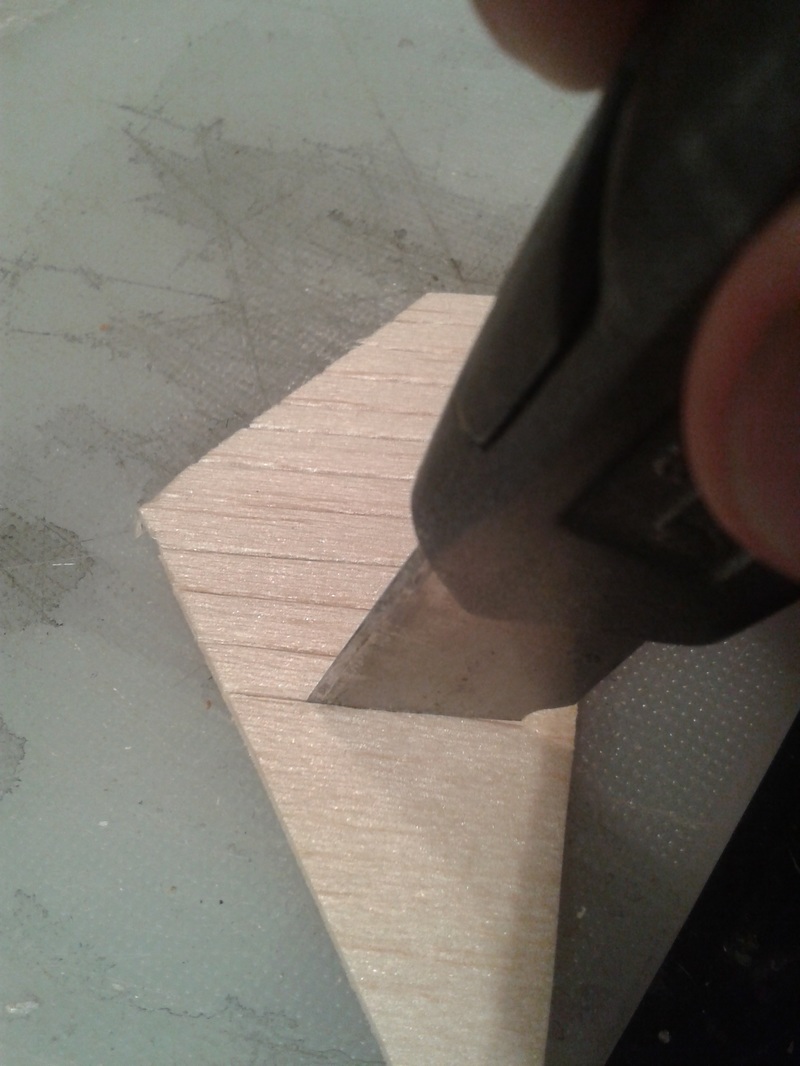
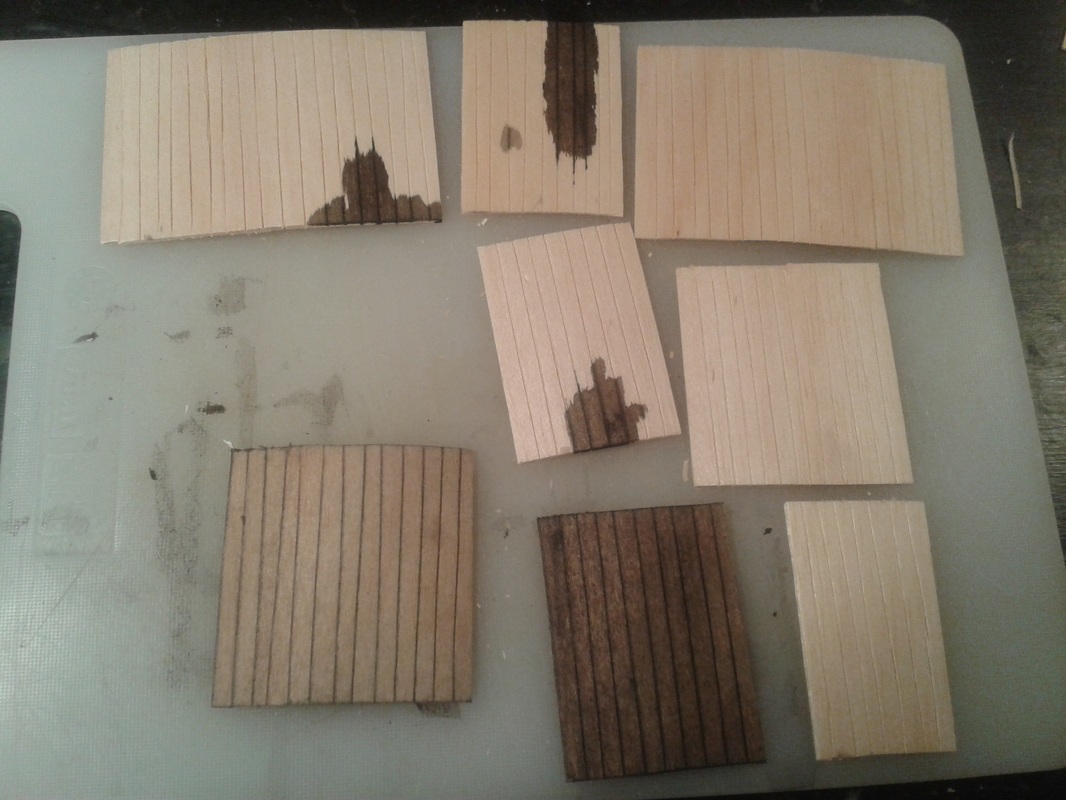
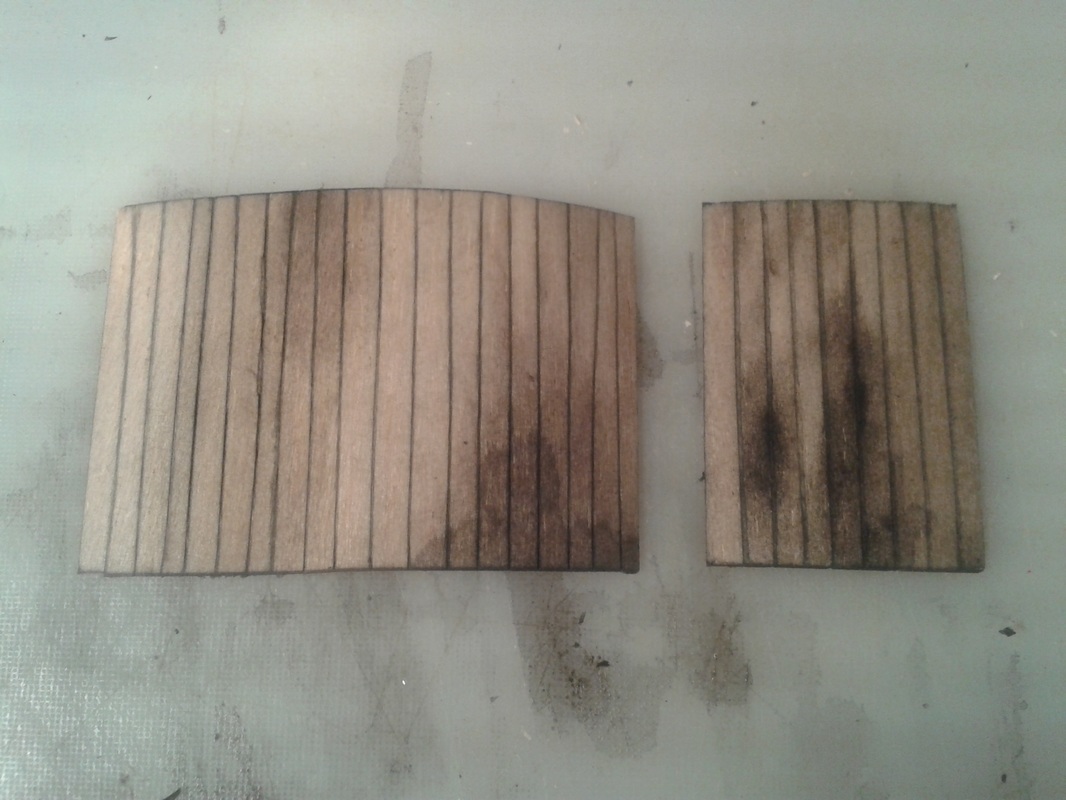
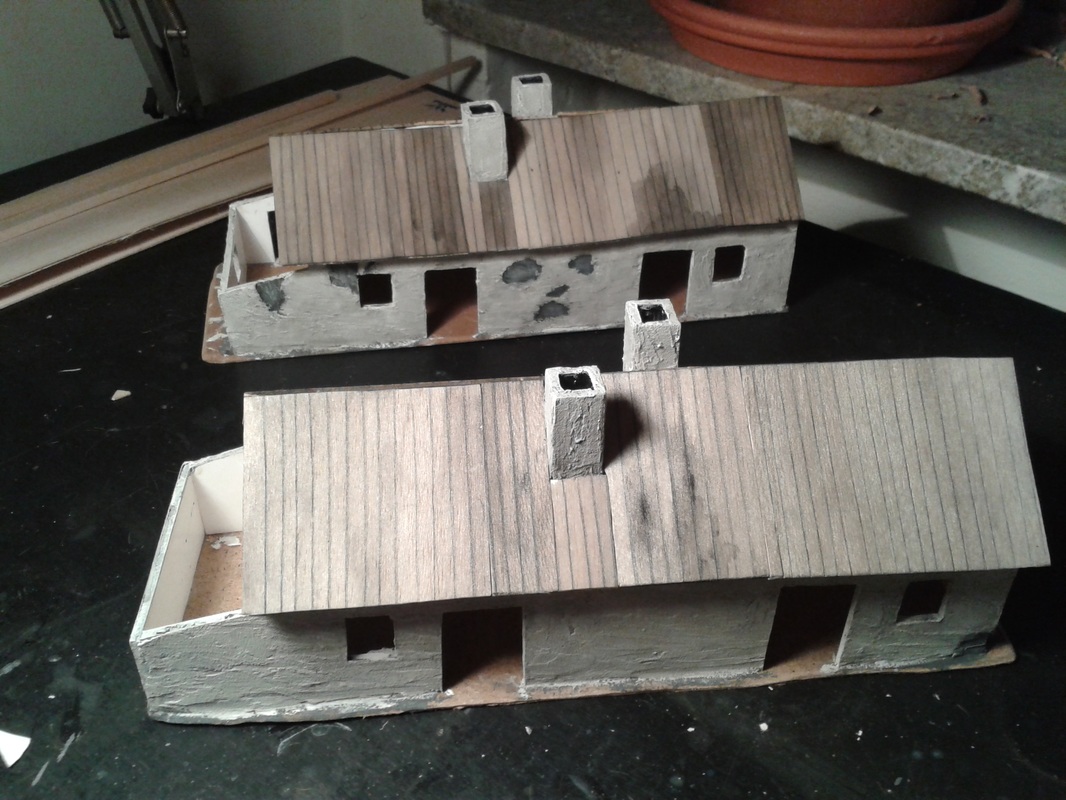
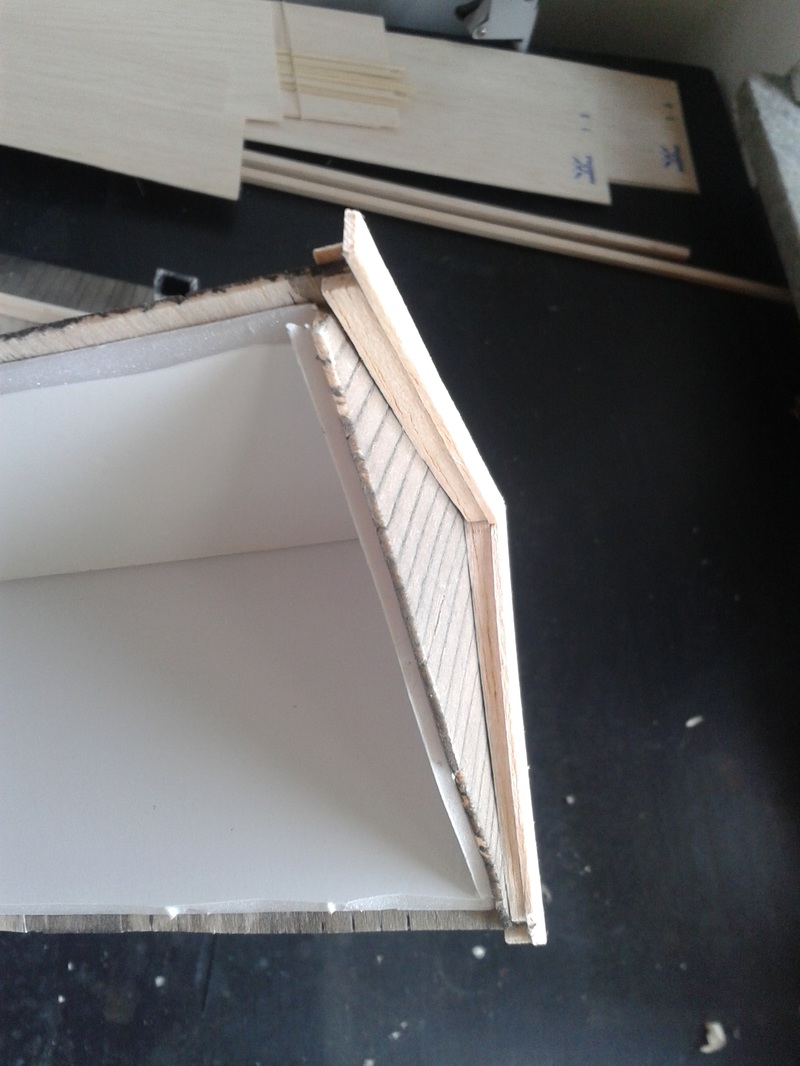
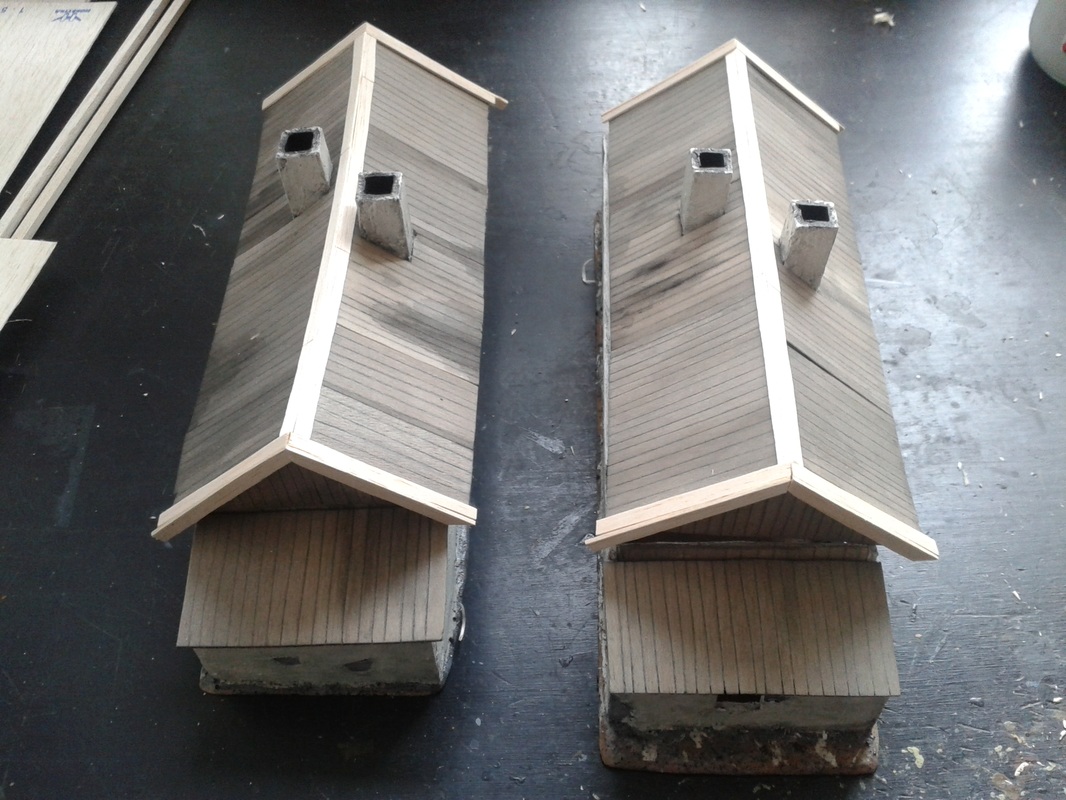
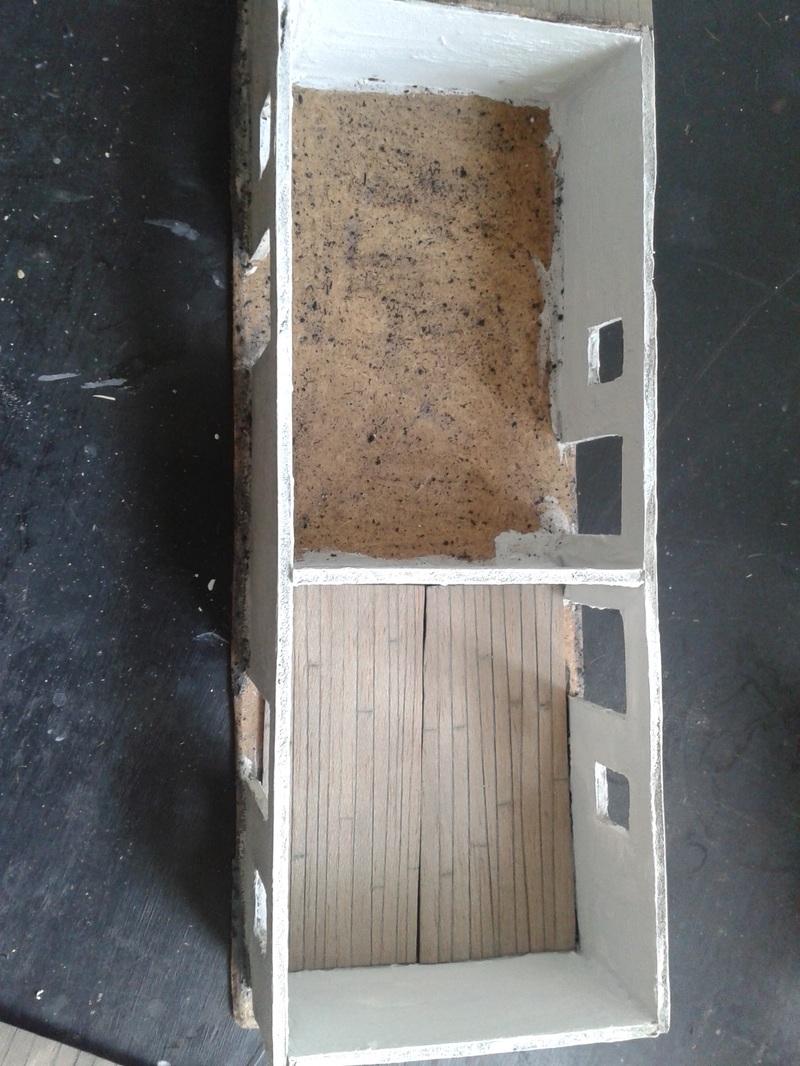
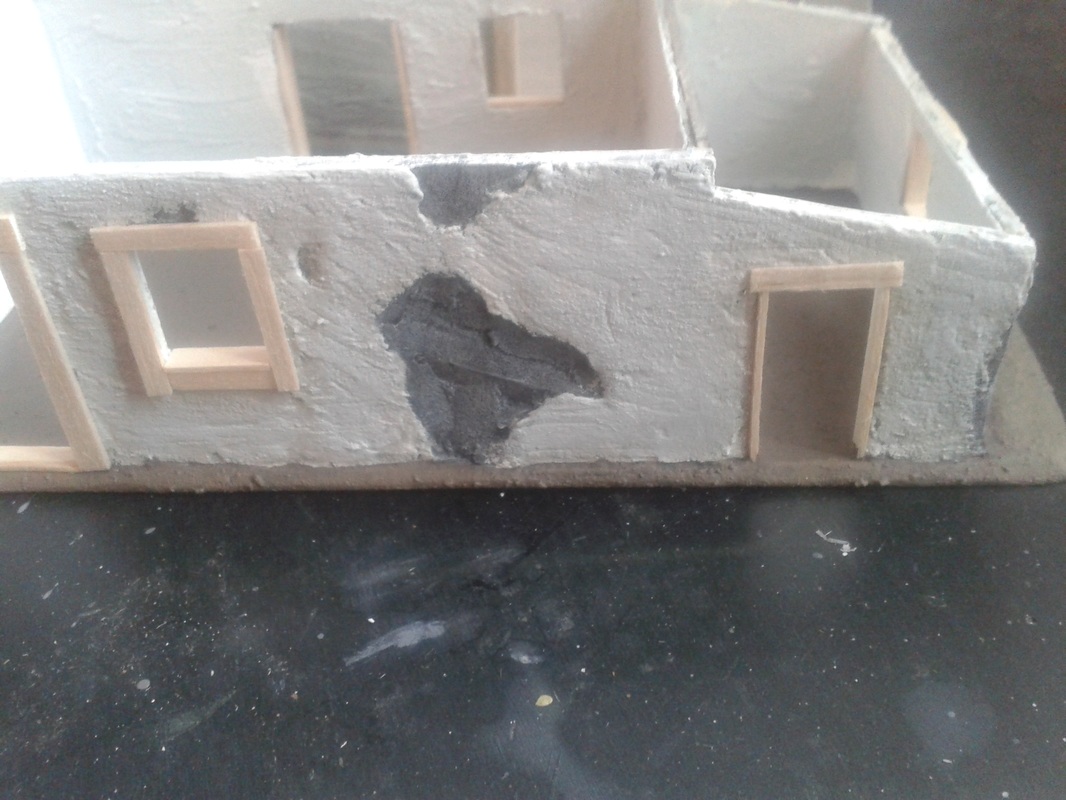
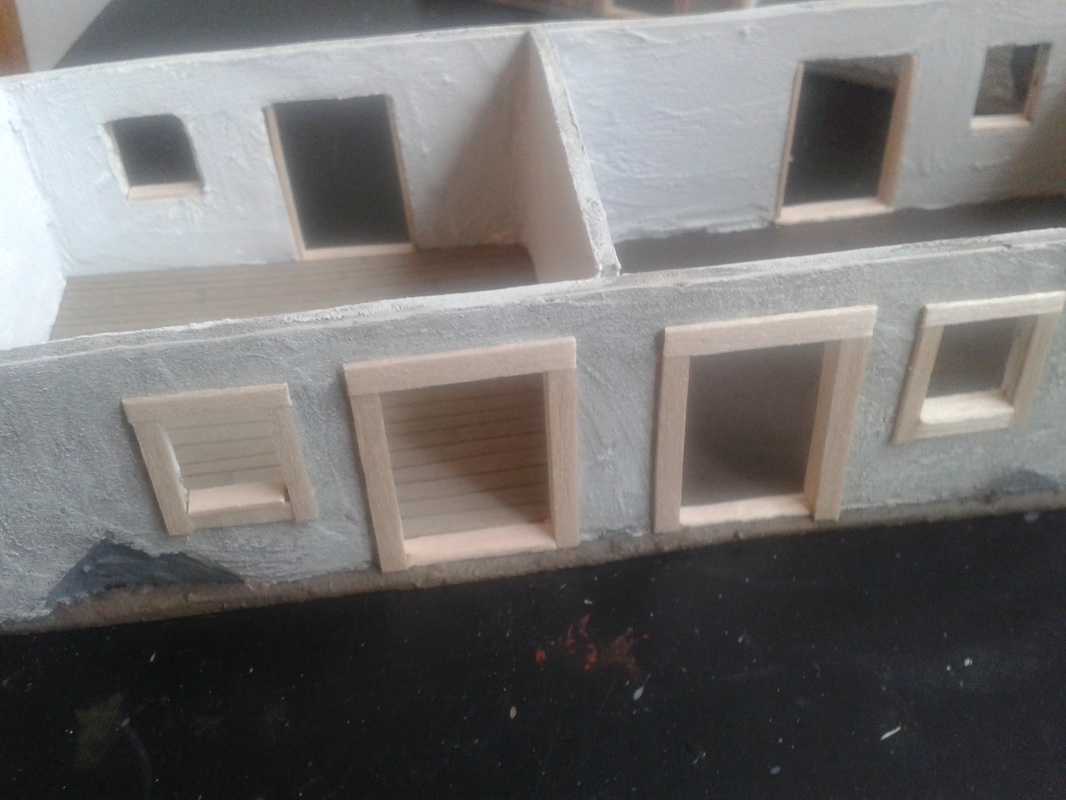
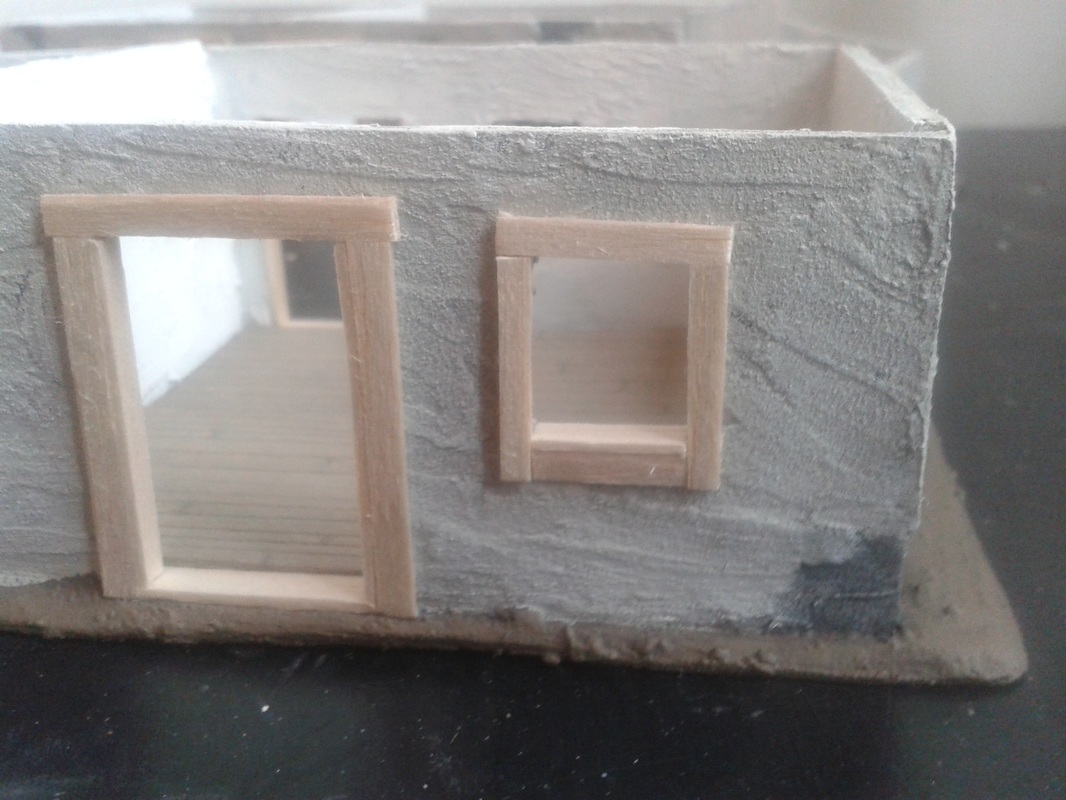
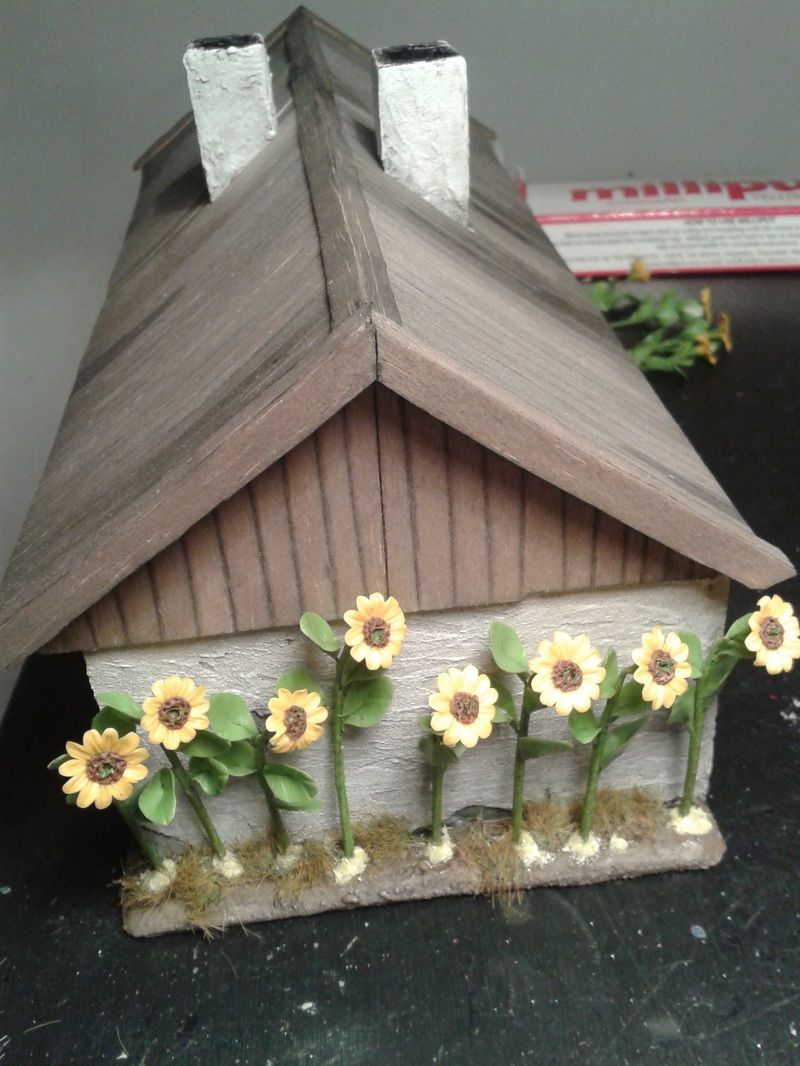
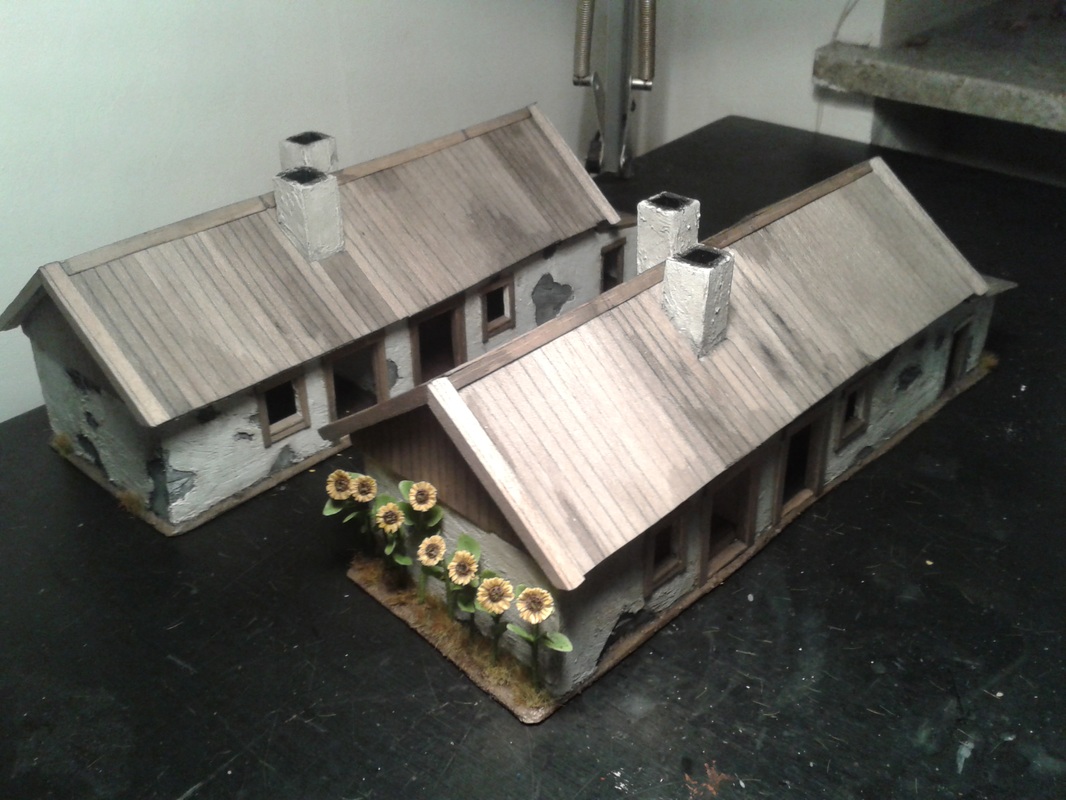
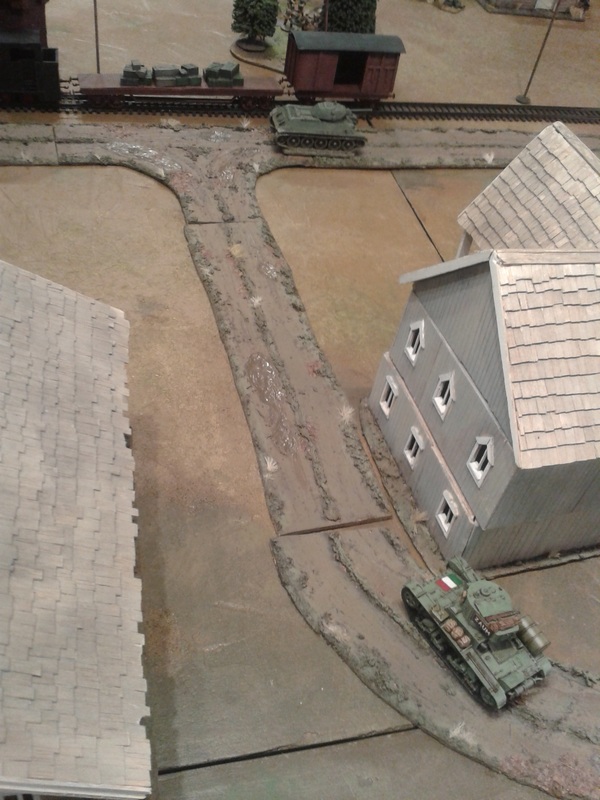
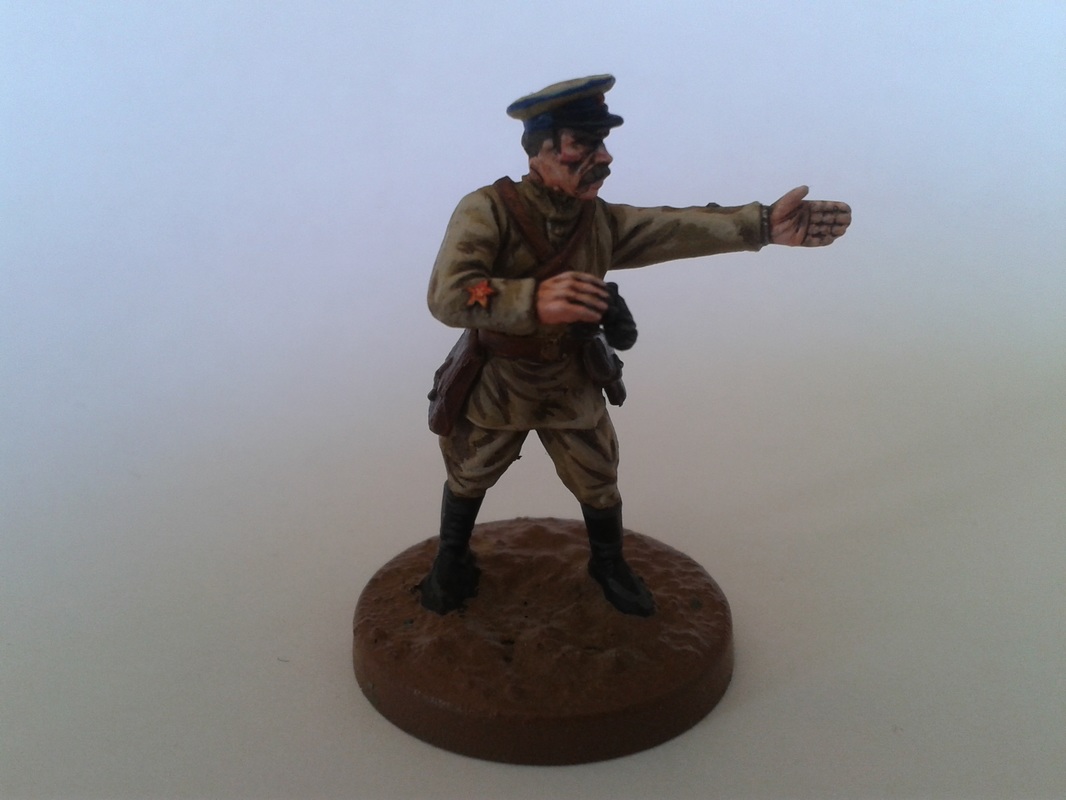
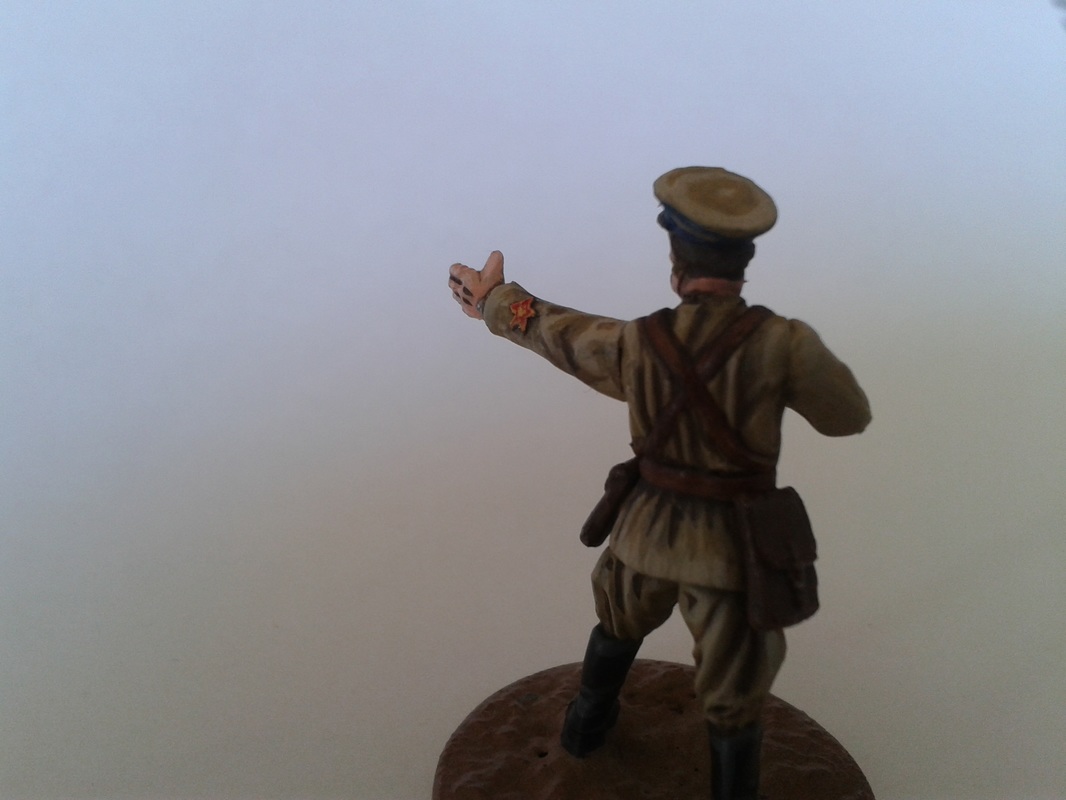
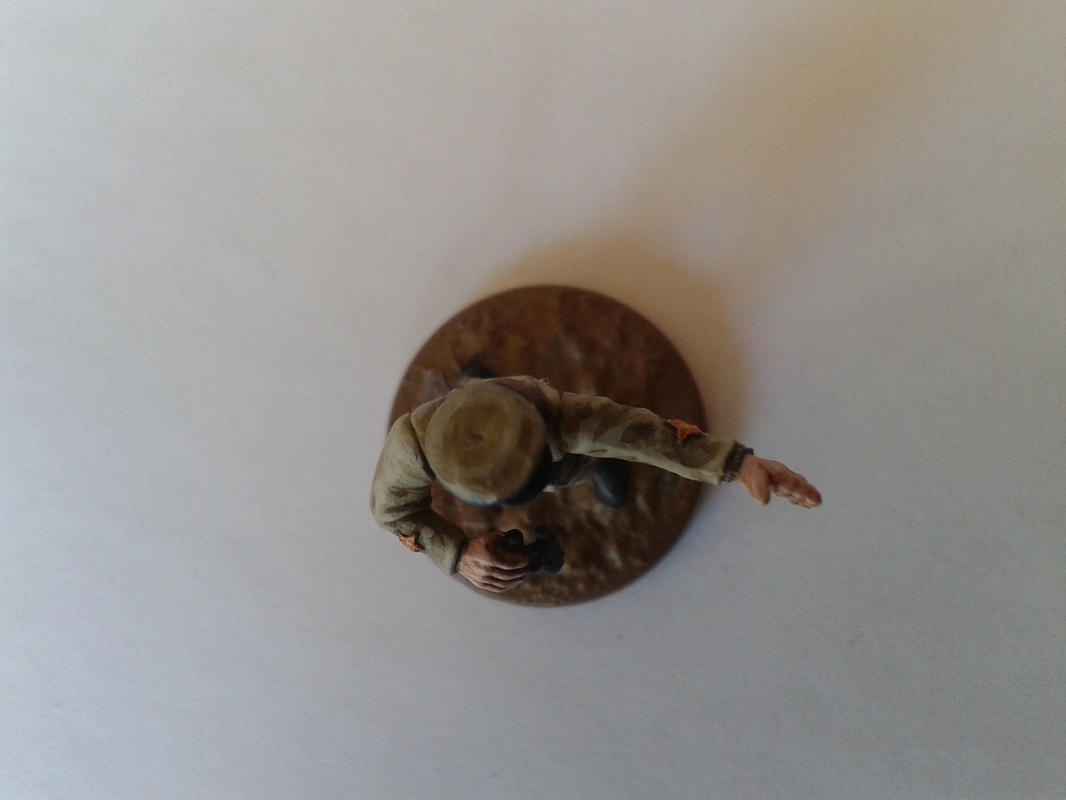
It is time to finish building Stalino so we can get the campaign going! I wanted the plaster on my houses to be in a bad shape. It looked like that on my reference pictures and it will give an nice 3D feeling to the buildings. As I built the walls in foam-board I just took a hobby knife and carved away in places where the plaster had given way! Then I took a medium filler with some water and applied it to the walls with an small flat stick, leaving the places where I made holes in the foam-board without filler. I think it turned out well, The filler gives a good structure and it was quite easy to apply, very easy if you don´t make any holes that you then have to look out for! The roofs will be made out of planks, and I will make them with balsa wood. To give the roof the look of repairs I painted the balsa sheets (1.5 mm) first and them glued them on the basic roof structure in foam board. This also helps you to not get PVA-glue on the balsa before painting as it really disturbes my very water heavy painting style. I treat the balsa with the back-side of a hobby-knife before painting as the "wash-style" paint I use (black hobby-paint, with much water) applies well, and in a couple of second it looks lika a wall/roof/floor! I painted the balsa in two stages and let the first dry before the second turn was done, in this way I achived a nice water/moisture-damaged look. Then I did some more balsa work to finish the roofs with barge-boards and so on. I used 1.5 mm balsa here as well, but it looked a bit rough so I had to trim them thinner with a hobby knife after gluing them to the roof... unnecessary extra work as I could have used 1 or 0.5 mm balsa in the first place! Then it was time for one plank floor. The other got dirt-floors as it was faster, a little too time consuming to get the balsa sheets in the right size for the rooms after the walls are built - if you want plank-floors, which looks really nice, make them before the walls are put in place. I also added door frames and windows. As this campaign is set for Stalino, which is located in Ukraine - we had to get some sun-flowers. We got them from Woodland Scenics who sells railroad modeling stuff. To plant them firmly I made a little ball of milli-put to stick them into and then glue them in. After I washed them with some watered down brown to get away from the plastic finish most model train stuff have. After this I was pleased! Something beautiful in the horrible year of 1941... It is said that many Ukranians survived on sunflower-seeds because that was the only food that the Germans left to them. But then one of my fellow gamers came to visit and with the comment of "Very cute, but don´t they look like gigantic buttercups!?" I knew something had to be done. So I trimmed the petals to a more sun-flower like apperance with a sharp scissors, which was a pain as they were already firmly stuck in the base!   The Stalino campaign is approaching at a break-neck speed, at least that what it feels like. To be able to track all the platoons and support options that will move around, we're making a very basic map to place chits on. As the platoons go back and forth, we can just move the chits instead of writing everything down on paper. I also got a list over the June-Dec 1941 ToE of the 4th Mountain Division from Micro Mark Army Lists through Wargame Vault. We plan for the division to be part of the Axis forces in the campaign, but there's no CoC list for Mountain Rifle Platoons as far as I know. So I used the books I bought and the ToE list to try to figure out a reasonable platoon list for CoC. In the end it seemed to be basically the same as the Barbarossa German Rifle Platoon, but with a seemingly obligatory anti-tank rifle (the PzB39). 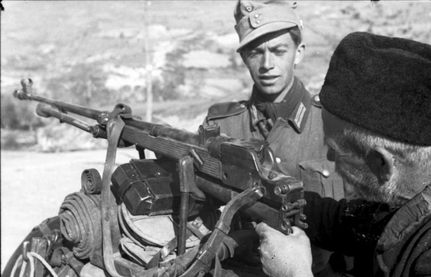 A Gebirgsjäger shows an old man a PzB39 - Greece 1941 I've never used anti-tank rifles in CoC, so I'm honestly not sure if it will be worth it. At least it gave me a reason to start converting up a Gebirgsjäger Panzerbüchse 39 team. Will it be finished in time?
-Jonas The Stalino campaign is approaching rapidly, and we're all scrambling to put together terrain, soldiers and vehicles for it. I just finished my first squad of the converted Gebirgsjäger. I noticed that the Perry Miniatures plastic minis have a slightly shallower, less exaggerated details - especially for their faces. This means that with my normal way to paint, they ended up a bit flat. But overall I'm happy with them, and especially that they ended up looking distinctively different from our "normal" German infantry.  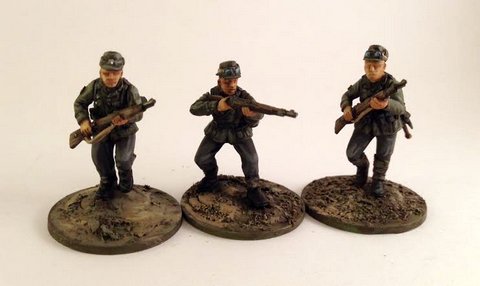 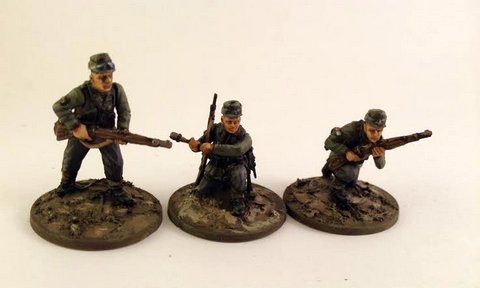 I will try to improve with the next squad. Maybe stronger highlights on the skin areas? Either way, rumours has it that one of the Axis forces in the terrain will be Panzergrenadiers, so it's suitable to add some more transportation options. Here's a Tamiya 1/48 kit, a Sd. Kfz. 251/1 Ausf. D. This version is way too early for 1941, but frankly, I'm not the person that can spot different versions of Hanomags at an arm's length, so I'm ok with it. 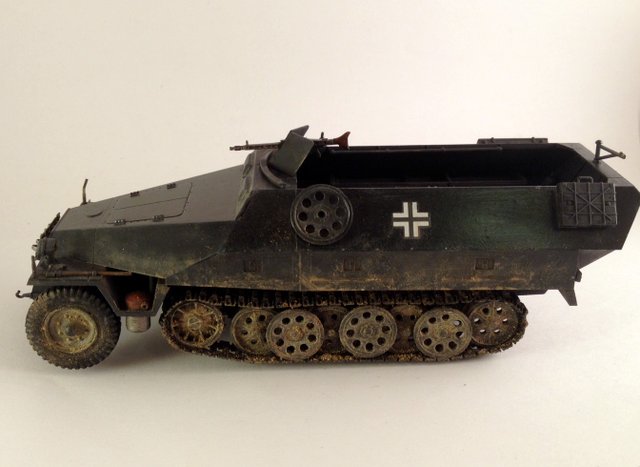  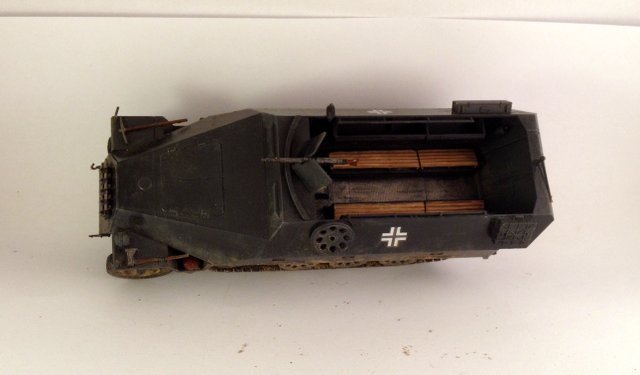 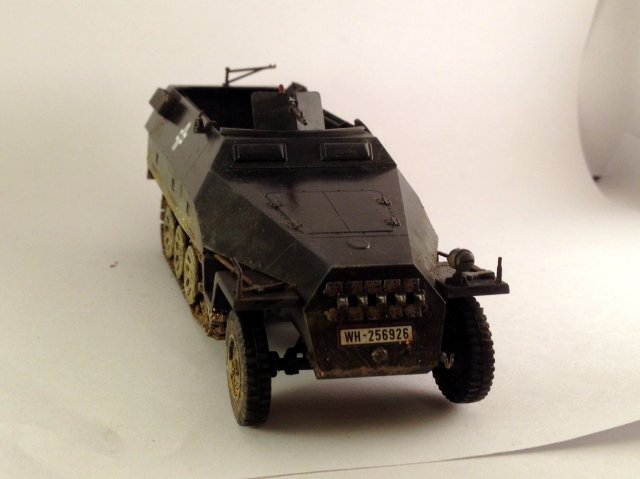 I'm trying to learn to use pigment powders to get a better mud effect on the tracks and wheels. Looking at color reference photos, it seems quite common for the mud to dry around the wheels in a very light, almost sandy brown. I was trying to recreate that, and thought I don't think it was a complete success, I learned something from the process.
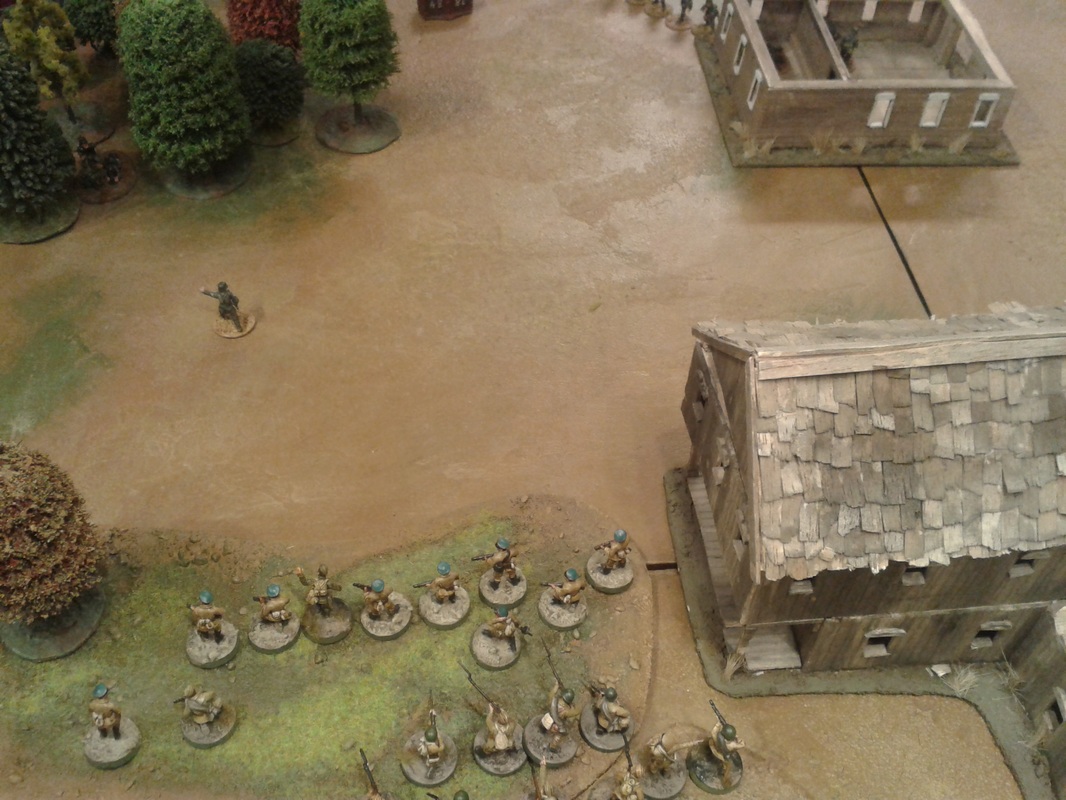
The kit itself was quite simple, and it comes with a bit of extra stuff to put on where you like. It does look a little bit strange to have it without crew at all, so if we're talking about future unneccessary vanity projects, I can imagine getting a second Hanomag with seated passengers. But for now, it will do just fine. I still have a half painted Opel Blitz truck and a Sd. Kfz. 232 waiting to be finished, so there'll be plenty of opportunity to practice! Cheers, Jonas Almost scince we started playing CoC we have been talking a lot about playing bigger games. Big CoC was an instant hit with us and I think one third of the games we played have been Big CoC. But we have wanted a more elaborate scenario for games with several attacking platoons and one defending - a very realistic attack scenario in WW2, which I don´t think Big CoC recreate quite as well as it does games with the same number of platoons on both sides. We wanted a scenario where the attacker needed to take bigger risks, facing time shortage to take the objective, and a numerically inferior defender that had a distinct upper hand when the attacker stumbles into prepared defences. When we turned out to be three players for a night of CoC we made up the following scenario, and it turned out to be an very exiting game. The attackers were one Italian and one German platoon, and a Soviet platoon defended. We played on a 8´ by 4´ board. It played out very well, and the fortunes of war waxed and waned back and fourth several times as it should in a good tabletop game! Here are the rules for the scenario: Hasty Attack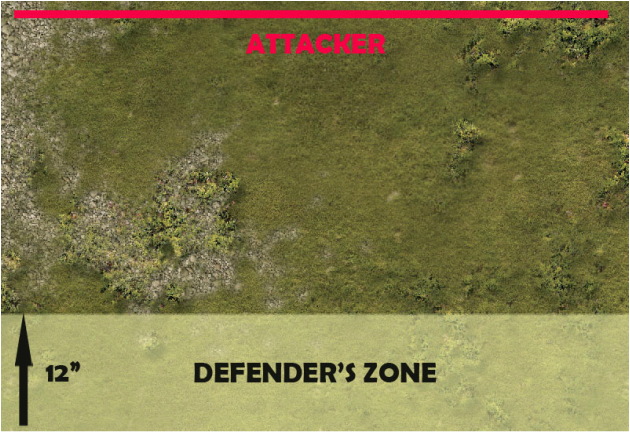 Start by setting up the terrain as normal. Once you have decided which table edge the defender will deploy from, mark out a zone on the defender's table edge. This zone starts at the table edge, and extends 12" into the table. If you are playing with a wider board then standard the defender's zone will be limited to 6' in width. So if you have a 8' wide table, the zone will end 12" from each short table edge as well. To win, the attacker must have an uncontested Jump Off Point in the defender's zone when the third turn ends, or win by reducing the defenders' morale. Any other result is a win for the defender. Note that it's at the end of the third turn, not third phase. The Patrol Phase The scenario is played with the attacker and defender deploying their patrol markers on opposite sides, on the long table edges.. The defender has four patrol markers witch is places ut to 18" from his table-edge in a continious line with no more than 12" between the markers. The attackers place three patrol markers each at a point anywhere along their table edge, the attackers need to have one each of their respective patrol markers within 24" of eachother. During the patrol phase they always need to have two patrol markers within 24" of each other in this way. The patrol phase begin with each of the attackers rolling a 1D3+1 and taking that many moves. The side with the highest morale makes then their move/es altering moves until the patrol phase ends. Morale, Force Support and Special Rules The defender gets three free special CoC-Dice, this three dice can´t be used to end turn, but otherwise functions as ordinary CoC-Dice. The defender also gets two free entrenchments. The defender rolls for morale as usual but the attackers roll only one die, using that morale togheter. Moral loss to any of the attacking platoons lower their unified morale. Effects of low morale applies to both attacking platoons. Each attacker rolls 2D6 for support. The defender gets half of the attackers combined support-roll, rounded down. The force morale ratings is then compaired for both attacking platoons individually against the defending platoon. The result of this is then combined for the defending platoon. More photos from the game are to be found in our pictures section!
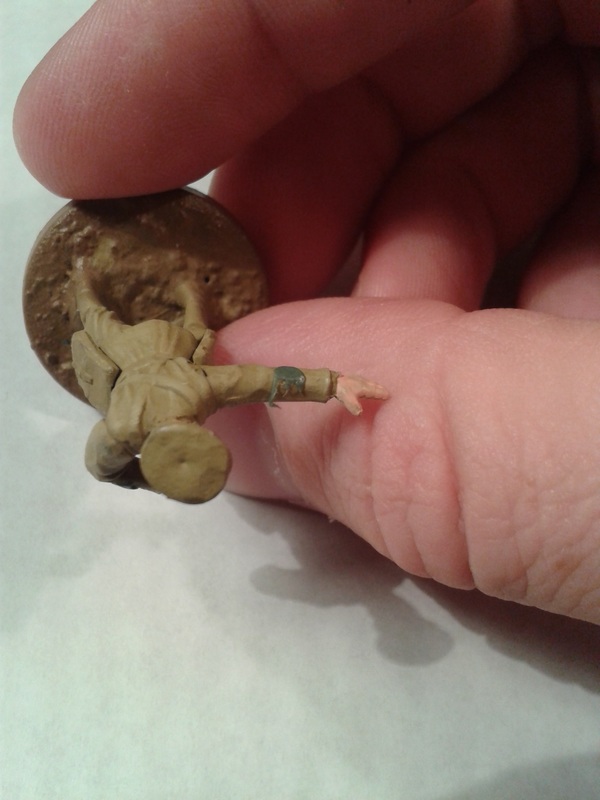
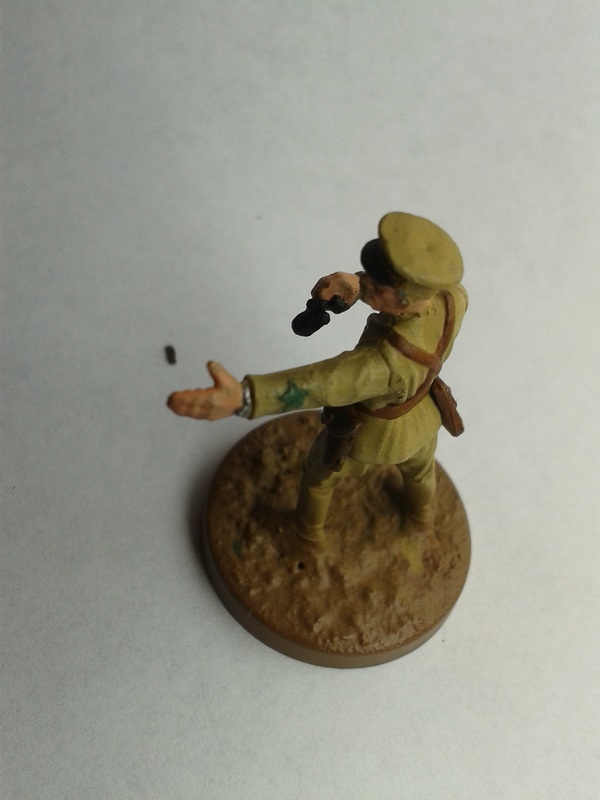
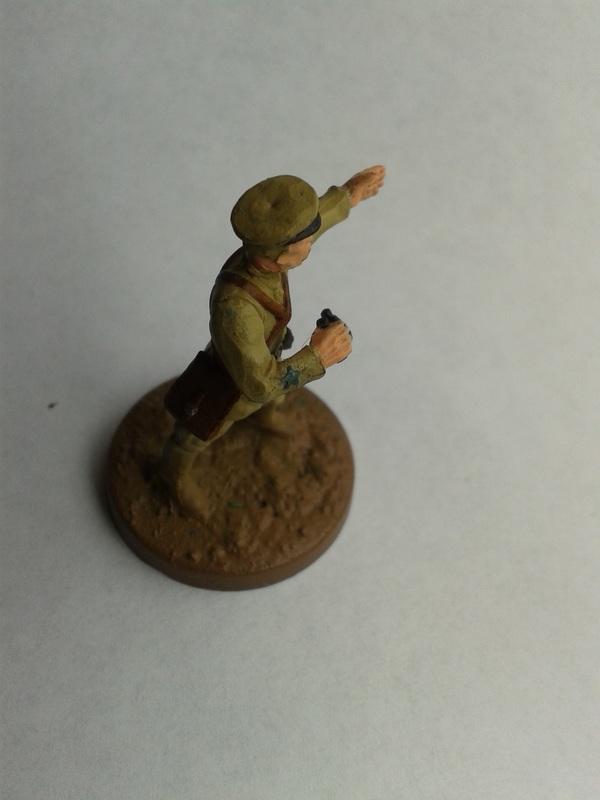
It was very fun to see Jonas gebirgjäger conversion, and especially his little edelweiss-badge, because at the same time I had started making green stuff badges myself! Great minds think alike. I have always wanted to field a commissar in my CoC-games - a colourful and special officer unique to the Red Army. But so far the rules for them in CoC have left me without testing them at the field of battle (not playing the winter war yet, and the Barbarossa list rules, being, in my opinion faulty both historically (shooting privates in the middle of fighting?) and rules-wise (shooting one third of the section to unpin them?). So I sorted out some own rules after discussions at the TFL-forum, great! The only problem now was that I did not have any miniature... That should really be no problem as any officer model ought to suffice, but I´m kind of a purist and in the beginning of the war the commissars (or politruks, as they were named at company level) had a star-shaped patch with the hammer and sickle on it on their sleeves instead of a chevron as other officers. Of course my commissar needed this (no manufactures of miniatures has done an early war commissar, no suprise there!) I took a very small amount of greenstuff, rolled it to a ball, put it on the appropiate place on the model and flattened it. Then I worked it with a sharp hobby knife to the star-shape I wanted. It was not to easy, but both stars were to my liking at the third try. The smartest thing I did was to leave the first star to dry before doing the second, otherwise I would inevitable mess it up and destroyning the firts one making the second. As I already had primed the model (a WG-plastic soviet with WG-plastic Blitzkrieg german arms) you can´t se it to well, but the stars are there and greens stuff green! Then I felt I had to paint the commissar up so you could see the finished result, he is not based yet but he will get some love there in the future as I have more models based at the same time... With finished base in sigth, redy to lead the poeple of the soviet union to victory over death and destruction! I have not tested my own rules yet (not having a proper commissar model), but if you want be the first to give my new commissar rules a try out here they are:
COMMISSAR (LIST TWO SUPPORT) The Commissar is a Senior Leader. If within command range of any friendly unit with shock that may be rallied, the commissar has to be activated if any Comand Dice of 4 is available that phase (only a natural 4 count for this purpose). Before making any other activations (including activating himself for movement) the Commissar has to use all his Command Initiatives to rally available shock from friendly units within his command range. Cheers! /Simon 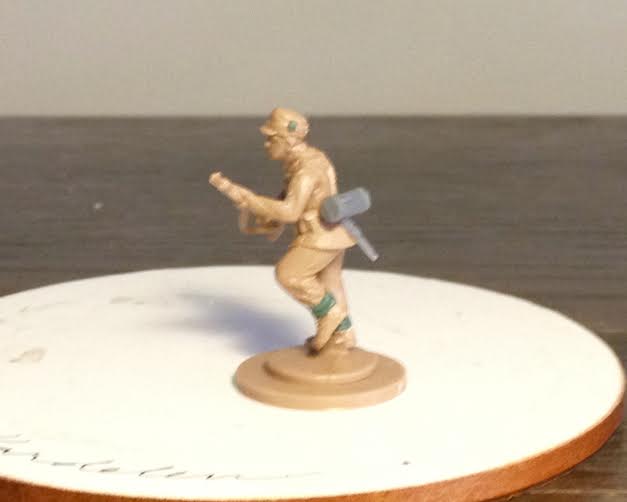 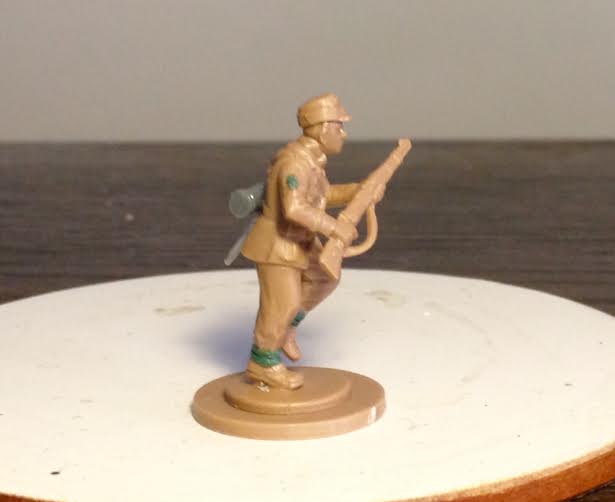 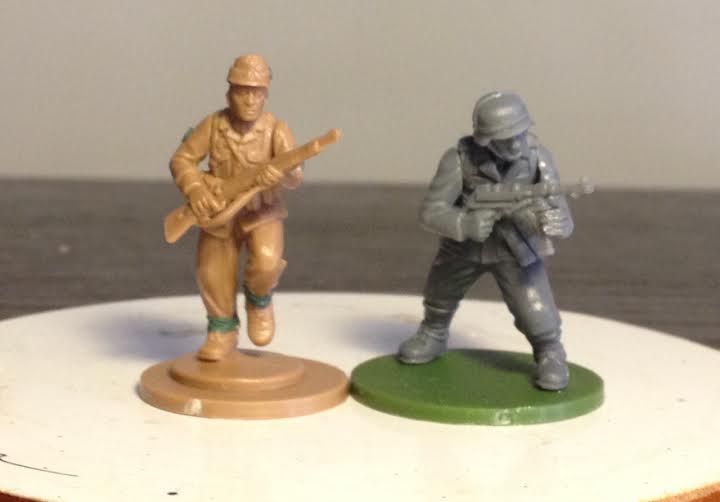 Just a quick update after conversion test of the first Gebirgsjäger, using the Perry Miniatures Afrikakorps box.
Left picture: I shaved off the botton of the legs with a hobby knife. I rolled two tiny "snakes" of green stuff, and attached one around each ankle. Then I took a dentist tool and flattened the green stuff a bit, and finally made a small score in the green stuff to make it look like puttees rolled around the legs. For the hat, I first shaved off a millimeter or so of the bill. I took a very tiny ball of green stuff and flattened it on left side of the cap, which is as close as I can get to model an Edelweiss in this scale. Finally, you can see that I went with just a gas mask container. In a lot of the pictures in the reference photo book I got, the Gebirgsjäger would carry a very light load, both when marching and in combat. Othen they are seen like this, with just the gas mask. The Perry box doesn't come with a bit of just the container, so I took one from a Warlord Games Blitzkrieg Germans sprue. Funny fact about how clueless I am about WW2: I used to think that this round container was some kind of thermos for food! Middle picture: again I took a extremely tiny speck of green stuff, rolled it to a ball, and flattened it against the right arm. This is for the Edelweiss emblem worn by the Gebirgsjäger. Right picture: comparison with a Warlord Games miniature. It's becoming clear just how much these will stand out from the other Germans. The stances are very different, with the Perry's having a much straighter stance than WG's, and I like the more realistic proportions of the Perry miniature. On the other hand, the Perry Kar 98 rifle is a bit too stocky, and I think I prefer WG's rifle actually. Finally, the Perry kit comes with what I assume is 20mm round bases, and we have 25mm round bases for all our WW2 troops this far, so they will definitely be different if not only because of this. Overall, I'm kind of happy with how it turned out, and the work involved has definitely not been so much that I'd reconsider doing a whole platoon. My big concern is whether the puttees will look good painted, or if it will look like a bunch of Germans with ankle monitors. I also think that maybe it would be enough to paint on the arm badges, but it will probably be nicer to have a bit of 3D feeling to them. Cheers, -Jonas In my first encounter with squad-level WW2 gaming I was impressed by how beginner friendly it was. After all, the miniature requirement is much lower than for the kind of army level games that I was used to. Even when you add a lot of support points to a Chain of Command game, you're still looking at 30-40 guys and about two or three choices of guns, vehicles or small teams of engineers or a lone medic. Not exactly enough to fill an entire wardrobe. However, if there's anything stronger than the power of love, it's the power of wargamers to find excuses to add to our lead mountains. Now that we reached the point where we can field two (or even three!) platoons of ordinary riflemen for both Soviets, Germans and Italians, it's not enough for us to just get more troops. Instead there are fierce Cossack raiding parties forming in the Soviet camp, and spectacular Bersaglieri plumes are spotted among the light Italian tank, so can I be faulted for starting to feel left out with my bog-standard German infantrymen? Something had to be done. 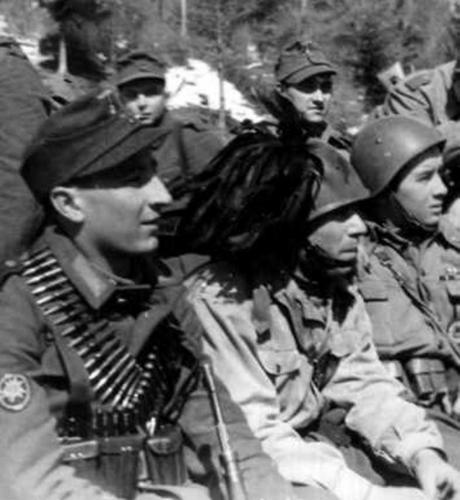 Axis Alpine BFFs The Hills are Alive with the Sound of FascistsI considered my expansion options carefully. I wanted to do a smaller force, just a single platoon, that I could invest some effort into now that we have enough minis to easily play even a four-player game. So having to do some simple conversion jobs was not a hindrance, but rather something appealing. I also wanted it to something slightly unusual as far as WW2 wargaming goes. Fallschirmjägers is a popular force with lots of miniature support, but also kind of out of place on the east front at the time. SS units are also notoriously popular among certain wargamers, but not really my cup of tea. Ragtag squads of naval troops would be very cool, but a bit limited in scope and availability as minis. But Gebirgsjägers started to make more and more sense, the more I looked at them. Pros:
Cons:
 Once decided, I did some web-based resarch to figure out what I needed to represent these alpine Teutons and what to use to convert them. Visually, the Gebirgsjäger are distinguished by their different headwear (Bergsmütze), Edelweiss emblems on caps and arms, mountain trousers with extra reinforced seats and crotches, and wool puttees (leggings). They also had a special anorak to wear in snow or cold mountains. Looking at my available options, it dawned on me that the Perry Miniatures Afrikakorps box could be the way to go. First of all, it includes several of the M43 field cap, which was closely modeled after the Bergmütze. If I could just shave off some of the bill it would be close enough. The trousers are not that big a deal, and just painting them stone grey instead of field grey is good enough for me. The puttees will have to be converted with some cutting/filing and green stuff. As a bonus, the kit comes with a light mortar team, so I wouldn't have to get any extra metal minis to convert these. However, the kit also only covers three squads, so I would have to get two boxes to field a full platoon. On the other hand, this would leave me with enough extra men to convert up some Gebirgsjäger crew for the guns we already have. Rules-wise there are not that much to adjust compared to a normal German riflemen platoon at the time. The Gebirgsjäger would generally use lighter weapons suitable for cramped urban fighting or that could be dragged along by pack animals in difficult terrain. This can easily be represented by choosing anti-tank guns or Flak 30/38 guns instead of tanks and heavy artillery when deploying for battle. Speaking of pack animals, they used a ton of them (around 6000 per division, including everyhing from donkeys and mules to camels!) to carry their stuff. They would also have a designated animal caretaker in each squad. This is a great source of ideas for Jump Off Point markers and I won't settle until I have a small Wehrmacht zoo to accompany these men. 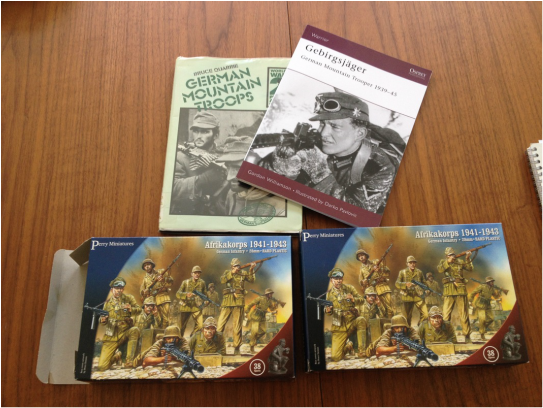 So here's where we stand: two boxes of Afrikakorps, the obligatory Osprey book for a cursory grasp at the subject, and an old reference picture book liberated from the Buckinghamshire County Library via Amazon. It has tons of great pictures, both staged propaganda ones and from real actions, so I am ready to give this a shot.
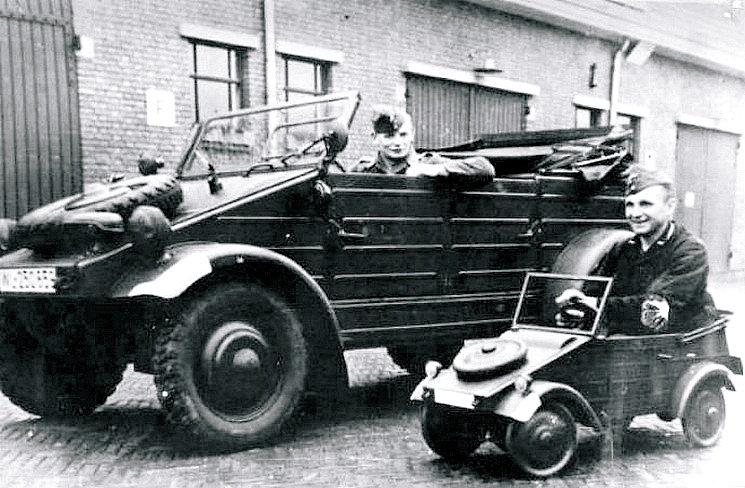 No, tinier! 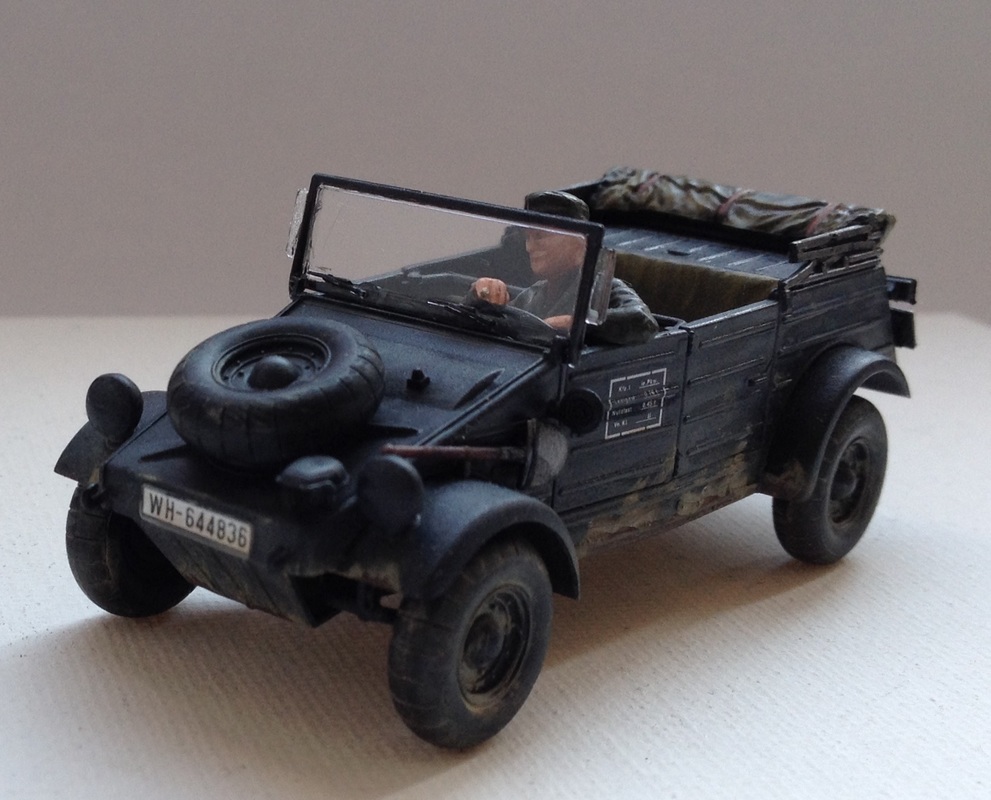 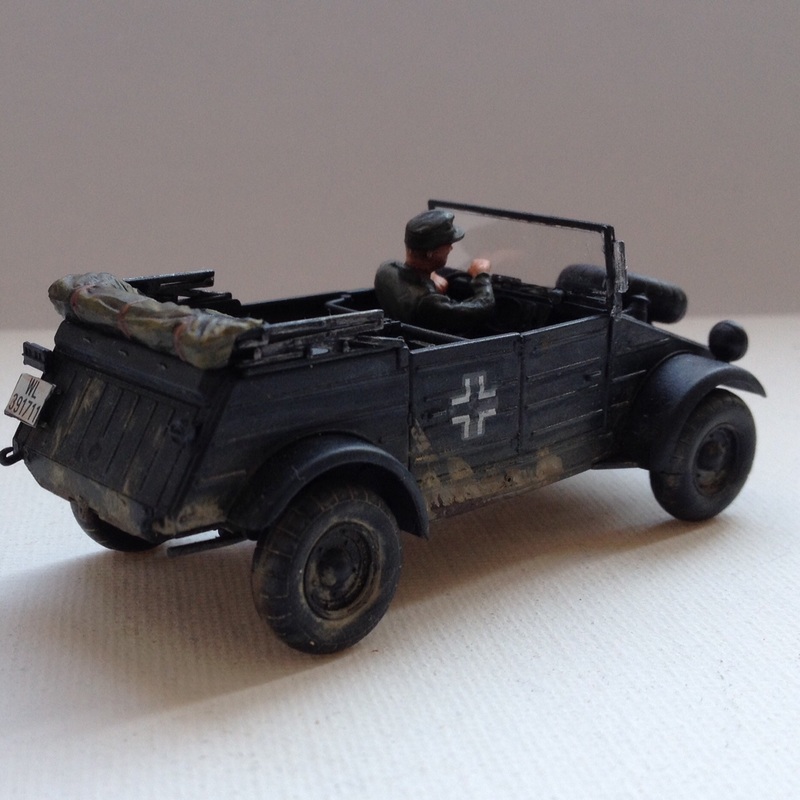 It was time to get the Kübelwagen painted. As with all the previous 1940-41 German vehicles, it was a straight forward job: pretty much the entire kit was painted with cLifecolor's Panzergrau. I got some pots from Lifecolor when we bought an airbrush for the club, and I've grown to like them more and more. The seats and the rolled up canvas roof were painted khaki green (Dunkelbraun). Finally I did some highlights with Tamiya's grey pigment powder. 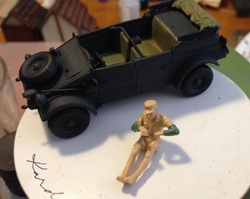 The driver included in the kit was dressed up for Africa, so I used kneadatite ("green stuff") to add some sleeves. I assumed that the short pants would not be visible once seated, and ended up just painting the legs Feldgrau. You can kind of see it if you hold up the model and peek in, but then I would like to know why you're peeking at miniature legs in the first place. Once I painted the Kübelwagen, I put on the decals. In this case the kit only came with Luftwaffe decals, so I did some googling to see how an army version would look. It turned out that there were all kinds of versions, but I found several examples with the Balkenkreuz on the rearmost right side door, so I went with that. Again, the kit didn't come with the cross, but I had some left from when I built a Panzer II, so I used that one. This time I remembered to put on micro sol on the decal before painting gloss varnish over it, which was a big improvement over last time. Finally, I weathered the kit with some yellow, sand, and mud pigments. This is the part that I feel the least comfortable with, and I think I put on a bit too much this time. I really should take the time to learn how to use these pigments properly. But in the end it's good enough for tabletop standard in my opinion, so it's off to Stalino with this little driver, along with the Pz.Kpfw. 38(t). 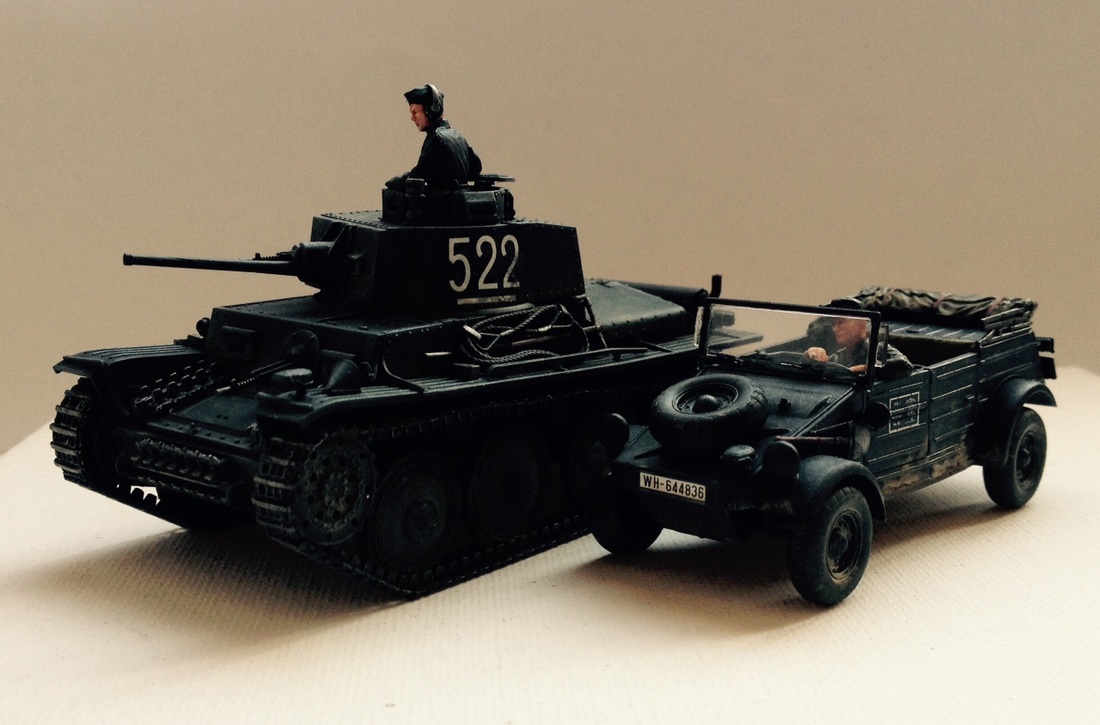 -Jonas
Building terrain is fun, but sometimes you need a break from building houses and telegraph poles. There are tons of things to add to your battlefield that suits the WW2 era, so I went and built an anti-air cannon! 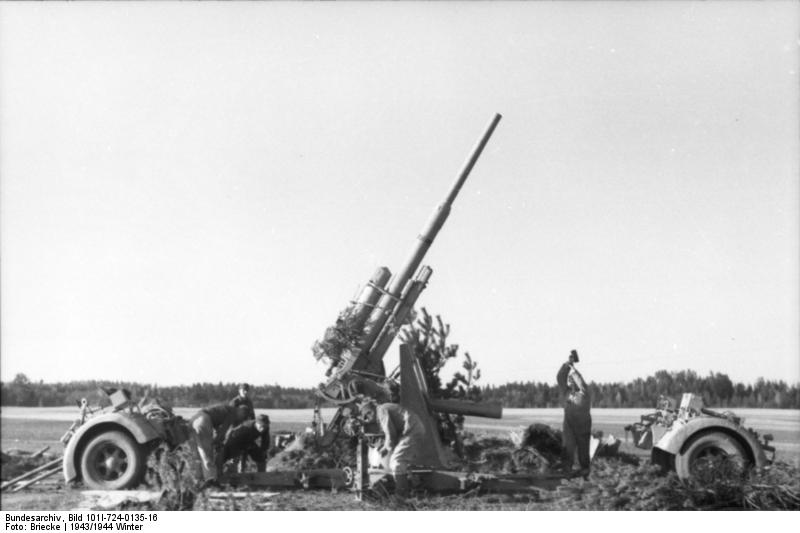 The German 8.8cm Flak gun, or "eighty-eight" as it got known as, was a weapon designed to shoot down planes. However, it quickly became obvious that it was deadly when used against enemy armour or fortifications. Able to deploy in less than three minutes and fire at both ground and air targets, it was both mobile and versatile. Chain of Command is a game that is played on much too short distances for weapons such as large flak guns to be a relevant playing piece. When used against tanks, these guns could penetrate armour two kilometers away!. However, there's nothing stopping you from putting an anti-air emplacement on the board, either just as scenery or as an objective. Can the enemy overrun your guns to pave way for an air attack on the nearby HQ? Or are your opponents going to stop your gun emplacements just as they are about to obliterate an approaching tank column far outside the tabletop? Or will you be able to smugly end the game with "I'm afraid the acht-acht will be quite operational when your friends arrive"? 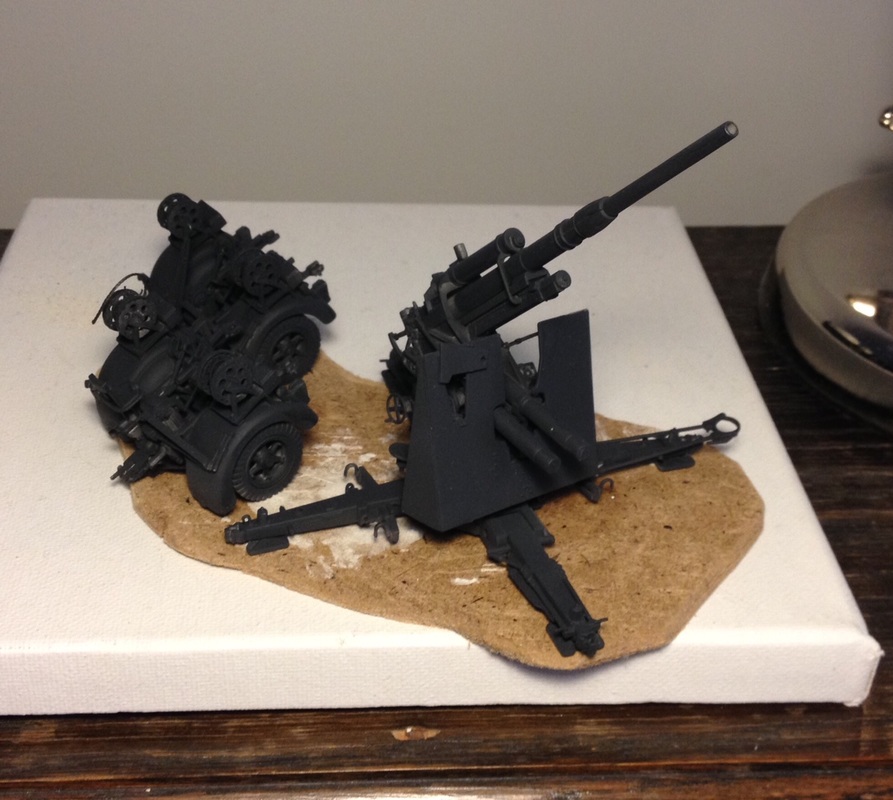 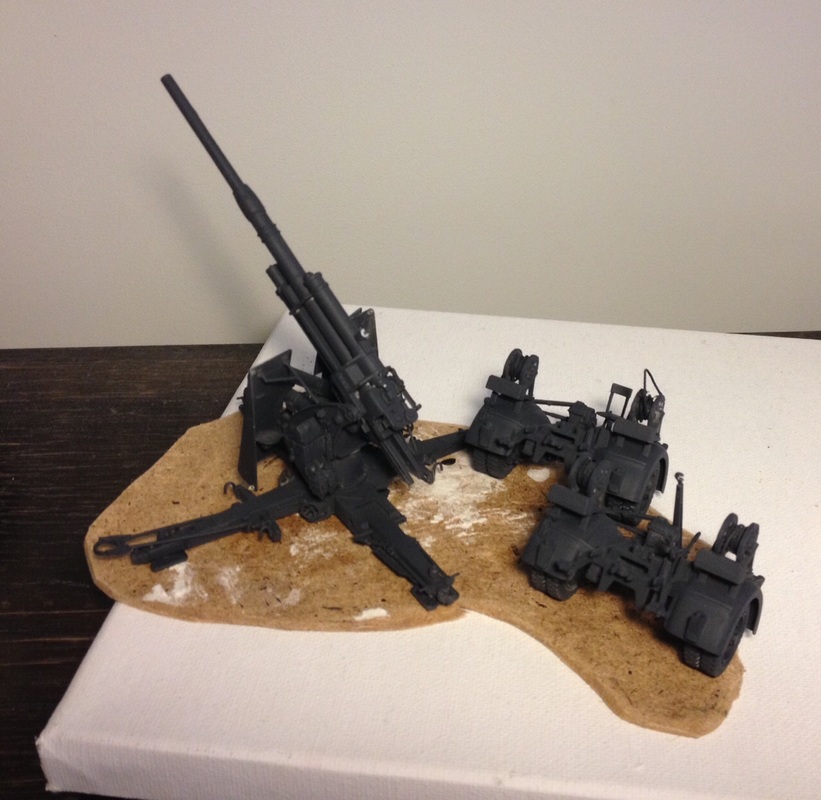 I had bought an oval base for the gun that turned out to be too small. However, luckily enough, I found an old carved out MDF base that was supposed to become an island for Trafalgar many years ago. It was just large enought to fit the gun and the two parts of the carriage. 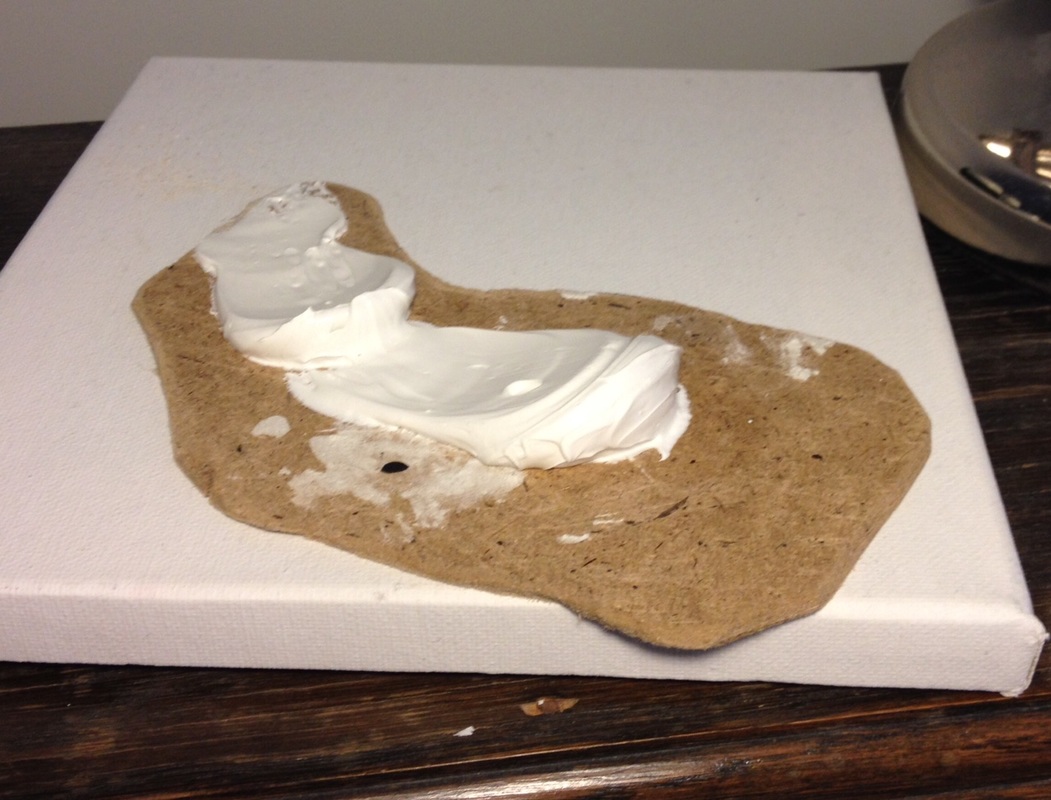 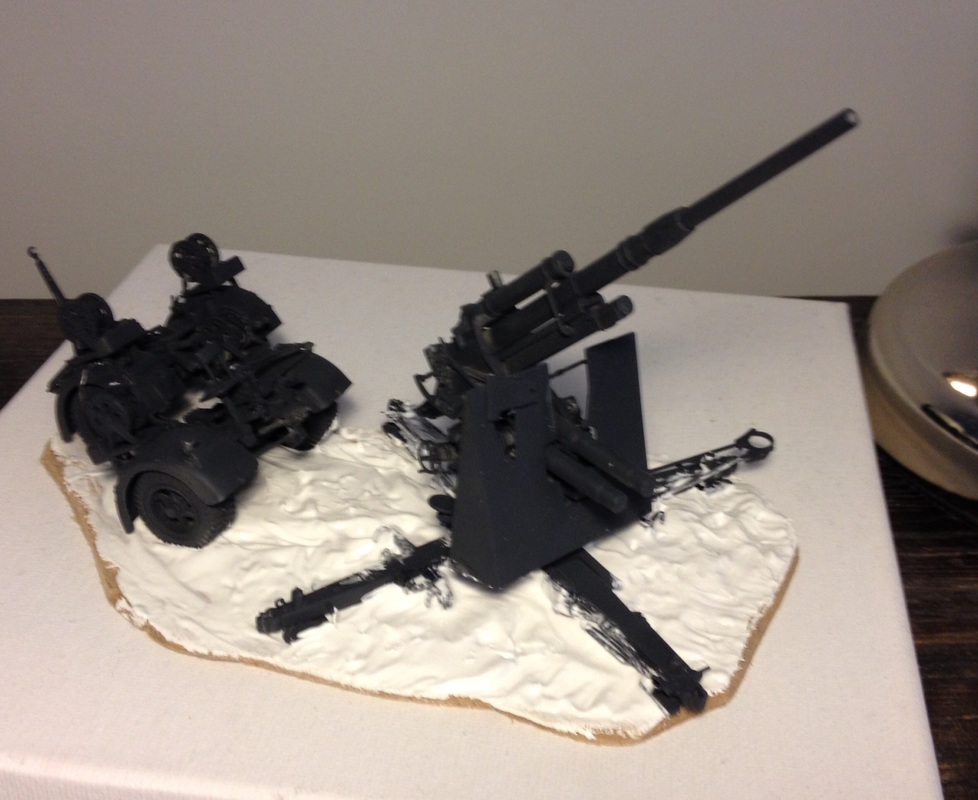 I applied a blob of spacle to the MDF base, and smeared it out. The gun and carriage was firmly smooshed onto the thick paste, and I used an old brush to make wheel marks from the carriage and to make sure that the gun was not completely covered in spackle. In the end there was still a bit of spackle on parts of the gun, but I blame the thick, Russian mud.
Anyway, I hope that it will be more fun for my Jerrys to take cover behind this instead of another stone wall. If you ever feel that you want to add a truck or artillery or something that doesn't suit your ruleset, you can always try to field it as objectives or terrain instead. Cheers, Jonas |
WW2 Campaign BlogThis blog follows the second Chain of Command club campaign, set in the intense fighting over Stalino in October 1941. Archives
January 2018
Categories |
 RSS Feed
