Samurai Painting GuidesI've received a lot of questions over the years regarding how to paint samurai. It's a tricky subject which can require some research to get it right. I've made some samurai painting guides to answer some of the more common questions, and they are linked here below.
Other Blog Posts
0 Comments
Next up it was time to start what will be the main bulk of the army - the halflings with pikes and pole weapons. These were mostly very simple conversions, mixing Perry heads and some heads I sculpted myself. 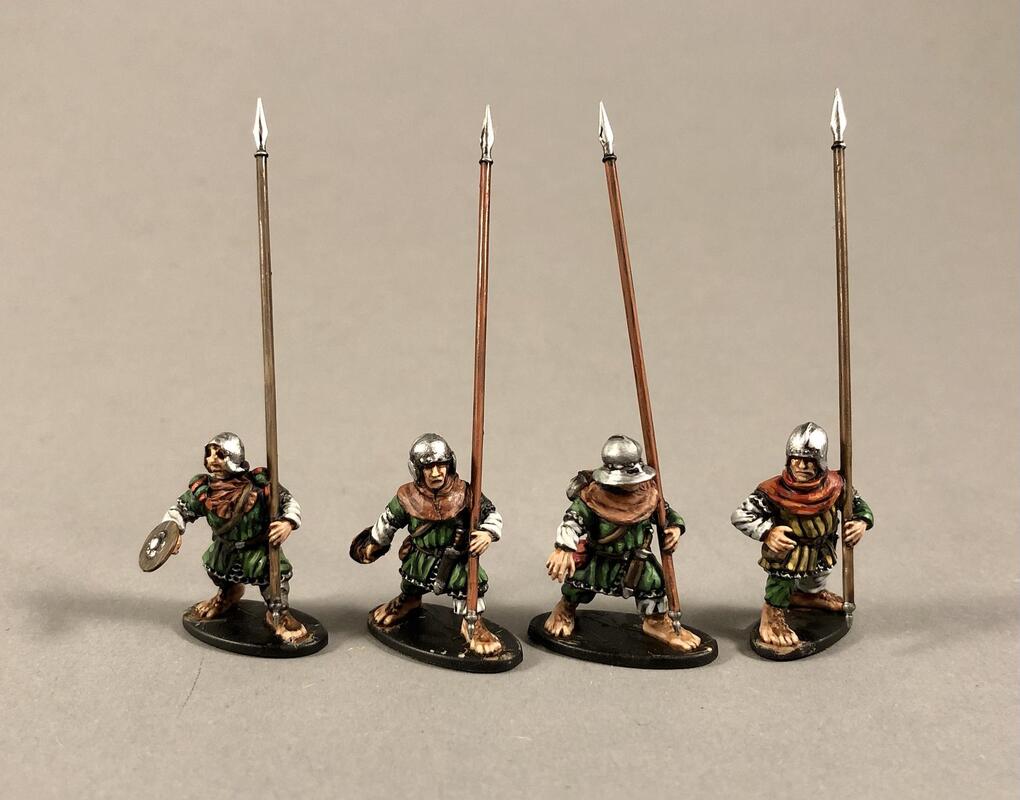 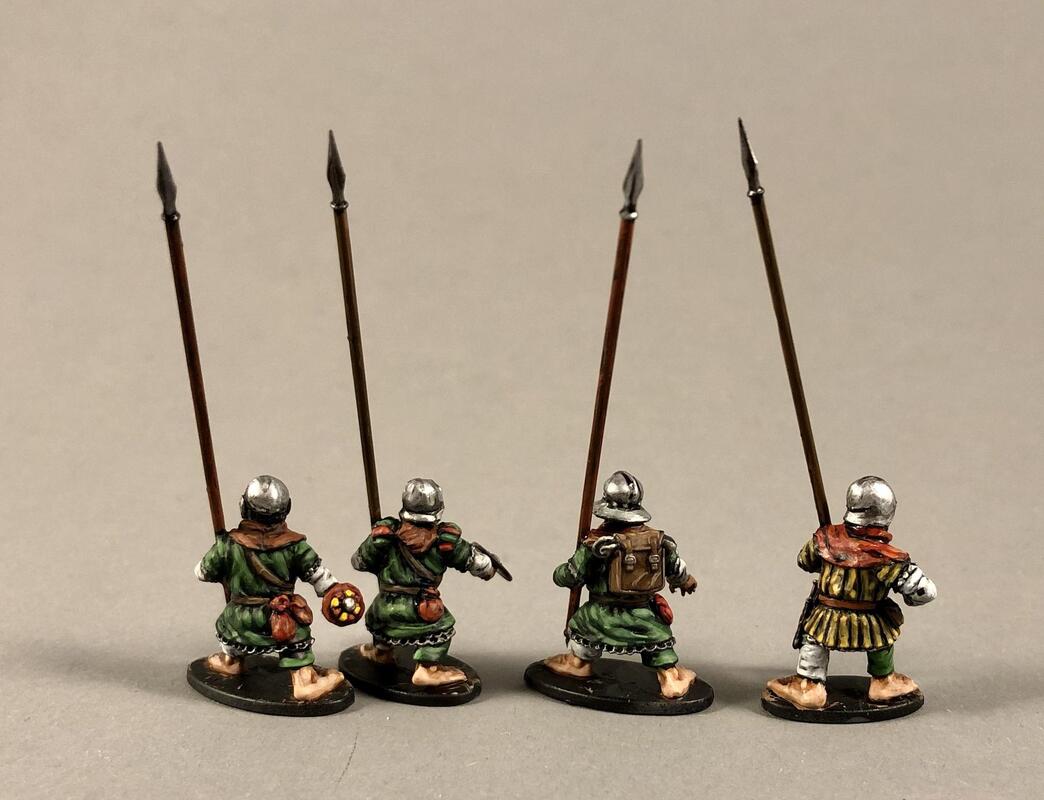 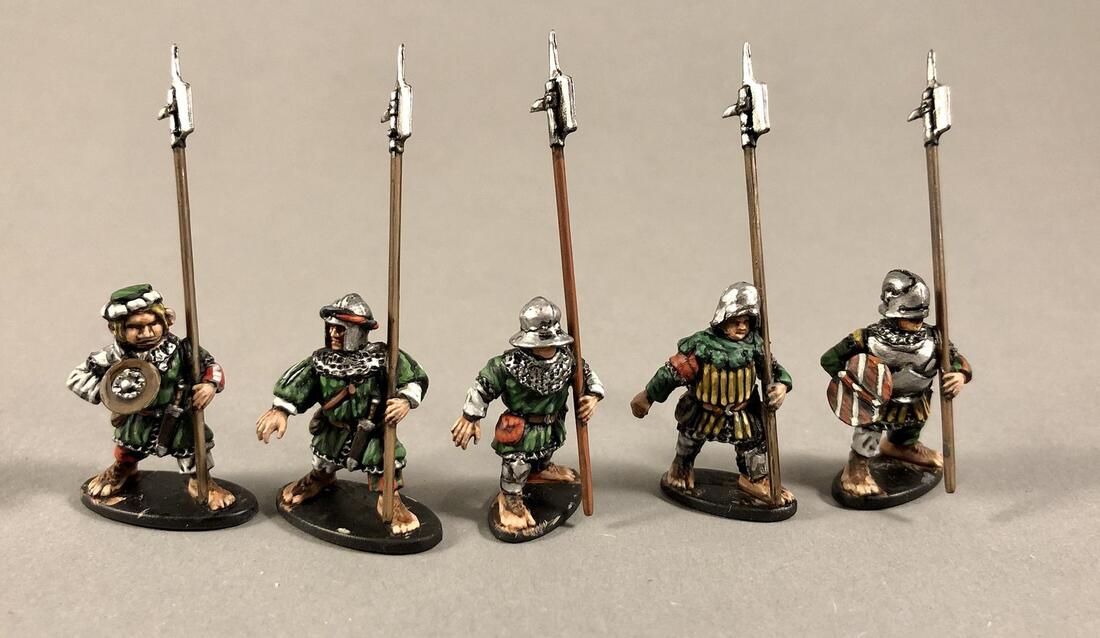 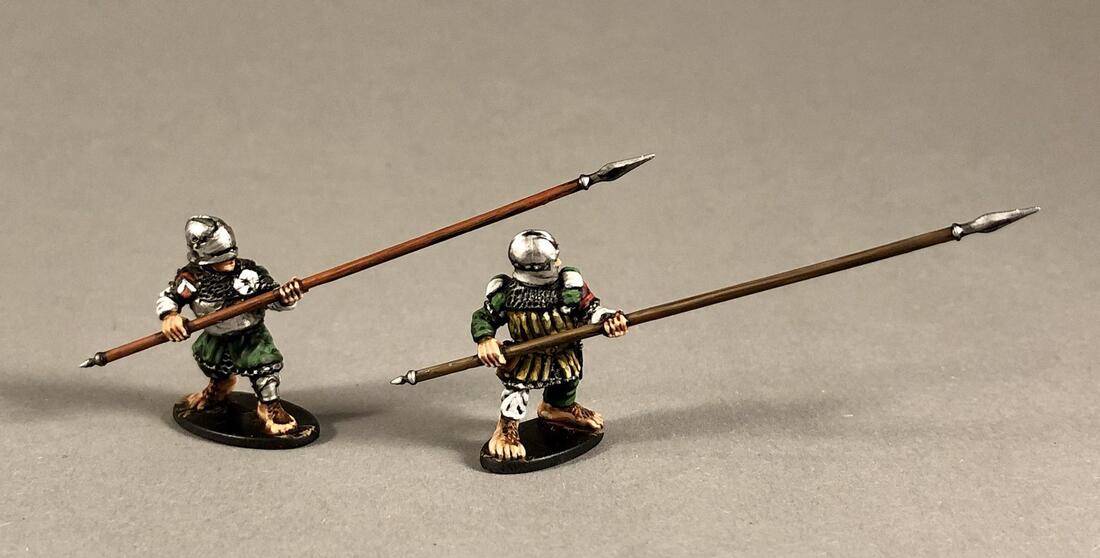 I plan to convert a second row of troops with weapons at a slightly steeper angle, so that I'll have an almost tercio look. 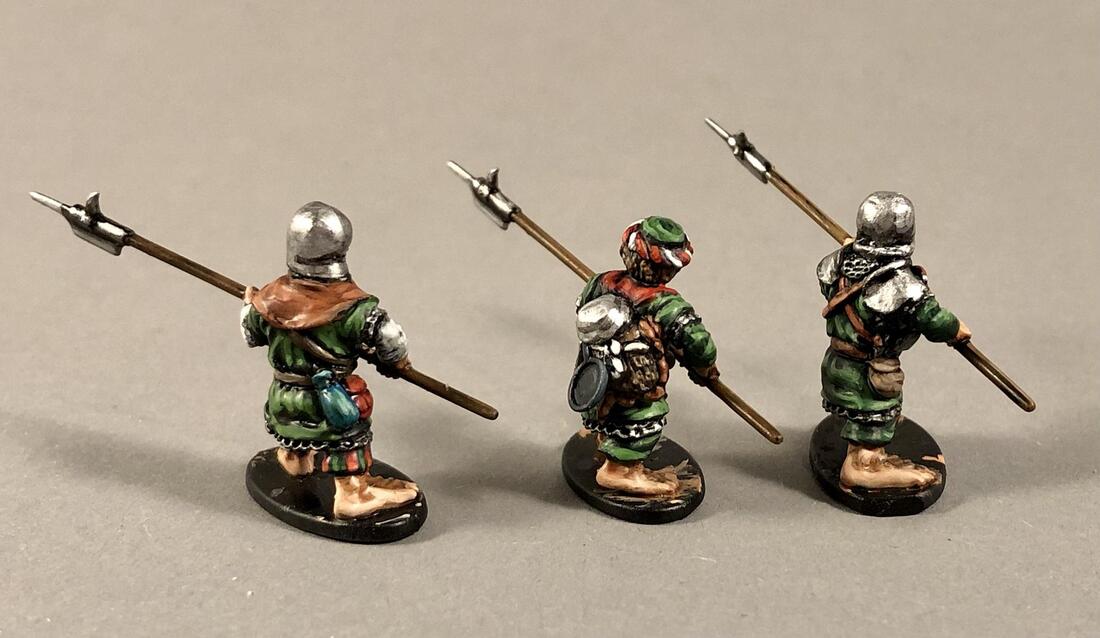 The halberdiers got their own campaign cook, armed with pots, pans and sausages. 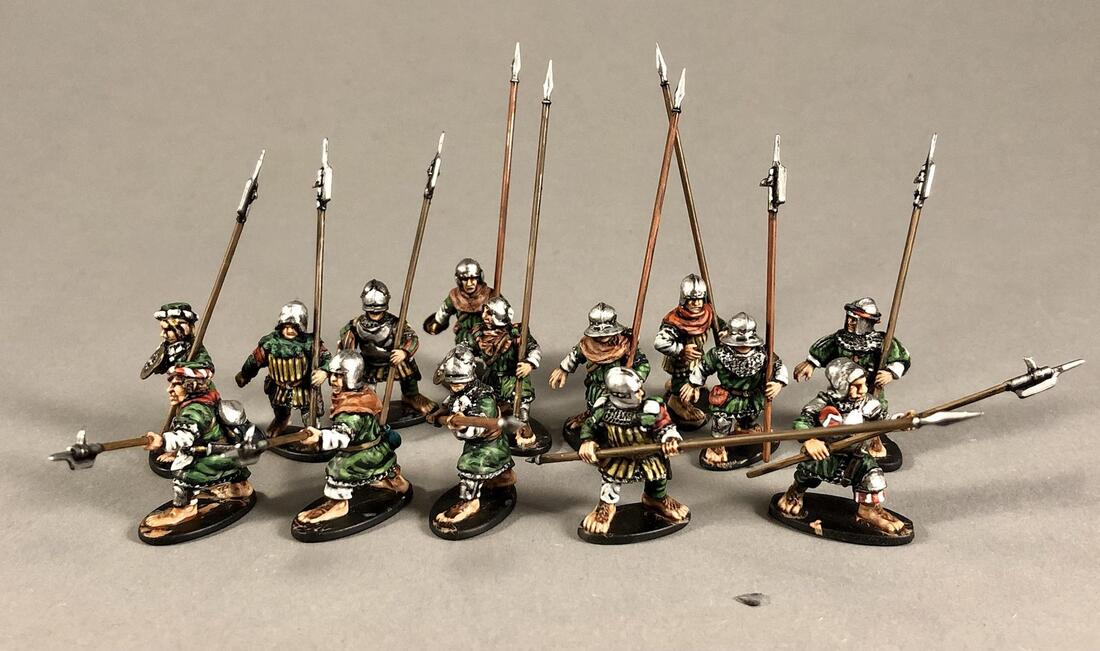 These inital hobbits will form the nucleus of the pike formations. I need far more than this, but by now I've run out of bodies! I'm waiting for an additional box that I ordered, but until then I'll have to try to sculpt my own. 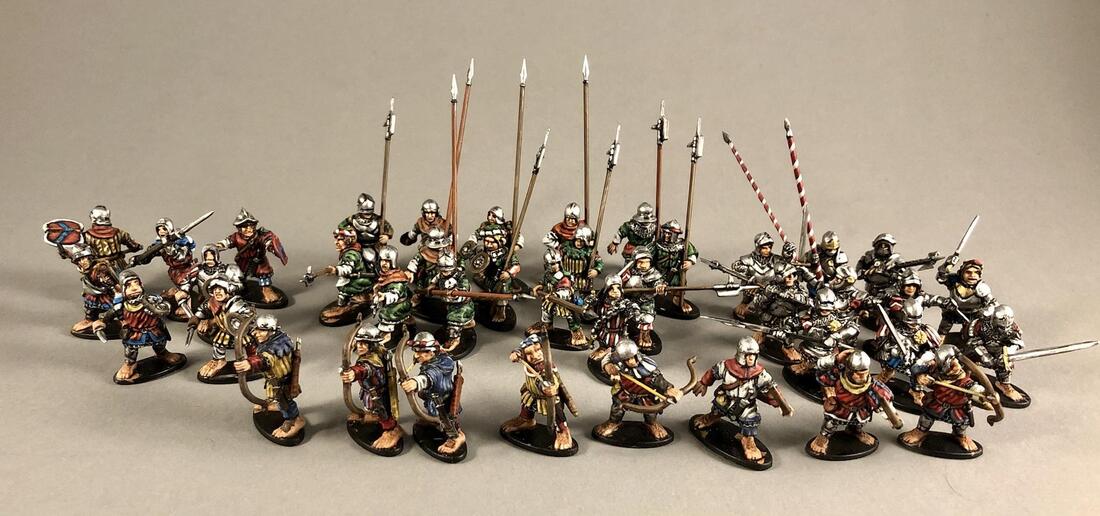 The halfling warband this far. It's starting to look good, though it's far too small and I also need to base them. I'm planning to order bases with pre-drilled holes for magnets, as it'll be a bit of a pain to individually drill hundreds of bases in the end. Now they need artillery, cavalry, and more infantry!
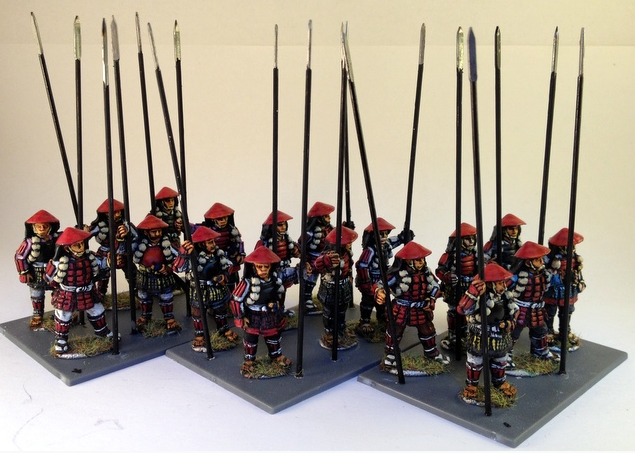
After all this time converting, it was time to paint them up. I looked around for historical colour schemes, and while they did not have proper uniforms yet in the early 16th century, some colour combinations were connected to specific city states of families. For my first units, I thought that red, white and blue would look nice. 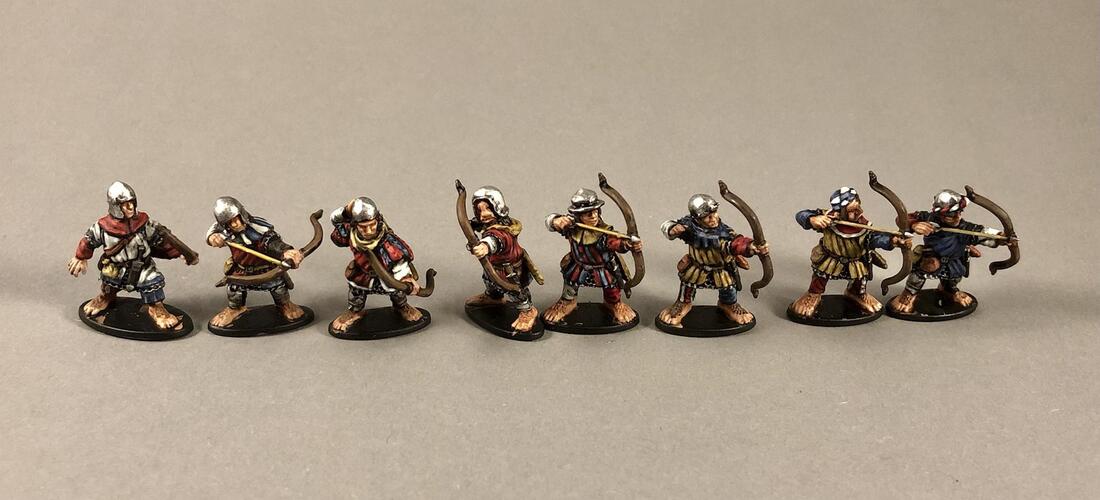 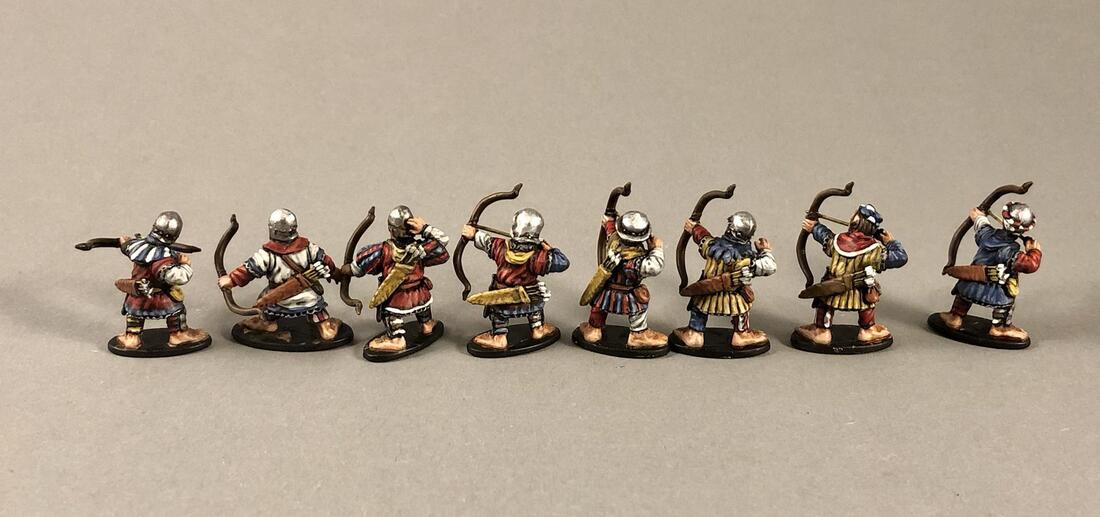 The first unit I painted were my archers. These were mainly head swaps, but some of teh extra stuff I added showed up pretty nice, like the puffy sleeves. My first personal victory of this project was to paint up eight minis where two heads were scratch built, and having them NOT stand out as immediately weird in comparison. Feeling encouraged, it was time to paint up some of the more heavily converted units.  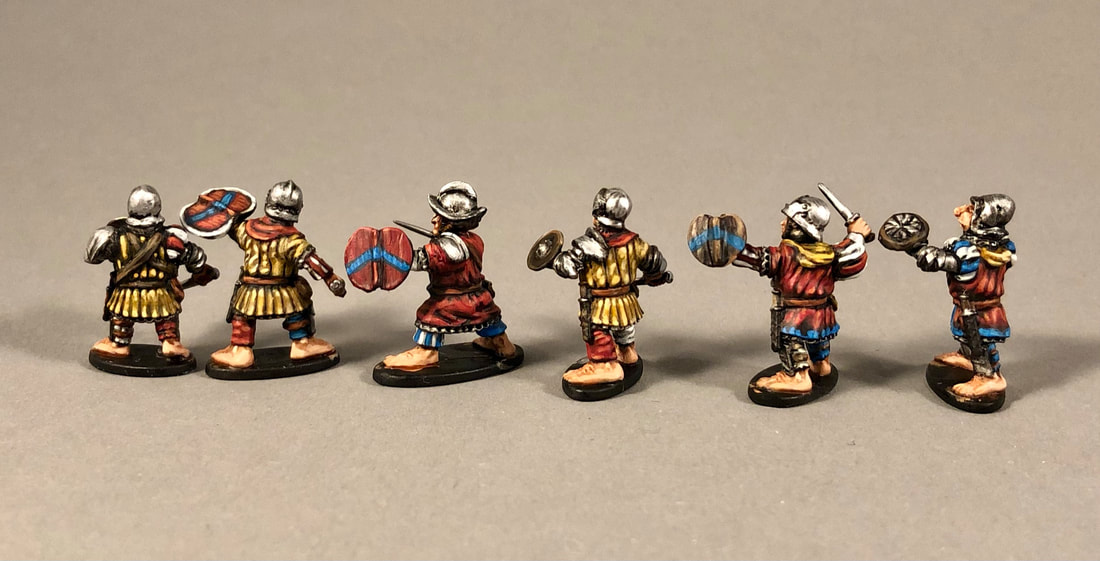 The rodeleros got blue stripes to to tie the unit together. The gambesons took up so much space on these short-legged fellows that they completely dominated the painting scheme after all. But I like how they turned out, they look suitably rag-tag for light infantry. 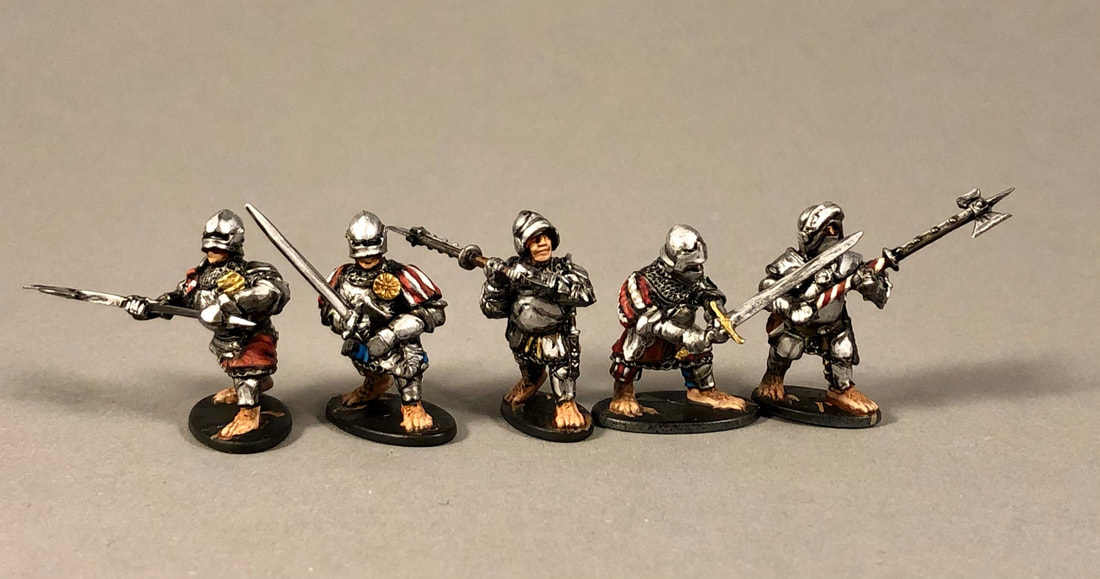 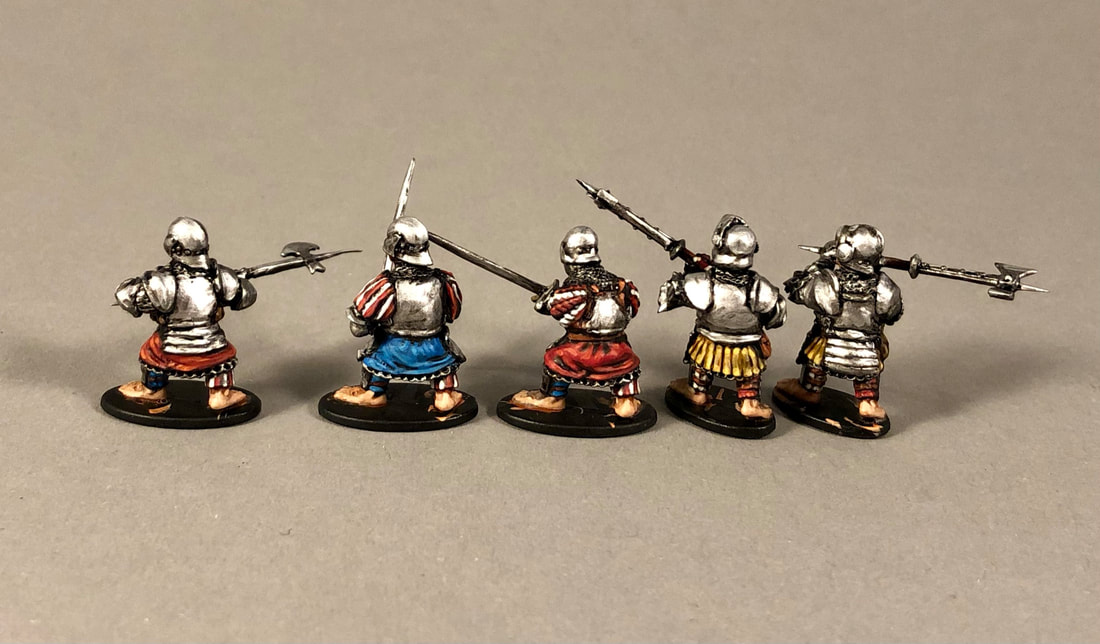 While heavily converted, the men-at-arms turned out to be quick to paint since it's mostly metal! I added some gold-tinted parts to make them more interesting from the front. These heavily armoured members of the halfling elite are ready to charge into the densest of fights, cutting through kneecaps and shins alike with fearsome fervour. 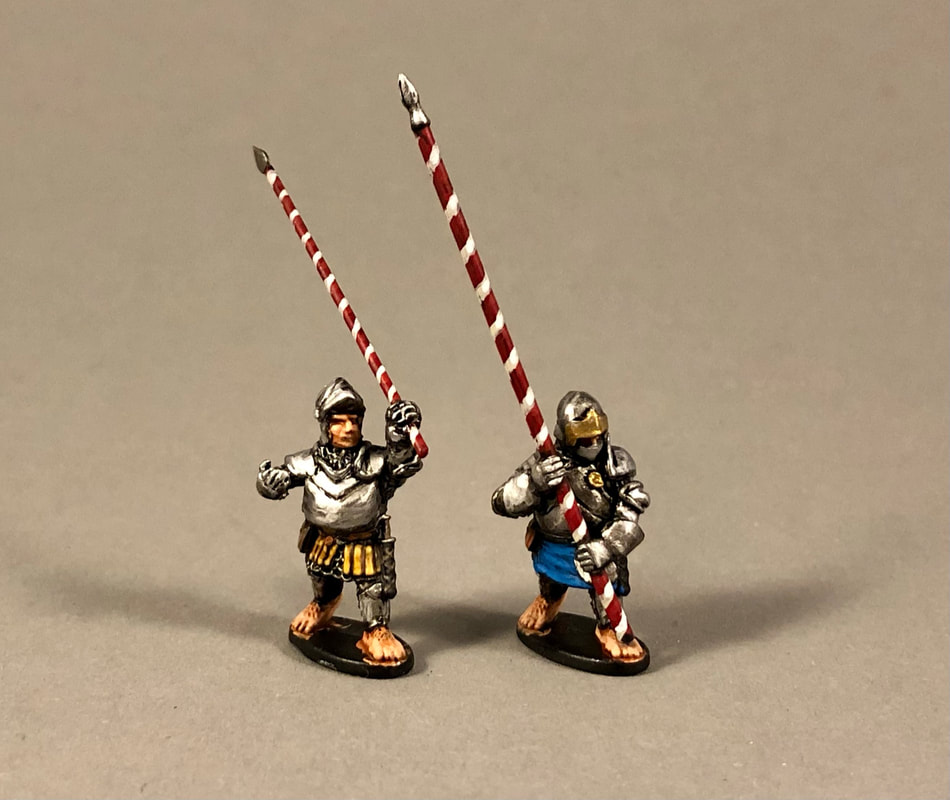 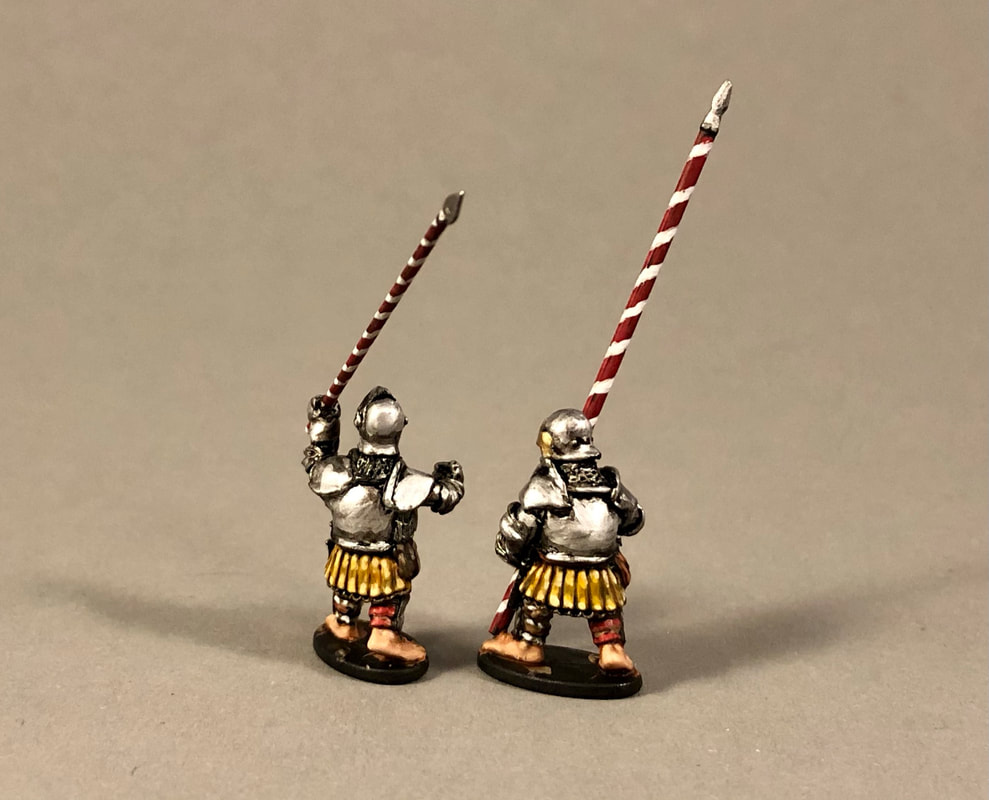 I have not yet decided on what flags to use, but I'm slightly leaning towards them being from northern Italy. So I might up ending using a combination of both Milan and some princely families from there (like the Sforza), as well as condotteri (sort of mercenary captains) employed by them. The coloured flagpoles were chosen to emphasize the red and white scheme, as so much of the minis are covered in metal. 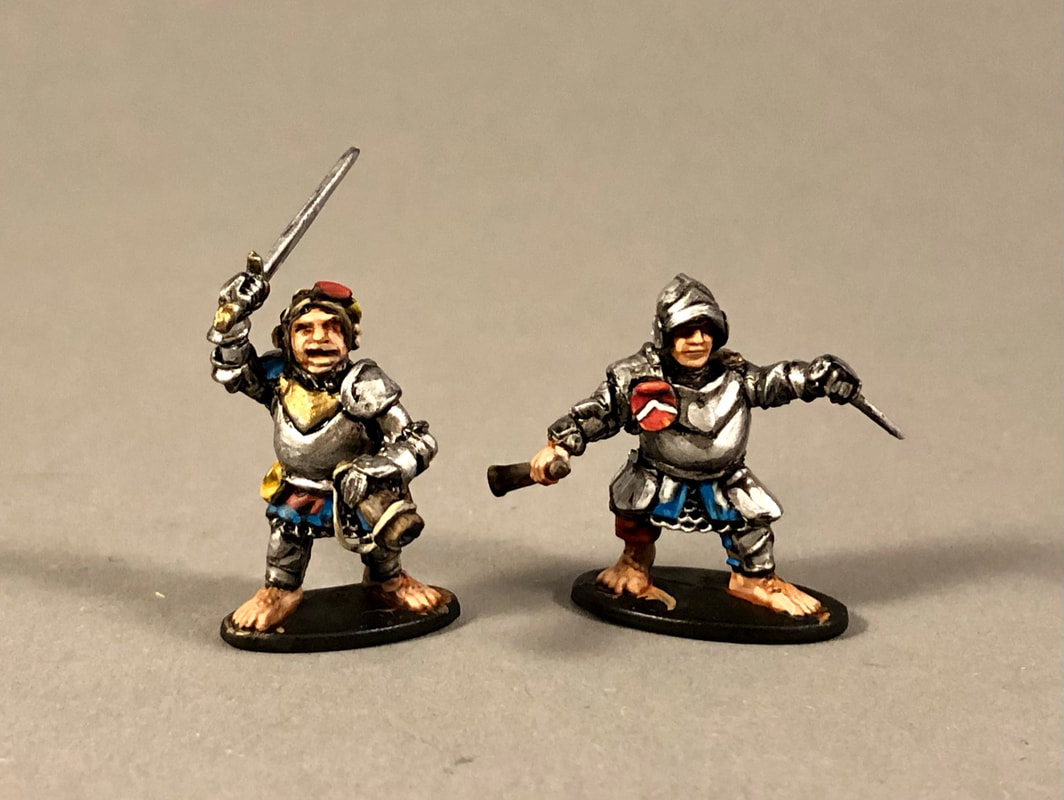 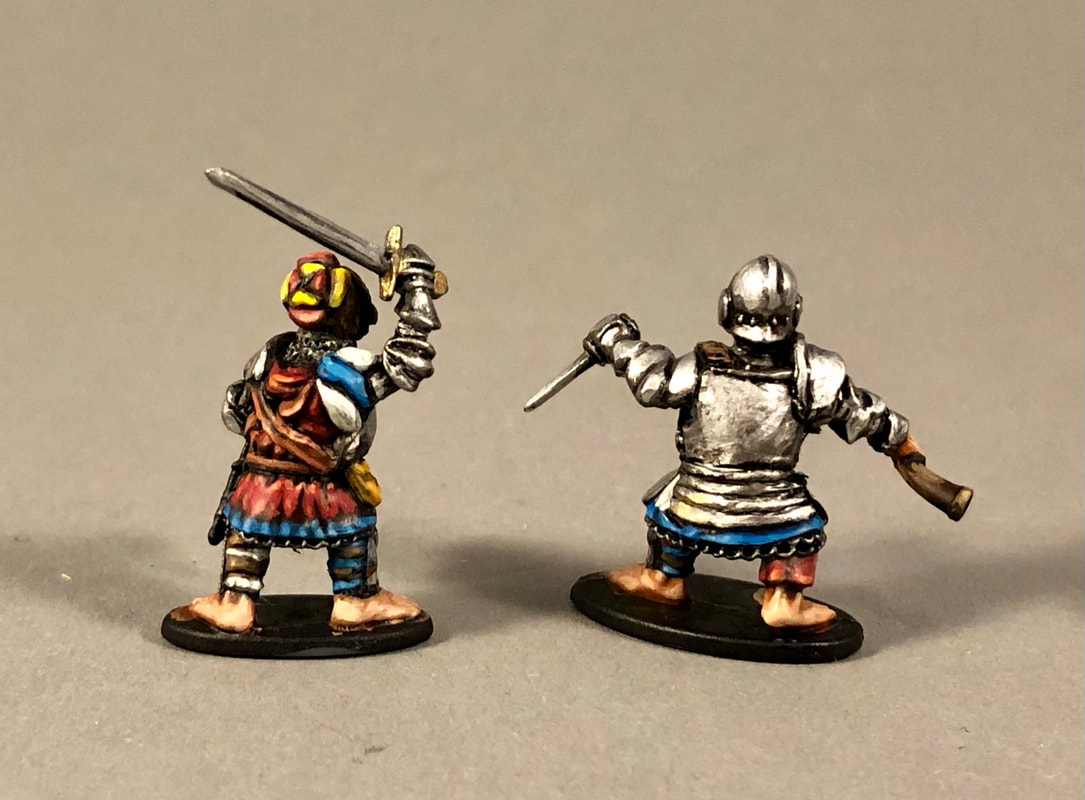 The musicians got horns. Later on I'll try to make some pipe and drums, as those seemed very common, often depicted in pairs. 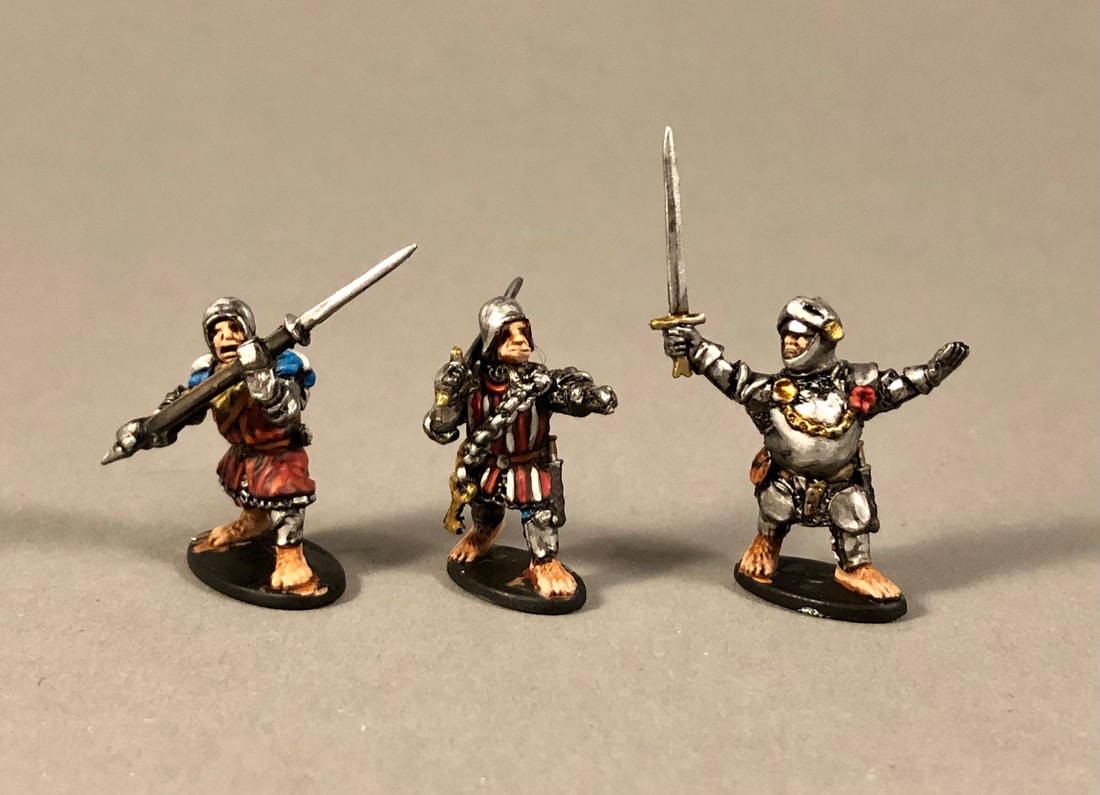 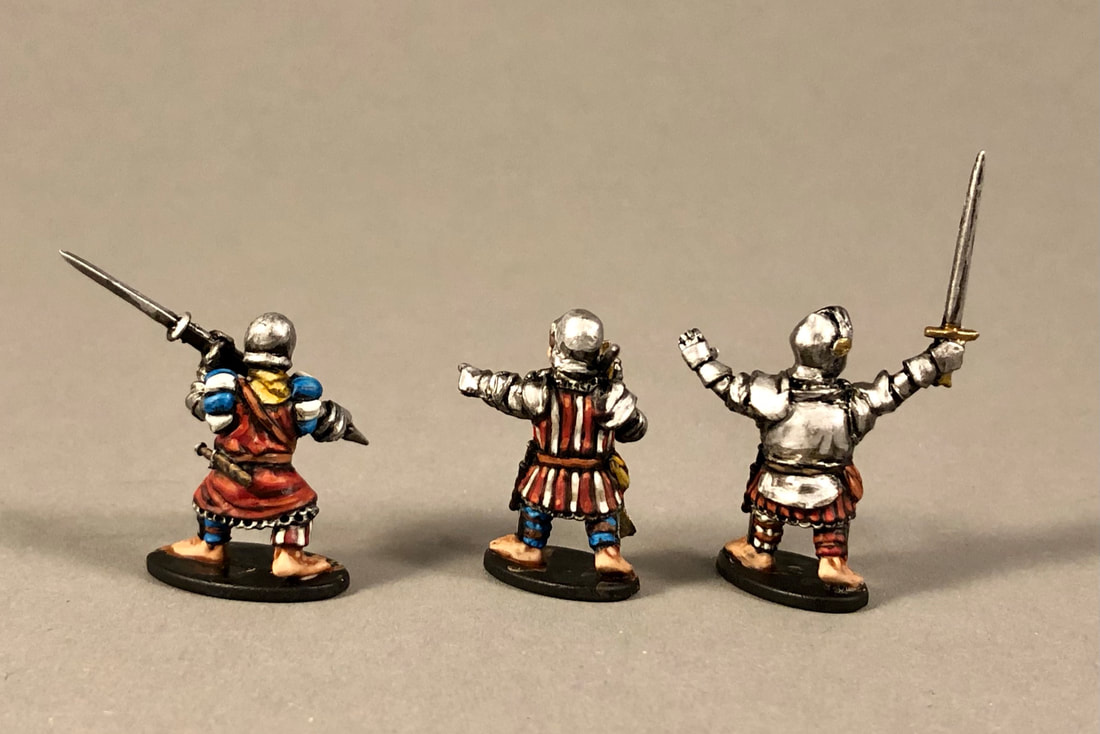 And finally, some commanders. I used the chains as a sign of their status. They can either lead units, or be relegated to further back if I end up making better looking ones.
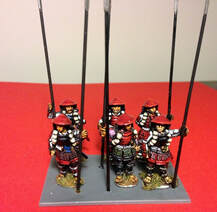
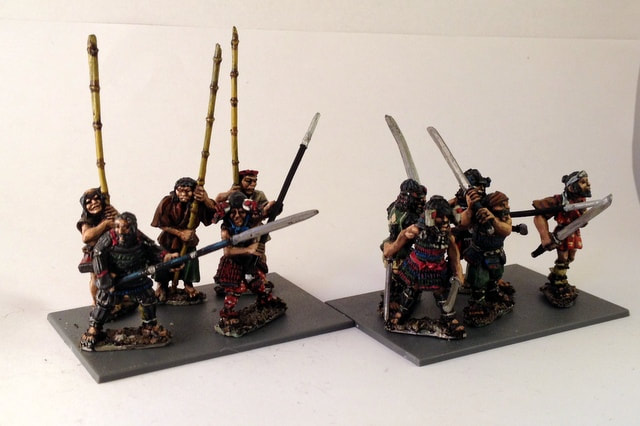
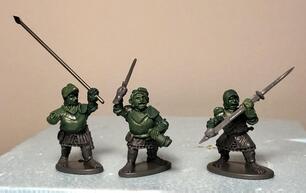
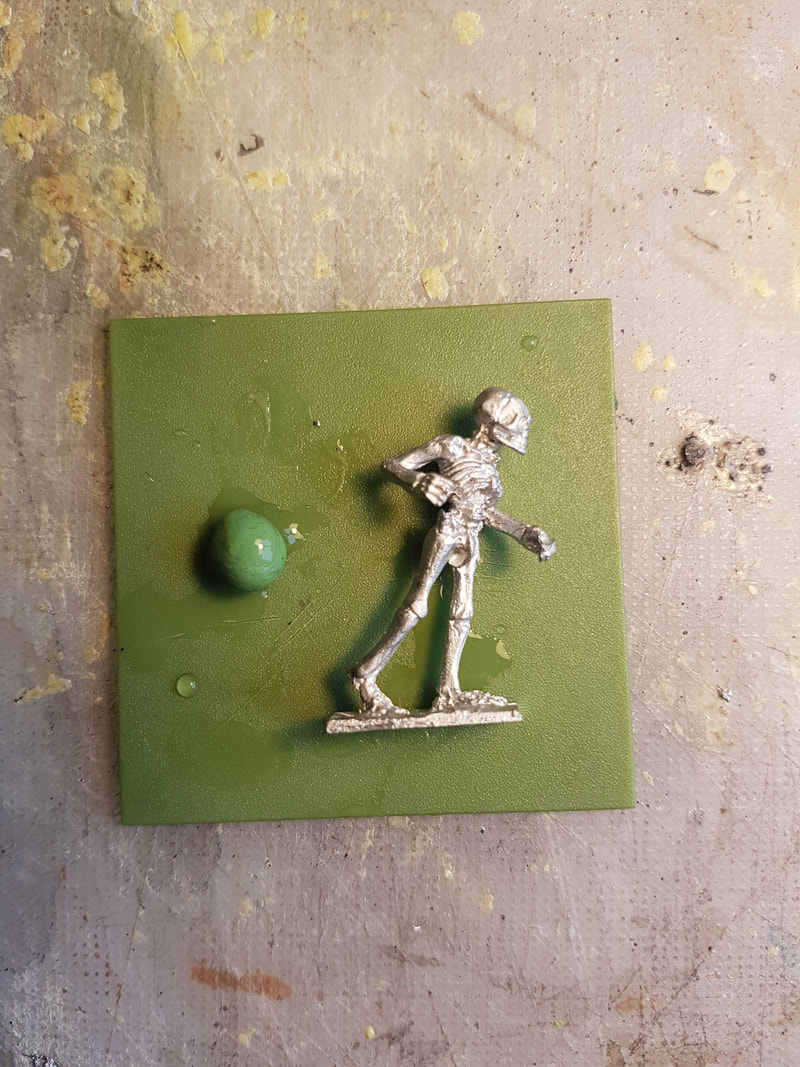
The close combat hobbits were more heavily converted than my archers, and it was fun to see them painted. Basically all metal armour except the leg guards were converted, and on some of them the entire arms and heads were converted as well. Next up will be some more "vanilla" troops, in that the spearmen are mostly head swaps. But there are some surprises in there as well. :) By Jonas Well this is a little side project that has completely derailed my hobby time, but in a good way. It all started with the idea of making a small contingent that could fight as an ally to any of the other growing Italian Wars/Fantasy armies. By picking up a box of Wargames Atlantic's new halflings, I would get 40 men, enough for a small unit of archers and some spearmen. A nice, small, self-contained side project. 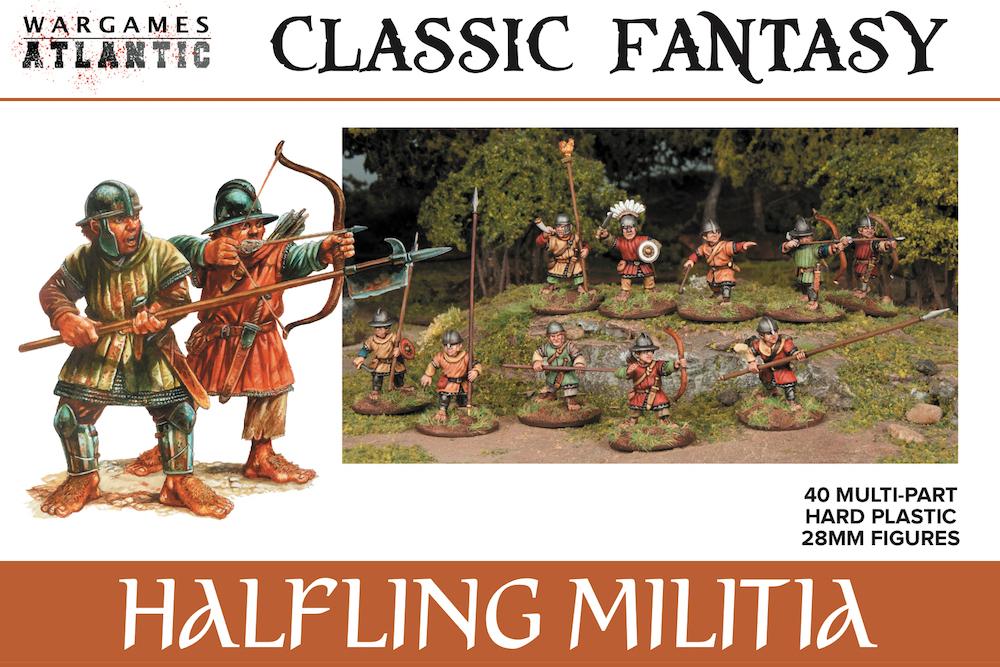 These plastic halflings are fine and all, but looking at early renaissance pictures it was clear to me that most of the helmet styles were unsuitable for the Italian Wars. Switching the heads sounded like a cool idea and would make my halfling troopers a bit different than halflings built straight out of the box. Would Perry heads fit? Since we were doing a big order of plastics at the club, let's see if the War of the Roses and Foot Knight kits are compatible. 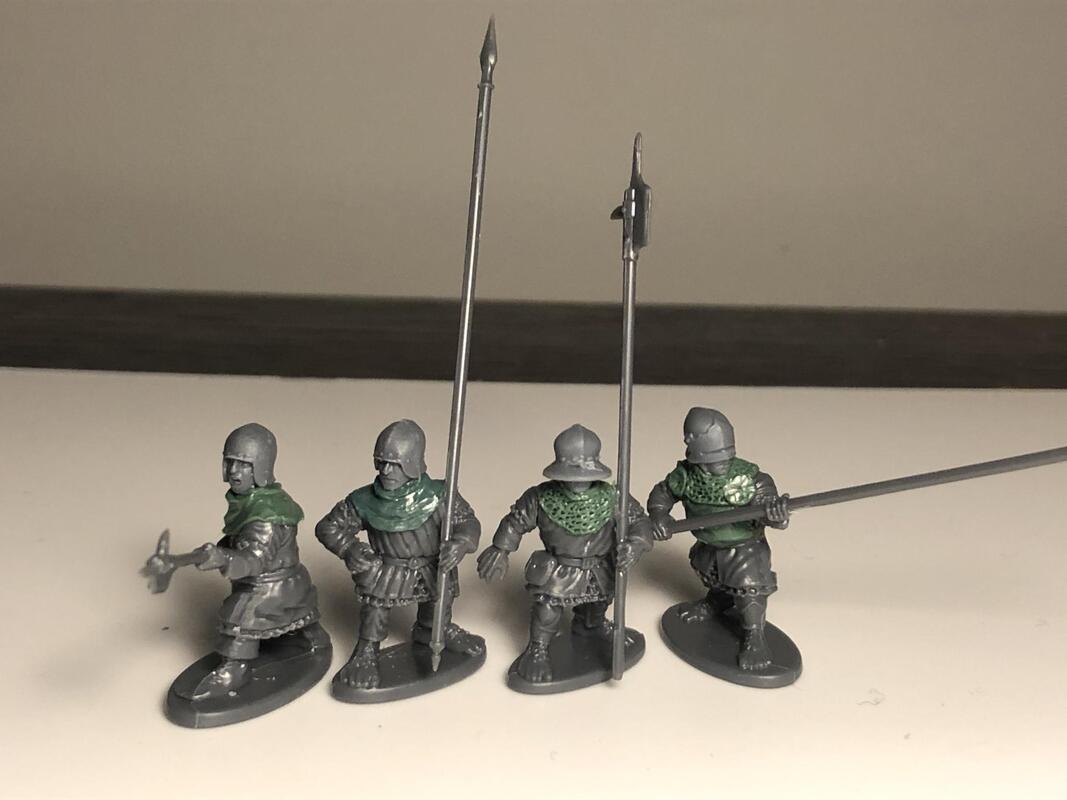 Bingo! I was happily surprised by how well they fit. The green stuff was added to hide the neck gaps, but also as I've seen many pictures of early Italian Wars soldiers wearing large cloth or mail collars. 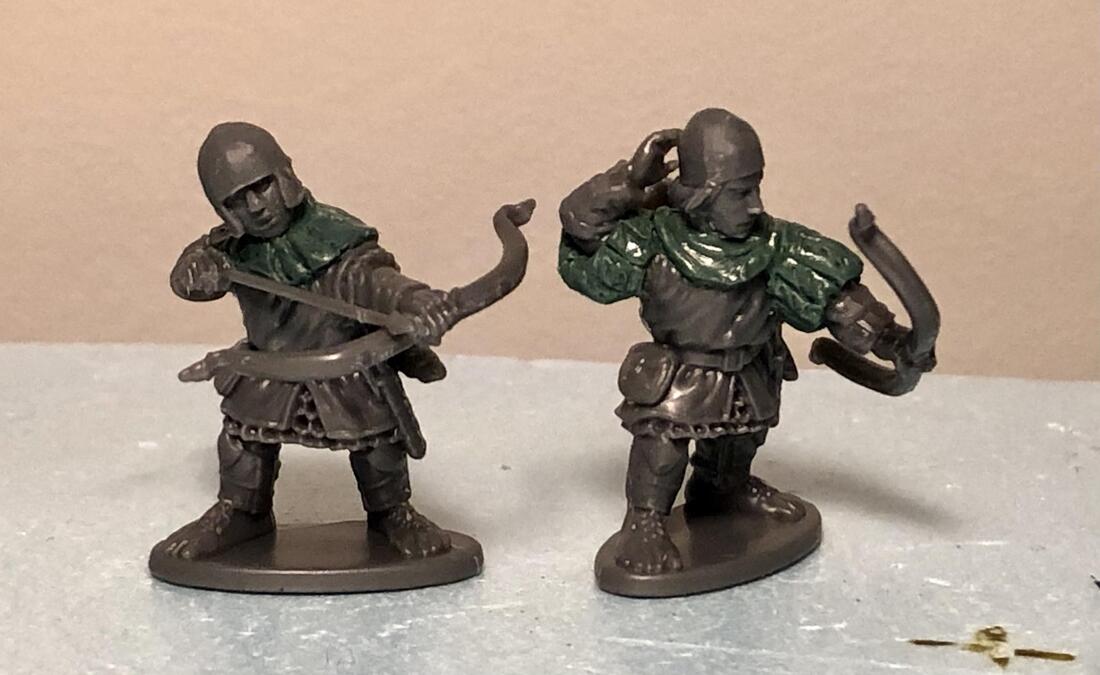 Archers worked well too. I got a bit more confident with the green stuff and tried adding some puffy sleeves, a very obvious way to make the minis look more at home in the early 16th century than generic medieval fantasy. 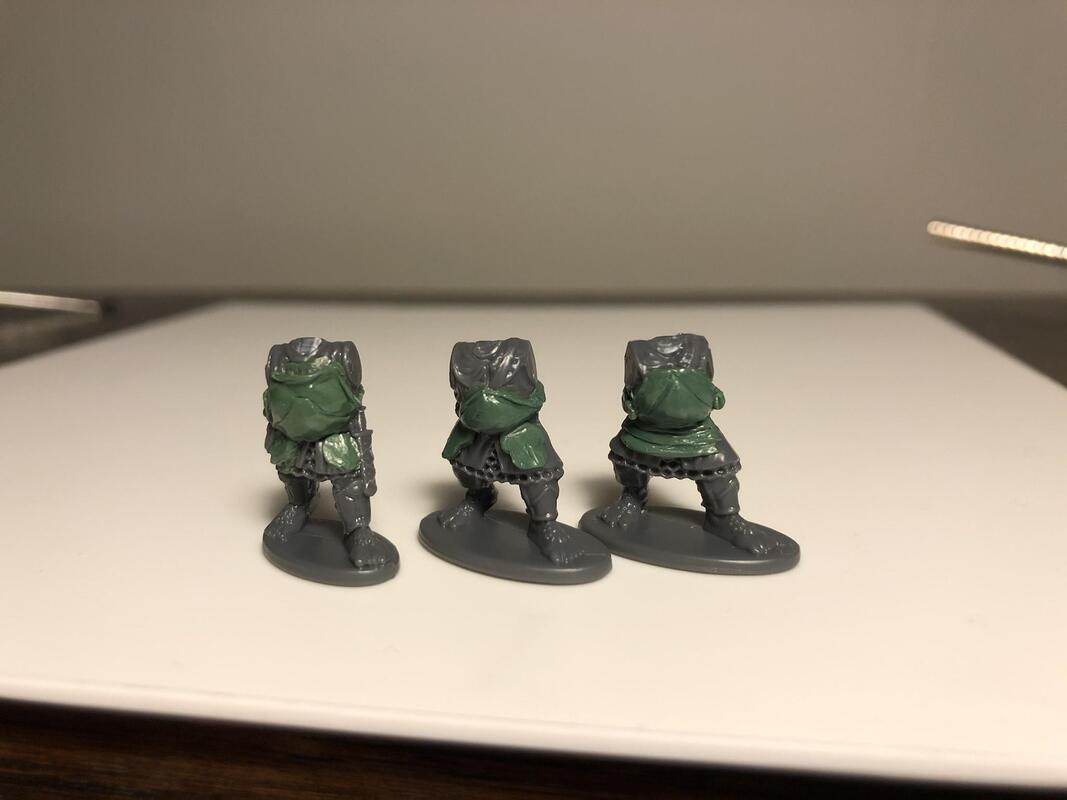 But 16th century also means a lot of plate cuirasses and armour in general. I could not find many good options for plate wearing halflings, so again I turned to the green stuff. Was it possible to sculpt armour onto the plastic bodies? To my surprise, it turned out to both be relatively easy, and a lot of fun! By now the scope of the entire project was clearly expanding, as I started to imagine a few units, including armour-plated pint-sized men-at-arms hacking away at some unfortunate French invader's kneecaps.  But to make the two-handed arms from the perry foot knights kit fit, I needed to sculpt new arms, as they were far too long. Sometimes I could get away with just cutting off half an arm, sometimes I had to cut off everything. At this point I was approaching a level where it was easier to actually re-make the arms instead of trying to keep too much plastic, but I had not realized it yet. 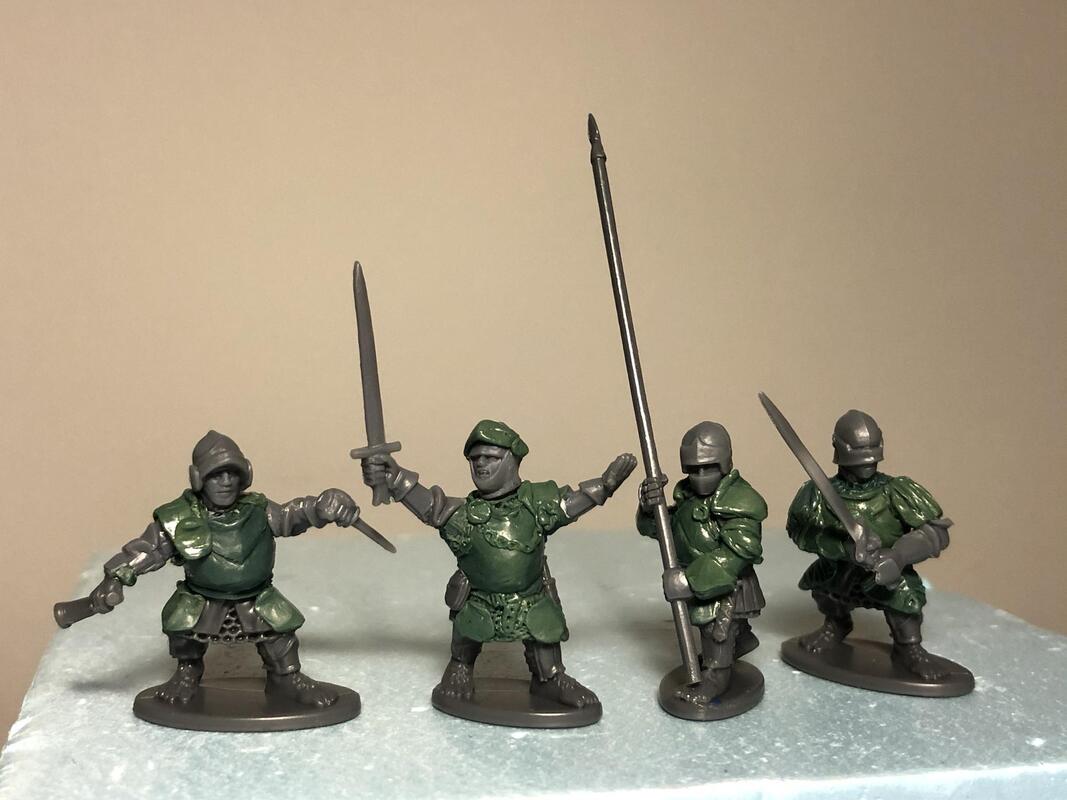 For example, the arms on these command groups turned out a bit wonky, mainly because I tried to keep too much of the perry plastic and I had yet realized I needed to make armatures for sculpting these arms. S o they drooped a bit while curing. But on the other hand it was really fun to sculpt them, and I got the idea from some pictures of Italian gendarmes to use a chain of the the chest to denote the leader's status. I think I'll use it for more champions in this growing army. 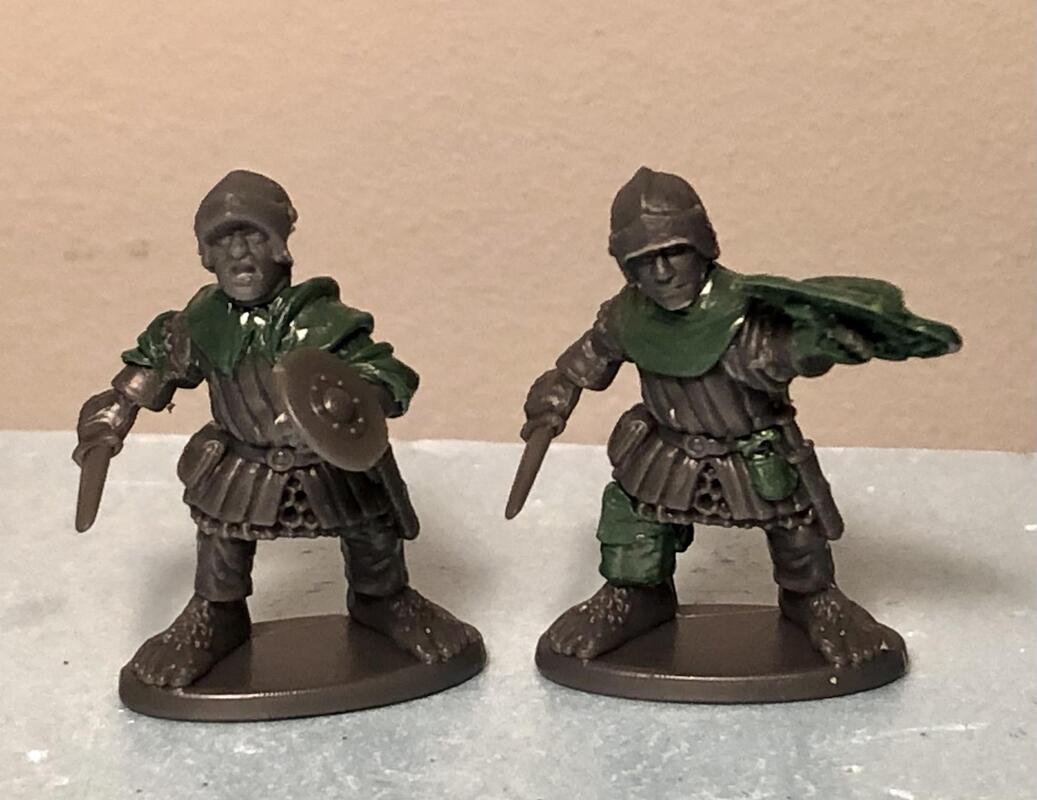 My armour spree continued by making rodeleros, a type of lighter infantry armed with swords and shields that got really popular. Initially mainly in Spanish armies, the idea spread all over Europe, including to Sweden, with "imitation" troops borrowing both the tactics and dress styles. I made small adarga shields, a type of hide shield invented by the Berbers and then brought to the Iberian peninsula by the Islamic conquest. It ended up being used by both Muslim and Christian soldiers there, and then spread across Europe, including through Italy where large numbers of Spanish soldiers fought in the Italian Wars. The addition of these shields were another way I planned to make them more grouned in the Renaissance than in generic fantasy.  After all these armour plates, I was ready to try something more difficult - heads and faces. It did not take long before I had used up the Perry heads I had, so it was kind of an important point. But I also decided that the project had turned from a tiny head-swapped ally unit into me learning how to sculpt. So at some point, there'd have to be a completely scratch built hobbit in this force, and a big hurdle would be the head. To practice this I ended up doing many, many heads. At first all of them were bad, but after two dozen or so I started to get some that were not hideous. And as I sculpted more and more heads, the ratio of OK heads increased. I am not yet at a point where I'm confident, but by now I would say that there's maybe a 50-50 chance that each head will be usable. Above are some of the earlier attempts, and below are some of the more recent: 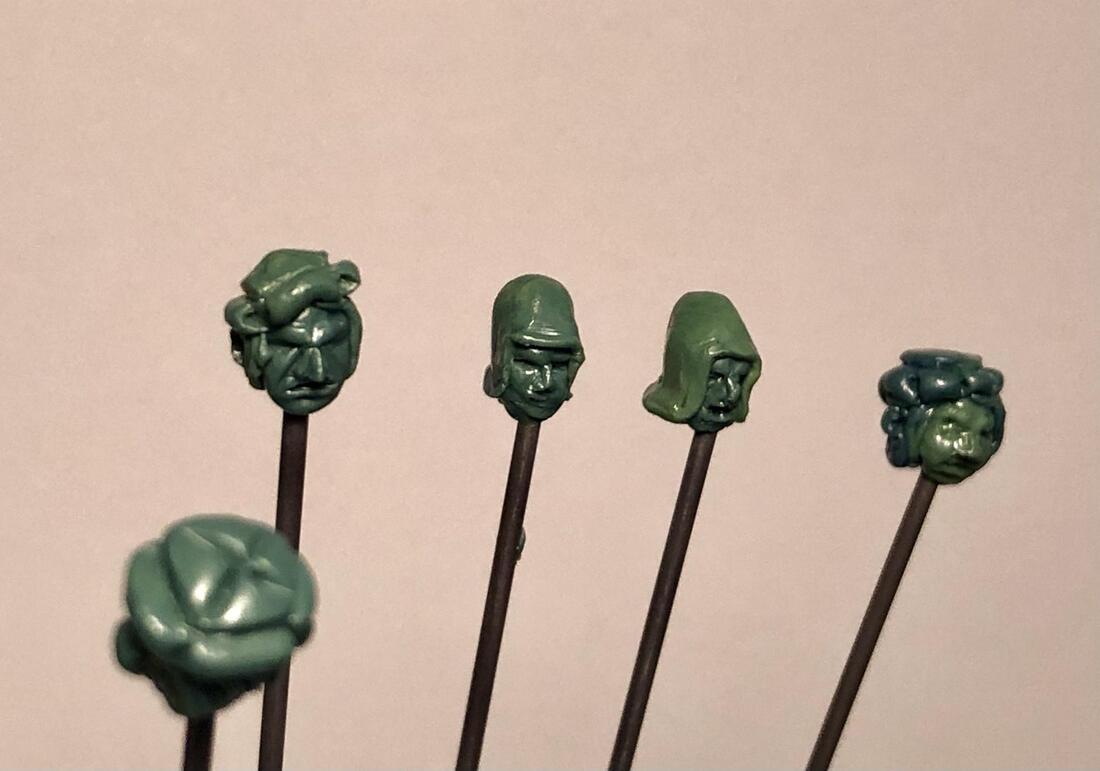  These last three were the most involved sculpts, as the arms are completely hand sculpted using wire armatures, and the heads are also sculpted. So there's just the stock torsos, weapons and two plastic hands.
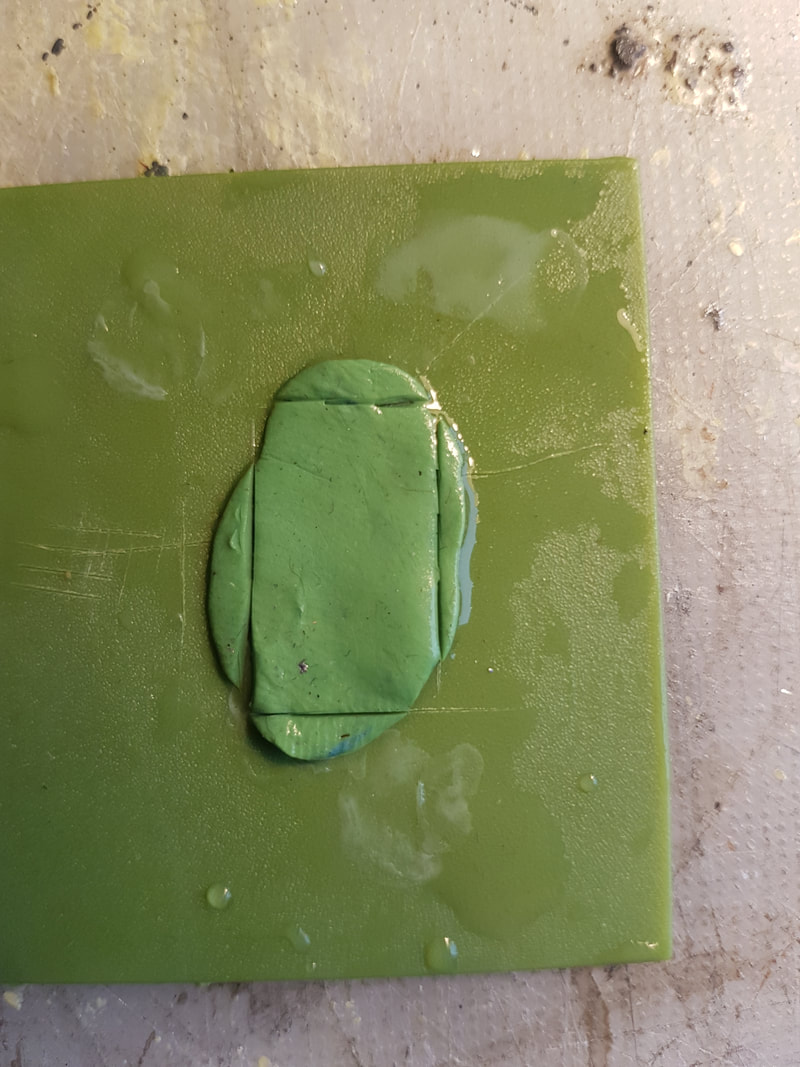
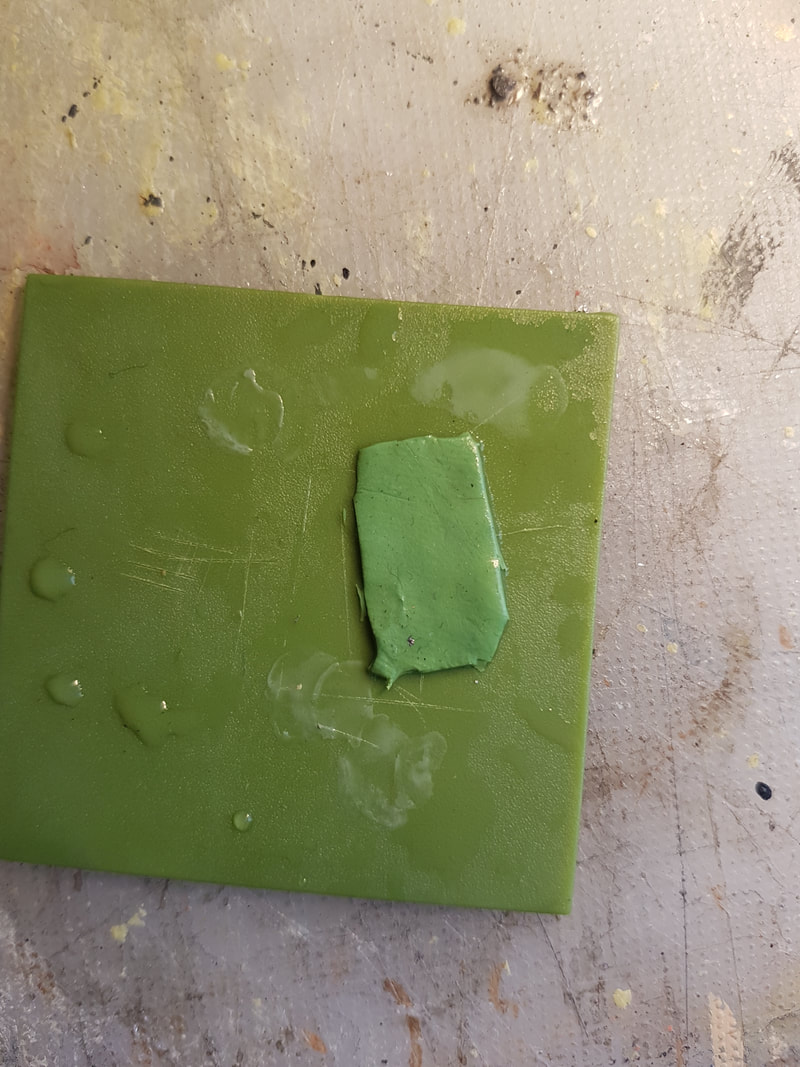
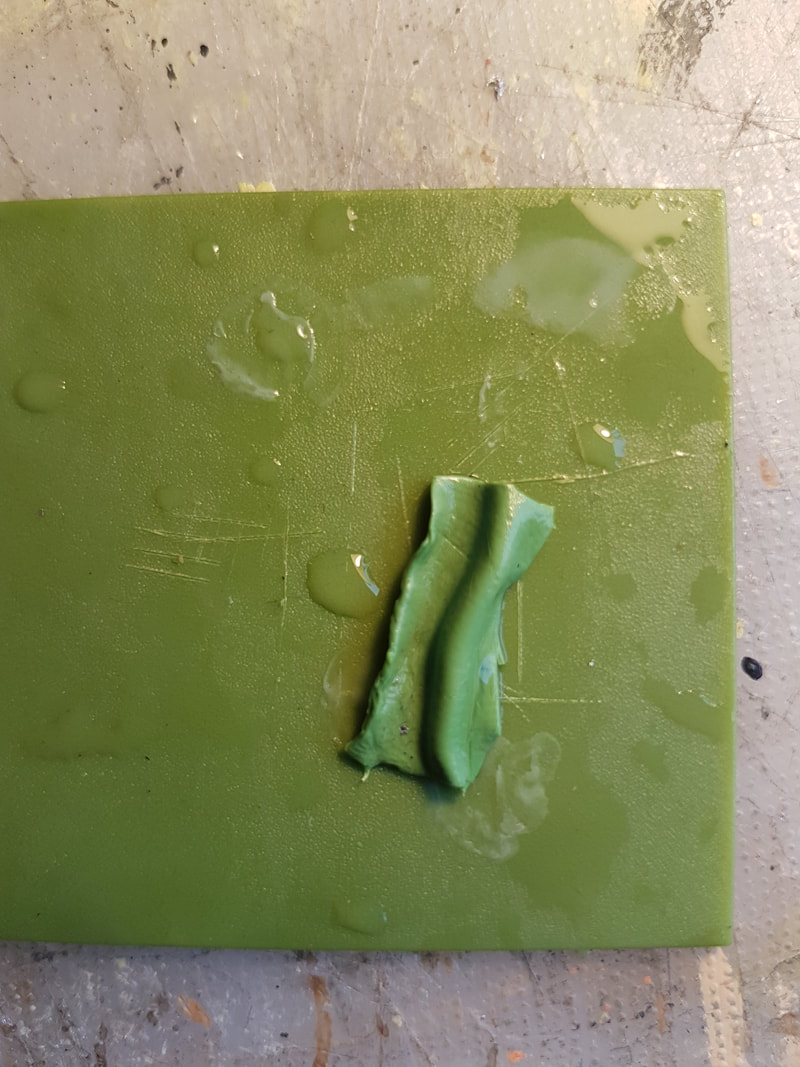
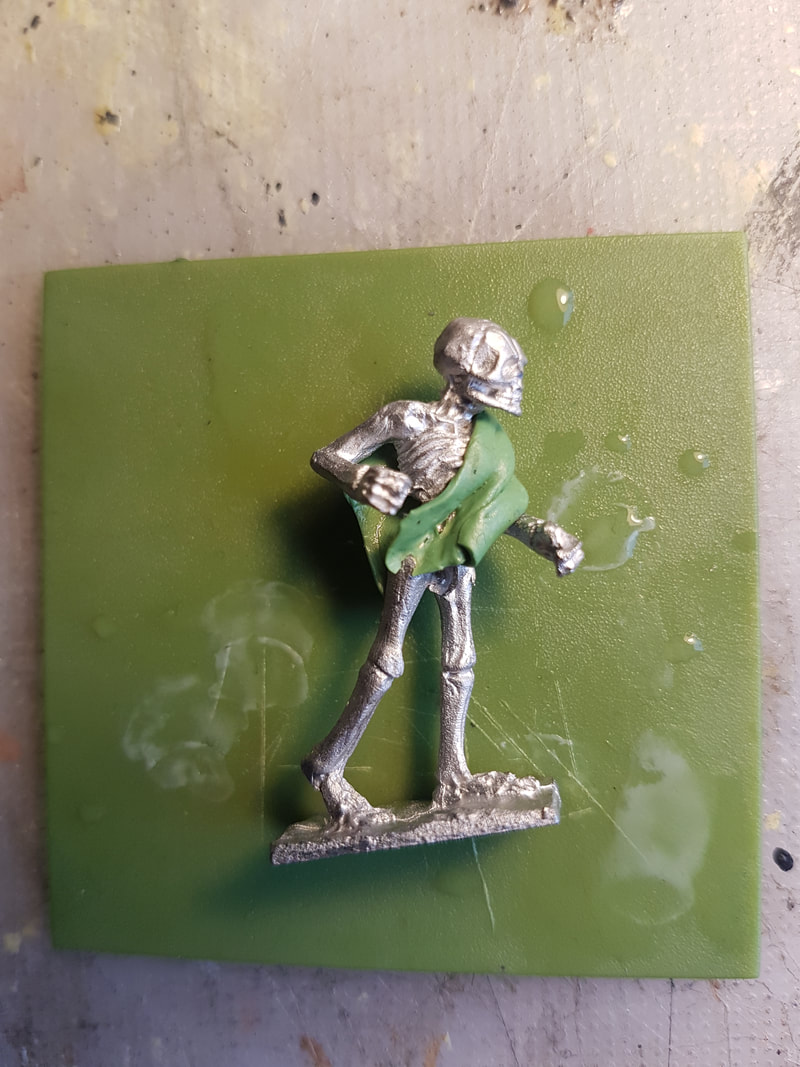
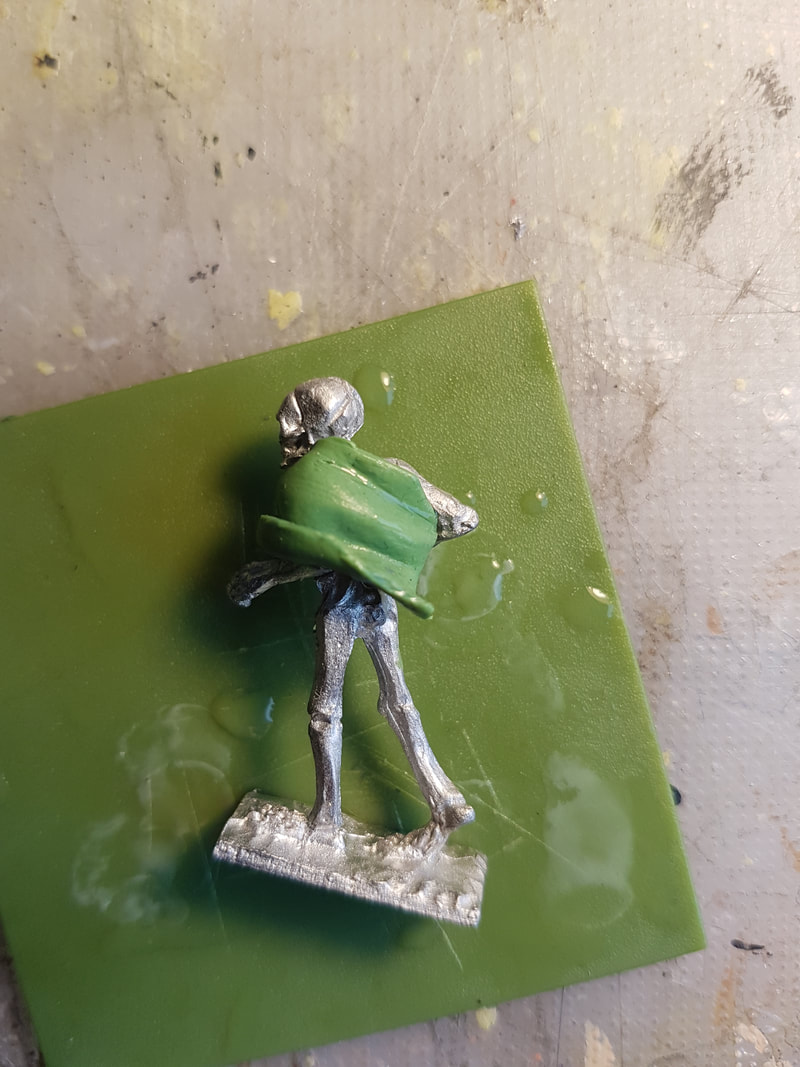
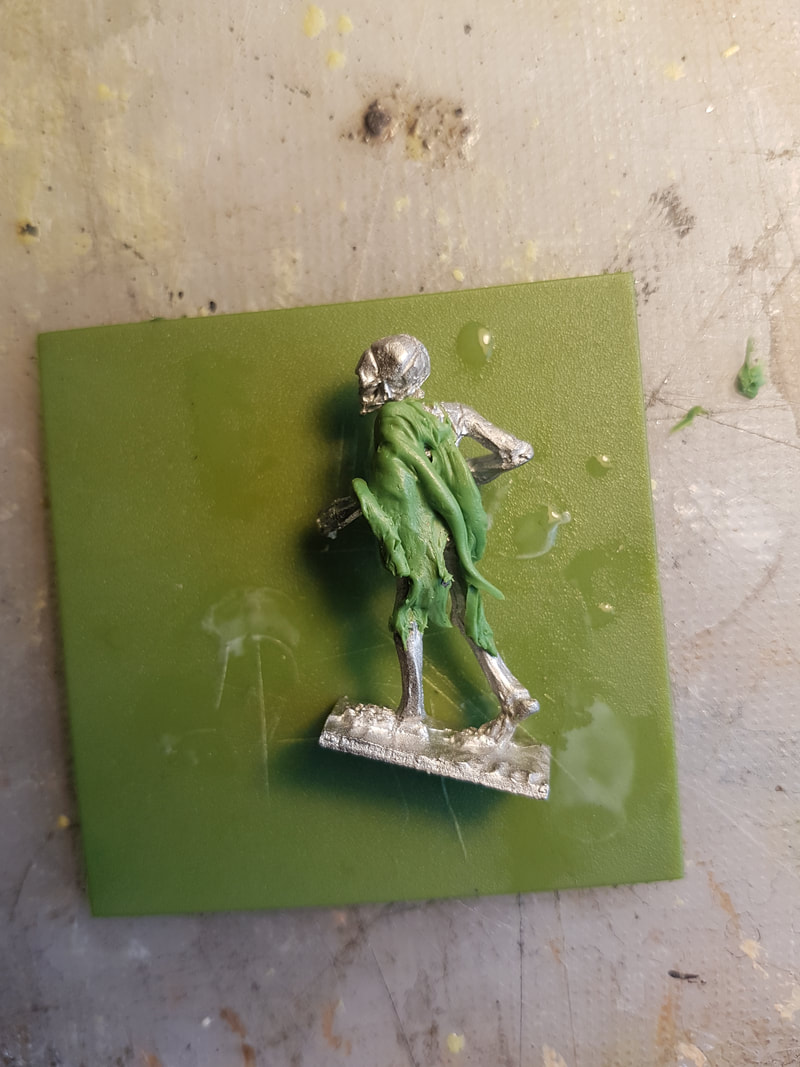
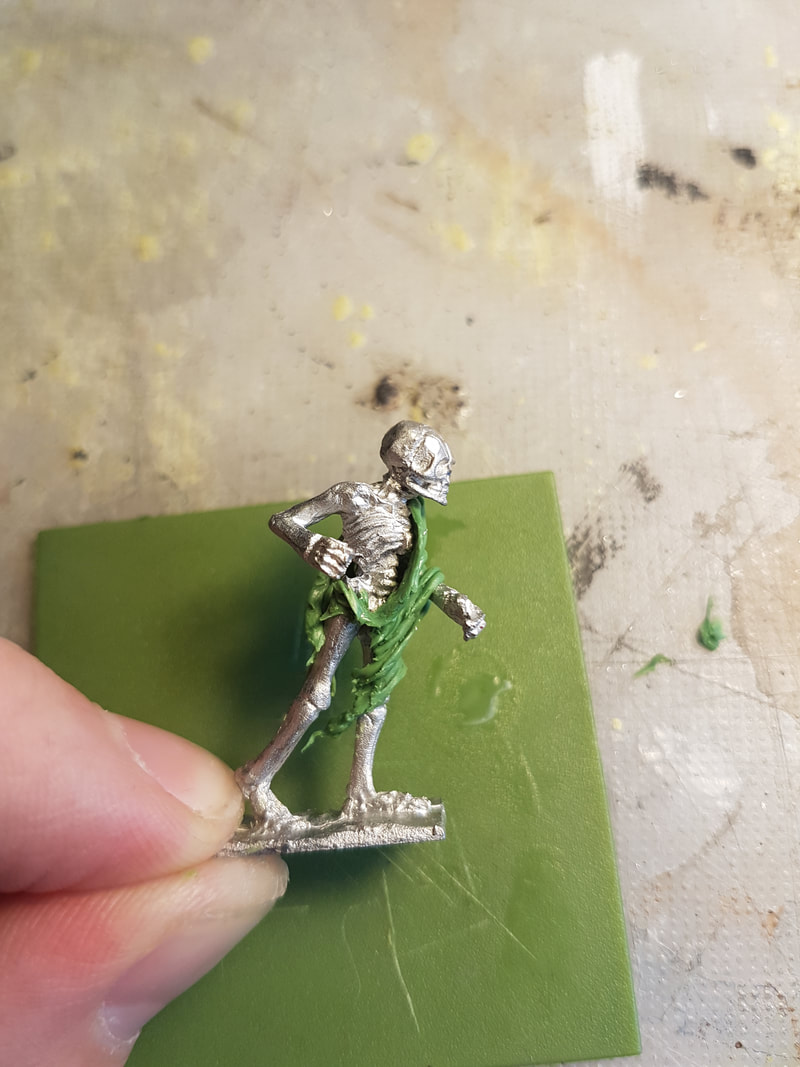
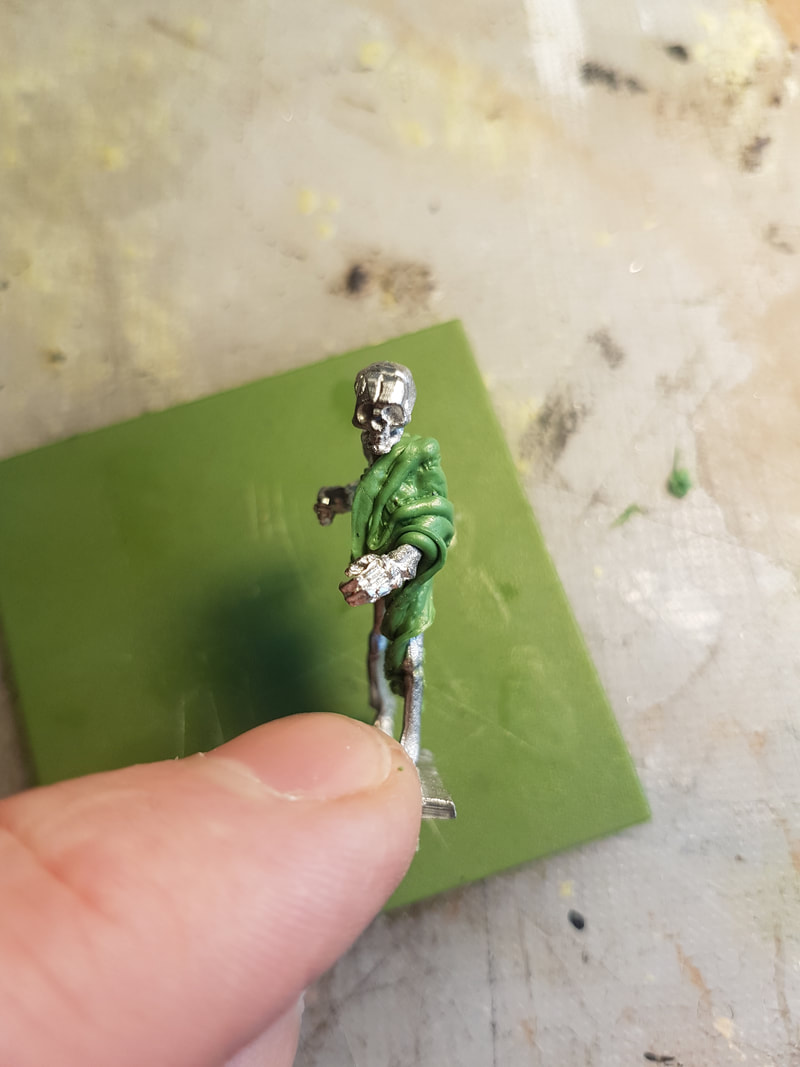
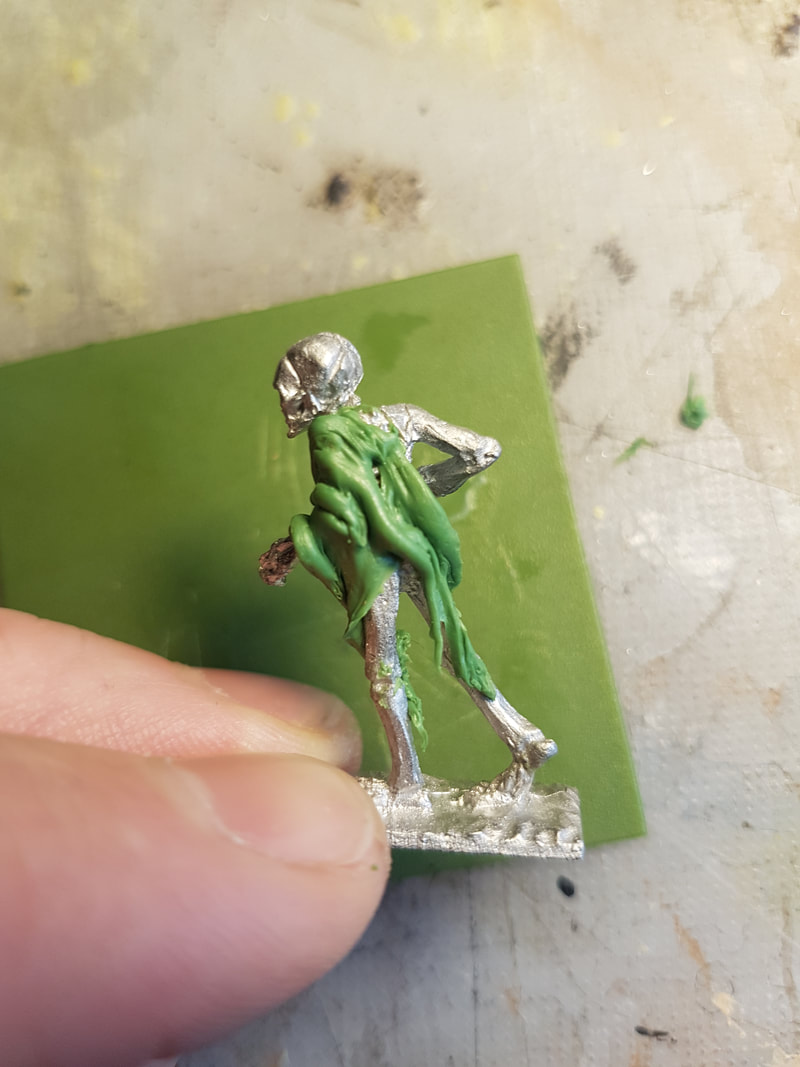
At this point I had used up all 40 bodies. I ordered more, but I've also ordered corks and bette wire to attempt some scratch sculpting. Next up will probably be some pictures of these painted! By Jonas The Dead RisesAfter Shirty converted a bunch of our Skull and Crown skeletons to have those nice burial shrouds, he primed them and left them with me over the winter vacation break. They turned out to be a welcomed break after the complex Napoleonic uniforms - with just a few colours per skeleton, I could easily knock out a few skeletons every night. After less than a week I had managed to work my way through the unit that was handed to me. 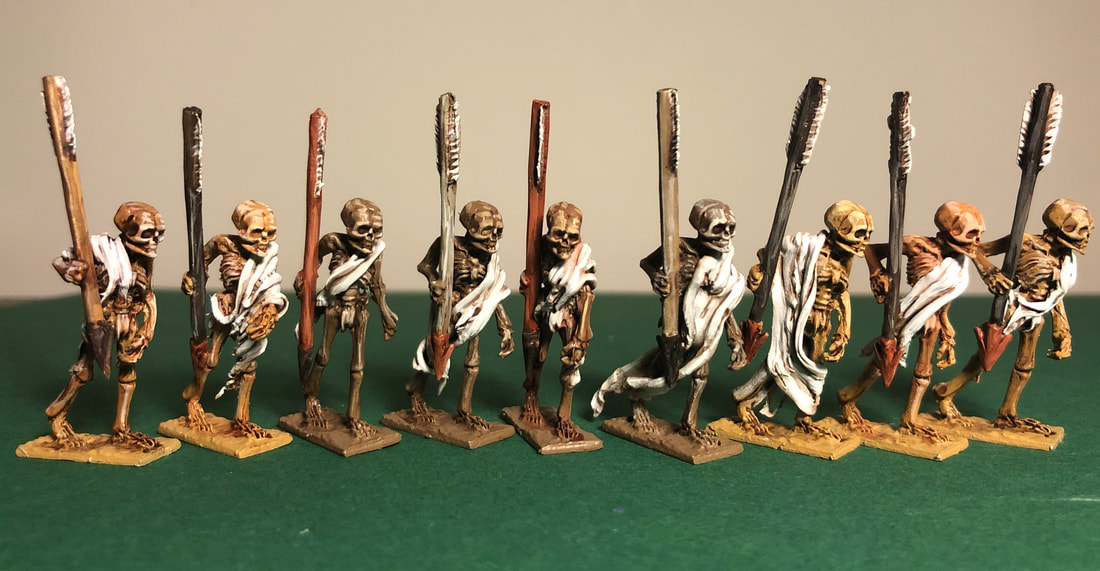 Most of our skeleton infantry will be carrying these javelins, halberds or pikes. These are with converted burial shrouds. Painting the SkeletonsShirty primed them in two different colours, one lighter brown and one more greyish brown. I wanted to do these strictly tabletop quality, aiming at a level of detail where I could paint a dozen at a time and finish the whole bunch in about a week. Step one was to wash the skin. I used three different washes: a skin tone wash, a brown wash, and a black wash. Together with the two different primers I was able to get a lot of variation in the skin tones this way, from fleshier browns to mummified greys. The shrouds were washed brown. Step two was to go over the other parts, painting the javelins and shrouds in base coats. After the first bunch I decided to try to keep to using darker brown javelins on the lighter skinned skeletons, and vice versa. Step three was to do highlights. I mixed colours and gave the skin two highlight layers, and the javelins a few stripes of lighter shades. Again, keeping with the theme of mixing skin tones, I did this part in a rather random manner, mixing a bunch of dark browns and beige colours on a wet palette, and then just playing around with them (from dark to light shades: Vallejo's German Camo Black Brown, Deck Tan, Old Wood, Cork Brown, Beige Red, Buff and finally Dead White). Since there was basically just the skin tones to paint I could spend a little bit of time playing around with mixing colours and doing two highlight layers, yet still paint them quite quickly.  The skeletons without shrouds were even easier to paint. If you are a GW veteran you might spot that Shirty did a few other conversions as well, like head swaps! 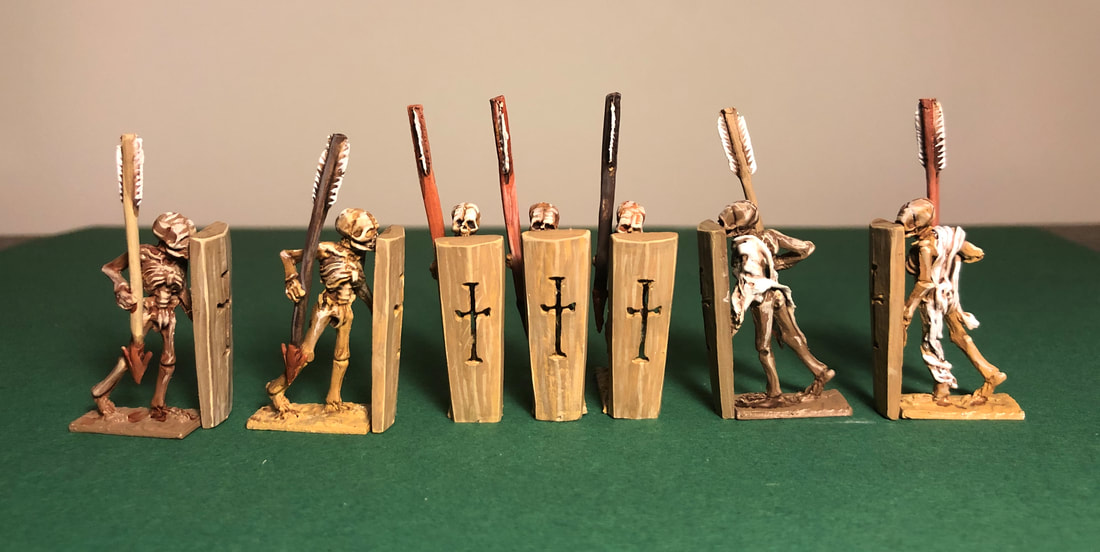 I think these are the coolest part of the unit, a front rank carrying pavise style shields made out of coffin lids! Again, some are converted with burial shrouds. 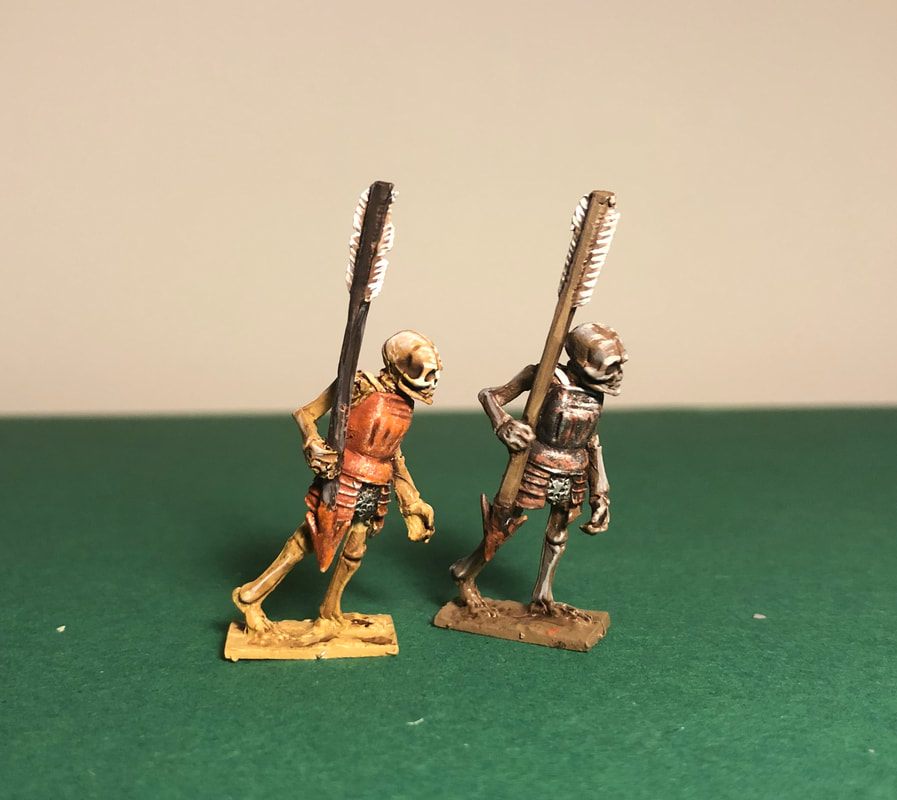 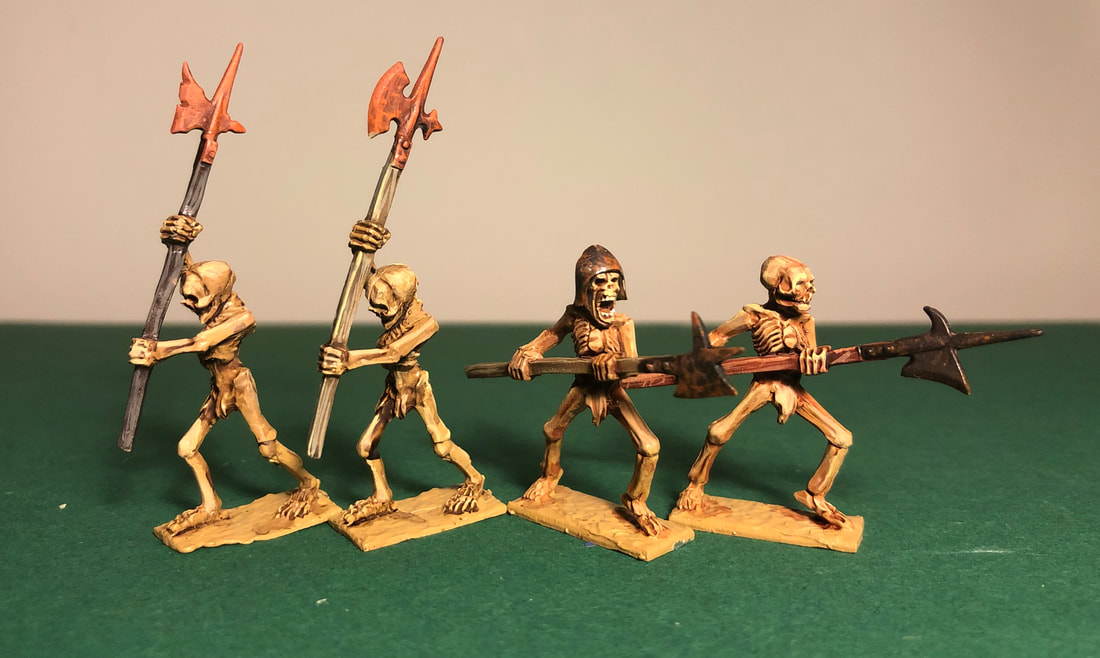 Shirty left a few odd ones among the javelin dudes. Two javelin guys with armour will create some more variety, and there were four halberdiers as well. One of them (also a conversion) is really angry! Unit Proof of Concept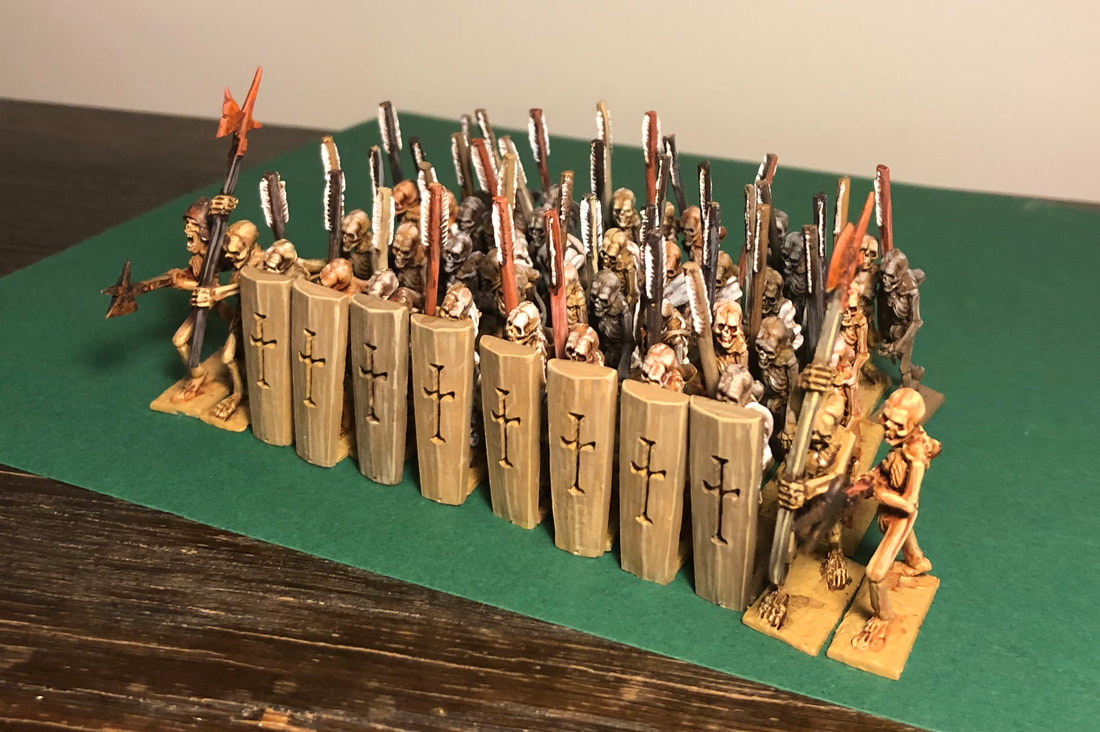 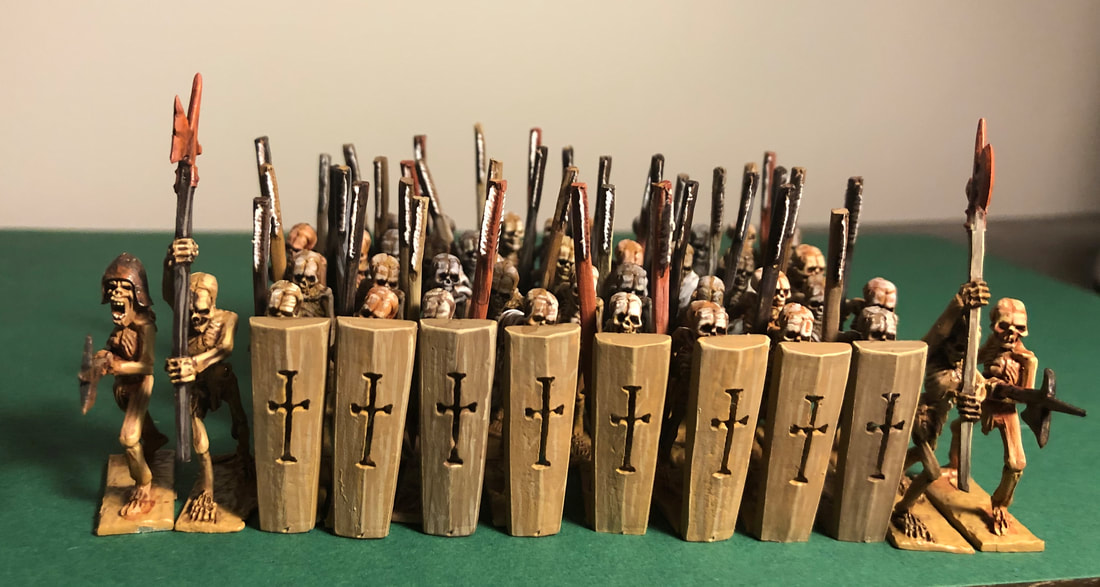 So this is about how I imagine the unit will end up looking. The thin sculpts means that we can jam the minis very tight to each other, creating a dense formation of scary skeletons. There will also be a few command miniatures in there, which I'll tackle after these rank-and-file minis. We also have some ideas about extra unit fillers, inspired by the Triump of Death painting, which might make this unit a lot bigger in size. Overall ImpressionsFirst of all, I liked these sculpts a lot. They are a bit quirky and charming, and are very quick to paint. I was happily surprised that I could get through a whole unit in a week. Once they are based and the command miniatures are in there, I bet it will be a neat looking unit. After this unit we'll tackle some halberdiers and pikes, and rumours have it that someone has ordered even more of these little guys. See you then! /Jonas Click below for larger sized pictures By Shirty 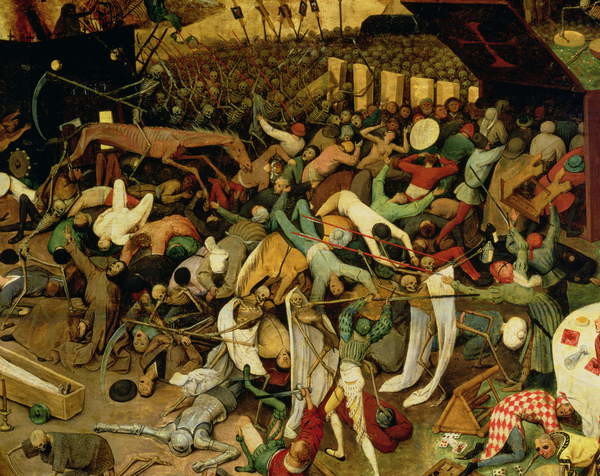 The extraordinary nice range of Renaissance skeleton range by Skull and Crown Miniatures, named after The Triumph of Death painting and various 16th century wood-cuts, has caught our eyes (and Kickstarter pledges). We went all in on the first Triumph of Death Kickstarter but have not painted any of the models yet. With the Triumph of Death II Kickstarter incoming, which we knew we would support, we started preparing the skeletons for the coming storm of Death! We love these miniatures, and this is a kind of army I have wanted to do for at least two decades! In our communication with Thomas Foss (the force behind Skull and Crown Miniatures) I could not resist to show some of the things I have done to his creations, and he asked if I could not make a blog entry about it. And of course I don´t need any more encouragement than that! So, the specific topic was green-stuff cerecloth on the skeletons. Let´s go! 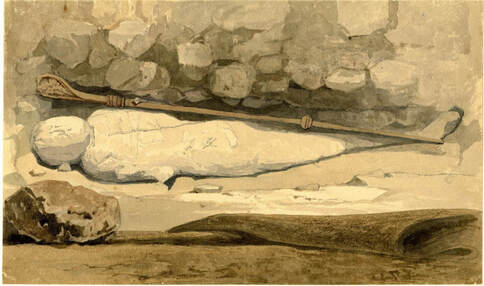 A medieval corpse wrapped in ceredcloth Make balls of greenstuff (one for each miniature - test some different sizes) and let them lay to rest for about an hour (or maybe 45 minutes - at least longer than you think!). If you use it prematurely, it will only be a mess when you apply it to the miniature! Experiment a little and you'll get it right. Flatten the ball on a glib/slick surface (I use a plastic surface) with cold water. If it´s so hard that it hurts a little bit on your fingertip when you flatten it it´s still ok. In the process, turn it many times so it doesn't get stuck, and add a little cold water each time. Take a knife and cut out a fairly rectangular "sheet". You can save the cut-offs and put them on another skeleton as torn apart landsknecht clothes when you are finished with the skeletons. You can probably skip this step and get a good result, maybe I just do it out of superstition. Wrinkle it before attaching it to the model. I have used both fingers and different tools for this. It creates a much better result than if you try to do it once attached to the miniature. Push it on the skellie, push it on hard so it is stuck when you work to rearrange it! Rearreage the sheet with a tool until hopefully satisfied. Put the tool in cold water while you work. I used a plastic 28mm lance and a hobby-knife. Some say there are fancier stuff out there to do this kind of work. Here comes some finished miniatures. Most of them with nice new clothing. As you can see you have the opportunity to build some variants that would be really hard to cast. This is partly doable because the green-stuff is half hardened when i work with it. 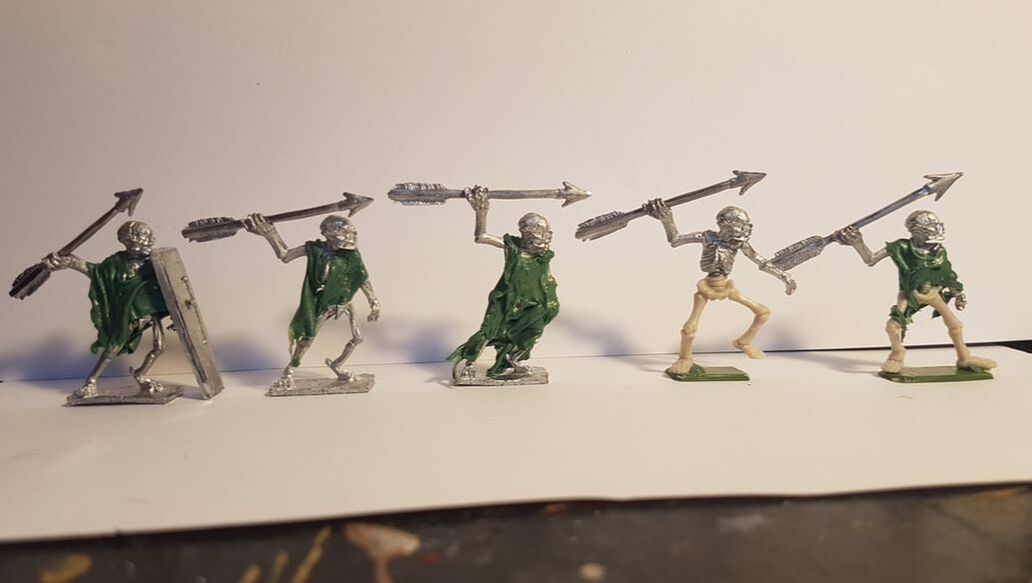 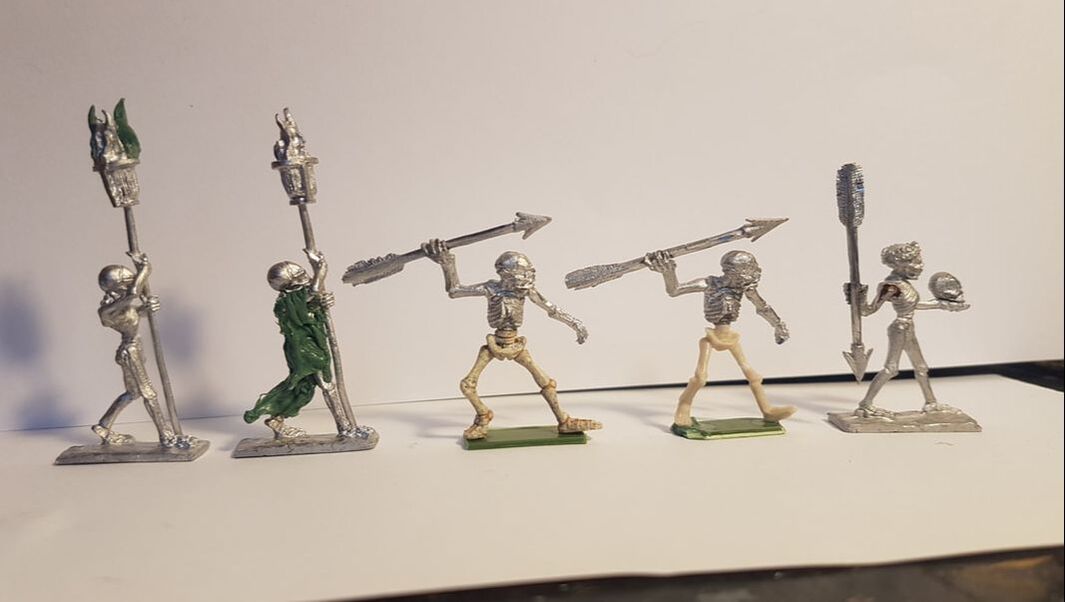 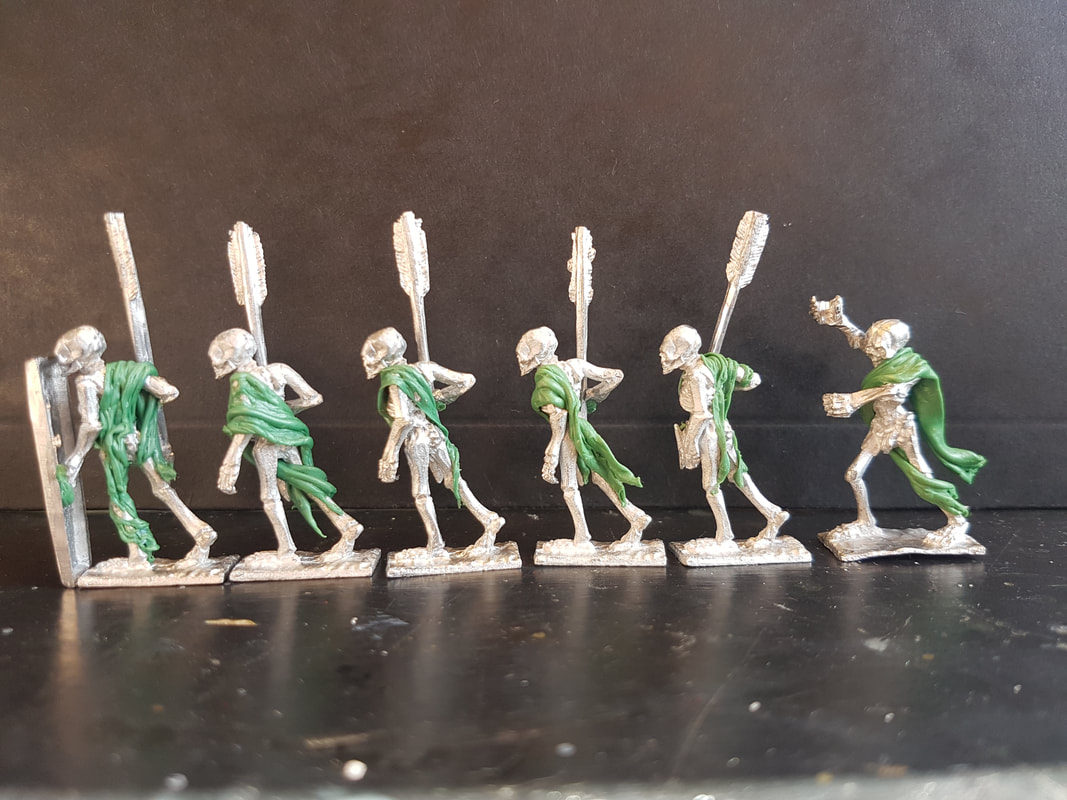 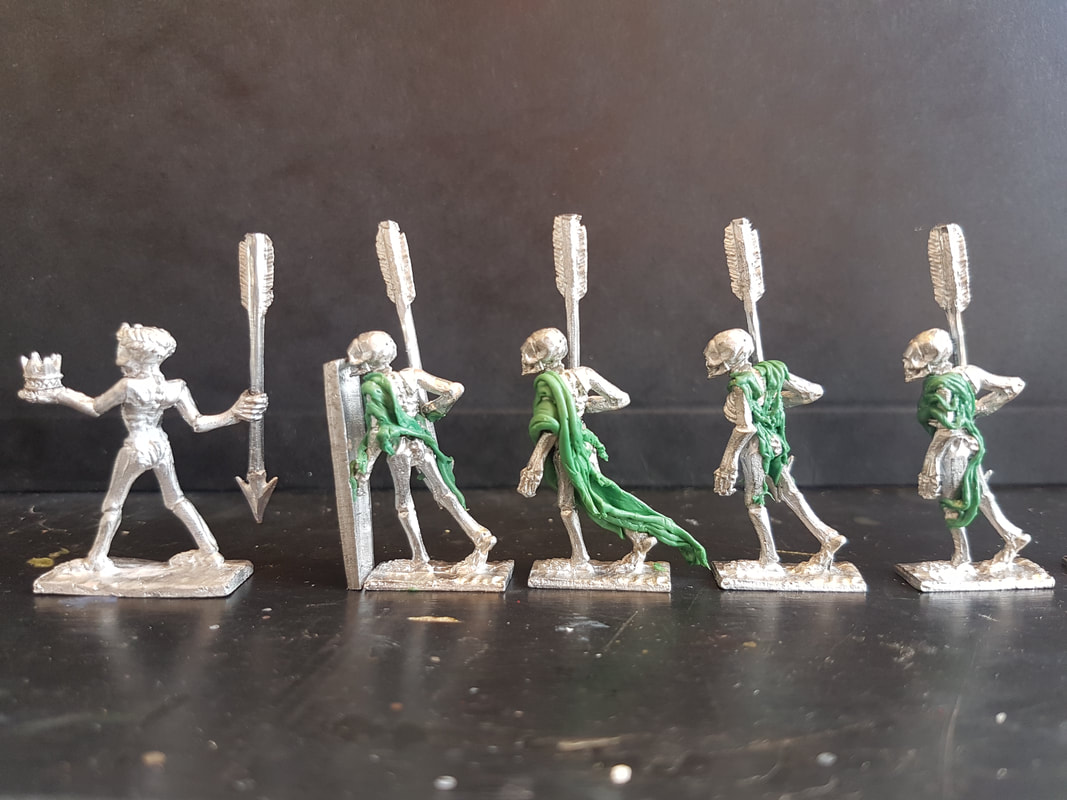 When you get a hold on it it´s fairly quick, so you can do several at a time. Good luck with the coming Apocalypse!
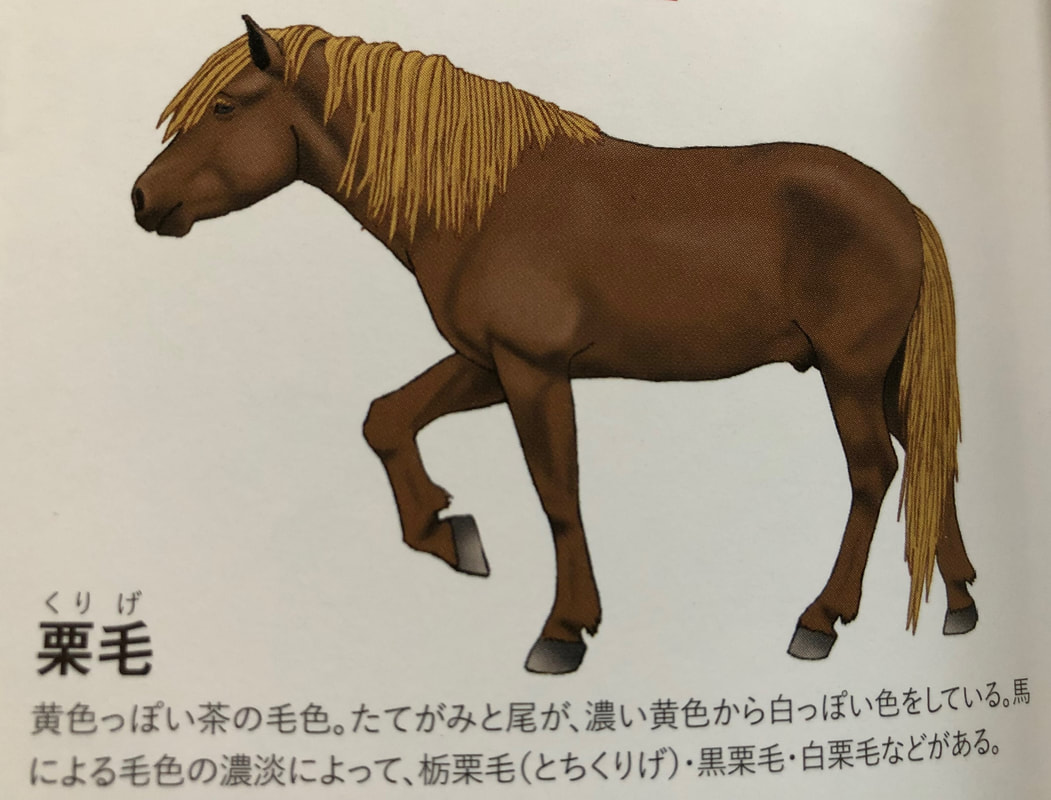
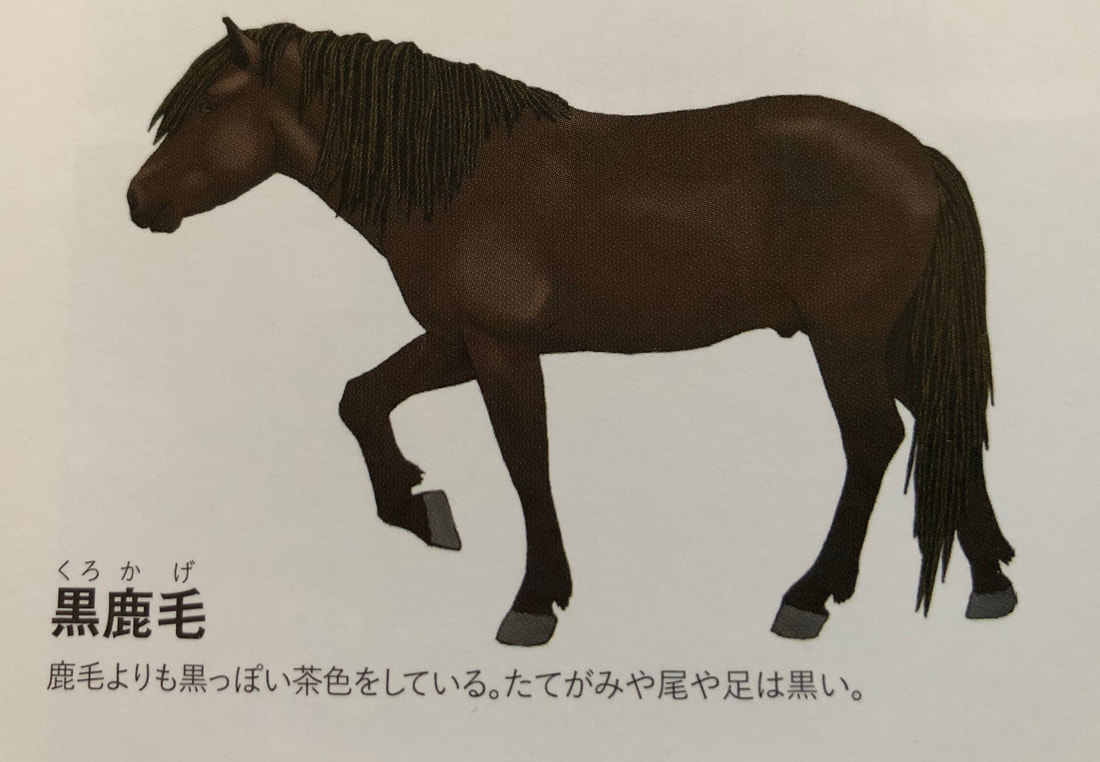
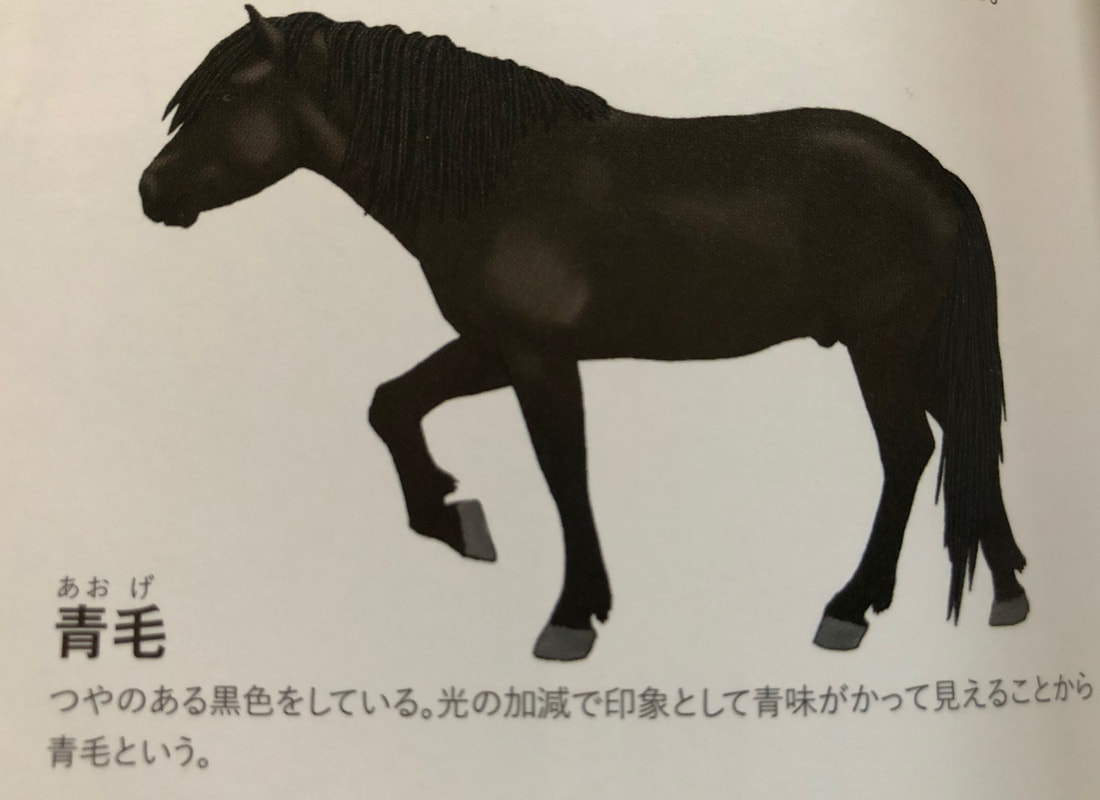
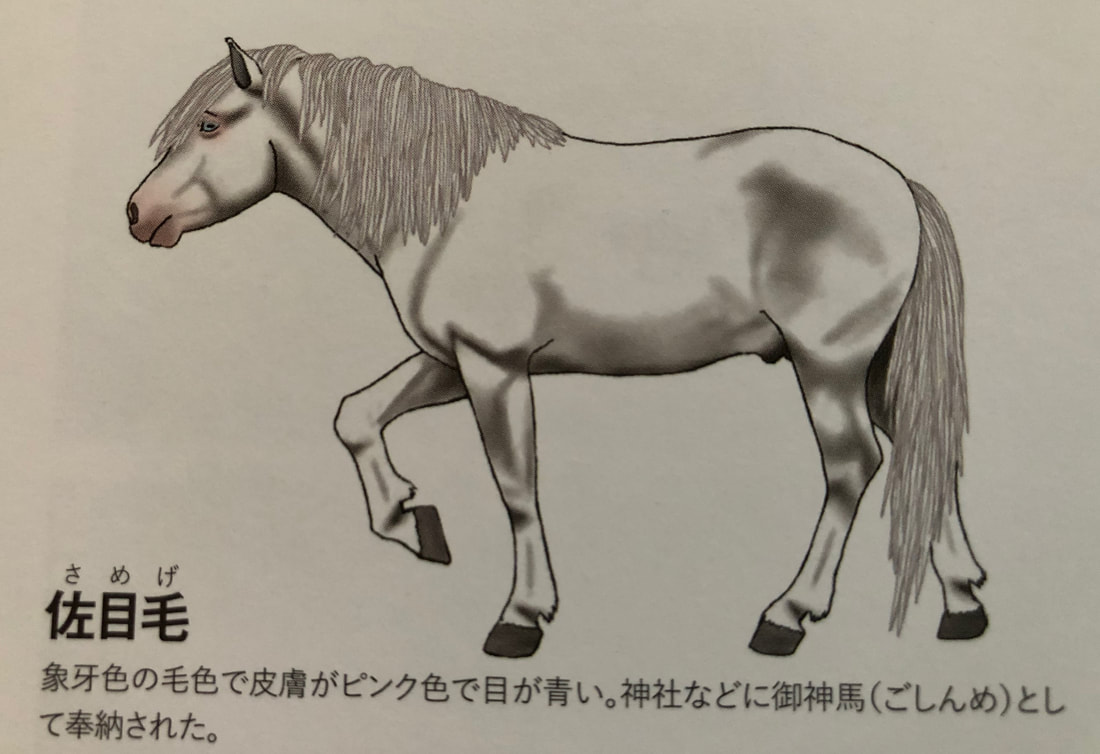
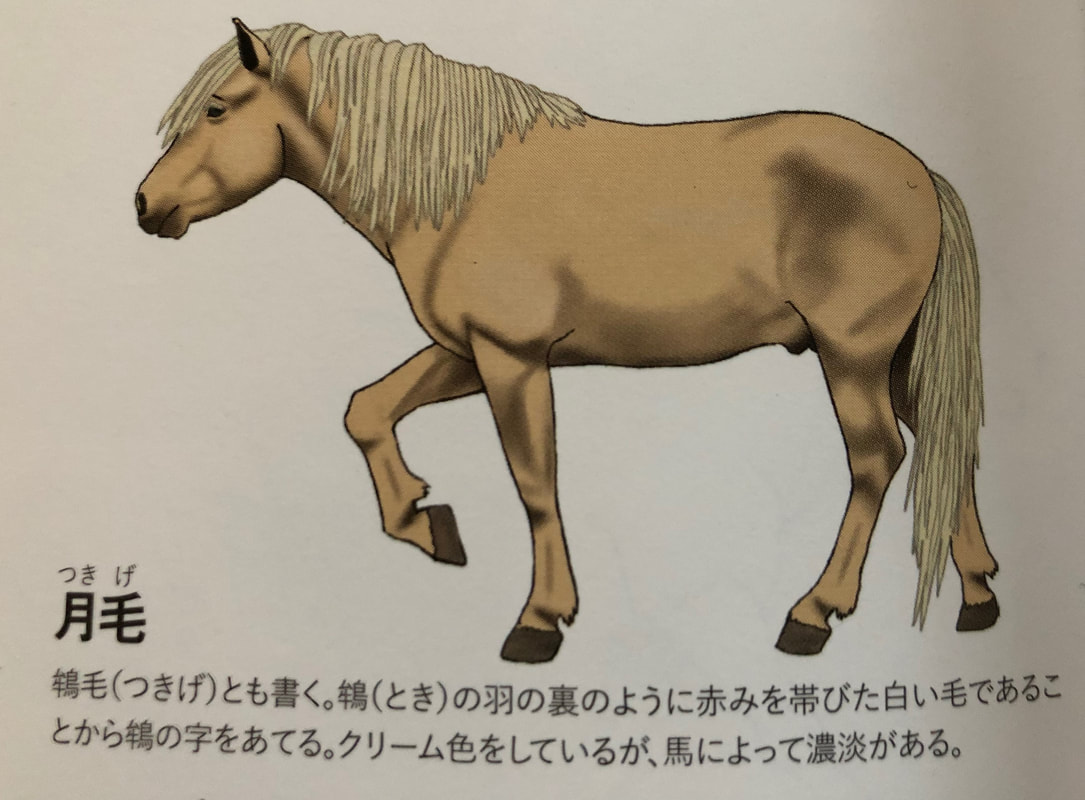
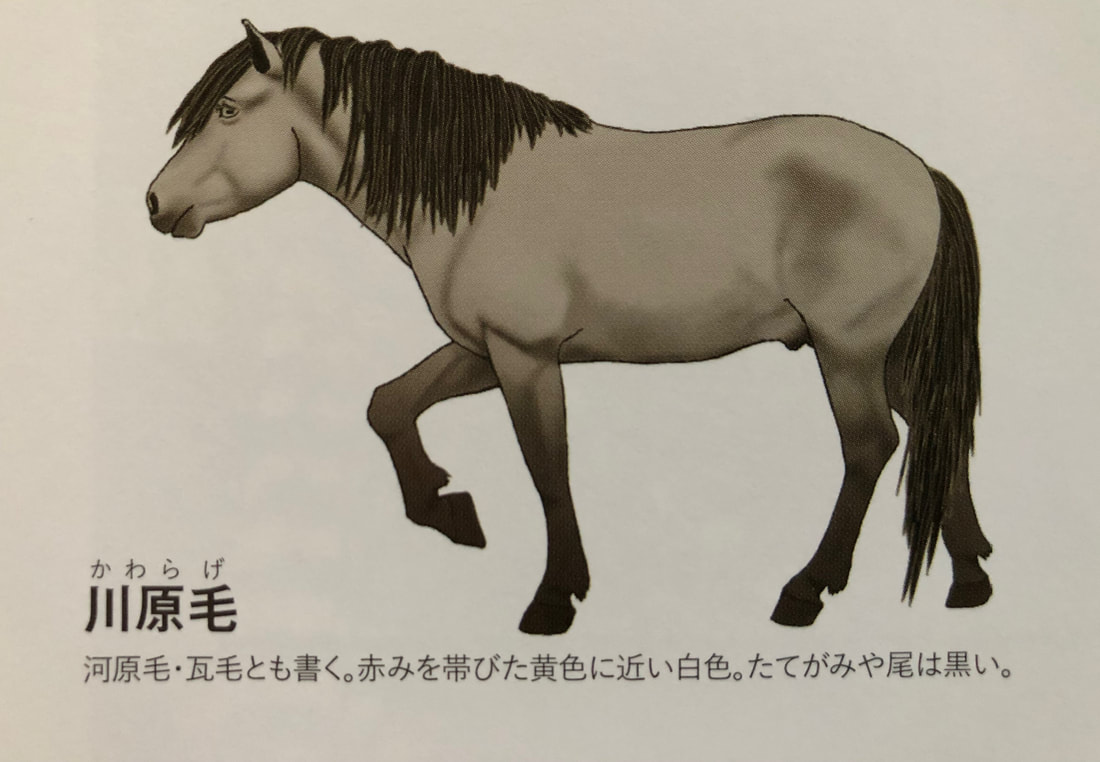
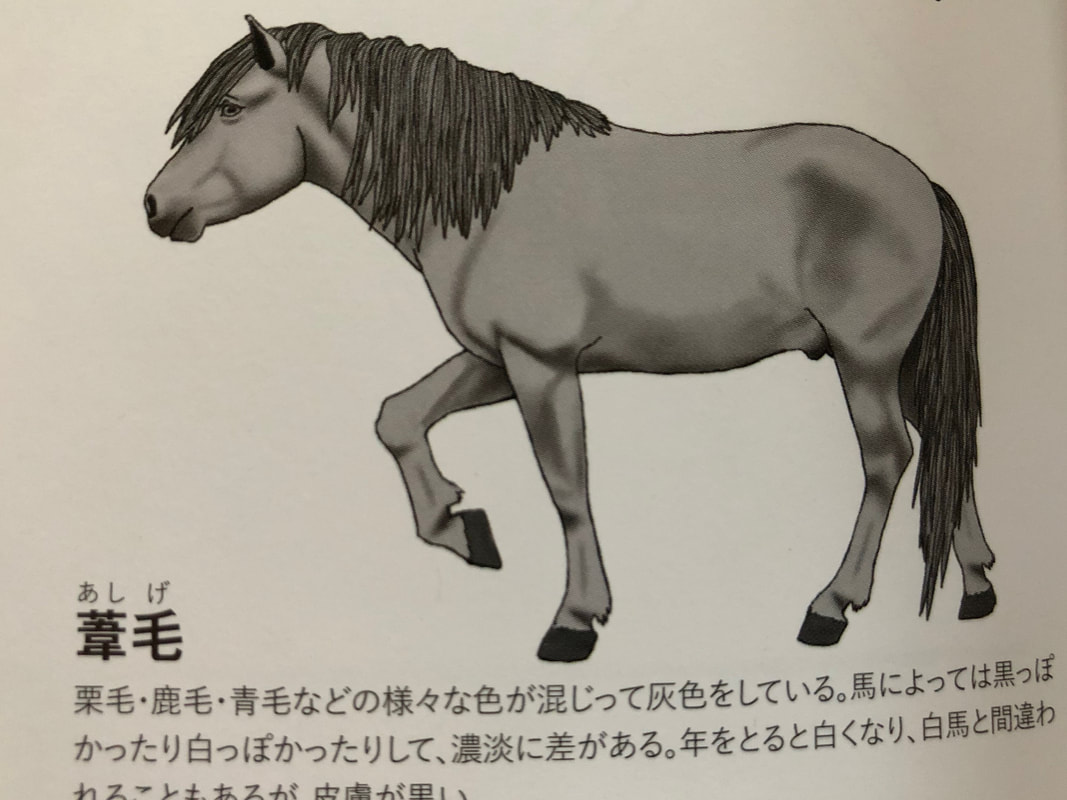
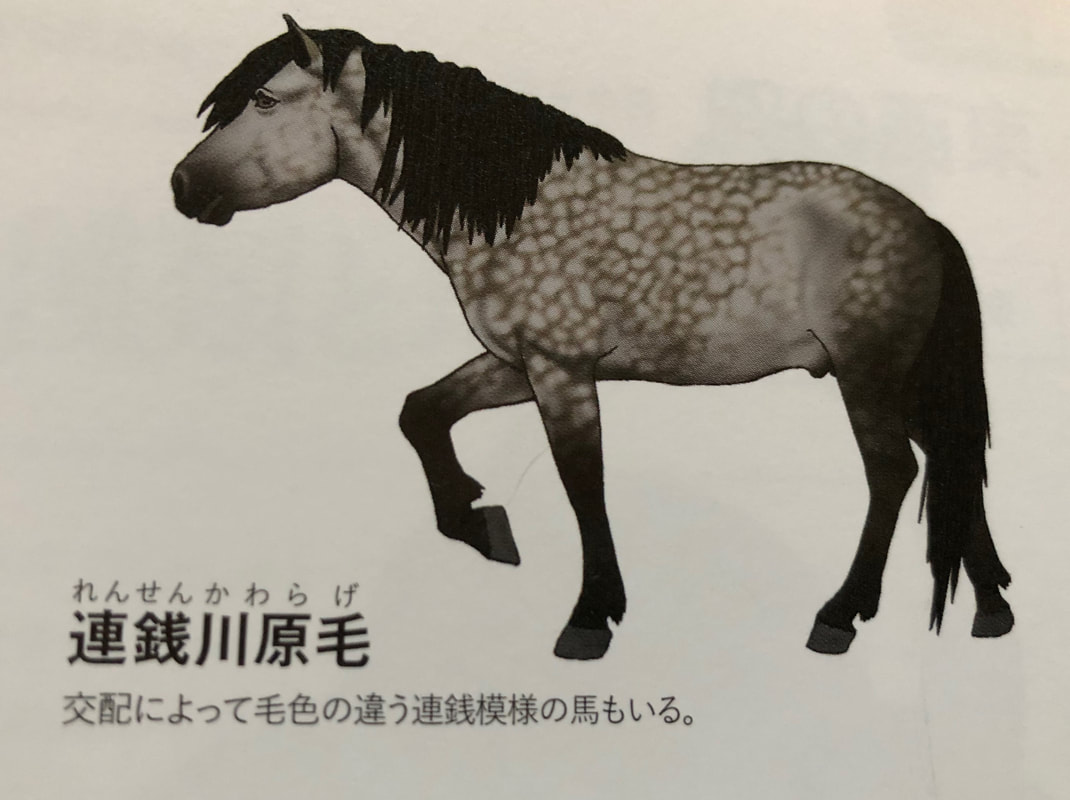
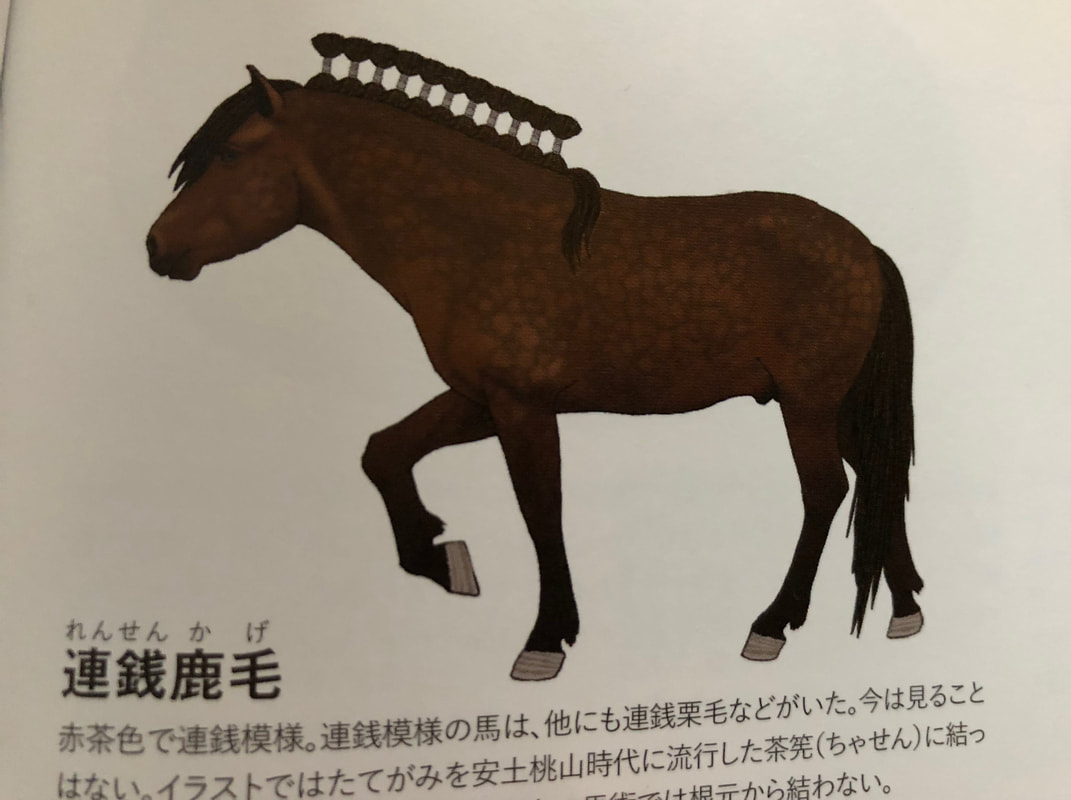
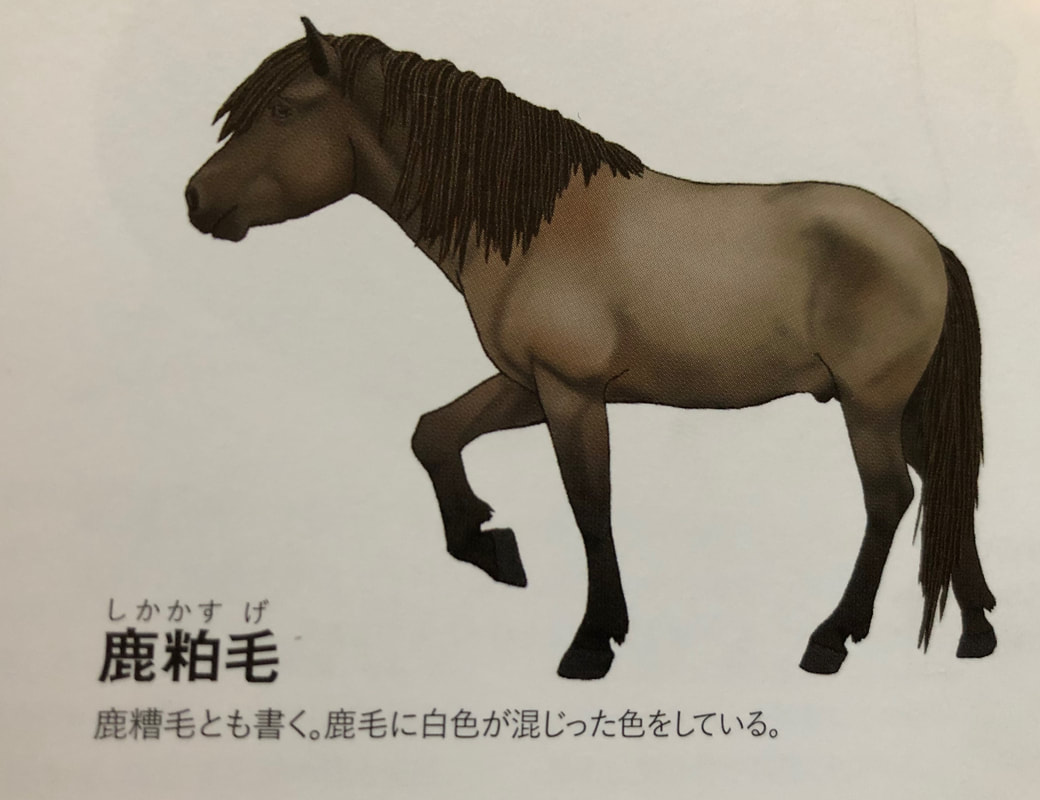
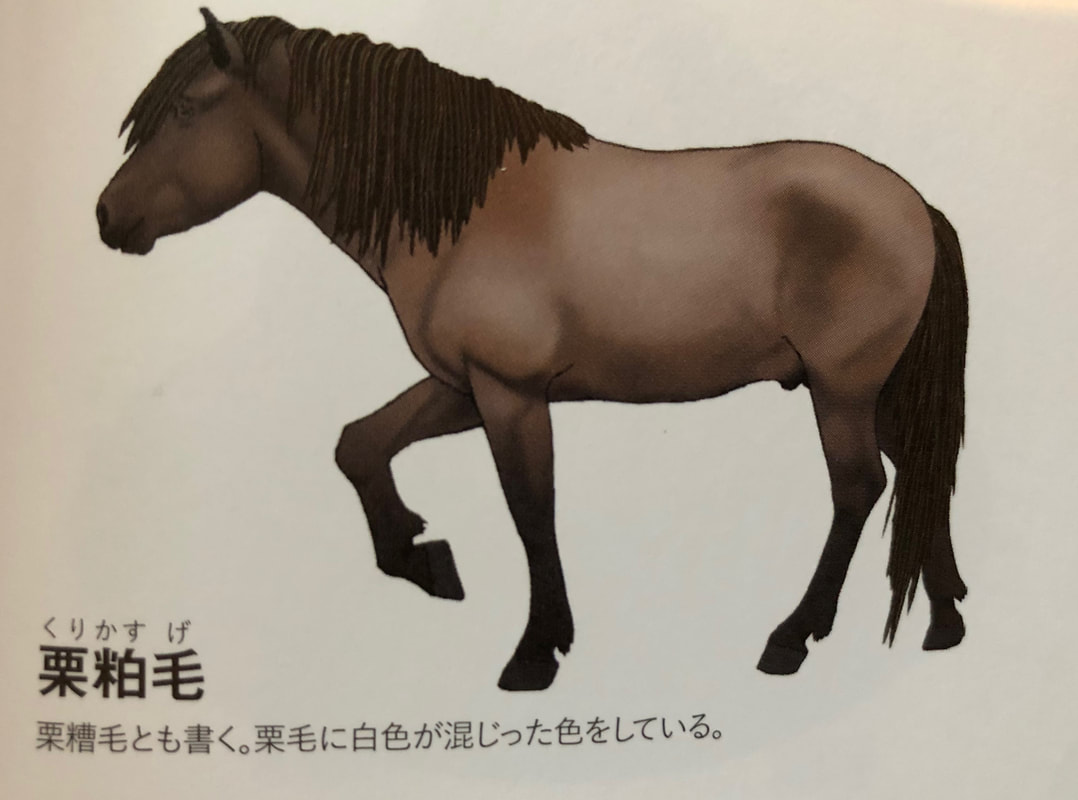
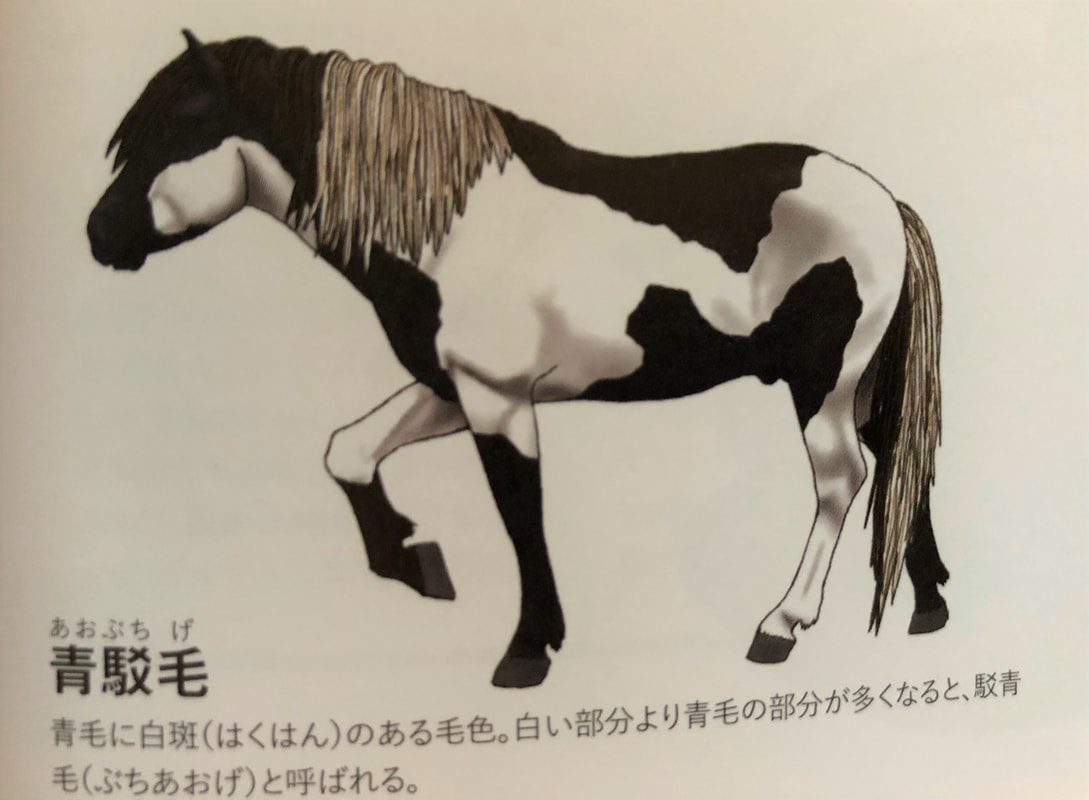
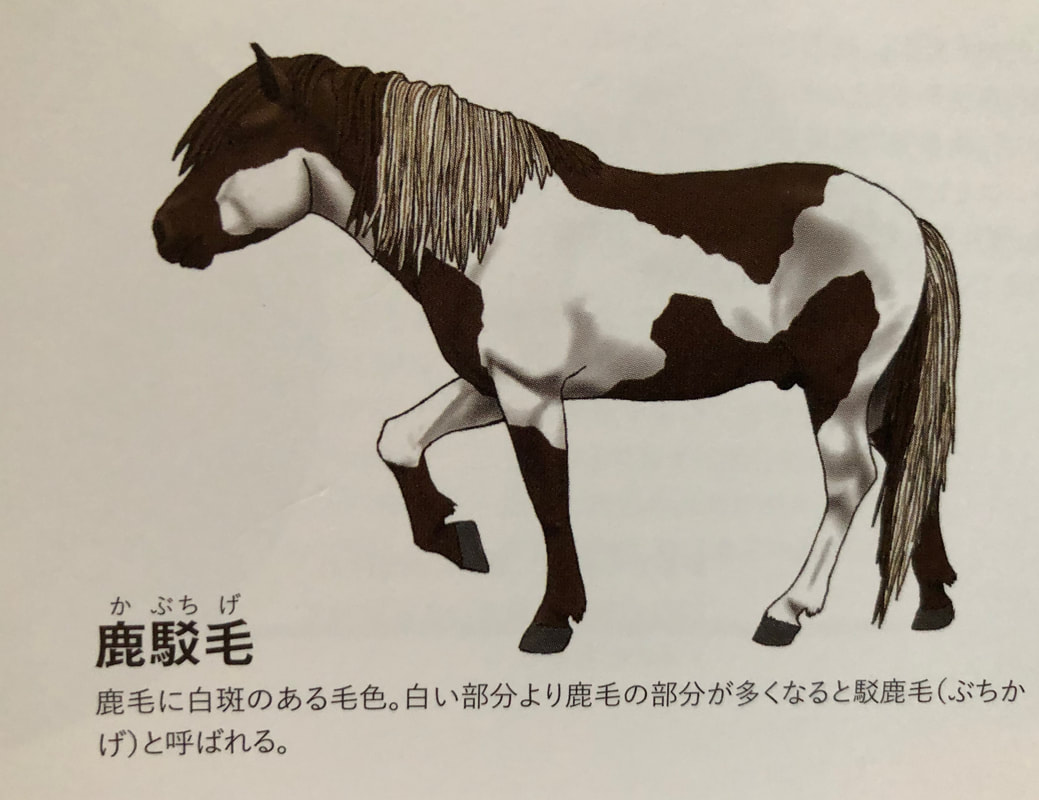
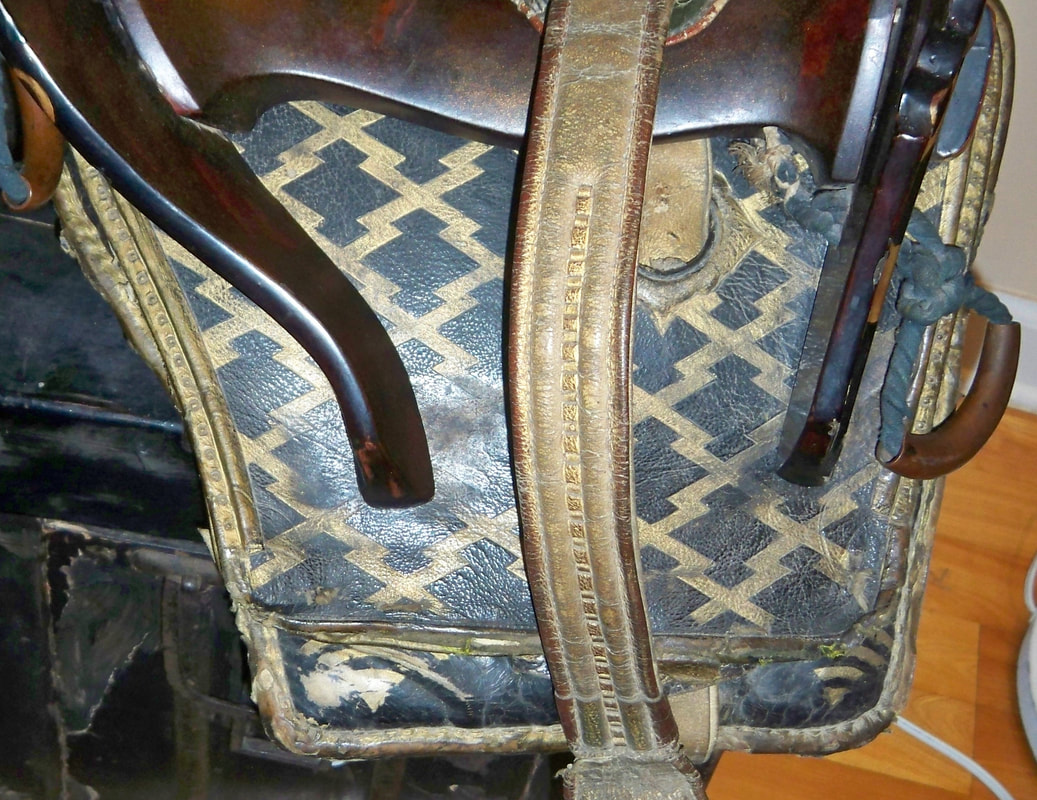
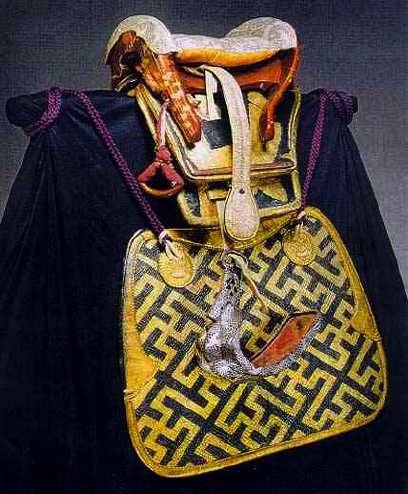
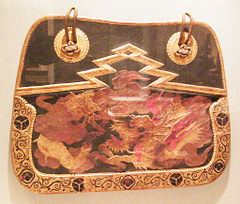
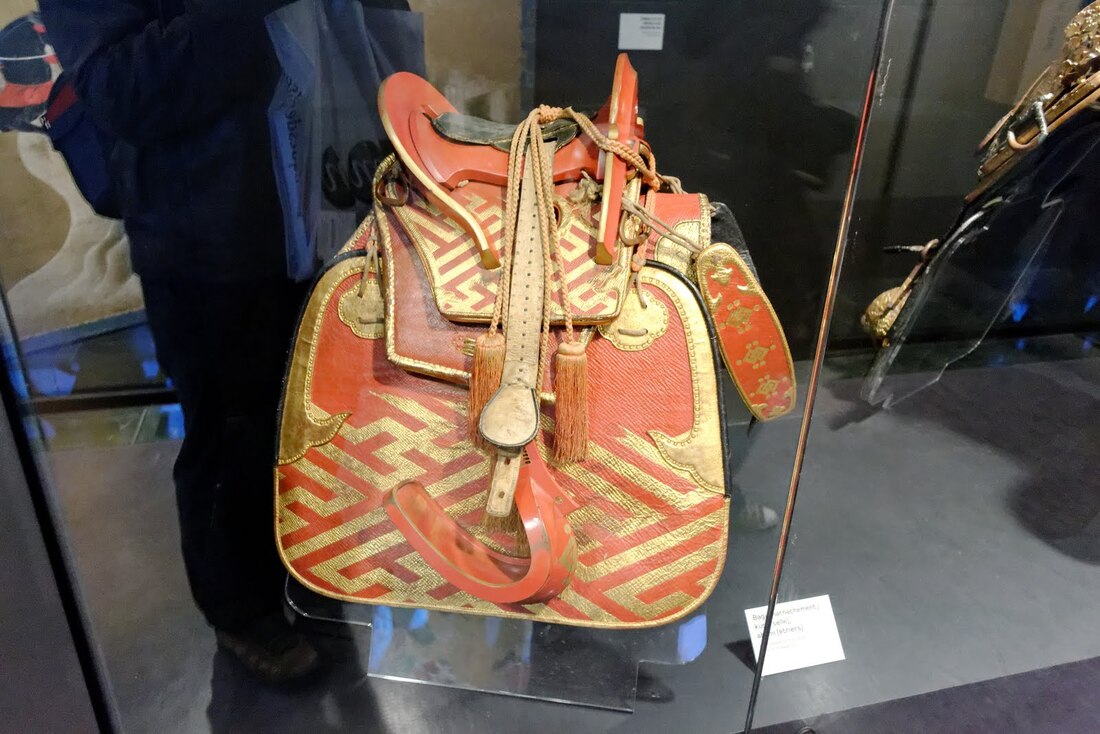
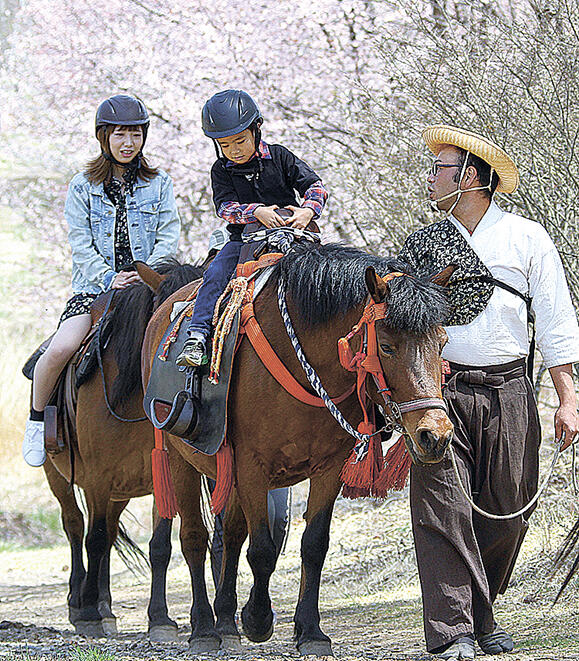
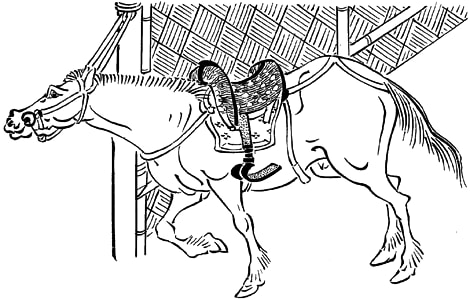
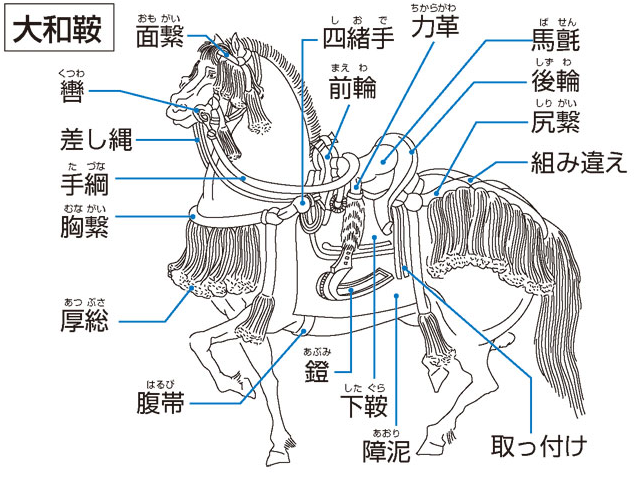
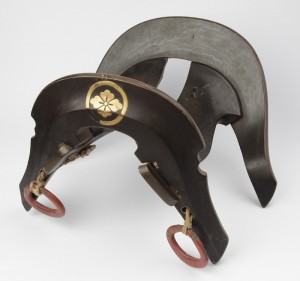
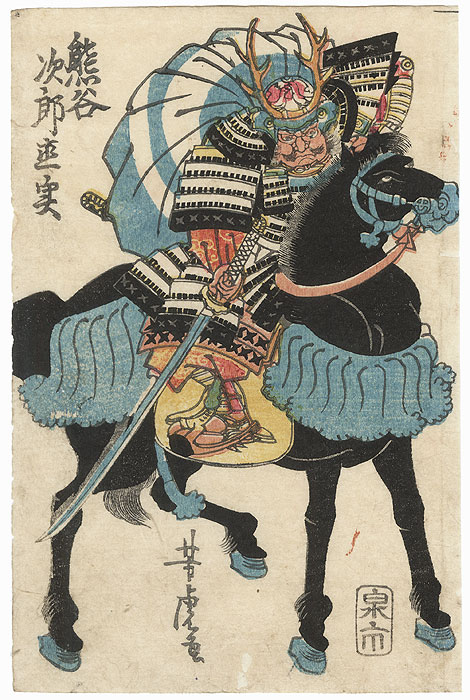
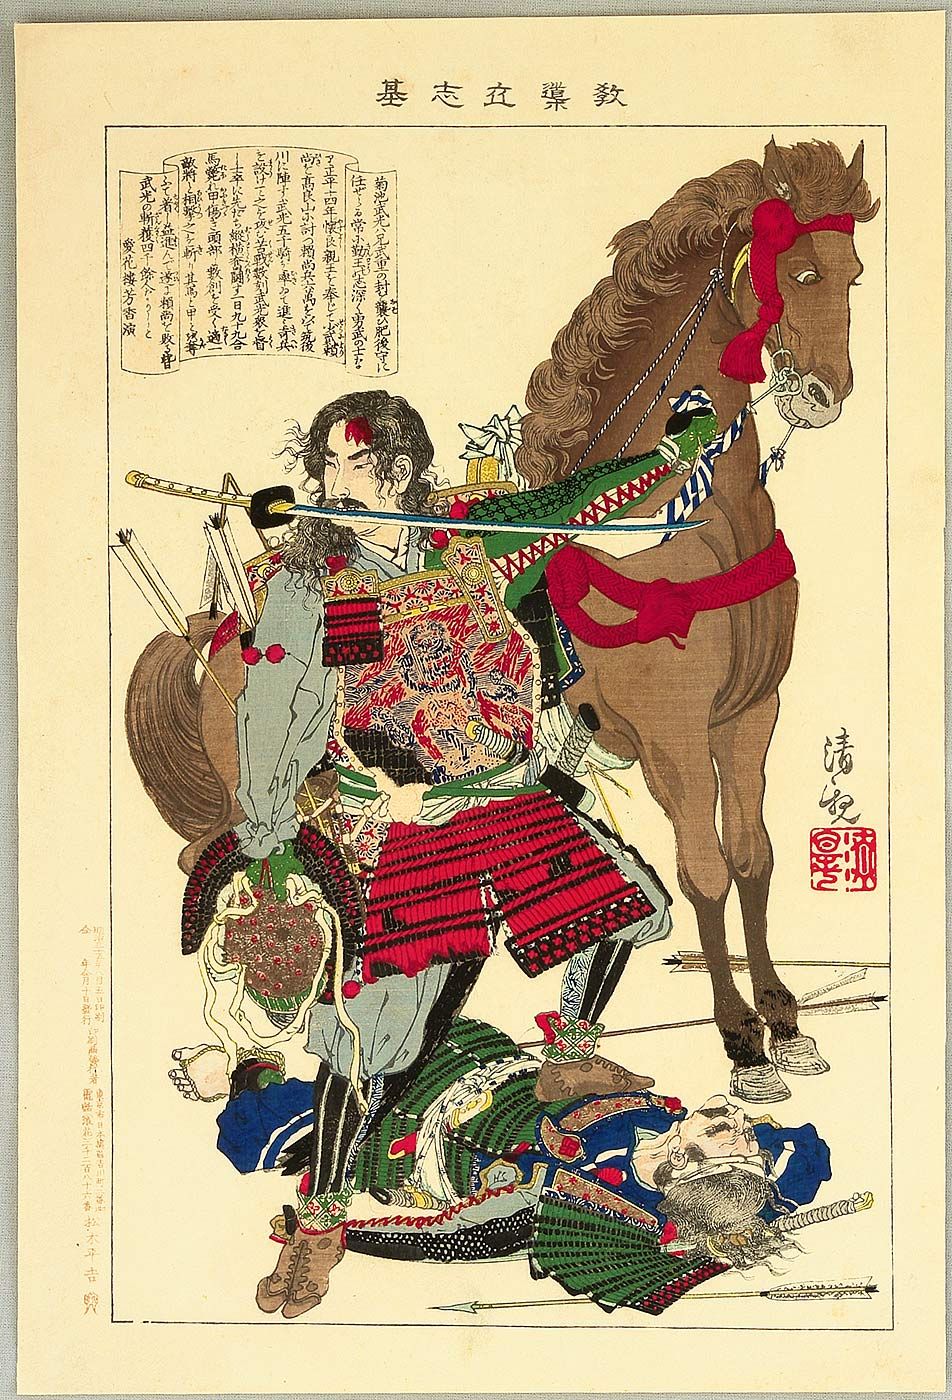
Cheers! /Shirty 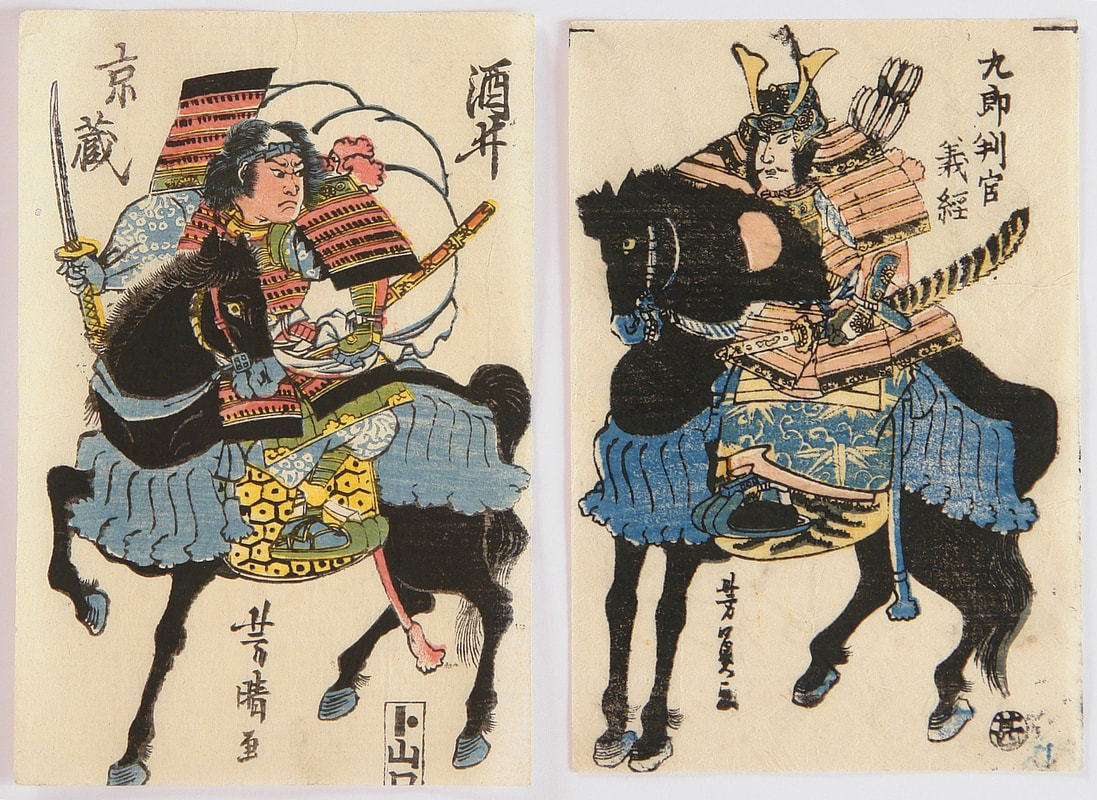 The samurai caste was born from the mounted archers who let the Kyoto emperors match and eventually push north the Emishi, who populated large parts of the main island of Honshu. Military developments made their role develop over time, but horsemanship remained a valued skill even at the threshold of the modern era. This means that you'll probably eventually want to get some cavalry if you collect a samurai army, be it a group of mounted Kamakura era archers, an elite spear-wielding hatamoto cadre crossing the fields outside Sekigahara, or just a single mounted shinsengumi captain leading his gang through the streets of Edo. This guide is not a technical guide about how to paint horses. Instead I will cover some things that are specific for Japanese horses, or more specifically those ridden by samurai, so that you can find some inspiration for how to get them to look both impressive and historically correct. A Different Breed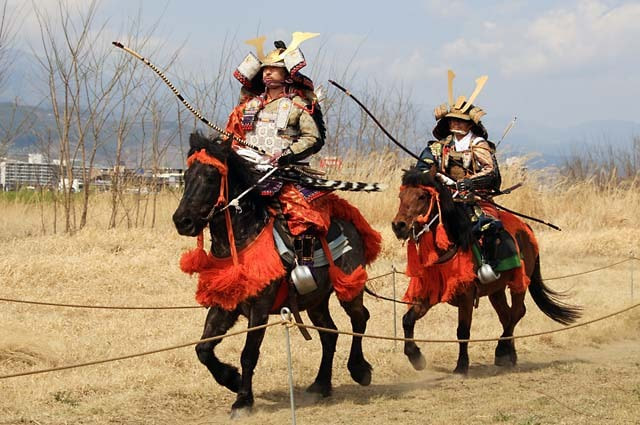 Modern Kiso uma with reenactors, showing how proportionally small the horses look. The native Japanese horses were small and sturdy, related to the hardy ponies that enabled the Mongols to cover vast areas in their conquests. These sure-footed horses were perfectly suited for navigating the many hills and mountain passes of Japan, as well as serving as solid platforms for mounted archery, but the lack of speed and mass meant that they could not provide the same shock charges as the Western knights. The samurai would also ride stallions, instead of geldings, preferring the extra aggressiveness as they'd kick, bite and trample their way through a melee. When the Meiji restoration opened up Japan for international trade the army undertook an agressive breeding program to replace these small horses with much larger breeds. This program included mandatory gelding (castration) of stallions, making most of the native breeds extinct within decades - so if you're making a WW1 or WW2 cavalry force you should pretty much ignore this guide. During much of the 20th century the native breeds were almost wiped out. This means that pretty much every mounted samurai you've seen in movies or TV shows have been very anachronistic, and even modern reenactors are most likely to ride an imported breed. However, eight native horse breeds have survived with limited crossbreeding. In the case of the Kiso breed thanks to a single stallion being excluded from gelding due to it being dedicated to a shrine. In other cases it has been due to living on isolated islands, or being of a very specific use like the Hokkaido workhorse. From them, archeological finds and contemporary paintings we can tell a lot about what a horse ridden by a samurai could look like. The horses would be rated as ponies today - a Kamakura (1185–1333 AD) horse would typically be about 110 to 140 cm in withers. To put that into perspective, the modern boundary for ponies is 147 cm, and an average thoroughbred will be about 160-165 cm. If you imagine a small icelandic horse, you're pretty spot on. Japanese Horse ColoursOne of the main differences between modern horses and the native Japanese horses is that facial markings were unusal or non-existing in Japan. I'm honestly less sure about white socks, but I can tell that they are more or less non-existant in both contemporary pictures and in pictures of the surviving breeds. That's not to say that I can swear that there was never a single horse with markings before 1868 - but if you want to stay on the safe side, don't put markings on your horses. As you can see on the picture above, you can still vary the colours by painting the lower legs and muzzles darker than the rest of the coat. As for the actual colours of the coats, here's a gallery with pictures of sengoku period horse colours. Some breeds would be more likely to have some colours, but as long as you base your horses on these you should be safe. Click on the pictures for bigger versions: Japanese Tack ("The Stuff You Put on Horses")Some parts of the traditional Japanese tack is the same as the Western ones, but some parts of the construction is different. Here are some descriptions and details that hopefully can help you when you're painting it. It's important to keep in mind that when you see pictures from surviving items in museums, they are not necessarily very representative. They are typically made in the Edo period, after the major wars. At this time wargear tended to become less and less made for actual use, and more as to showcase the social status of the owner. The older items that have survived are more likely than not those of immensely rich and powerful owners, as they would be preserved as family heirlooms. As such, the surviving items in museums generally tend to be more decorative and elaborate than the gear you would see an average samurai use on the battlefield. So don't feel bad about skipping the elaborate designs and gold patterns if they feel scary! Plain leather and solid colours will work fine as well. SaddleThe japanese saddle, or kura, is made of several parts. This means that you can go for a very colourful look, and if you enjoy painting patterns you'll be able to go hog wild. 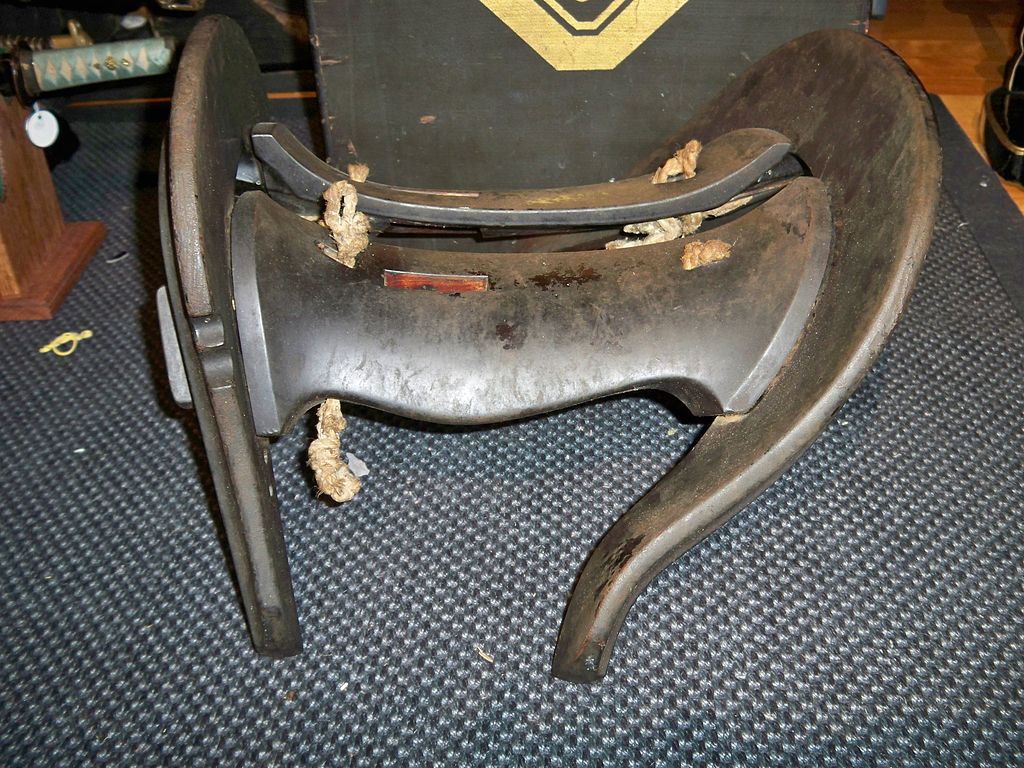 The core of the saddle is the kurabone, a wooden structure typically made out of red oak. Wealthy riders would be able to have it lacquered or even elaborately decorated with patterns in gold or other expensive materials. 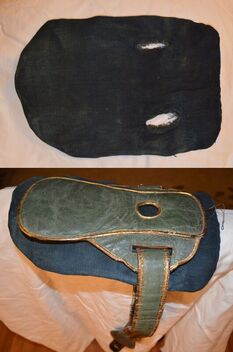 The rider would not sit directly on the kurabone, but on a small leather saddle called kura tsubo or basen. It had holes for chikaragawa, straps holding the stirrups. In between the kurabone and basen could be an additional pillow called kura zabuton. Leather details could be either plain leather coloured, painted or decorated with patterns, sometimes in gold. I've found that lining the edges in a different colour like in the example above looks great and is relatively easy to do.
To protect the back and sides of the horse, there would be two sets of leather pads underneath the wooden kurabone. The horse's back was protected by a hadazuke or shitazuka, and lower down the horse's sides would be a set of pads called aori to keep the stirrups from scratching the horse. Again, these would be either in natural leather colours, painted or elaborately decorated depending on the wealth of the rider.
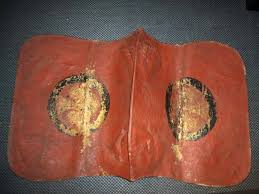
Closest to the horse would be a saddle blanket, kiritsuke, for a final protective layer. These can be plain or very elaborate, just like any cloth details on the rider. Other Main Parts of the Horse Tack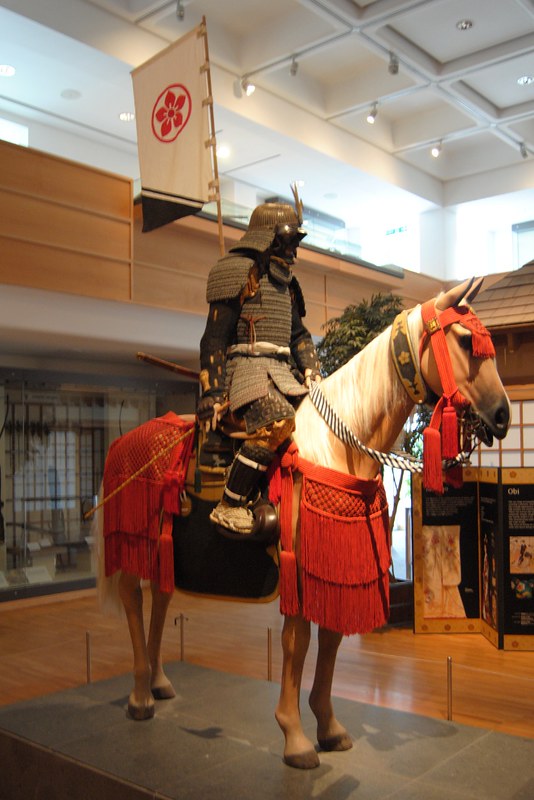 The saddle and headgear would be attached by a set of cloth straps called sangai. These would typically be in a single colour such as red, purple, blue or yellow. They could have long tassels, which would be in the same colour. In the picture above, it's the red pieces in the back and front of the saddle, as well on the head of the horse. 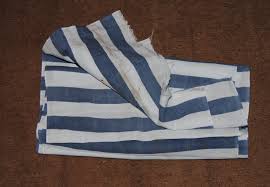 The reins, tazuna, would be cotton cloth. A common version seems to be a printed striped patterns of white and another colour, often blue. But they could also have just a single plain colour.
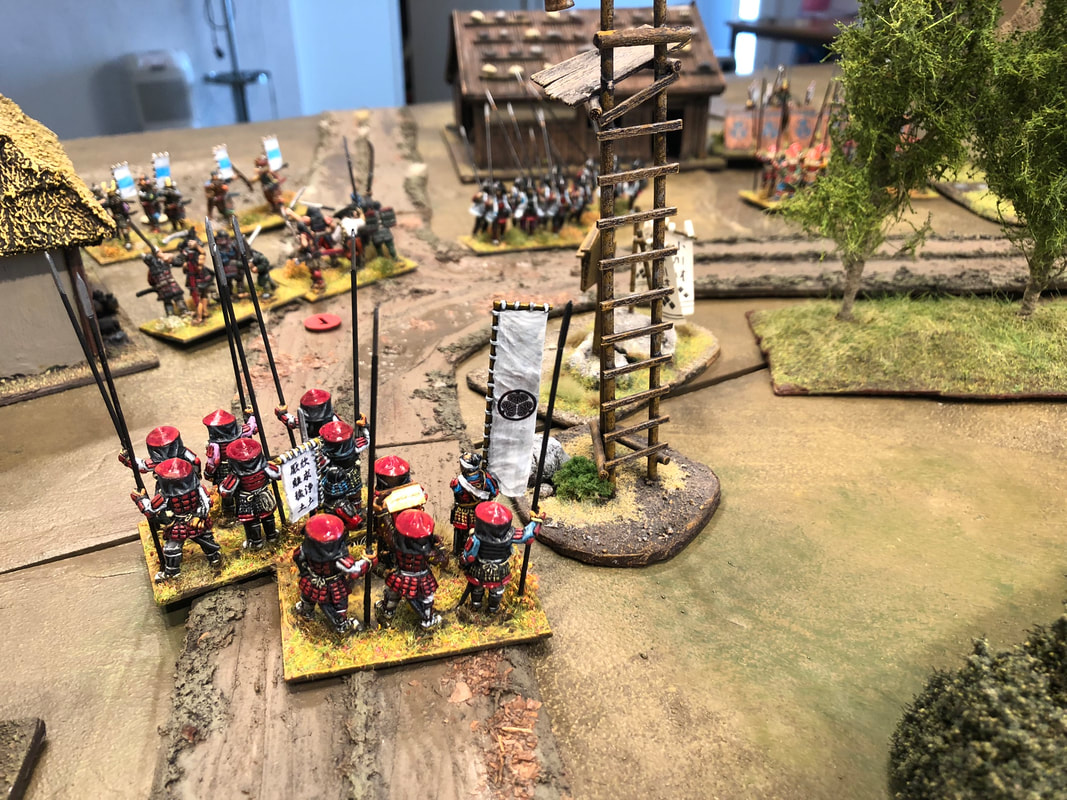
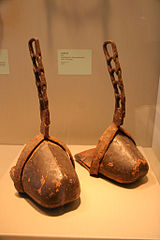
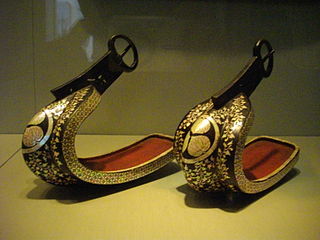
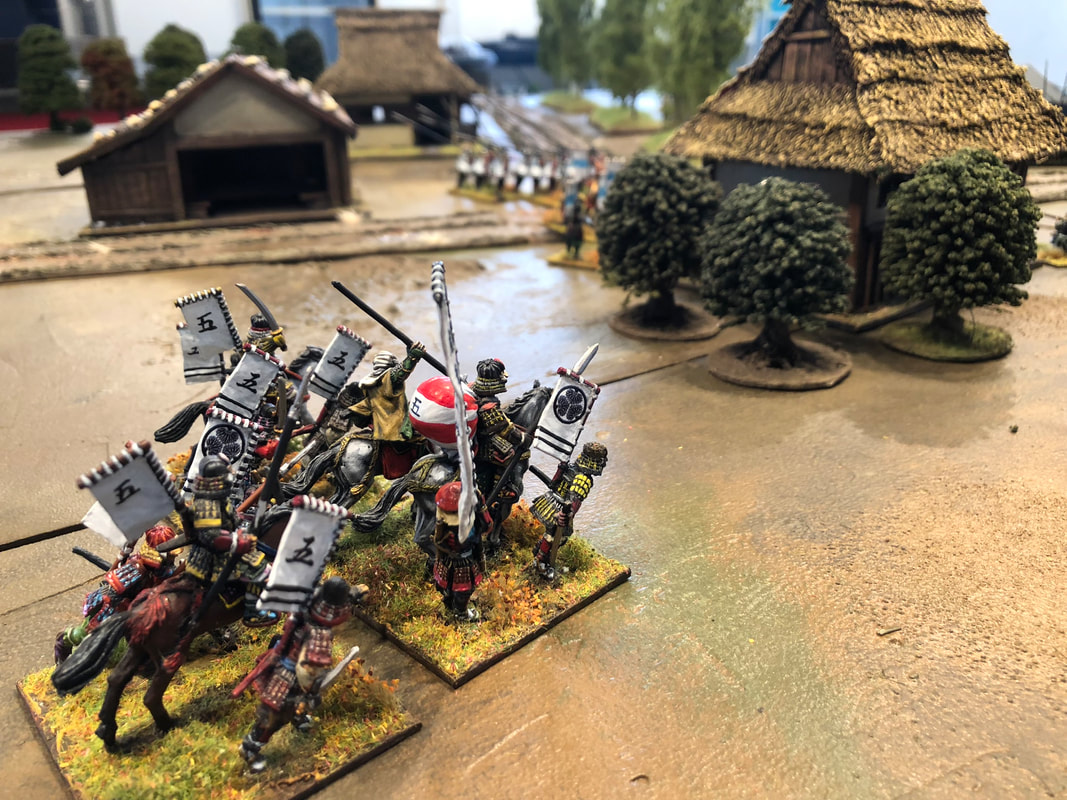
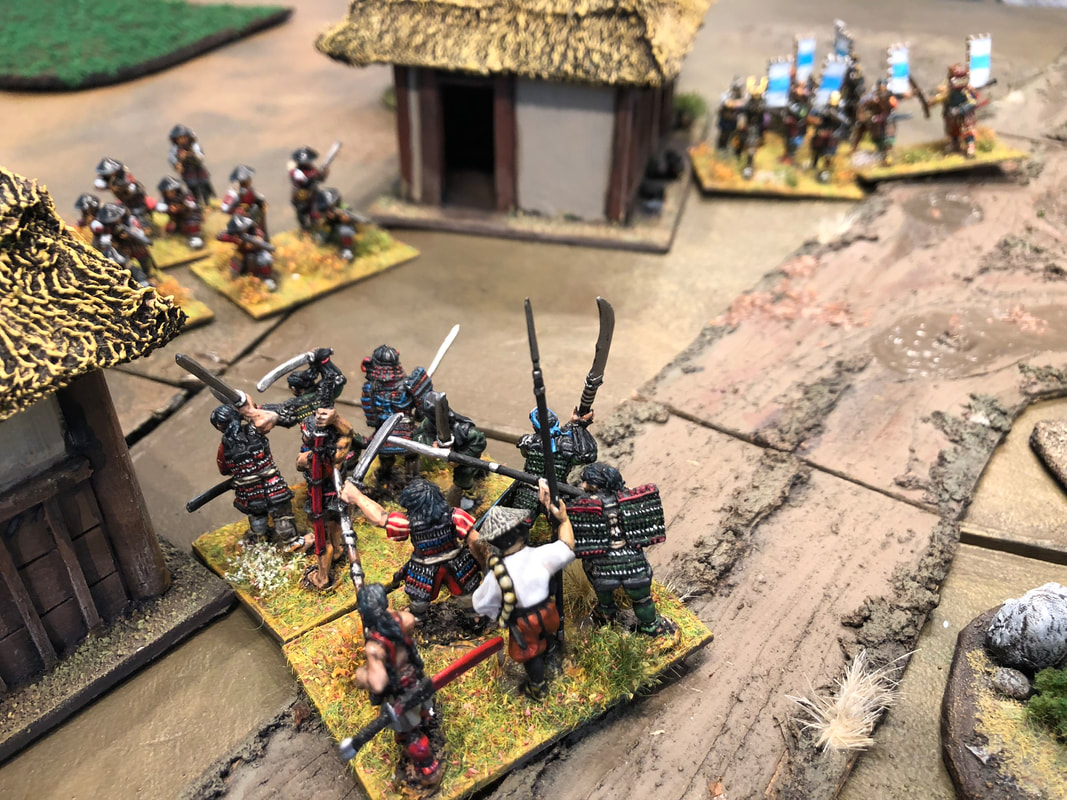
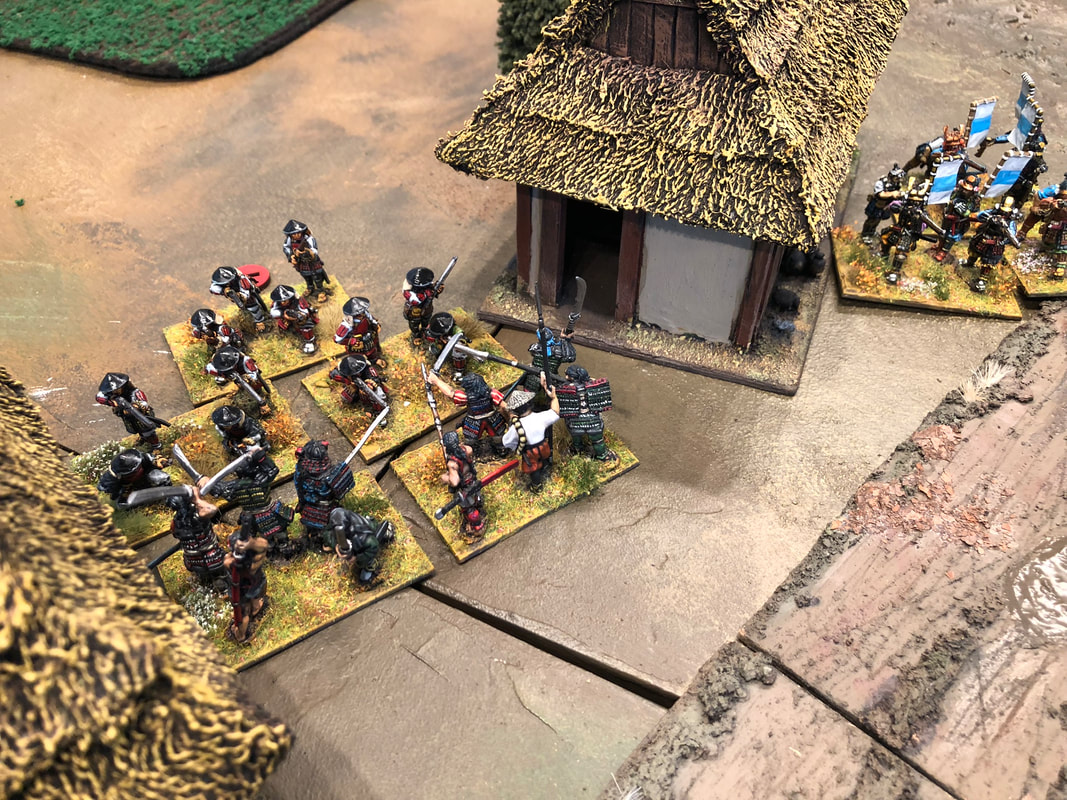
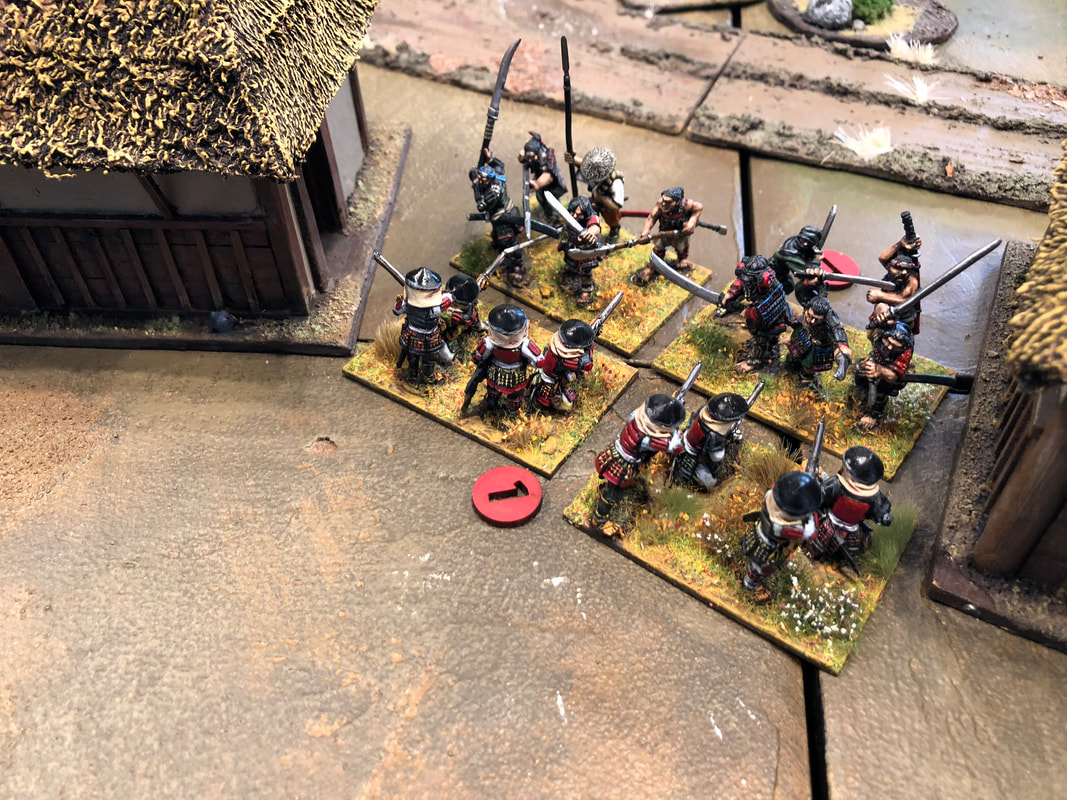
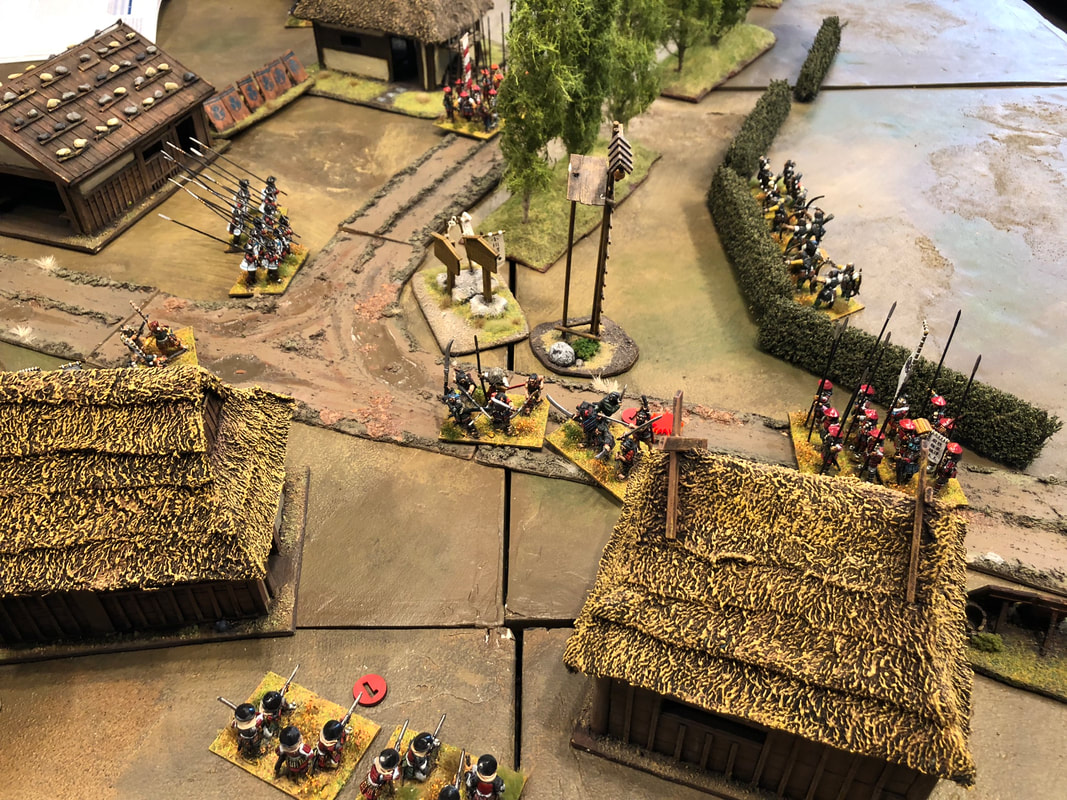
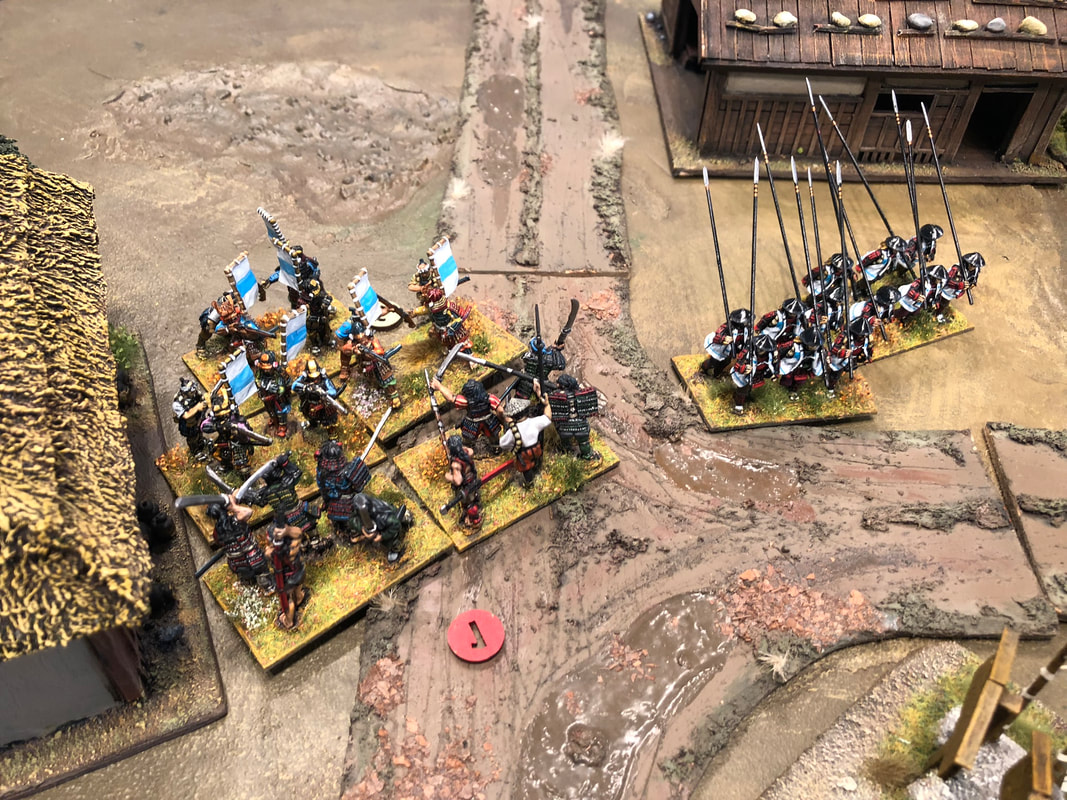
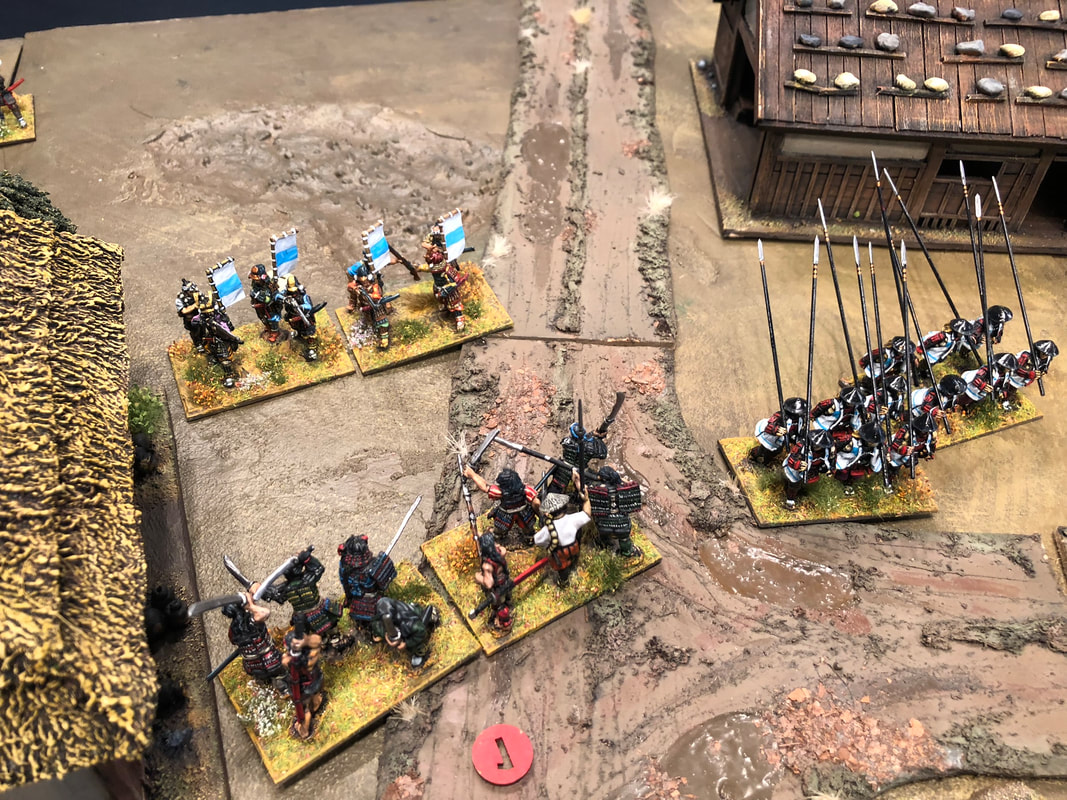
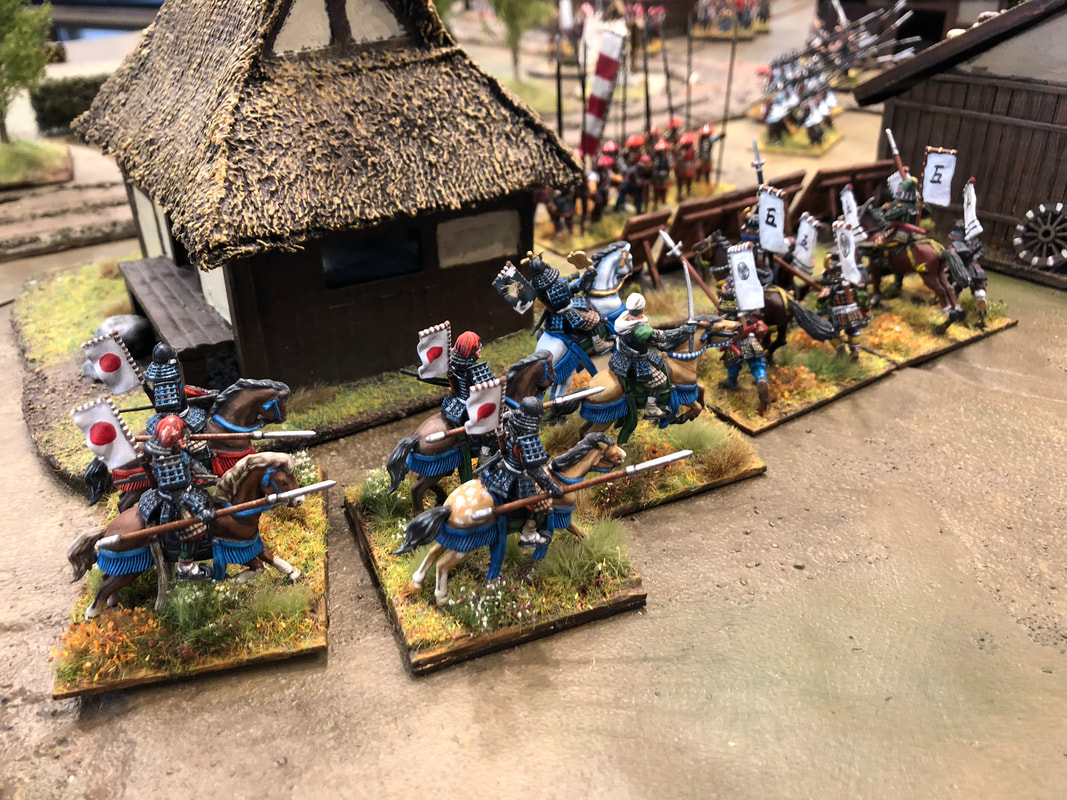
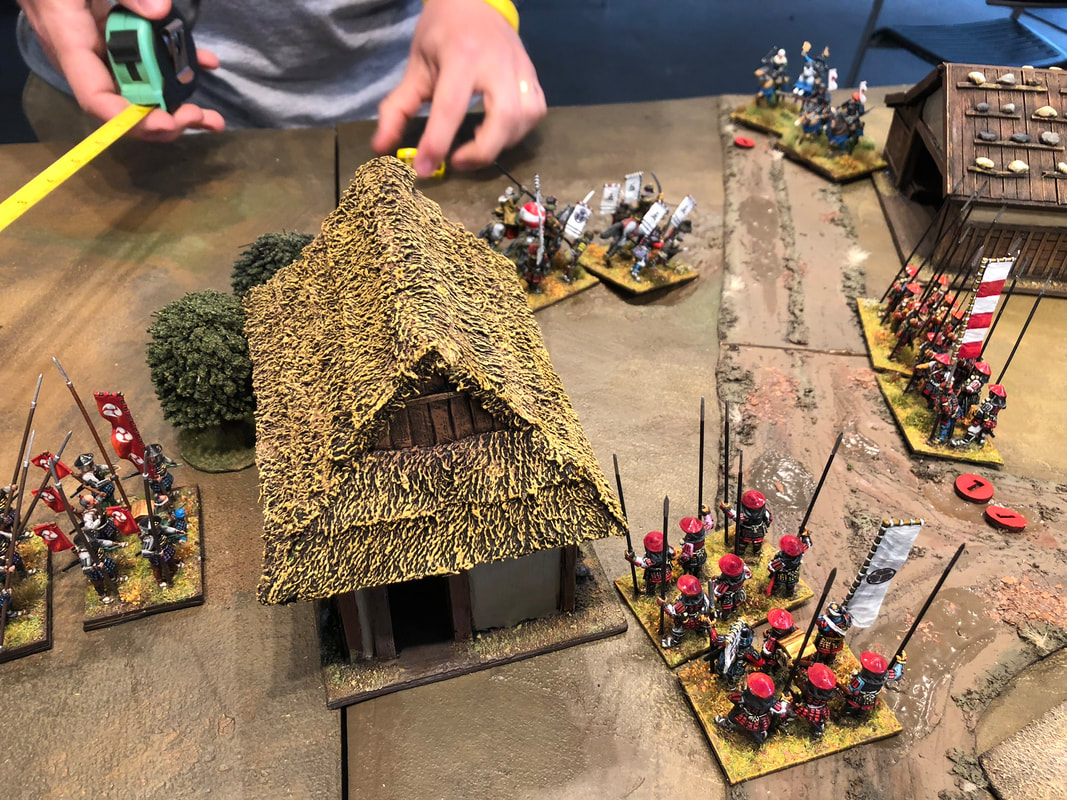
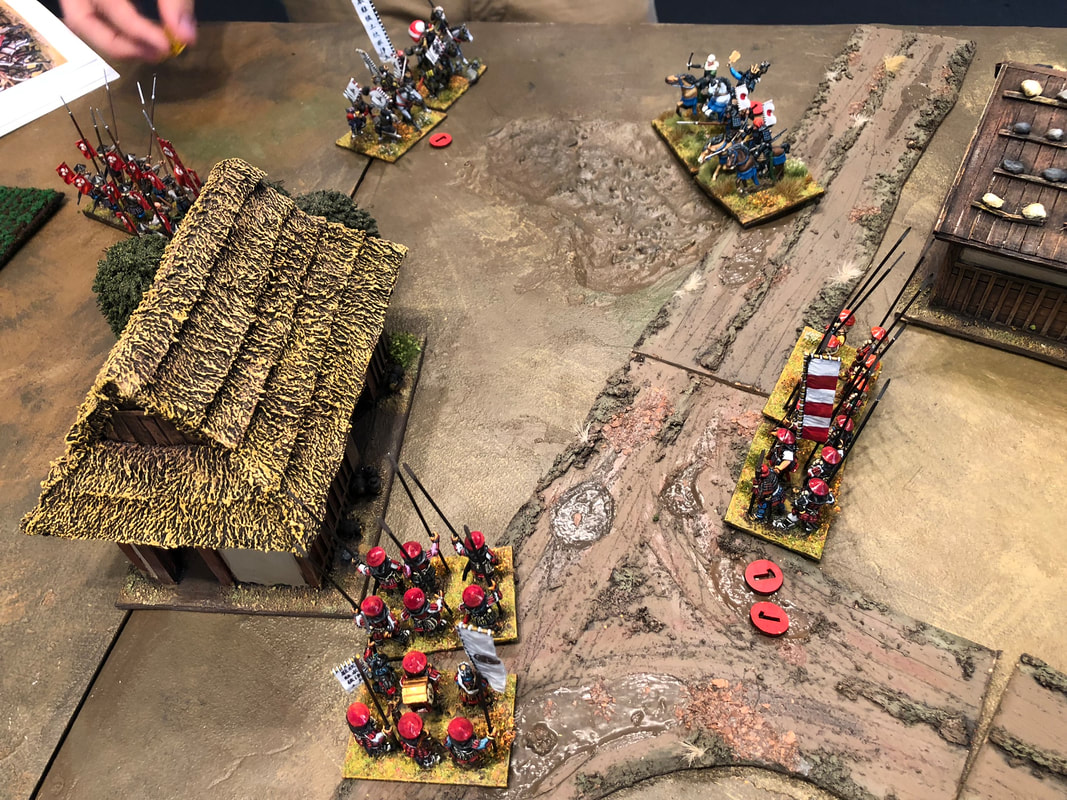
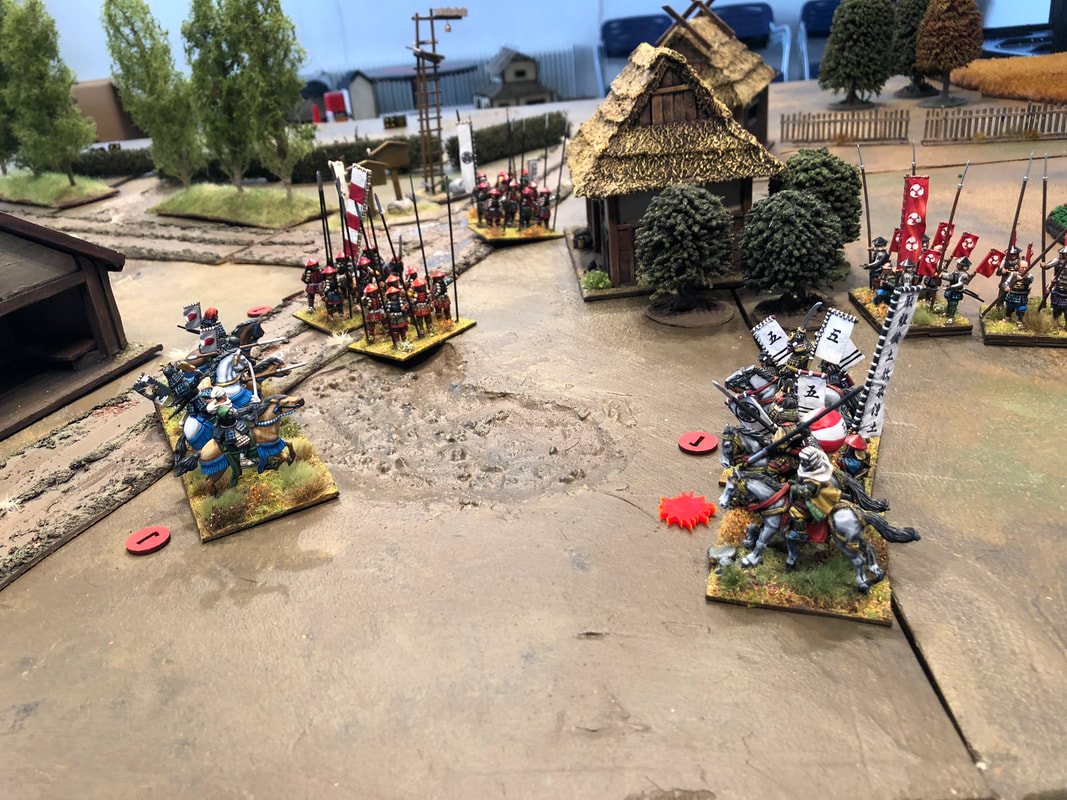
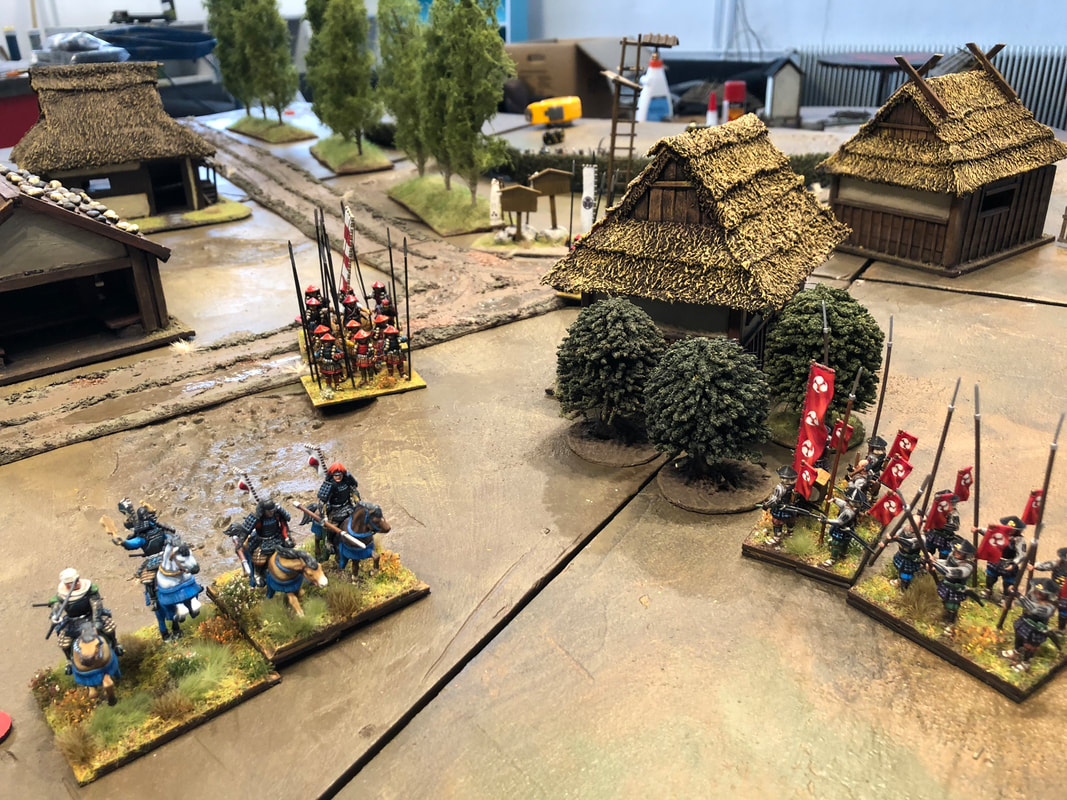
The stirrups, abumi, would typically be of cast iron or wooden, and lacquered in black, brown or red. Again, a wealthy owner could have them decorated with gold patterns, or they could just be plain coloured. Some Complete SetsHopefully this will cover most of the basics when it comes to samurai horses. Of course there are more details and several smaller details of the tack, but depending on scale of the miniatures you might not need to sweat over those parts. Below are some more pictures that can be an inspiration. Now get out there and paint some mounted samurai! /Jonas 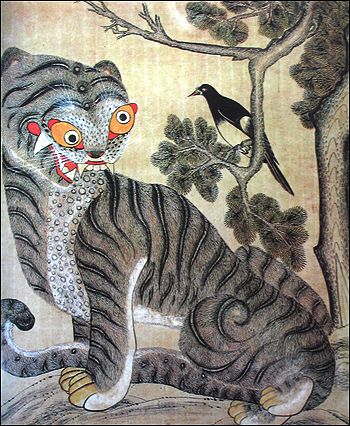 There are not many lions in Asia, so here's a tiger. A stupid tiger. There's an entire Korean folk art genre (Kkachi horangi) of well, pictures of stupid tigers getting owned by smart magpies. Yes, it's a thing. On the Prowl for RulesetsA lot of our preparations for Renaissance wargaming has been to find suitable rulesets. While mostly geared towards more medieval settings, Zach and Jonas set out to test the Lion Rampant ruleset. It's written by Daniel Mersey and published by Osprey Publishing, which has released quite a lot of tabletop rulesets lately. Lion Rampant at a GlanceThe game is a kind of semi-skirmish one, where units of usually 12 miniatures operate quite freely without flanks, wheeling or other restrictions. Each player takes turn activating their units, where each activation requires the player to roll a target value on 2D6, which varies by unit type and activation (move, charge into combat or shoot). So a unit of infantrymen might require a 5+ roll, while the more scary prospect of getting into combat might require a 6+. Once a player fail a roll or has activated every unit, it's the next player's turn. Combat is also simple, with each unit always having 12 dice if more than half the men are alive, and 6 dice if the unit is at 50% or less strength. Both player rolls against a target value for each die that depends on unit type, say 4+. You then count the number of successes, and compare with the opponent's armour value. An armour or 3 means that for each three successes you score, one man is removed from the unit. Less than three successes means that it's unscathed. Taking casualties means that the unit becomes more and more vulnerable to psychological effects, but the big threshold is the 50% line where its combat effectiveness takes a big dive. There are some more rules involved, but once you grasp these things you're pretty much golden. Sounds simple enough right? Let's see how it works in practice. Let's Ramp Up These Tigers Ok, I promise this is the last stupid looking tiger. 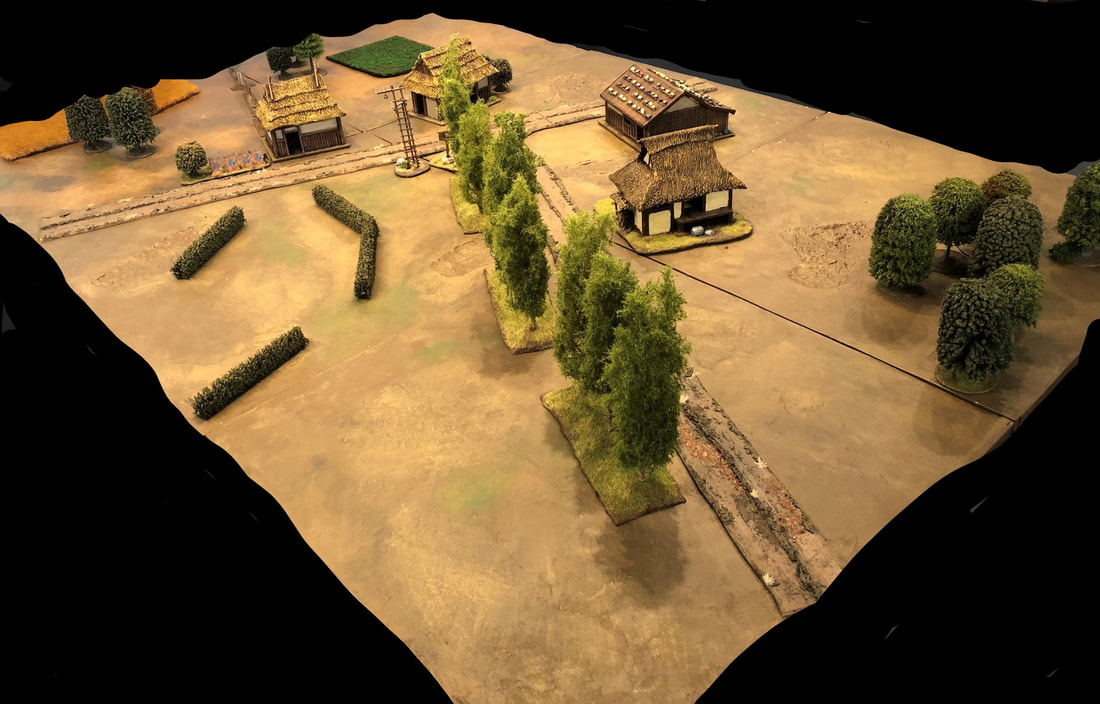 The battle would take place here, at the small hamlet set around a crossroads. These houses were built more than a decade ago, and has been in gaming club storages since then. They are badly in need of some touch-ups and repairs, but they will do anyway. Our main problem was a lack of thematic scatter terrain, meaning that a Russian road and some generic trees and hedges helped out. But if we play more then this lack of terrain will have to be adressed. Jonas Mighty Retinue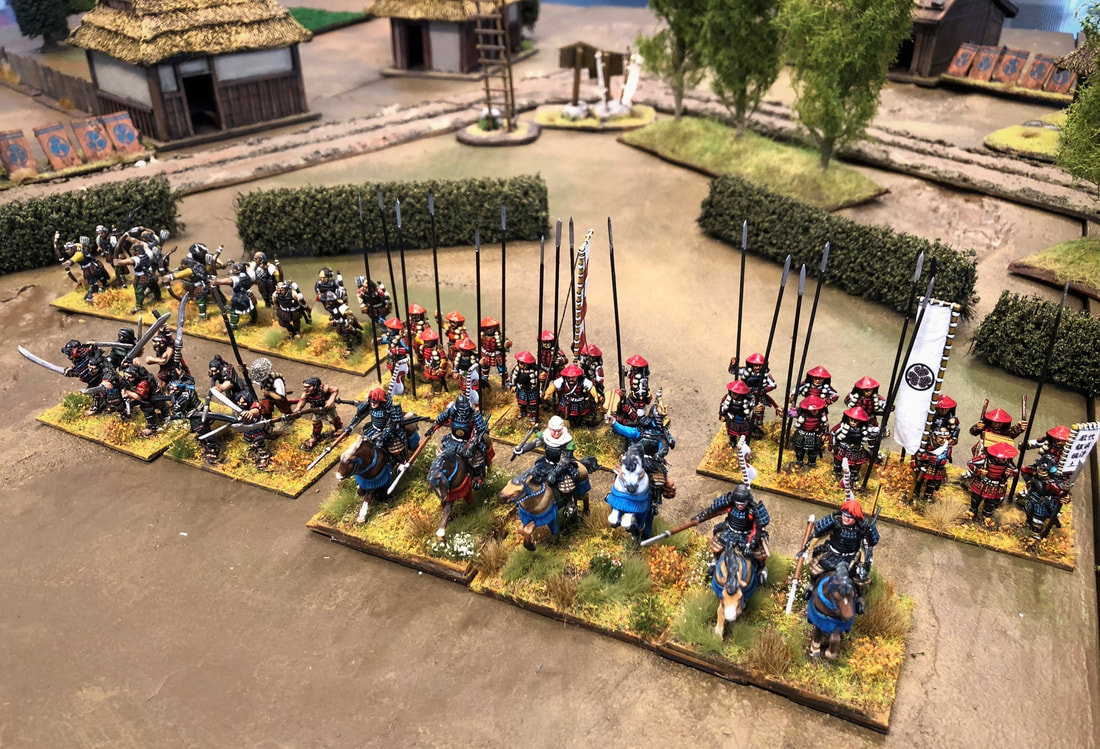 We decided to use the stock army lists in the ruleset for our test game. The lists are simple enough that it shouldn't be much trouble making our own more thematic lists later on. We used the standard recommended size of 24 points per side. My force was led by a leader commanding a unit of mounted men-at-arms, basically the toughest and most impetuous cavalry available, It's even easier to make them charge than to move around the battlefield. They are backed up by two units of foot serjeants (the ashigaru), which are good on the defensive but not the most impressive attackers. This core is supported by one unit of expert archers and one of fierce foot, in this case a bunch of unruly ronin who are good at breaking through enemies but vulnerable when charged themselves. All geared up, my general prepares to take the hamlet and chase off any opposition he meets. The Forces (kind of) DeployBoth sides start off table, and we take turn to roll to bring them on. Most units need a 5+ or to do standard move actions, but my impetious cavalry require a 7+. As this is the biggest risk for a turn-over, I start out activating the infantry first. They make it on the table and start to fan out into a defensive formation behind a hedge. 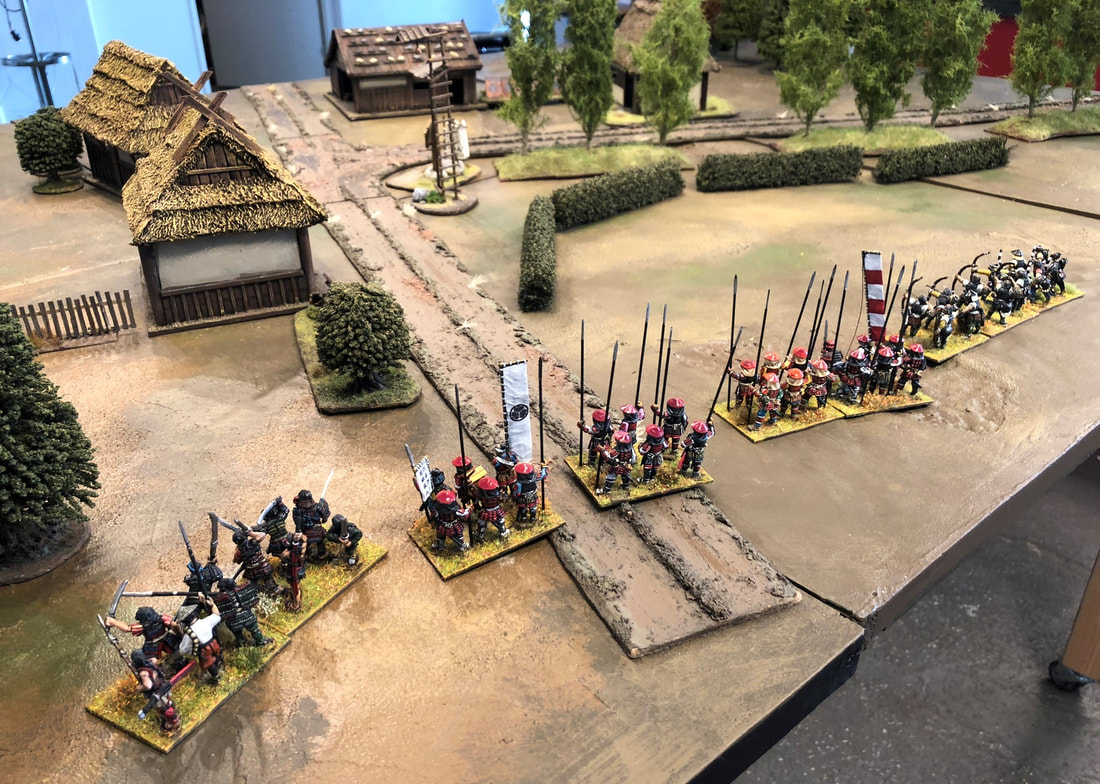 My mounted general, however, decided to sleep in, and remains off table after a series of snake-eyes. Will Zach take the opportunity to seize the initiative, given that my forces are practically leaderless? 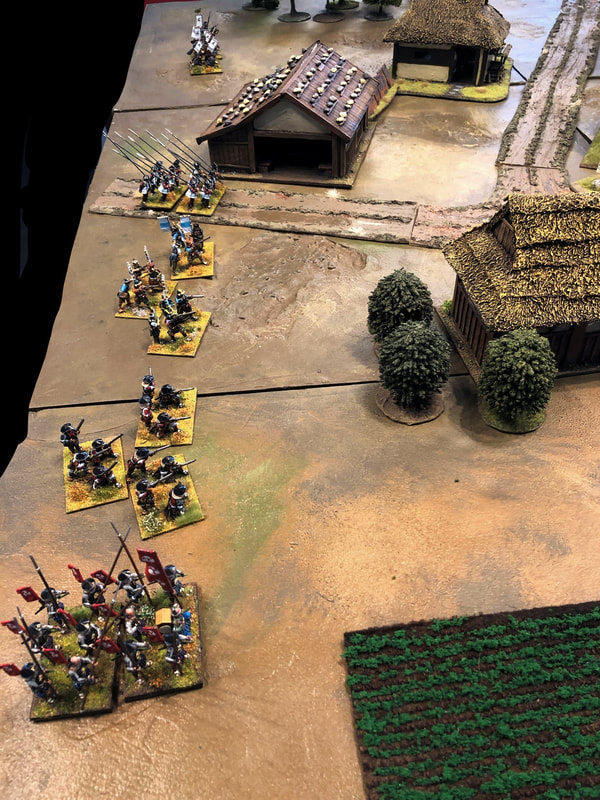 Not really, as it turns out that his general is also late to the action. But his retinue starts to form up, with two units of arquebuses (we count them as crossbows for now), two units of spearmen, and a unit of less heavily armoured cavalry on the left flank. Eventually we both manage to get our generals on the table, and the first couple of turns go back and forth. My forces start to forma defensive line while my cavalry sets off to my right flank, while Zach starts to get his arquebuses into range for a shoot-out. A Ferocious ChargeWith Zach's missile troops outnumbering mine two to one, a missile duel doesn't sound so tempting. Instead, I take the chance on my ronin troops, which has a slightly longer move and good chances to activate when it comes to attacking. I push them towards the middle of the hamlet, doing my best to get them into charge range. I steel myself for the incoming hail of bullets, and urge them on. 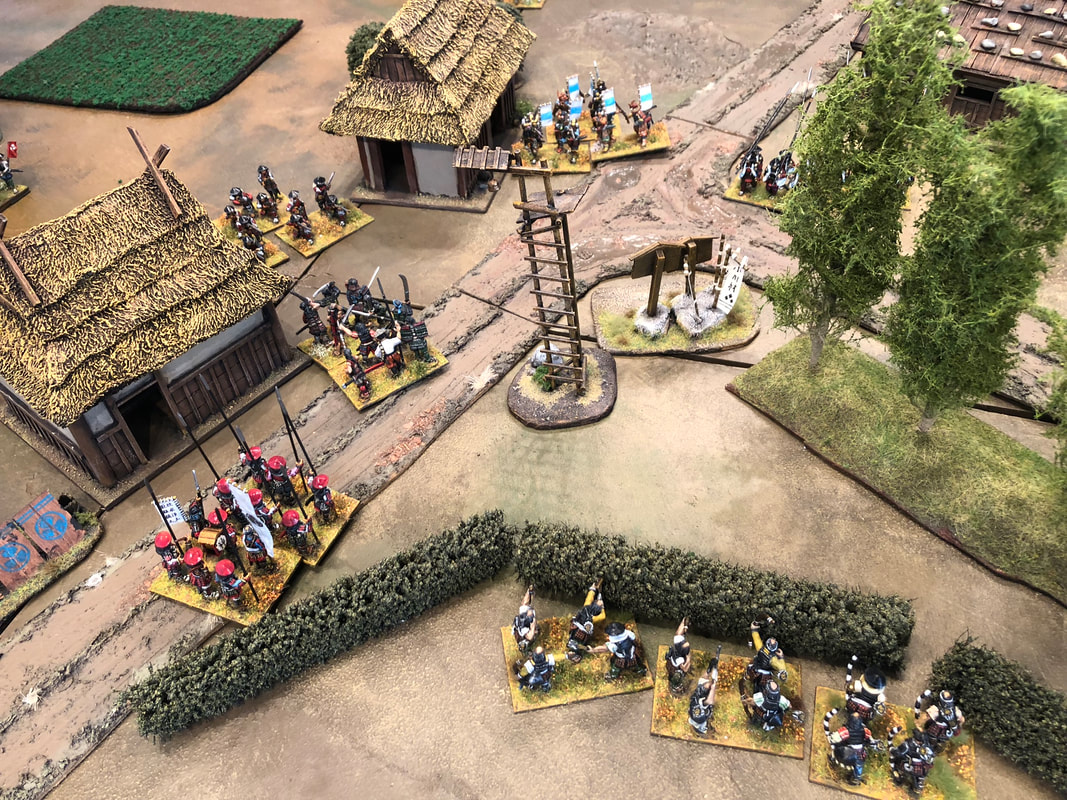 The sight of a dozen angry unwashed madmen running towards them is clearly shocking enough, because the gunners fumble their activation! Any failed activation means a turn-over, so if you're lucky and your opponent fails, you get to exploit it immediately. My warriors easily pass their 5+ test to attack, and crashes into one of the arquebus units without taking a single shot. The fighting is fierce, and both sides take casualties (we used markers since we can't remove men). However, his arquebuses take far more as five men are slain to a single ronin, and so they are beaten back and "battered". This means Zach will need to roll courage rolls every turn until they are rallied, taking more casualtes and continue fleeing in the meantime. My men also fail their courage test though, and turn back, wavering. Will they be a one-hit wonder, leaving the field as well? After all, they are now just in sight of Zach's untouched arquebuses, ready to wreak revenge. Luck continues to shine on my general, as the ronin not only manage to rally, but to yet again seize initiative. Zach has tried to cover up the impeding attack, but it's too late. The charge lane towards the remaining arquebuses is open, and the now very confident ronin charge home again, killing off a bunch of enemies and pushing them back.  My ashigaru enjoy looking at the ronin doing all the hard work for them. Flanking Action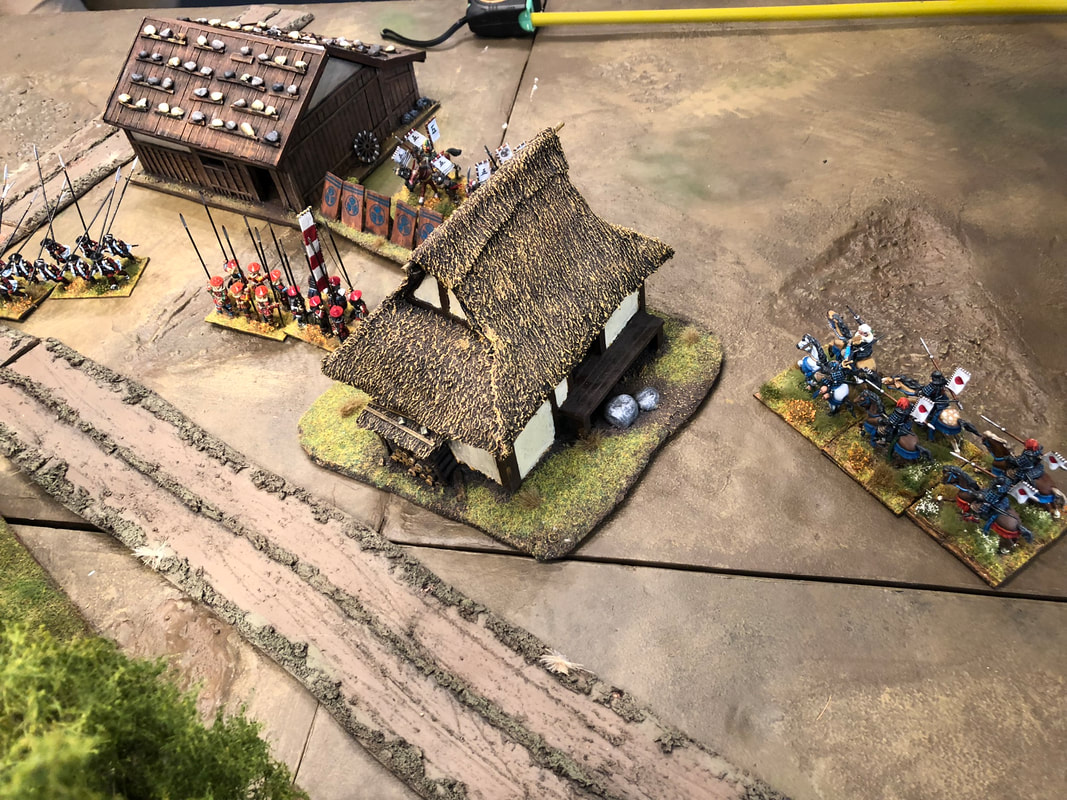 Meanwhile, my general makes a slow but steady arch around my flank, sizing up the opposing cavalry. This is a fight that would favour my heavier horsemen, so Zach wisely backs off, postponing the fight. This makes for a "double pincer" - his cavalry is stuck between my cavalry and my red-helmeted pikemen, while my pikemen are stuck between his cavalry and his black-helemeted pikemen. This led to our first discussion about the rules. As combat is resolved immediately upon contact, and there are no flanks, neither of us could really exploit this situation with a tandem charge, something that would have been devastating in most rules. Instead, Zach ended up backing off with his cavalry even more, as any fight would be disadvantageous to him - the pikemen are better on the defence than offence, and my cavalry would probably overcome his in a fight. But after a short retreat it becomes clear that Zach's cavalry can't back off much longer, as my general pushes closer and starts to approach charging distance of the rest of his army. A furious set of charges and counter-charges begins, ending with his cavalry routed and mine blunted but still dangerous. A Bloody MeleeZach's general clearly has had enough, and wants to turn these initial setbacks around. Thankfully for him, there's a unit of ronin standing in the open with a bulls-eye painted on them, and so it's clearly time to charge them. 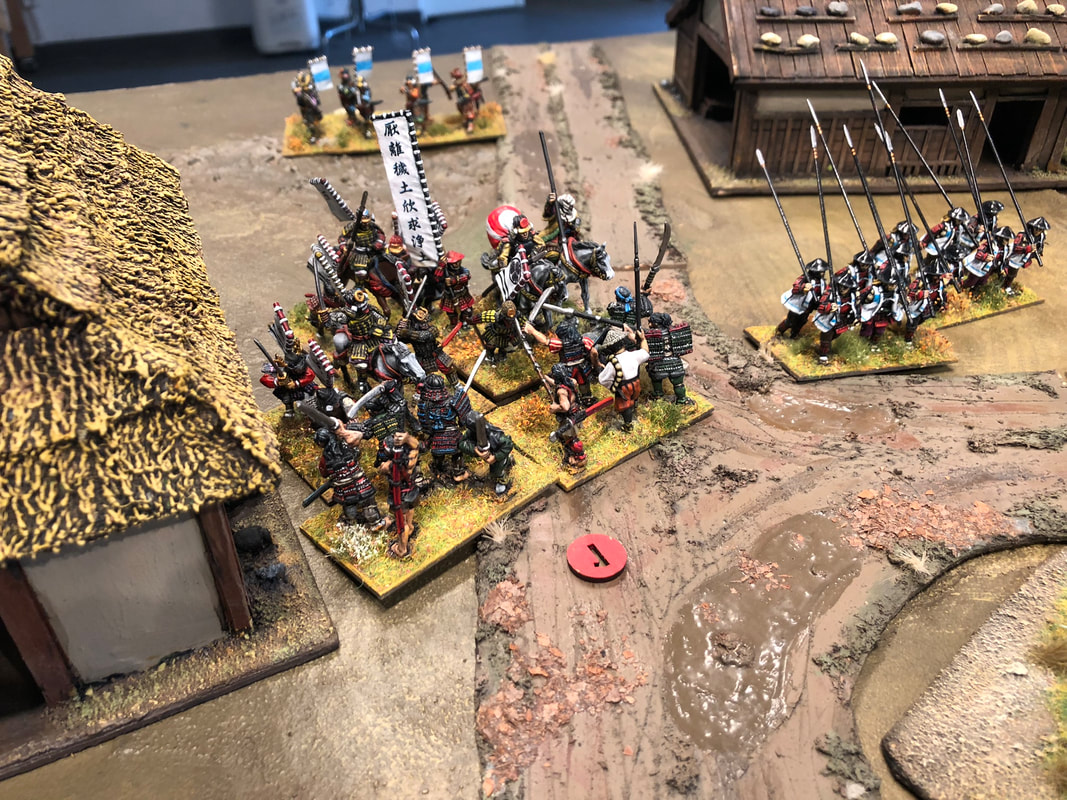 The charge is successful, and the ronin stagger back in confusion. Zach's pikemen follow up the inital attack, mopping up my remaining ronin, but taking several casualties from my archers in between charges and counter-charges. 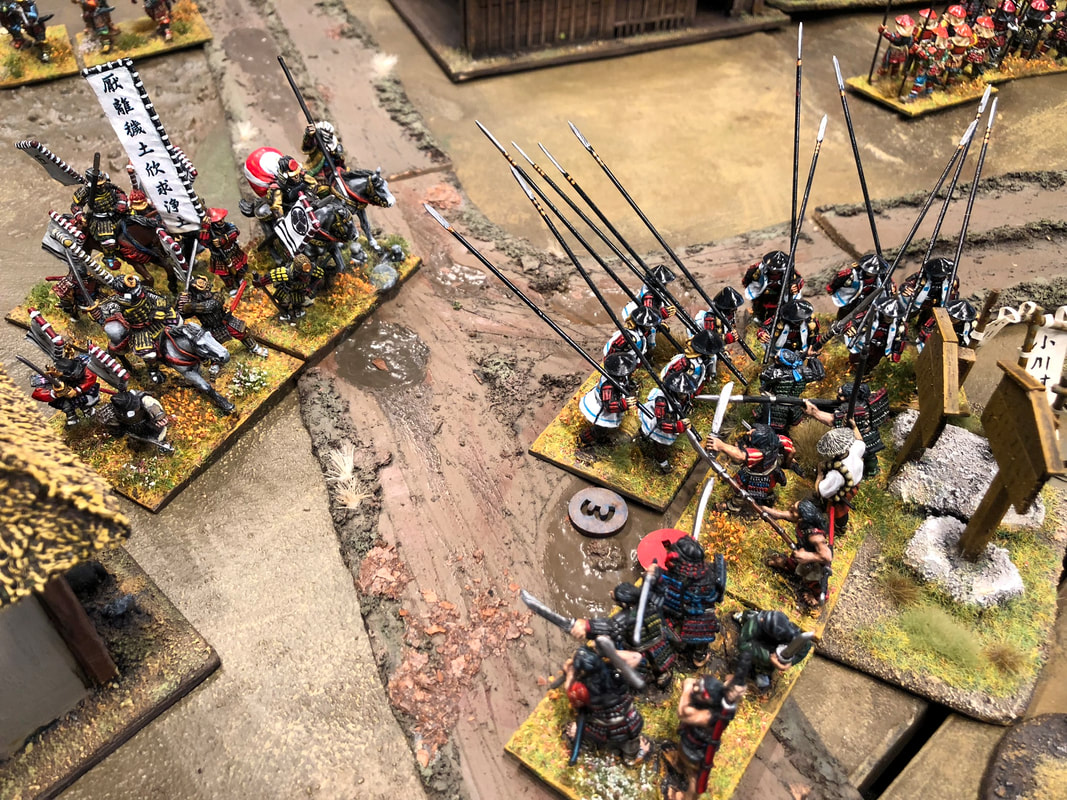 The Final ShowdownBoth sides have now taken a bunch of casualties, though the noose is slowly tightening around Zach's retinue. My cavalry finally make their way around the flank, finishing off the remaining arquebuses. 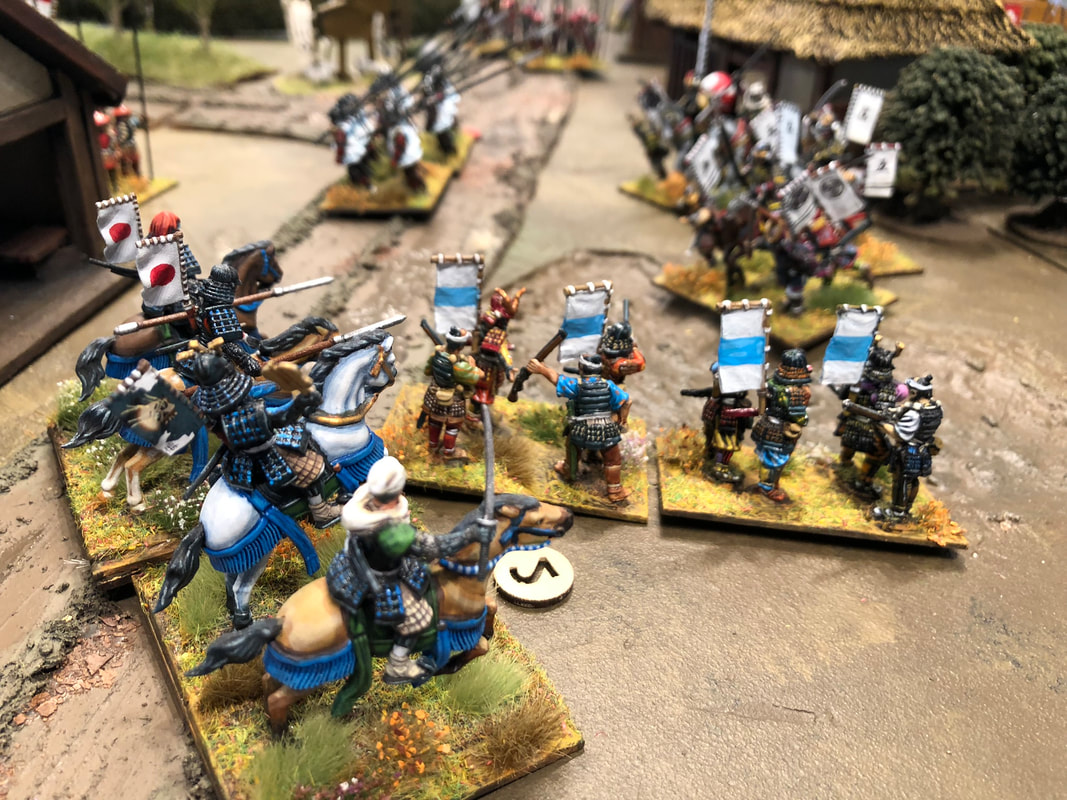 My units surround Zach's general, pinning him against a house. The general desperately attempts to break through my general's unit. While his cavalry is less scary in combat, my accumulated casualties could be enough for him to get an edge in the engagement.  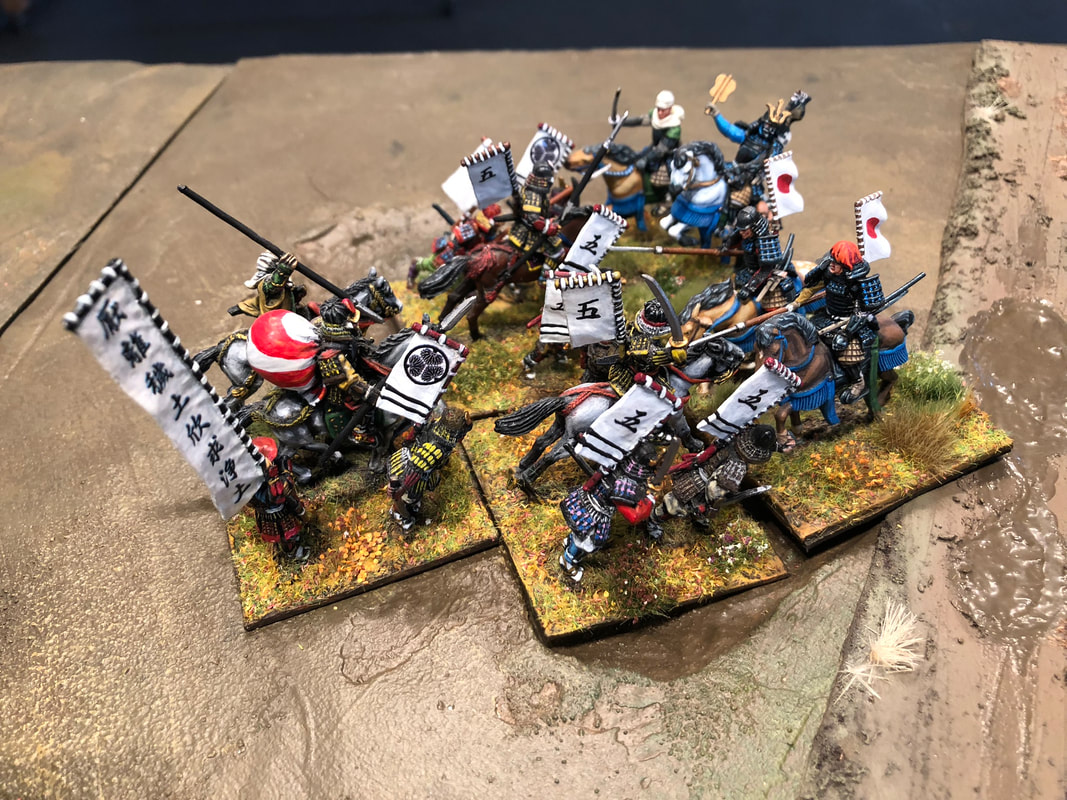 But my general continues to cut a bloody path through everything he encounters. Zach's general is pushed back, taking losses, and now he's facing a battle of attrition that is bound to end badly for his retinue. With all arquebuses fleeing the field and the sole remaining pikemen unable to come to his rescue, Zach's general is eventually run down and routed. First ImpressionsPositives: This was a very quick and simple game, both to learn and to play. Overall it took maybe two hours, and that's with me not having read the rules at all, and Zach playing it for the first time even though he read the rules in advance. So it certainly hits that sweet spot where you can set up, play and tidy up before lunch on a weekend, or in an afternoon. But simple games can be either boring or interesting. In this case, I still had several tactical decisions to do each turn. First of all you have the risk management of choosing which units to activate first. Do you start with the parts that are crucial to your plan, or do you start with the rolls most likely to succeed? It's very much like Blood Bowl in this manner, if you've played that game. In this game, activations proved crucial as I managed to charge and beat Zach's missile troops before they could cause any damage. I also like that the target number to activate helps balancing the units. While my cavalry was dangerous in combat, they also needed a 7+ on 2D6 to move, a real liability at around 40% chance of a failed activation and handing over the turn to your opponent. Moving the troops around was also extremely simple and quick, especially when based in groups like this. Each unit has a 3' bubble around them, and you can move freely in any direction, meaning that there was little fine details taking time each turn. The frequent turn-overs also meant that you rarely spent more than 5-10 minutes without being active. Negatives: The only noticable negative thing we encountered was the inability to used combined charges to attack a defensive position. This meant that in my case I could quite freely position my pikemen in the middle of Zach's army, confident that any attacks against them would be to my advantage. A half-ways solution to this is simply to have a unit that's great at attacking to deal with any defensive units standing around, but that's not really a very tactically clever idea compared to a carefully orchestrated pincer charge or a "hammer and anvil" manoeuver. A Roaring SuccessAnd the verdict is... *drumroll* ...that we liked it quite a lot! We'll see how we think about the tactical pro's and cons of the "no flanks" system after a few games. But overall it's a quick game that's easy to grasp, and after a few turns and a combat or two you'll get the basics. It was great fun to get out my samurai for battle for the first time in about a decade, and it got me inspired to both paint up more troops and to make some more terrain to go with them. Overall it's a good candidate for a shorter game slot, much like What a Tanker, and I can definitely see us playing more. Both using my samurai armies and trying out with medieval and renaissance armies. /Jonas 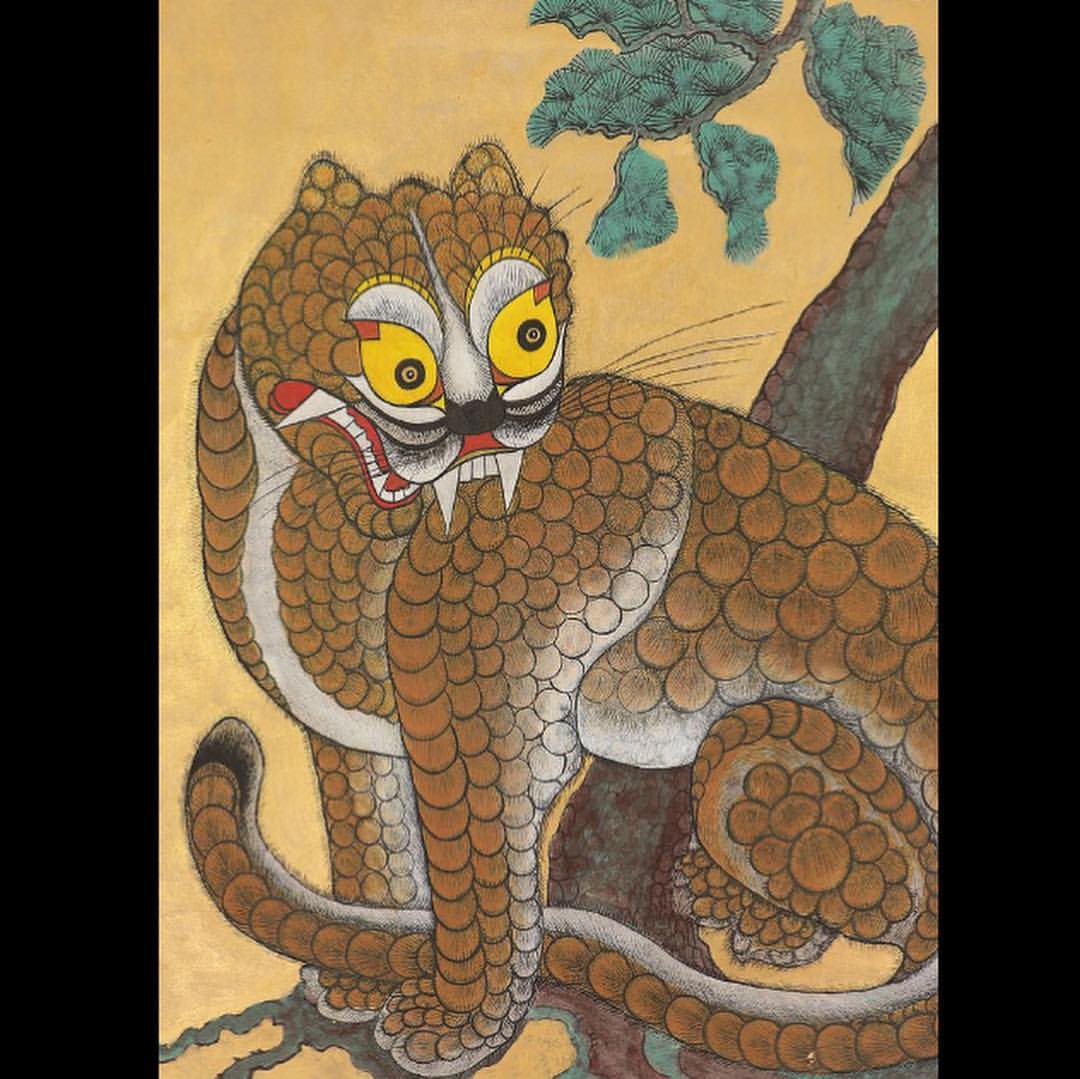 What, you seriously expected there not to be more stupid tigers in this blog post?
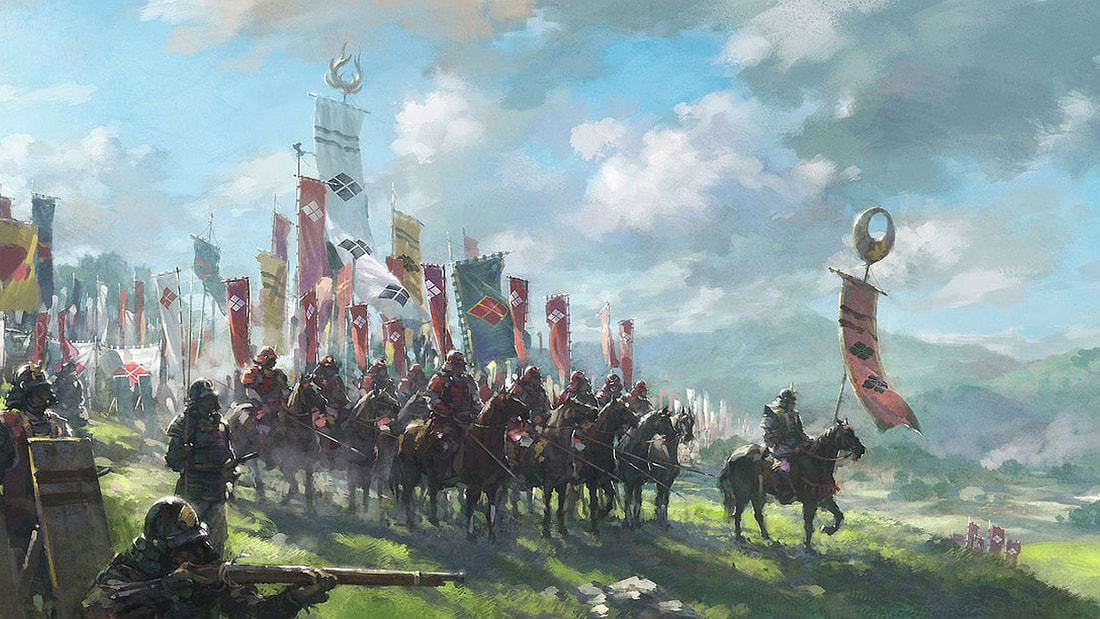
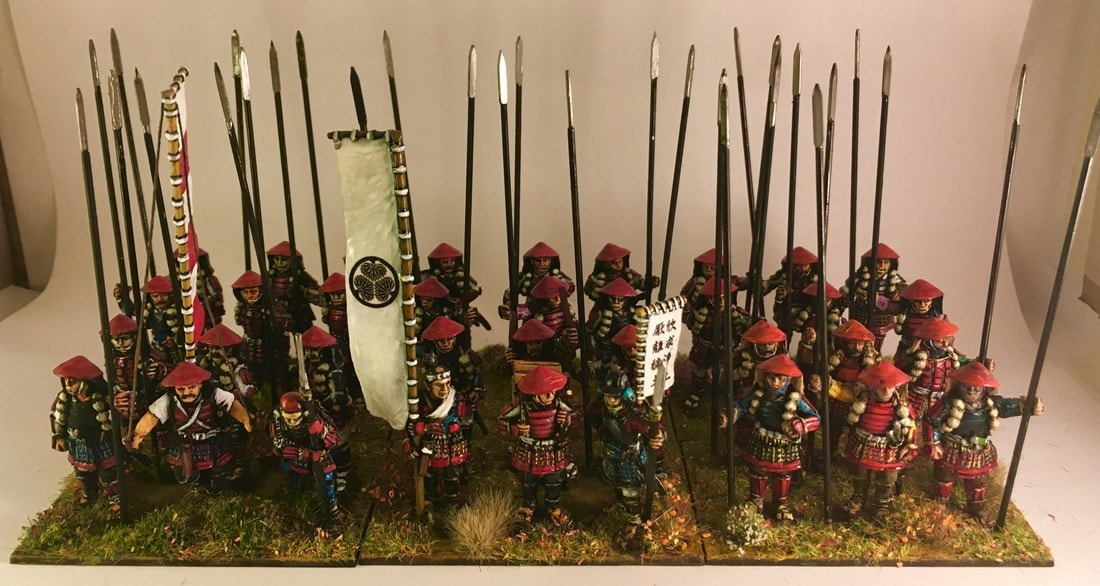
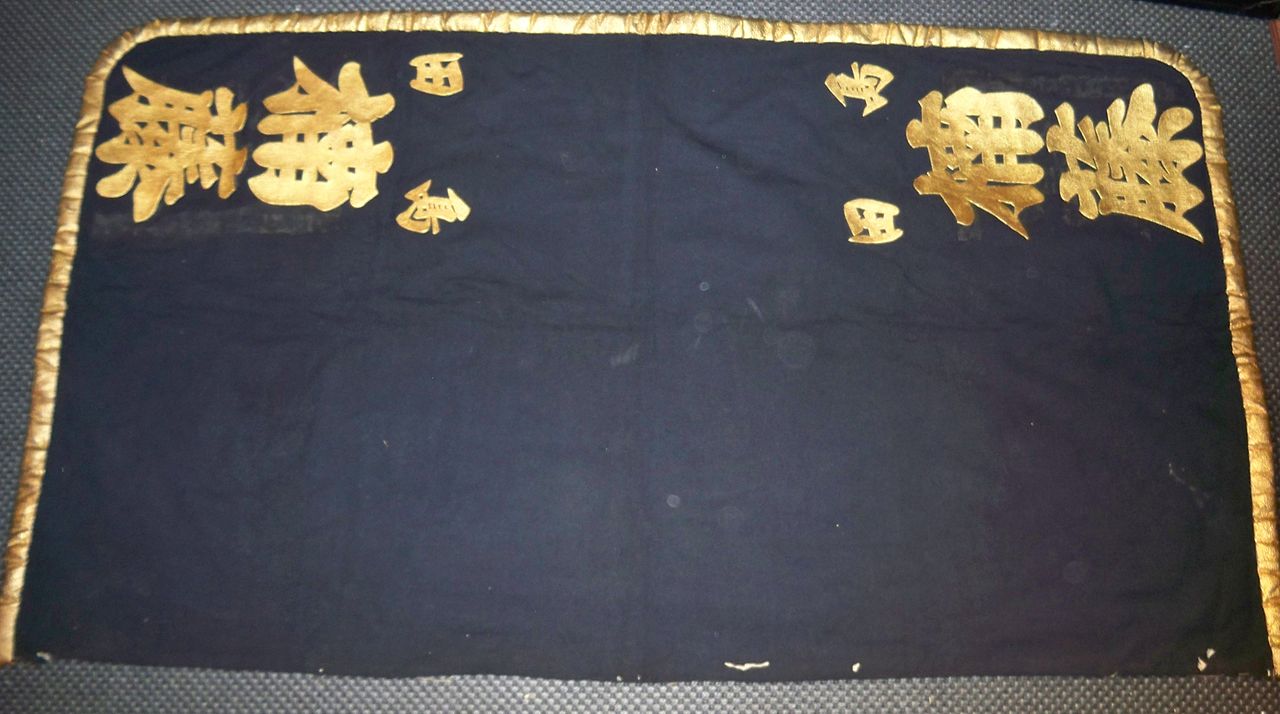
/Jonas 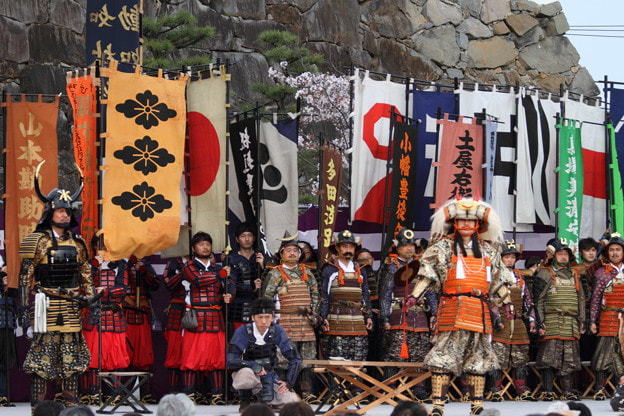 Flags displayed behind Takeda Shingen during the yearly Shingen-Ko festival, showing his many vassals. The most iconic feature of samurai warfare must be the use of various flags and other devices to proclaim the legacy and ambitions of the soldiers assembled beneath them. As a wargamer of the period, it can be incredibly interesting yet also challenging to bring these to your tabletop. Before we begin to go into detail, I'll cover a short history of these heraldric tools. They changed a lot over time, both in design and use, so you'll be well off with understanding why and how they developed. After that, I'll cover different types of flags, and what to consider when using them in your armies. Origin of Japanese Battlefield Heraldry 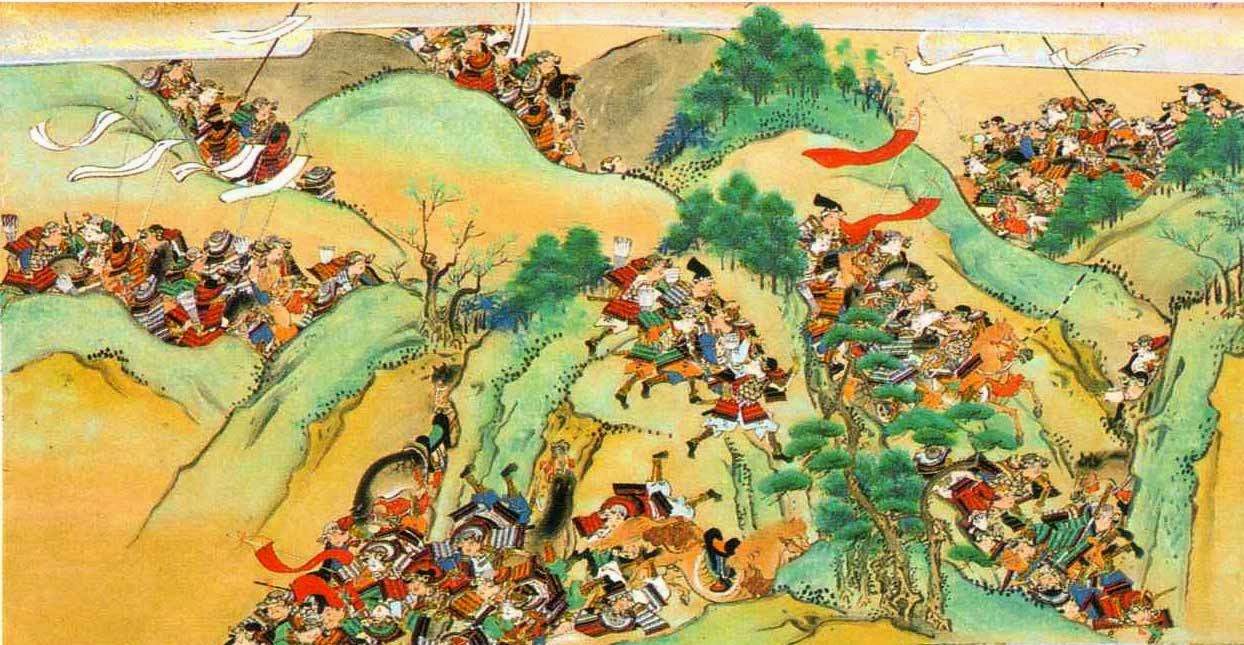 A depiction of the battle of Kurikara, 1184. Note the simple red and white streamer banners, telling the two armies apart. The use of battlefield heraldry evolved over time in Japan, just like in any other place. It had a humble beginning in the form of flags with family crests used during battle. So during the Gempei War in the 12th century, the Taira and Minamoto would raise their red and white banners, telling friends and foe. But while some individual flags existed, they were not part of a comprehensive system yet. It's not even clear to what extent these banners had the family crests that we associate the two factions with, or if they were purely red and white respectively. Instead of the family crests so familiar to us, early samurai flags often consisted of written prayers to the god of war, Hachiman. The prayer style flags would continue to exist later on as well. These early flags would primarily be long poles with a horizontal bar attached to the top by rope, with a streamer type flag hanging down from the bar. Heroic Heraldry A simple system of fighting under a simple coloured banner worked as long as a central government existed, and most wars were basically between two sides. However, it doesn't take long before we see the beginning of individual designs used to tell people apart on the battlefield. In contemporary depictions of the Mongol invasions (1274 and 1281) we start to see coloured flags with family crests on them. Individual lords would use heraldry to stand out, and then let artists depict the battles with these heraldric flags as evidence when claiming rewards for their feats in combat. 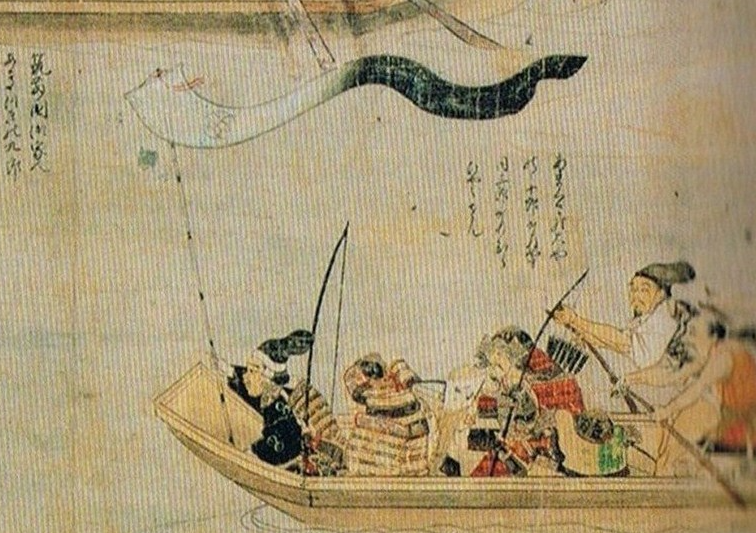 A family crest banner raised by a flag bearer on a boat attacking the invading Mongol ships. The other soldiers are stll without flags at this point. These were still more like regimental flags, not individually carried flags like the ones appearing later. But they worked well for distinguishing which part of the army fought under which general. After the Mongol Invasions, the political and military power fractured. In practice a feudal system replaced the Emperor’s hegemony, with a central military government led by a Shogun. This increase in importance and wealth of the warrior caste only helped to fuel their interest in standing out on the battlefield. As the Ashikaga shogunate fell and the country devolved into civil war in the mid-15th century, the soldiers in the field needed new methods to both tell each other apart. The regional administrators had cut their ties to the central government, preferring to rule the land themselves as daimyo. By now the battles could be between complex allegiances, with several families on both sides. In this new world, heraldry became more important than ever before. Organization Through Heraldry 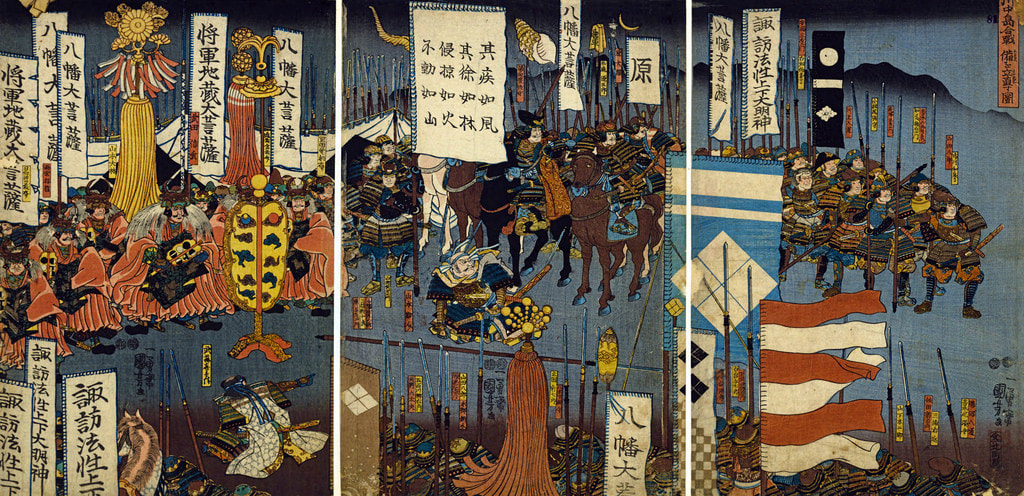 A myriad of devices based on family crests, flags of different colours, and written names all served different purposes on the battlefield. The Sengoku Jidai, or civil war era that followed in the 15th and 16th century, saw two distinct phases that both introduced new needs for heraldry. The first part of the period saw the country fracturing more and more, with a huge increase in the number of local lords. These lords became masters of small domains as the central government crumbled. They would often come from rather humble beginnings, with more ruthless and cunning individuals overturning the old nobility. As a way to legitimize their claims, they would make their own family designs to impress their peers and subjects. Some would even fabricate a more noble heritage, such as when a part of the Ise clan decided to change their name to Hōjō and to adopt the heraldry of the clan that had previously ruled as the power behind the throne during the Kamakura period, creating the "Odawara Hōjō" or Later Hōjō. The second half of this age of war saw the reverse process, as these lords repeatedly fought each other. The stronger lords would recruit more and more vassals, either by diplomacy or conquest. As their armies grew they included more divisions from more and more families, requiring new means of organization. These developments led to several new types of flags. Divisions and regiments would start to carry tall banners called nobori, so that the lords could easily identify their forces. The lords and generals would introduce "horse banners", uma jirushi, which were unique flags that made them easy to find in the crowd. Their messengers and bodyguards would carry billowing balloon-like contraptions on their back, horo, to make them easy to see. And finally, even the individual soldiers would start to war flags on their back, sashimono, that made them easy to identify asarmies grew bigger by the year. Types of Flags Used for Battle  Takeda clan cavalry ready for battle, with many coloured versions of their four lozenge family crest. Now let's take a look at various kinds of flags used on the feudal Japanese battlefields. Its' important to keep in mind that while these followed trends and some ways to use them were more common than others, there were no laws or regulations covering the entire country. So while we can look at what would be the typical use, there could always be exceptions. Nagarebata 流れ旗 This is the kind of flag attached to a bar attached to the top of the banner pole. They were not completely phased out as newer types of flags developed. Instead, they continued to exist in some armies, either as an alternative to the nobori banners designating units, or as uma-jirushi banners of an important lord or general. These pictures show some common types of designs on nagarebata: text written on a coloured background, a symbol or family crest, and a simple geometric design (in this case two horizontal lines). This example also shows them being used together with nobori flags in the same army. 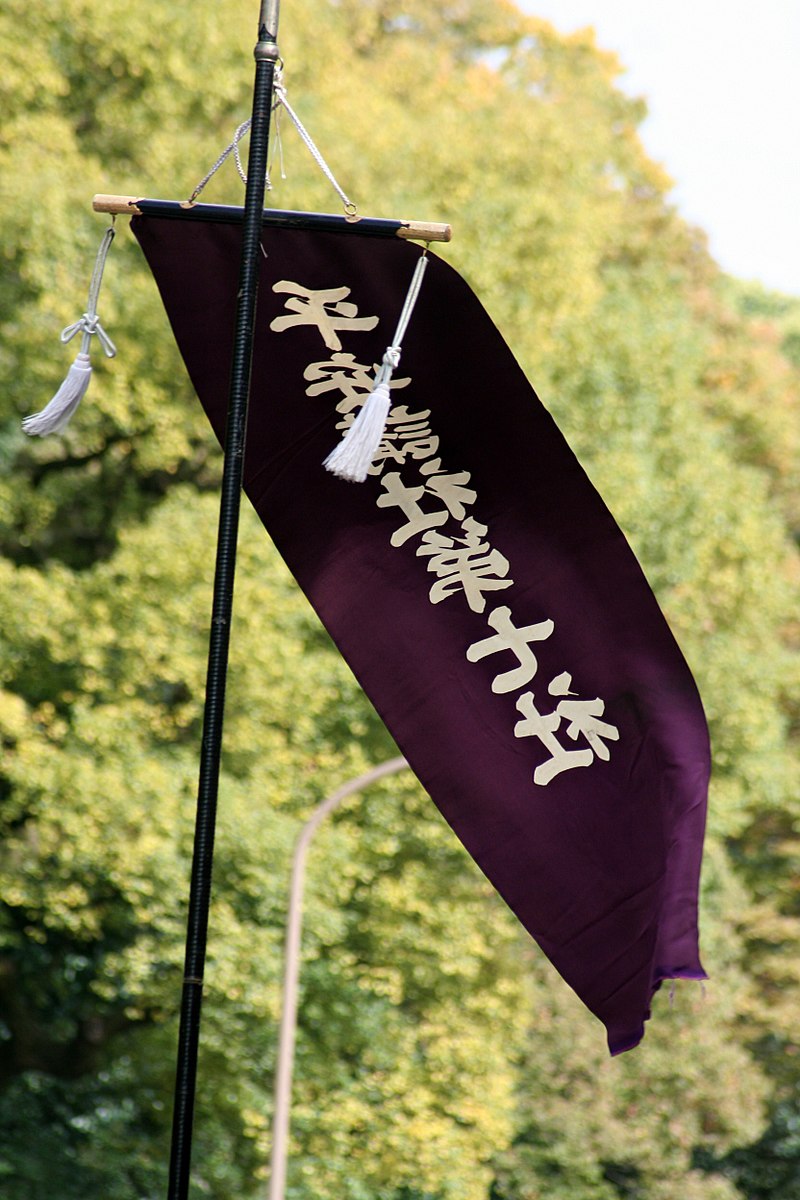 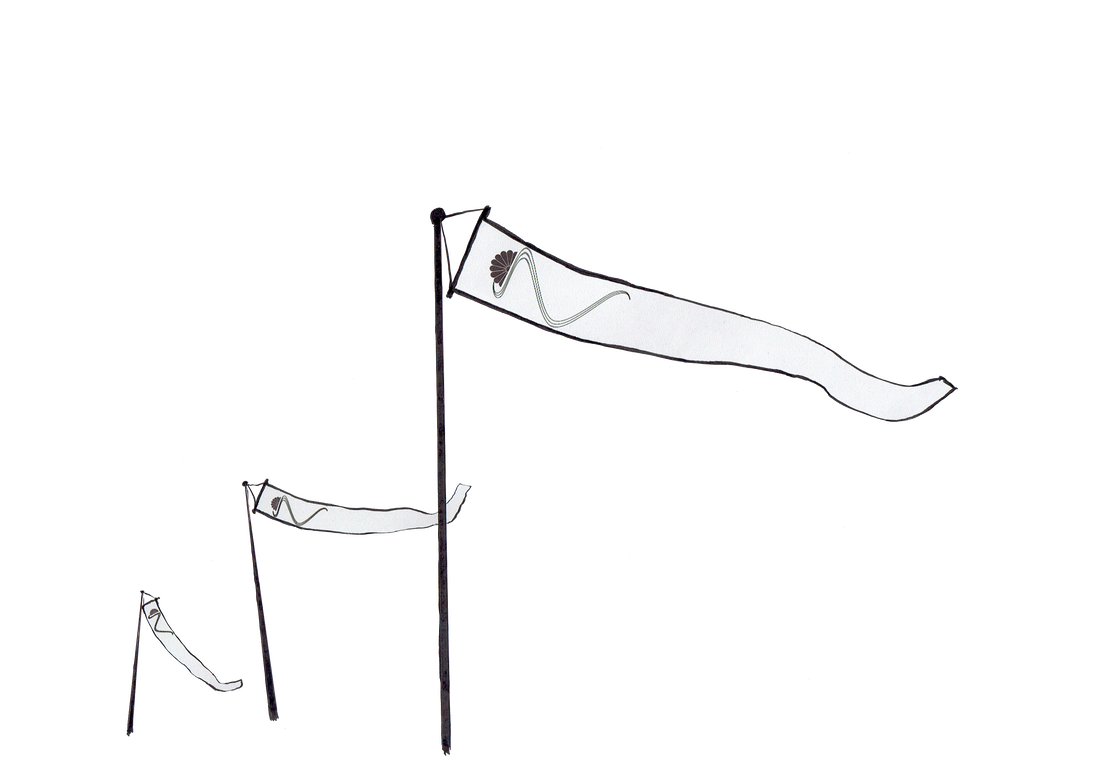 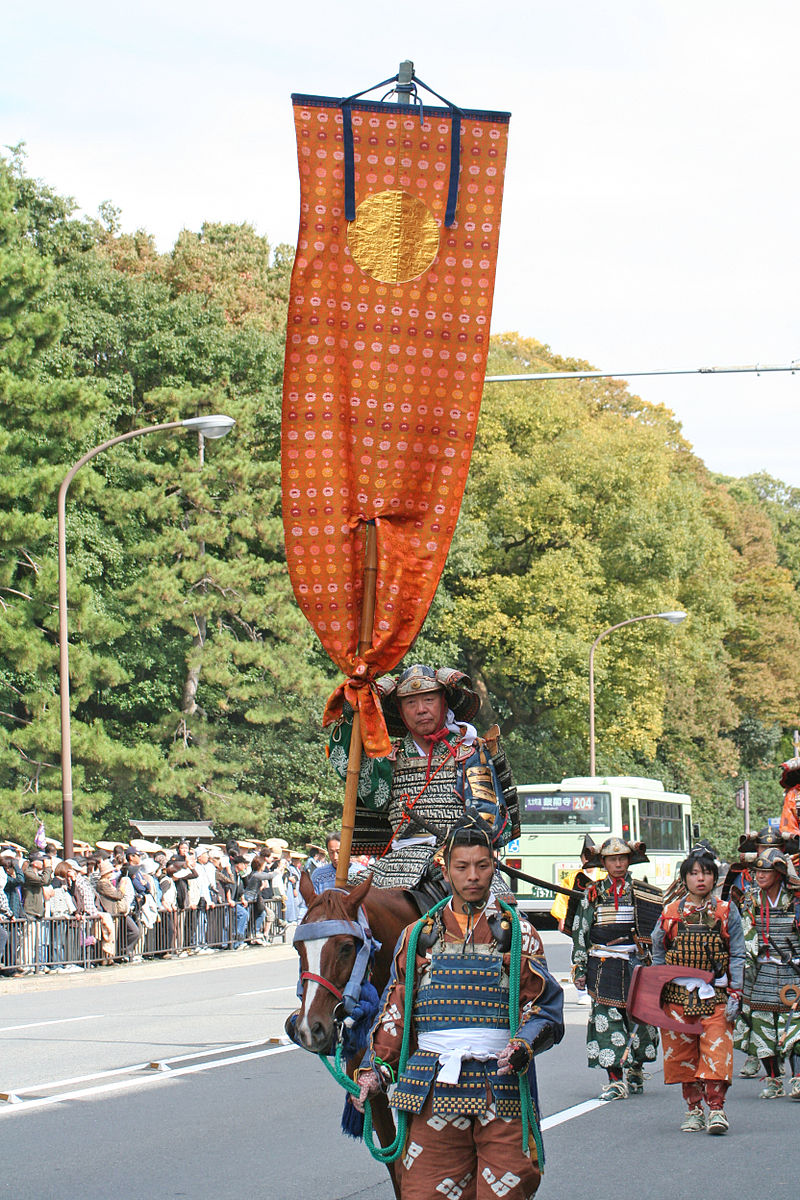 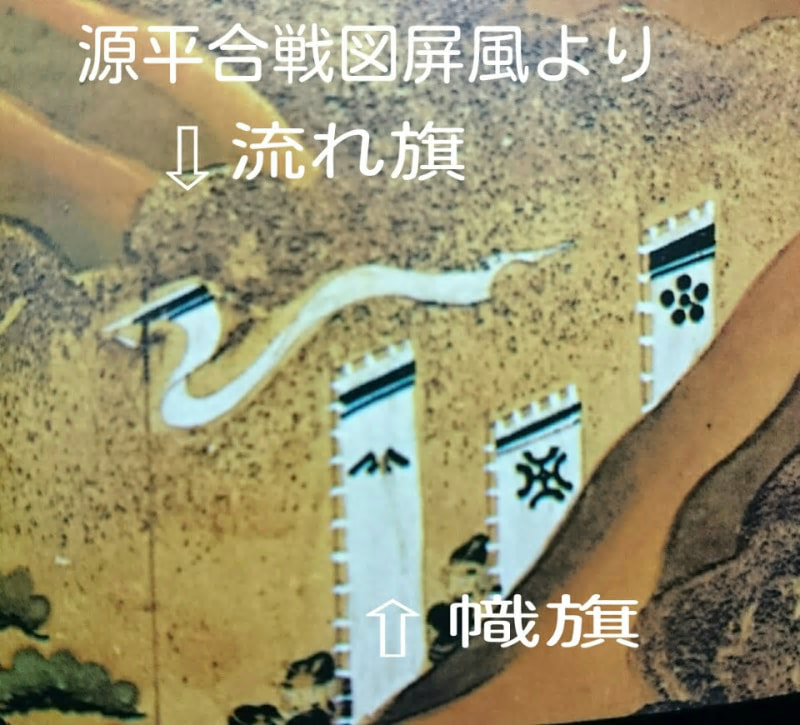 Nobori 幟 These flags identified larger units, and developed from the nagarebata. By attaching the flag on two sides, they became more sturdy and the designs became easier to read. Initially these would be of a similar design, but many armies quickly developed more complicated schemes. The family crests or designs could be used on different coloured backgrounds, or use additional geometric shapes, to designate different units. As the number of different flags in the army grew, the army HQ would include a standard bearer carrying a copy of each flag. In a large army, this meant that there would be a multitude of flags gathered around the HQ. 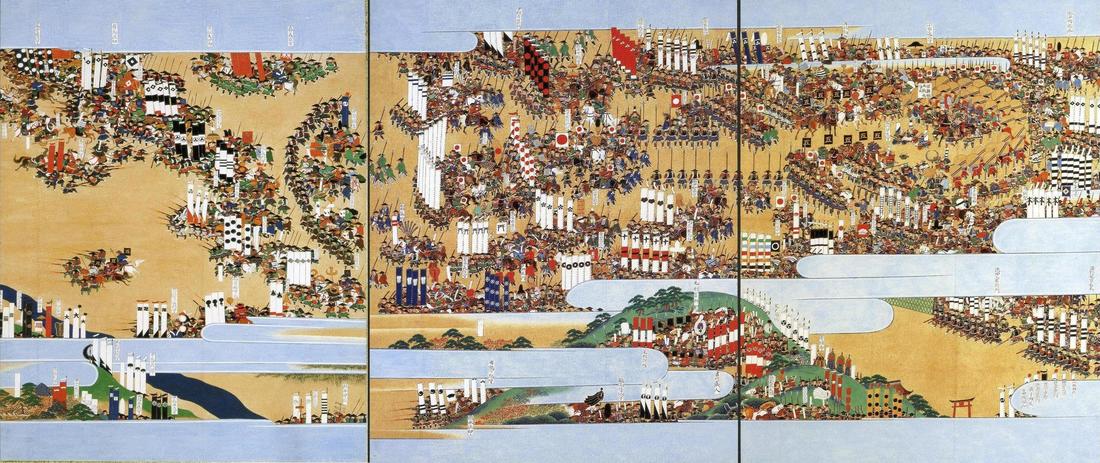 An army assembled for battle. Several rows of tall nobori flags identify the various forces making up the army. Click the image below for a larger version of this picture. If you are making a tabletop wargaming army, you can consider putting at least one of these in every unit of your army.  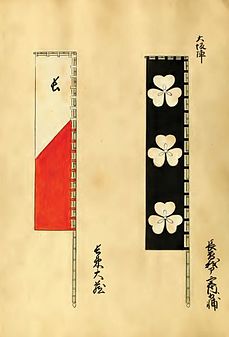    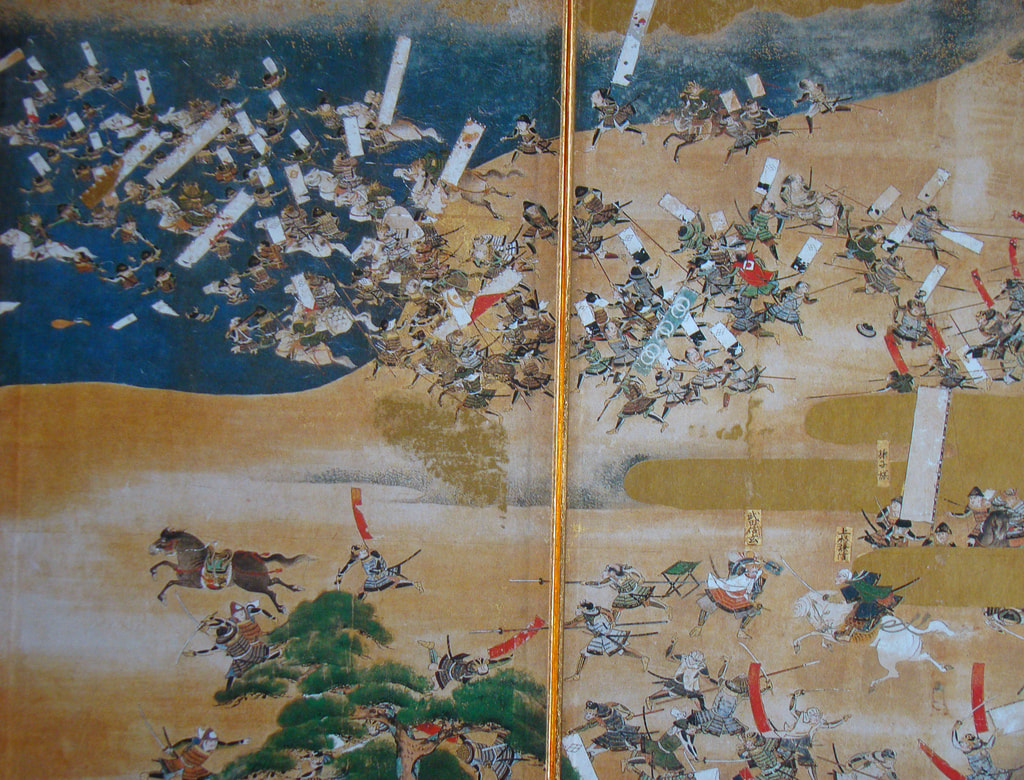 Uma-jirushi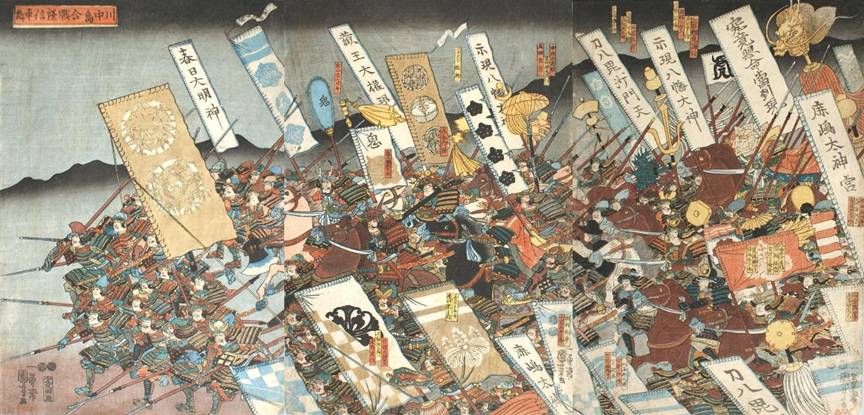 An army attacking, brandishing a large number of nobori (the tall narrow flags) and uma-jirushi (the larger square flags and flags made out of golden hats, streamers, and other objects). Literally "horse insignia", these flags started out as a way to identify a lord on the battlefield. Initially they tended to be similar to the nobori, but with a big square flag with the clan insignia, rather than a tall rectangular one. Like the other types of flags, these evolved over time. When generals started to use their own uma-jirushi, the more powerful lords naturally wanted to stand out even more, which lead to the distinction between "small horse insignia" (ko-uma-jirushi) and "great horse insignia" (ō-uma-jirushi). The latter tended to take new shapes, often unique ones that became famous for a lord, such as Toyotomi Hideyoshi's golden gourd banner or Tokugawa Ieyasu's golden folding fan banner. While these three dimensional designs were popular, other famous examples were written text on a large nobori style flag, such as Takeda Shingen's "Wind, Forest, Fire, Mountain" (seen in the drama series Fūrin Kazan), or the zealous Katō Kiyomasa's banner that featured a mantra of the Nichiren sect. 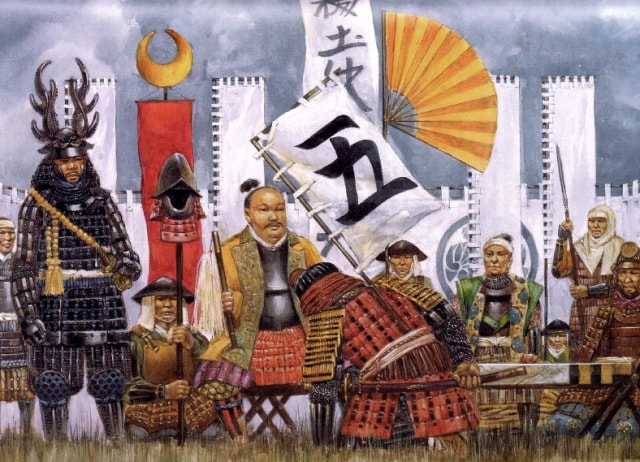 Tokugawa Ieyasu, with his o-uma-jirushi (the golden fan). He also used all white nobori, and many of his troops had the symbol "5" on their sashimono instead of the Tokugawa family crest. Faithful to the theme of this article, the use of uma-jirushi escalated as well. Some lords would adopt additional flags to celebrate important events in their careers, sometimes demoting an old flag while still using it as a "small" flag. Their sons would inherit uma-jirushi, and then add their own ones. But during this they would all be carried together with the individual they represented, ensuring that the fighting would be fierces on both sides wherever they were seen. Much of what is preserved about feudal era heraldry comes from a series of publications, also named "ō-uma-jirushi", released over a period of time in the first half of the 17th century by the monk Kyūan. This book covers a large number of lords and their personal heraldry. Unfortunately, it naturally covers the clans that actually survived the wars, and in some cases the descendants of the Sengoku period lords, but it still provide us with the most comprehensive documentation of these flags.  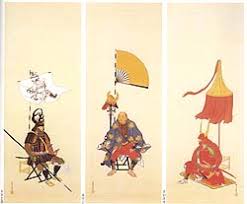  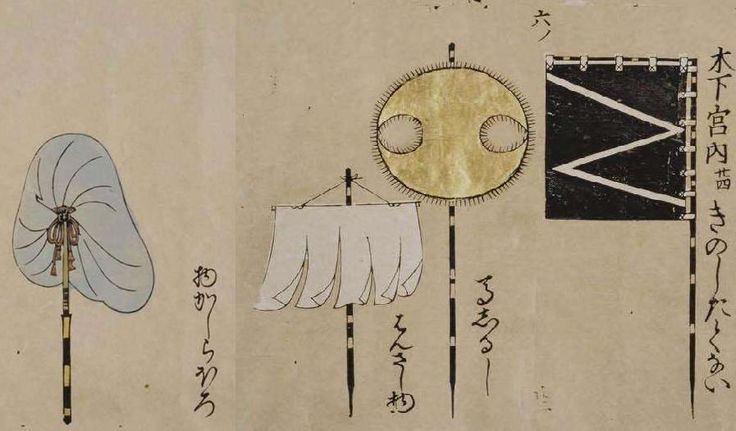 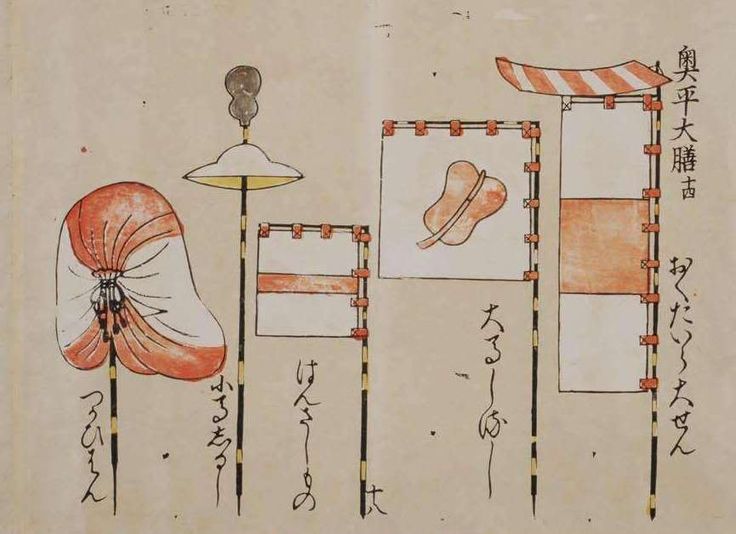 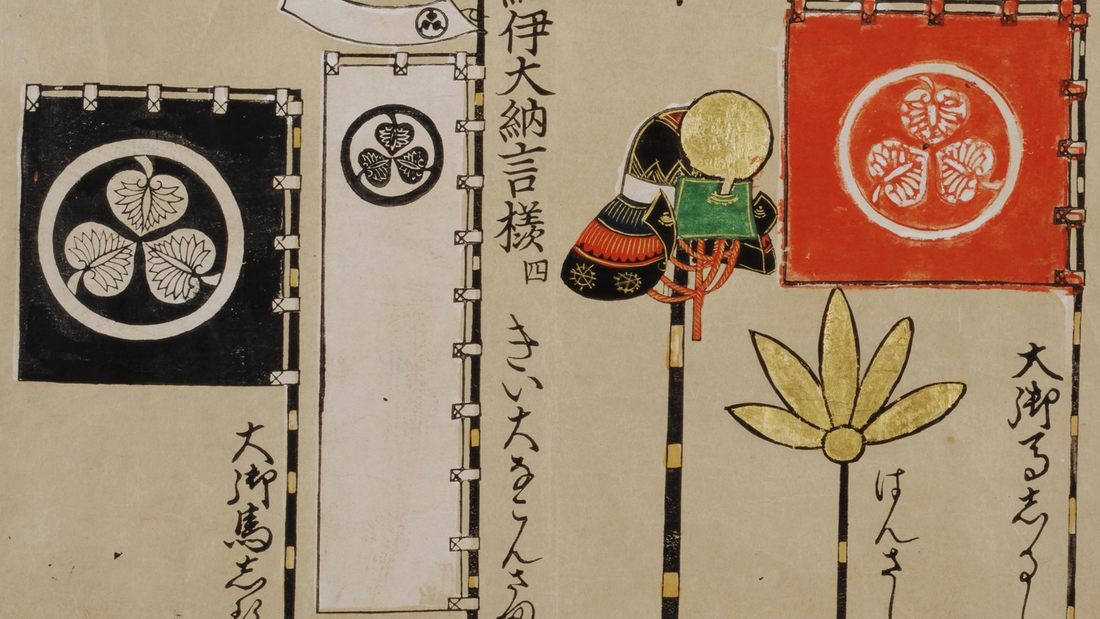 Sashimono 指物, 差物 These smaller sized banners were worn by individual soldiers, strapped to their backs. Most common were rectangular banners, usually a bit bigger for mounted troops, with either simple coloured designs or family crests of the lords they fought for. Anther rather common version was to wear between two and five smaller poles with thin strips of cloth attached to them. Elite troops would sometimes wear three-dimensional sashimono, similar to miniature uma-jirushi, to distinguish them from the rest of the army. These would often be painted gold, have streamers attached to them, or in a similar way make the wearer stand out in the crowd. 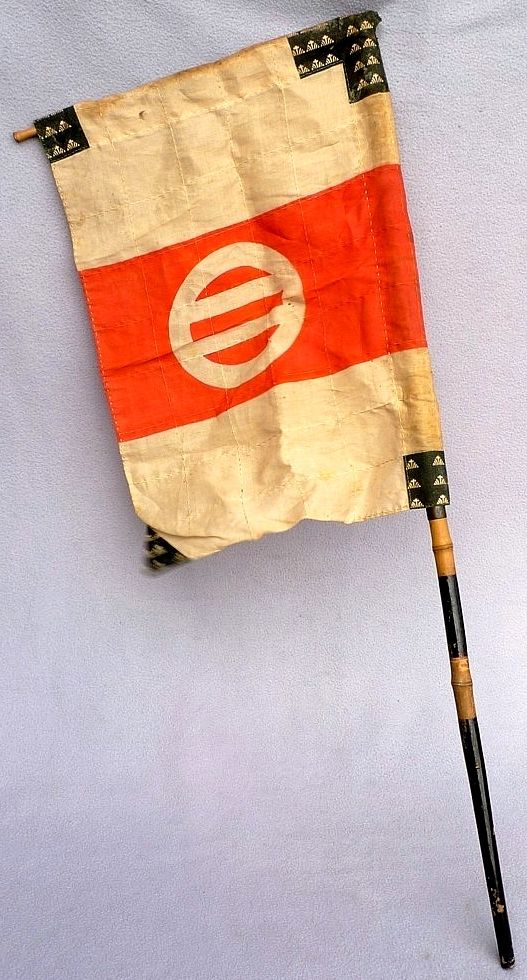 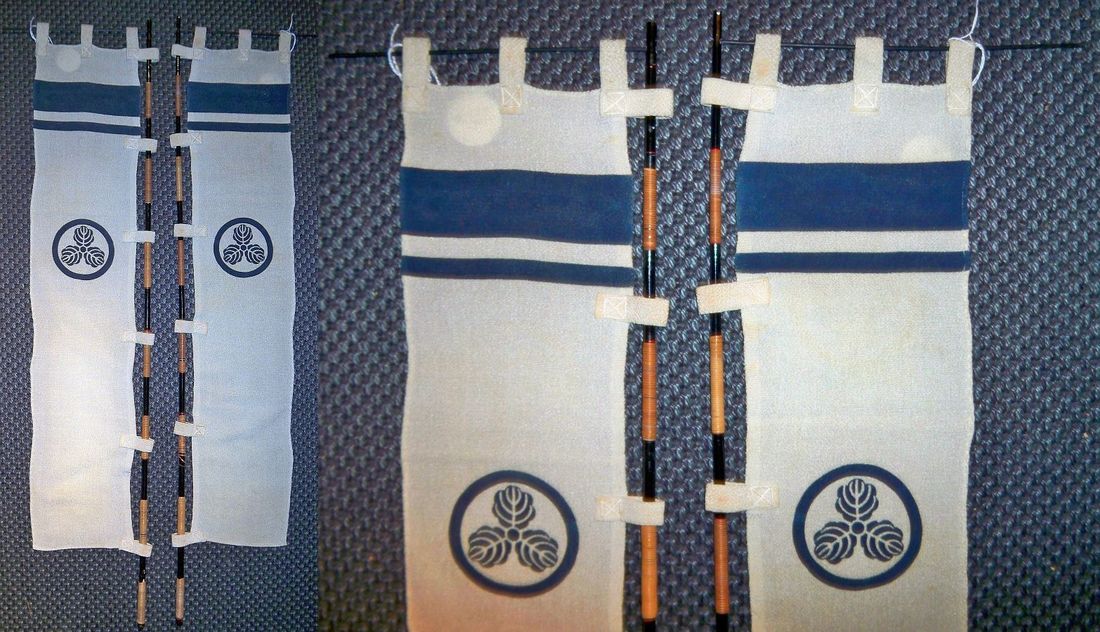 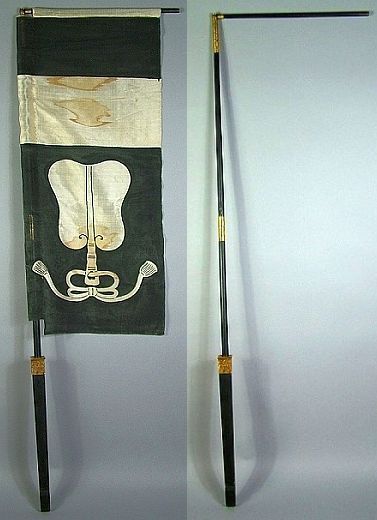 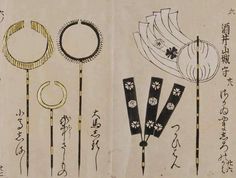 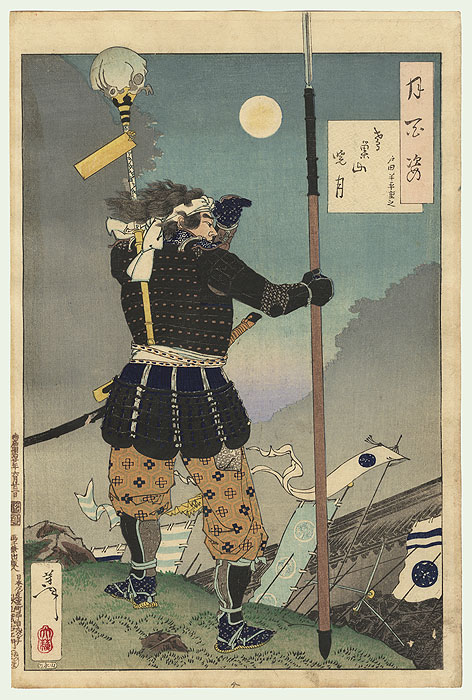 Horo 母衣 Originally a type of cloak, the horo turned into yet another way to show off heraldry on the battlefield. This cloak would billow in the wind when a mounted wearer rode quickly, almost like a parachute, and both stand out and allegedly protect from arrows from behind. These grew in size, and would eventually even be affixed on a kind of frame so that it was always balloon-shaped. The horo were usually worn by tsukaiban, a kind of elite cadre that would act as bodyguards, messengers, and similar tasks of highest importance. The horo could feature the family crest, often on a background that contrasted to the ones worn by the rest of the army. They could also be completely different, such as the centipede worn as a symbol for Takeda's tsukaiban. Finally, some simply had a single colour, or geometrical shapes such as lines. 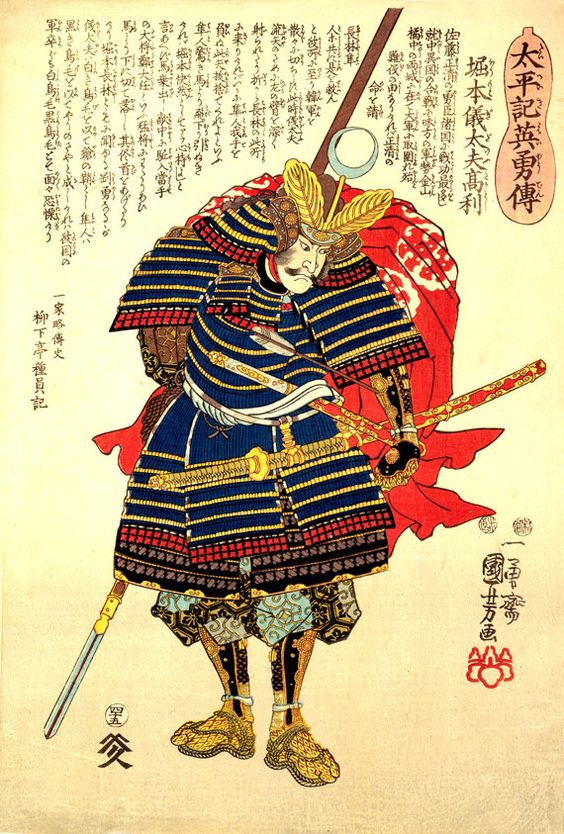 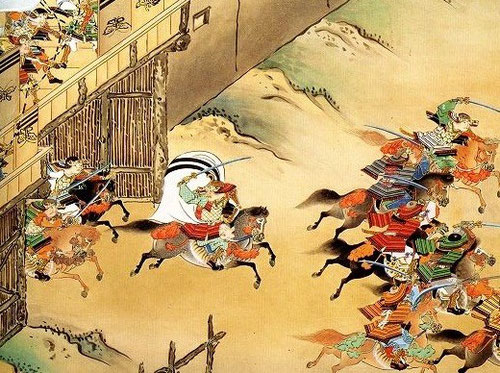 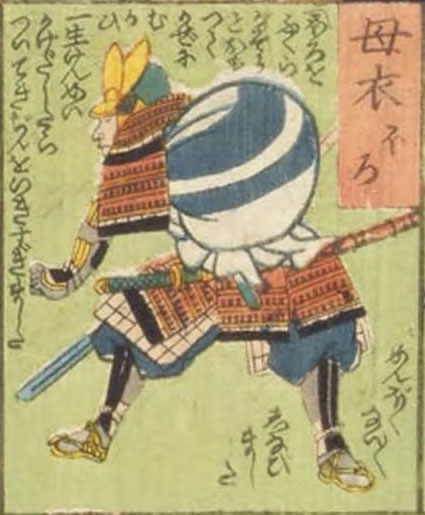 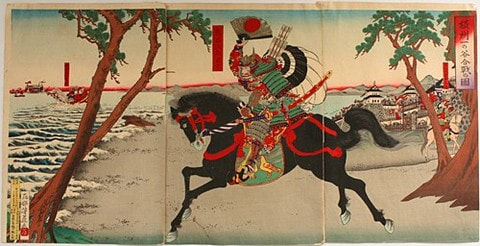  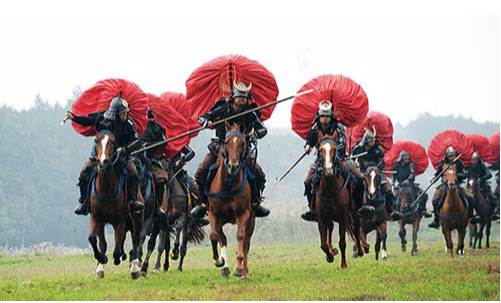 Sode and Kasa JirushiThese were smaller alternatives to the sashimono, either tied to the shoulder guards (sode) or to rings attached to the helmet (kasa). Made out of strips of paper or cloth, they would either have some text or heraldric design to identify the wearer and which side they fought on. 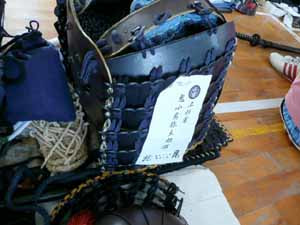 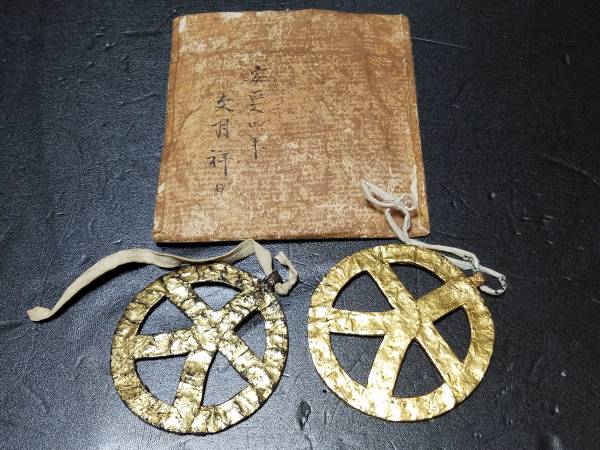 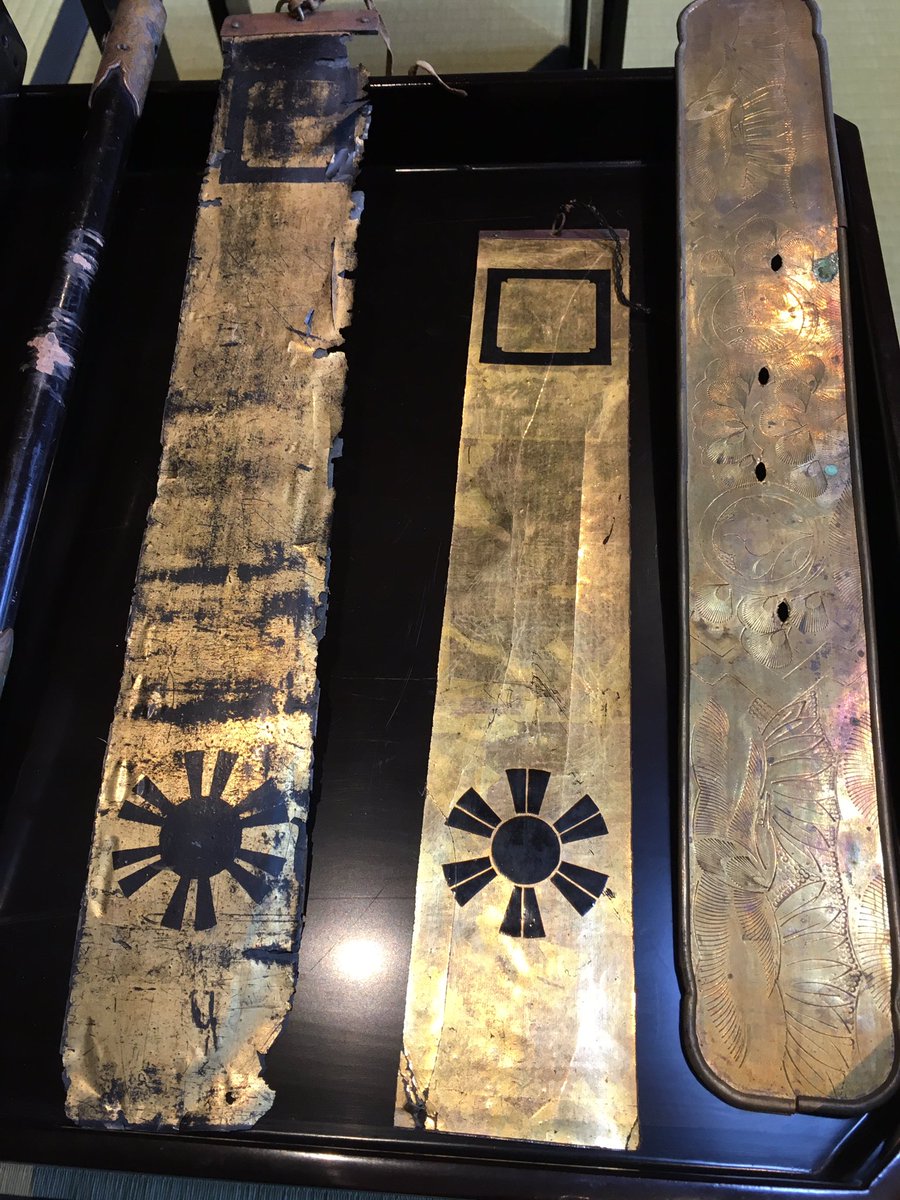 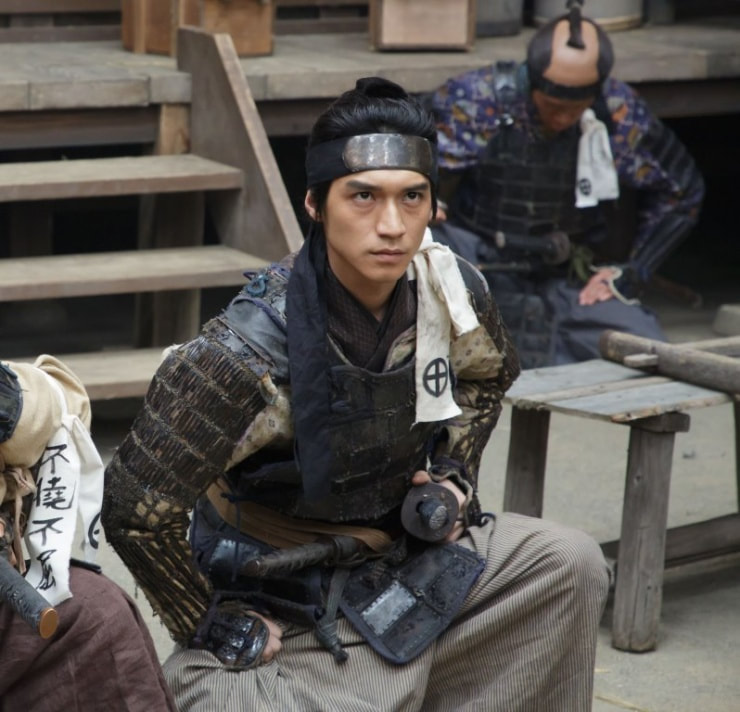 These are initially not very advanced, but often a piece of cloth or paper tied to the armour with a name or message written on it. These are called "sode jirushi" when attached to the shoulder plates, or "kasa jirushi" when attached to the helmet. Winging It - Making Your Own Improvised Heraldry If you are a wargamer and you just want to put a samurai army on smaller force on the table, a simple way to use heraldry is to adopt a family crest as your starting point. Several companies have water-slide decals that you can use if you don't want to attempt to paint multiple copies of these often intricate symbols by hand. A great generic heraldric device is the sun disc, which many families used for their battlefield heraldry and relatively easy to paint. Then, you can use that clan symbol on a coloured field for your various flags. You can either use the same colour for the entire army, or different coloured versions for your units. Say, a white crest on a green flag for one part of your army, and a black crest on a yellow flag for the next, and so on. Another way to distinguish your armies is to include simple shapes to your various units, such as drawing lines of different thickness at the top or bottom of the banners, black triangle fields at the bottom, and so on. Finding Sources - Painting It Perfectly This was just a short introduction to the topic. The follow-up question you might have by now is probably "so what kinds of banners should I use for Lord X at the battle of Y?" The first issue to adress is that the most complete documentation on heraldry was done after the civil war period ended, with an emphasis on the winners that shouldn't surprise us. Battle screens, especially the contemporary ones, do help a bit to cover the gaps. But all these depictions focused more on the lords and generals, while sometimes not giving as much information on the rank and file troops. That said, you can find a lot of nice information online. The Samurai Archive has a lot of information, especially in some threads on their forums, and also a lot of knowledgable people you can ask. More specifically, I'd point you to this thread on the old version of the forums, by Emmanuel Evalerio. He is probably the most knowledgable artist when it comes to samurai heraldry, and the thread covers the heraldry of a lot of important samurai, using different sources. Books on Japanese Heraldry When it comes to books, there's an Osprey title on samurai heraldry that is ok, but not great. Typical to Osprey titles it will give you a quick overview of the topic, and some interesting pictures, but it's not as useful if you are looking for heraldry for a specific lord, or if you want to look up the meaning behind a specific symbol.
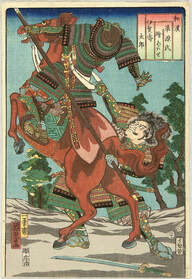
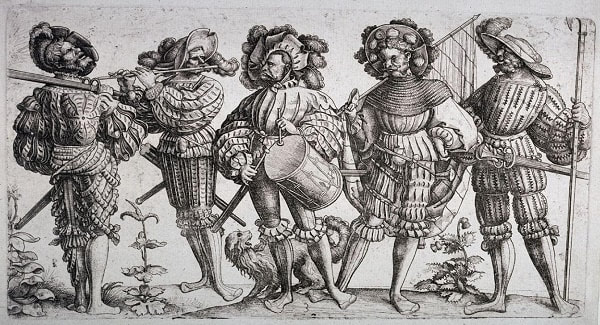
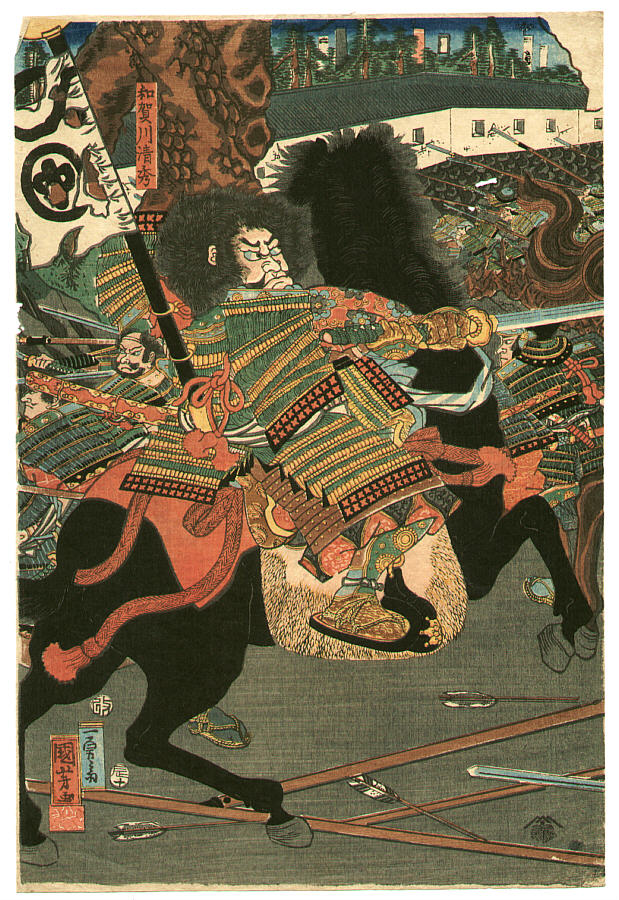
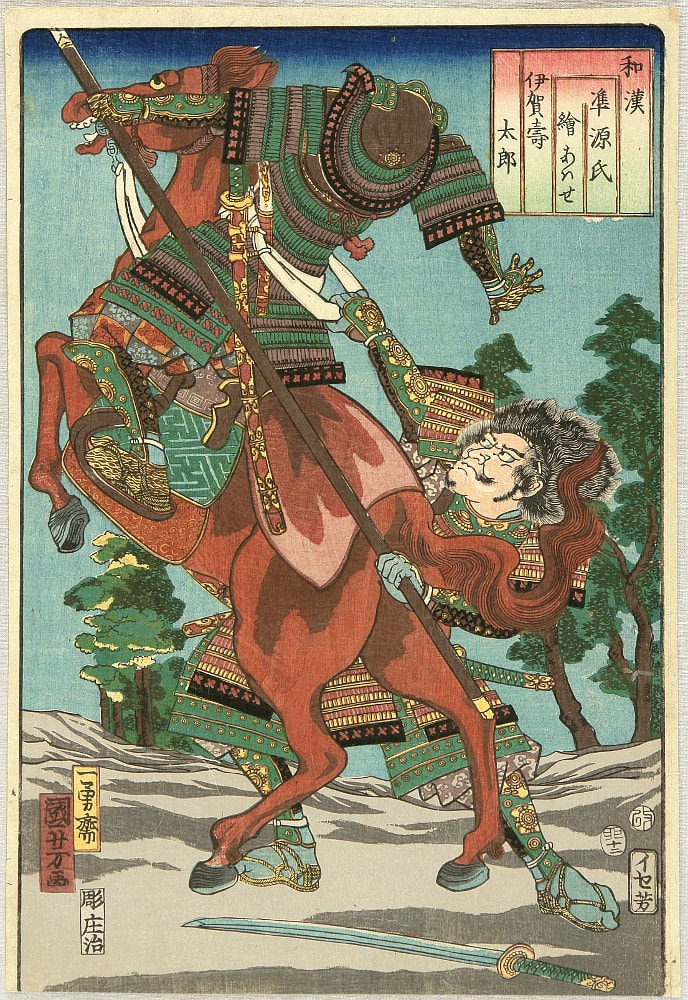
Instead, there are two books in English that are great as reference books if you are really interested in the topic. The first one is the o-uma-jirushi. And by that, I mean the compendium written by Xavid Pretzer. It's a translated and annotated version, with the entire 206 pages of the original scrolls together with some essays about japanese heraldry and the context in which it was (and still is) used. I got the book when it was kickstarted a few years ago, but you can still find it through some online retailers. The second one I actually didn't know about until I did research for this article. It's Japanese Heraldry and Heraldic Flags by David Phillips and the aforementioned Emmanuel Valerio. It's a new book published this year, with one part that basically explains the grammar of Japanese heraldry, and one part with may illustrations from Valerio where he describes the heraldry of various families and lords. While the second half might be of more interest for a wargamer than the first, I like the whole book as it gives a lot of information. Since I can't find a link to any available copies of the O-uma-jirushi, I'd say that this is probably the best available book right now. If you have a question about a specific flag, don't hesitate to make a comment below, and I'll happily did through my sources and see if I can find something useful. /Jonas 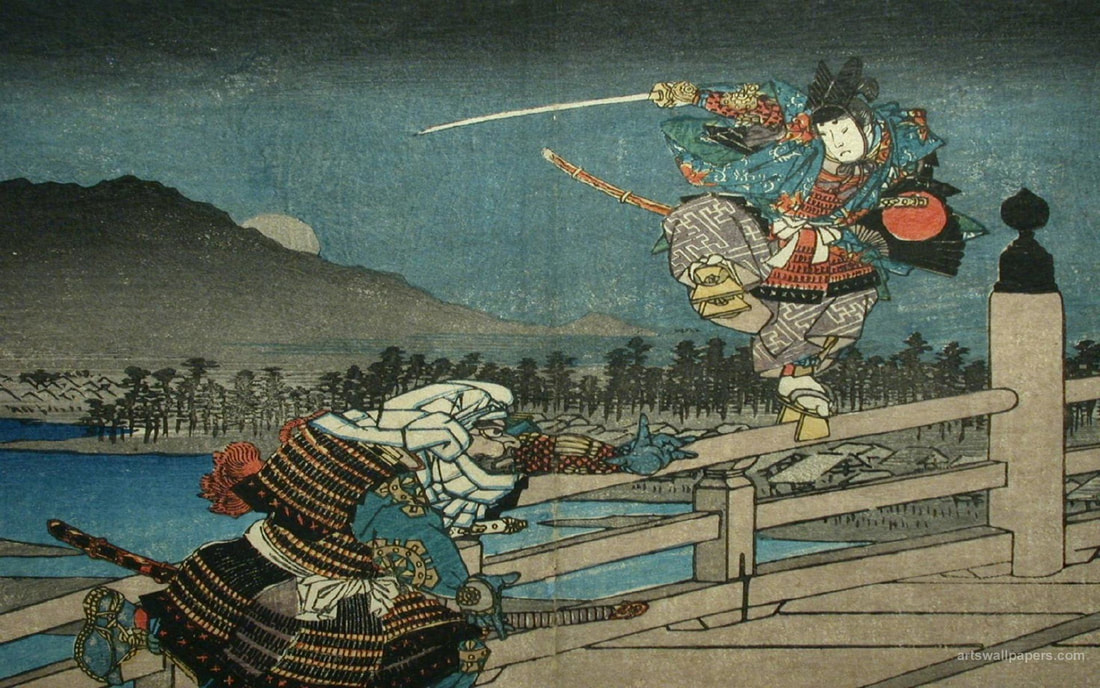 A woodprint of the bridge duel between the warrior monk Benkei and Minamoto no Yoshitsune in the 12th century. Notice the elaborate patterns on the clothes, and the bulky armour plates that are typical for this period. Part One - a Colour Guide I was asked by a club member to give some pointers for painting samurai, so I thought I might as well make a short introduction to the topic. In this first part I will not go into specific paints and techniques. Instead, this guide will give some overall pointers that you can use no matter which kind of painting techniques and painting ranges you prefer. Later on I plan to make some more specific guides based on how I paint my samurai, but that’s for another day. I will also do a separate guide for horses, as that's a pretty big topic in itself. 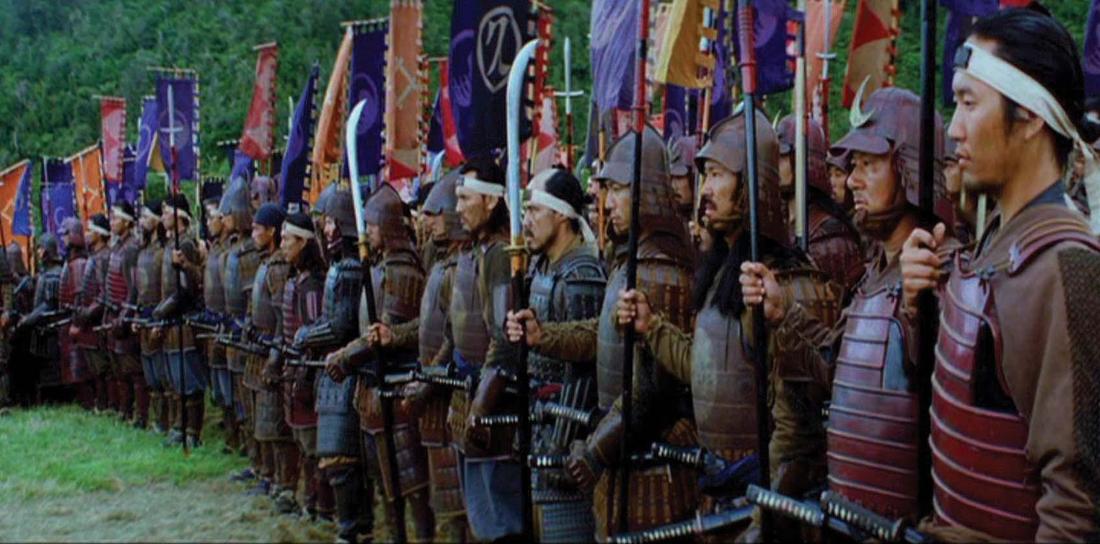 An army arrayed for battle. Notice the pragmatic black and brown armour with very little lacing, typical of the latter samurai periods. Skin Colour I’ll begin with the topic that I’ve gotten the most questions about over the years that I’ve painted and posted samurai online. What’s a good paint for Japanese skin? My simple answer is that the paints you currently use for whatever you paint will do just fine. Japanese skin is far less yellow than some painters assume, going towards what can end up as almost an old comic book caricature hue. What you can do is to avoid skin tone paints that tends towards a pinkish hue. Personally, I tend to start with a brown base colour (like Vallejo's Cork Brown) that I mix up with successive coats where I add more and more of a neutral skin colour. If you want to distinguish your troops lower on the social status, such as ashigaru and lower ranking samurai, you can make the effort to paint their skin as more tanned. At the start of the Sengoku period a lot of them would be part-time soldiers, toiling in the fields under the harsh Japanese sun inbetween campaign seasons. The more peripheral and less influential the clan, the more likely that their troops would not be full time professional soldiers. And even professional ashigaru would spend campaigns like so many other soldiers throughout the ages: digging ditches, carrying heavy loads, and generally doing hard labour while their officers could stay in the shade. A Very Very Short Historical Period Guide If you are new to collecting and painting samurai, it's not easy to keep track of the periods and more importantly - what they mean to you as a wargamer. Here's the three most common times you might see in wargames, how to recognize them, and what they mean. 1. The Time of Horse Archery 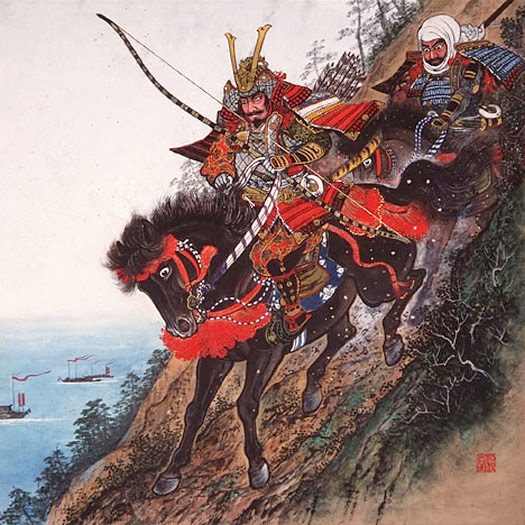 It's Yoshitsune again! Here in full armour suitable for a mounted warrior of the Gempei War. Once upon a time, the samurai were primarily horse archers. Japan was ruled by an Emperor (sometimes two), and warfare was centered on samurai clans fighting each other for supremacy within this system, or as agents of the Emperor fighting against rebellions, or against Mongol invasions. The most known military highlights for a Westerner are probably the Gempei War between the Taira and the Minamoto that levelled large parts of the country in 1180-85. and the Mongol invasions 1274 and 1281. While the shogunate had been installed in the latter war, the Emperor was till a potent force and would temprarily overturn the Shogunate through the Genkou War. While this kind of warfare covered several periods, you're probably going to wargame the Heian (794–1192) and Kamakura (1192–1333) periods. So, what does this mean? Basically, the armies were smaller, and battles would be more like skirmishes. The samurai wore bulky armours that gave maximum protection from arrows, and that were not ideally suited for dismounted combat. The helmets were very wide and combined with huge square shoulder plates protecting weak points while shooting arrows. Since battles were small, back banners were not used as much to identify people, but there were still army banners carried by hand to separate the opposing sides. Meanwhile, the foot infantry would mostly be part-time soldiers, wearing much less armour and tasked with surrounding the mounted samurai to protect them from being swarmed by opposing foot infantry and torn down from the saddle. So: no back banners, huge helmets, mounted archers everywhere, and big boxy armour plates. 2. The Time of Huge Armies, Samurai Lords and Flags Everywhere 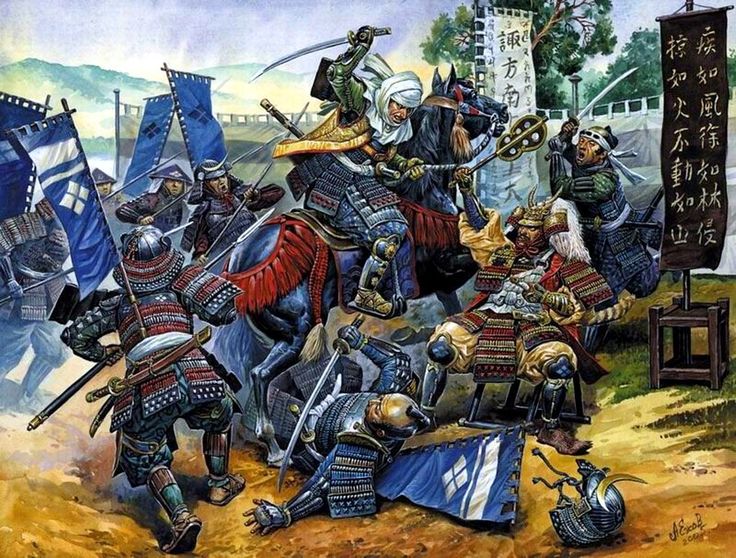 Takeda Shingen and Kenshin Uesugi traded blows at the 4th (!) Battle of Kawanakajima, but got separated and both survived. Some parts of the older armour style survived, especially with generals who might not expect to see frontline combat (check the unusually big curved plates on the seated Shingen's helmet). After the Gempei War had burned down most of Kyoto, the power of the Emperor gradually declined. Instead, local samurai lords claimed more and more freedom, until Japan was ruled by feudal lords, each one master of their domain. Then there were a whole bunch of wars as these lords battled it out, often taking defeated enemies as their vassals. As the remaining lords became more powerful, armies grew larger and battles bigger and messier until everything ended up with a big bang, as two halves of the country met at Sekigahara in 1600. The defeated forces tried for a come-back that died with the siege of Osaka castle in 1615, ending this period - the Sengoku (in popular media) or Muromachi (in academic texts) period. This is the big one for most wargamers. Hundreds of lords with their own armies, large battles, but also tons of opportunity for skirmishes. And if you want to you can involve China and Korea, through the Imjin Wars when Hideoyoshi tried to invade the continent. If you know of any pre-modern battles of Japan, chances are they are from this period. Most ranges of minis are from this period as well. Typical of the period is that armour styles were simplified. Large armies needed efficient equipment, and the expensive horse archers had no chance against large missile troop formations. So the big boxy plates that sucked for dismounted combat got smaller. Mass produced armour with less lacing became common. And large armies meant a whole new emphasis on making it possible to see which side you were on, with the introduction of back banners and clan crests painted on armour parts as identification devices. Basically if you could stick a flag on it, they did. 3. The Time of No Armies, Lone Swordsmen and I Guess Emperors Again?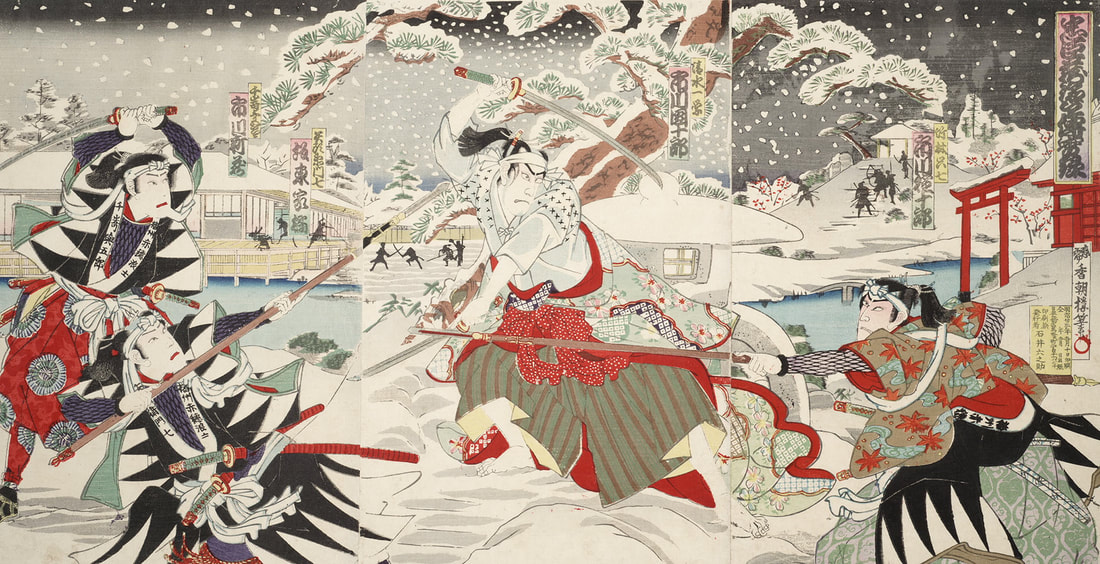 Combat in the Edo period was more personal affairs, often set around outlaws or masterless samurai who had lost their place in the rigid hierarchy of the age. Once the Tokugawa clan and their allies had won the civil wars, they pretty much organized the entire political and economic society around making it impossible for rivalling clans to ever grow strong enough to usurp them. This worked surprisingly well, and from 1615 to 1868 there were very few military campaigns. The period is called Edo, after the old name for Tokyo, which became the capital of the Tokugawas. This is the most popular period in Japanese historical movies and TV shows. If you have seen any movie or show where a tough dude walks around and swordfight lots of people, chances are that it does not take place in the period of actual wars, but during the Edo period. Typical of this period is the lack of armour, and by this time indigo had become a defining colour for the samurai caste. Most common historical conflict, prior to the next bunch of civil wars, is probably the Akou Incident (known as the revenge of the 47 ronin, or Chuushingura), but a lot of skirmish games are heavily inspired by fiction set in the Edo period (Lone Wolf and Cub, Yojimbo, Harakiri, pretty much everything with a ninja in it). You can also reenact the chaotic ending days of the Shogunate, where agents on both sides fought in vicious urban close combat skirmishes. Clothing (Ashigaru) 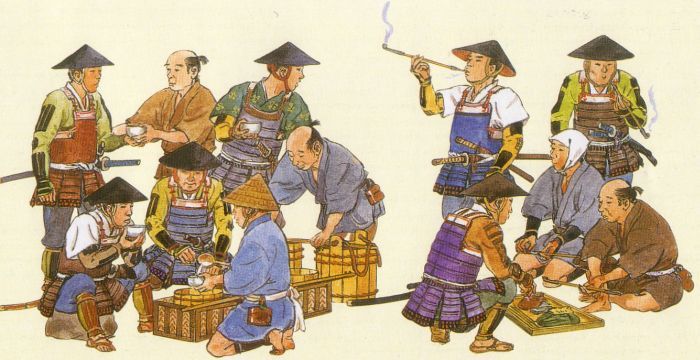 An array of ashigaru soldiers and labourers resting and eating. The armour is typical for the most cheaply equipped troops: conical metal helmets, metal plates sewn to sleeves, and simple breast plates and shin guards. They are not wearing a uniform like a modern army - both armour types and cloth colours are mixed. An array of ashigaru soldiers and labourers resting and eating. The armour is typical for the most cheaply equipped troops: conical metal helmets, metal plates sewn to sleeves, and simple breast plates and shin guards. They are not wearing a uniform like a modern army - both armour types and cloth colours are mixed. Few armies had anything close to a uniform clothing during the Sengoku period. However, some areas of Japan were known for specific ways to make and dye cloth, such as the shibori technique that sprung up around Nagoya at the beginning of the Edo Period. The availability of local dyes and some feudal lords providing equipment for their ashigaru is excuse enough if you want to have a sligthly more uniform force. Lower ranking soldiers would dress in less bold colours, and you’re safe to go with more earthy tones such as unbleached whites, greyish blues, browns, dirty yellows and greens. If you want to spruce them up, a good way is to introduce simple patterns such as stripes, spots or chequered patterns. For both Ashigaru and Samurai, the clothing visible on miniatures would usually be a pair of pants and a jacket, though you will often see pictures of ashigaru wearing no pants during summer (they would then just wear a jacket and a fundoshi loincloth mostly covered by the jacket). Ashigaru would normally be wearing just sandals in summer, but in colder times could be wearing tabi style socks as well. For poorer owners, unbleached whites or dark colours are a safe bet when it comes to socks. I've found dark blue to look quite nice, and it's a common colour still for tabi boots worn by carpenters in Japan. Clothing (Samurai) 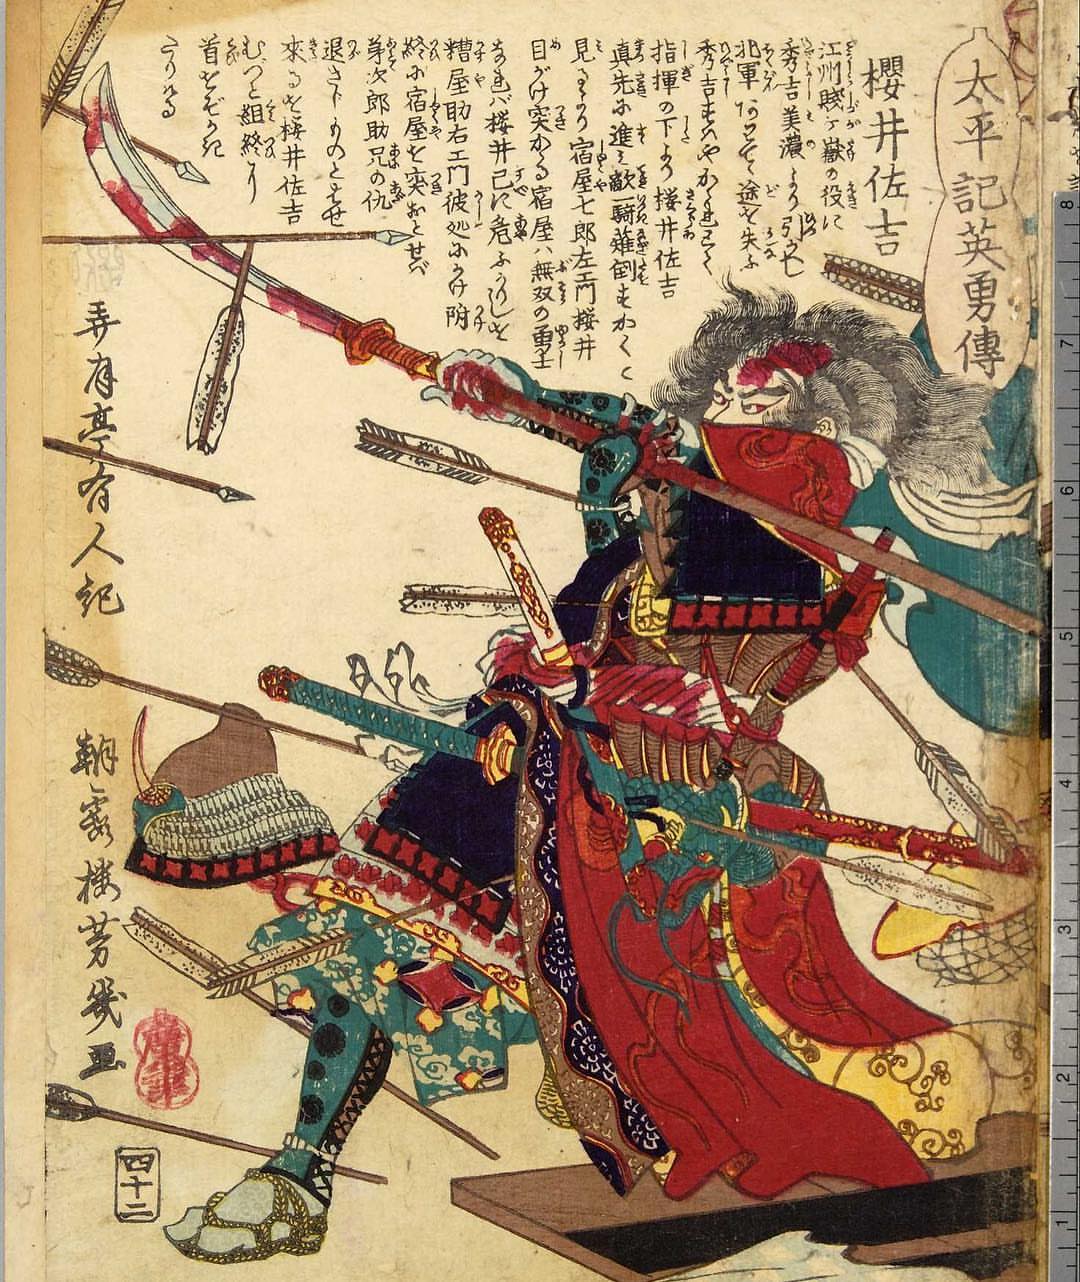 A woodblock print of a fierce samurai. Every part of cloth has intricate patterns, and he's wearing billowing robes on top of his armour, tied in place with the belt sash. The social ladder for samurai covered a large span, and in the end of the Sengoku period the ashigaru were simply the lowest tier of it. So you would have samurai that were not better off, and would wear just as simple clothes. But as their income increase, you’ll find them wearing more and more elaborate garments, both in terms of boldly coloured silk, intricate patterns and even silver and gold embroidery. So basically, the sky’s the limit and you can do whatever you want. Which is not a very helpful statement. But fear not: there are some ways to reign in the creativity and get good looking painting schemes for your samurai. One way is to use the traditional ideas of kimono dressing. These are based on seasonal colours, and set ideas of which colours go well with each other. Use any of these, and you should be fine. https://wafuku.wordpress.com/2011/05/15/japanese-colour-names-seasonal-combinations/ Samurai would sometimes be wearing gloves. These would usually be made of very fine deer skin, but could be dyed in many different colours as well. So if you want a high ranking officer to stand out, a pair of coloured gloves is one way to do it. Armour 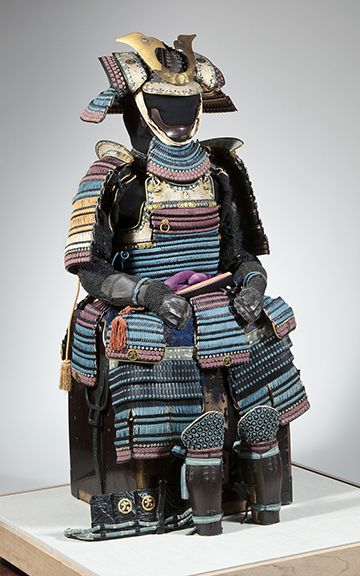 An elaborate piece of samurai armour, using several colours for the lacing holding the metal plates together. Most armour plates would be laquered black. It was the common colour on breastplates, shoulder plates, etc. The easiest way to get this effect is to paint them black, and then give them a layer of gloss varnish. If very worn the sheen of the laquer might be toned down, and you get get this effect using a matte varnish instead. Trailing behind black comes red, brown, and rusty reddish/brown colours. And way, way less common would be spectacular colours like gold and white, sometimes attributed to the most wealthy of lords. But generally, if you see armour that is not black, red or brown, it’s something produced in late Edo period with more modern methods, long after the point that they were regularly used in the field. Some armours would have a solid metal breastplate, while other would have several strips of plates that would be tied to each other with silk lacing. The smaller the armour strips, the more lacing. In the example above, the strips are narrow, so the lacing covers more area than the plates themselves. Armour Lacing 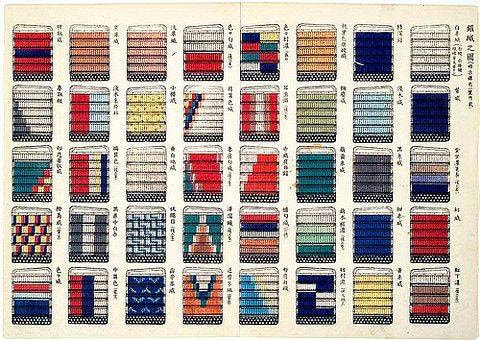 Variations on shoulder plate (sode) lacing patterns The big one for many painters, especially when they start out. This is where the colour on the armour comes from, not the plates themselves. These are silk chords tying the plates together, and can be a bit fiddly to paint. Generally, the earlier the armour or the wealthier the wearer, the more lacing. Later on, the types of breast plates without lacing or with minimal lacing became more popular, especially for less wealthy soldiers. There are three very broad categories to use as a guide.
Other Armour Details 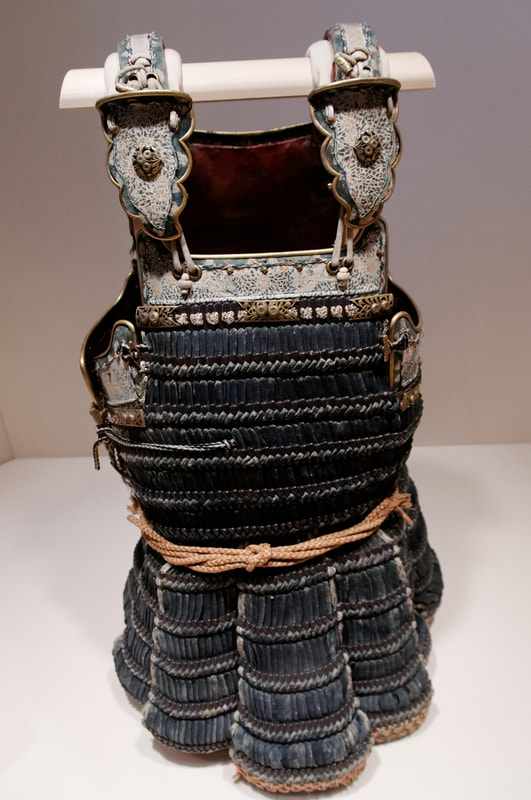 The top of this breastplate and the parts under the armpits are covered in painted leather, just like the shoulder straps and the extra protection on them. Some parts would be covered with cloth or leather. These areas can be found at the top of some breastplates for example. These can be painted in a single colour, or given a pattern, depending on how confident you are in your freehand skills. Sangu - Leg and Arm Protection 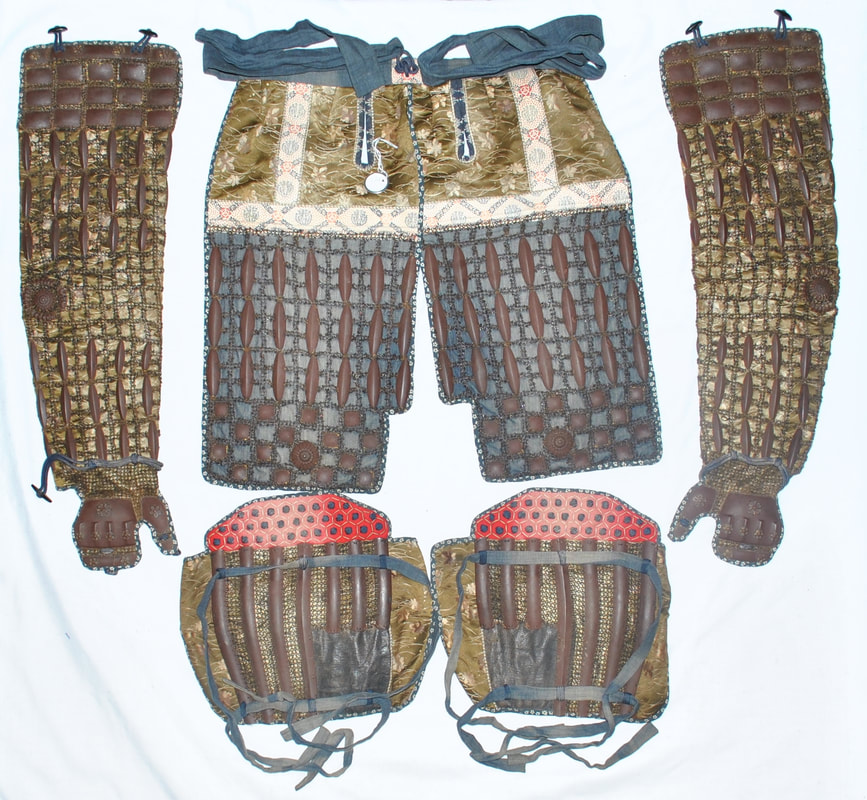 This collection of sangu (leg and arm protection) is well colour coordinated, while others would be more random, especially as lower ranking soldiers might have scavanged parts from a previous battlefield. Sangu the term for three parts of the samurai armour protecting the arms and legs: the sleeves, the shin armour, and the thigh armour. On all three parts, if it looks like chainmail, it is. You’ll often find this on sleeves, with metal plates affixed like brigandine armour. Paint it as you would normally paint chainmail. Sometimes it appears a lot darker than your typical Medieval chainmail, even almost black, so that's also a solid option if you feel that a bright metal chainmail would distract from the rest of the colours.  Armour sleeves (kote) The armour plates on the arms would usually be affixed to a separe pair of sleeves, that are tied around the arms on top of the jacket sleeves. So these could often be a different colour than what you’ve painted the jacket. 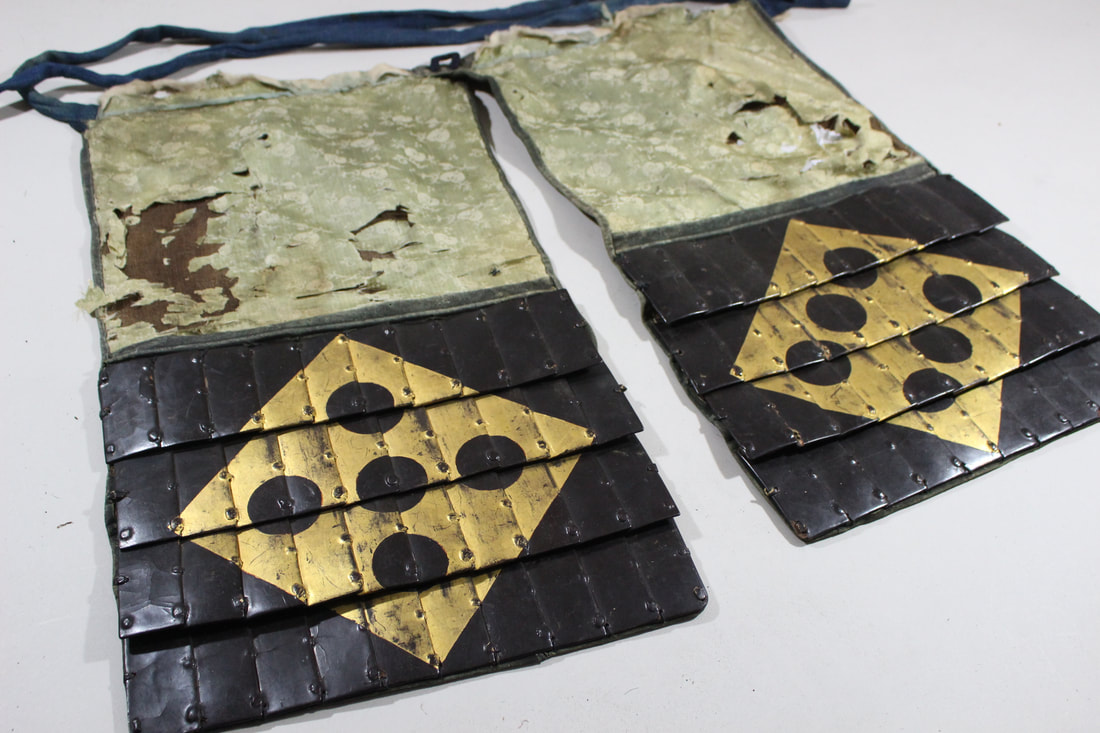 Thigh armour (haidate) This is the part that looks like your regular European style padded armour or brigandine armour, and covers the thighs. These could be lacquered metal plates sewed to cloth, or more fancy versions with laced plates, or even chainmail stitched to a layer of cloth. If you want to stay safe, paint them black, brown or red. If you want them more colourful, paint the edge of it in a more fancy colour, or go hog wild and paint a pattern on them. 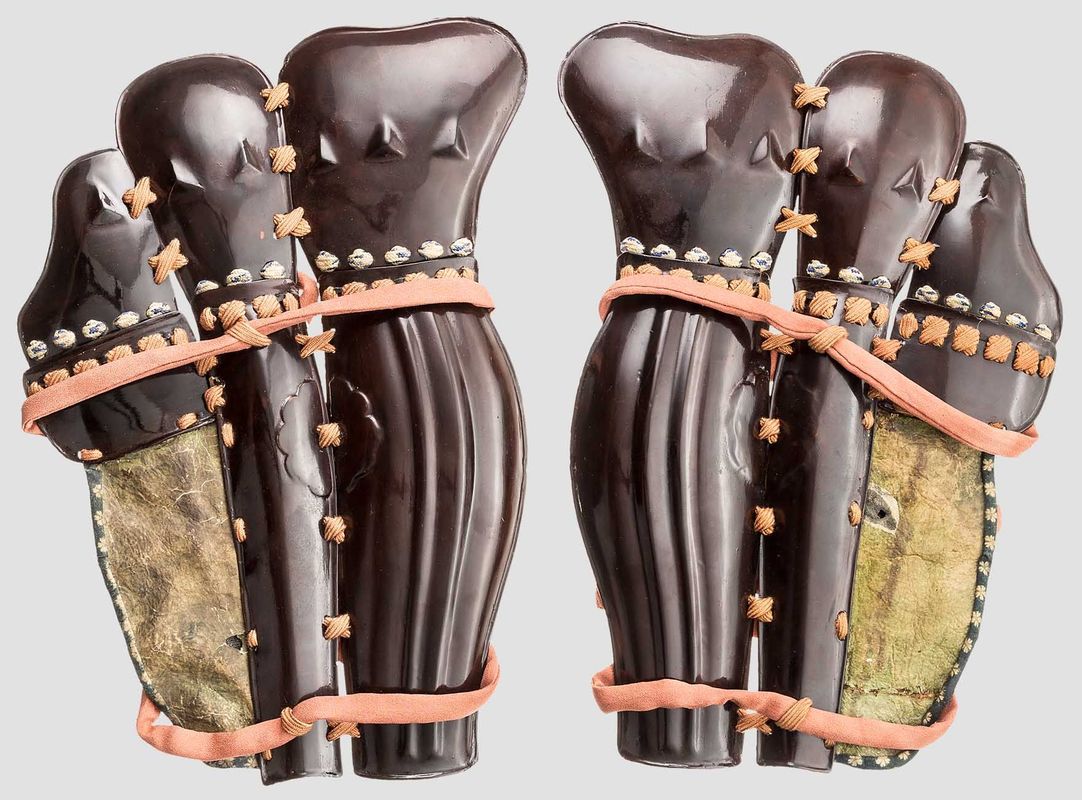 Leg armour (suneate) There are similar to the kote. The thing to keep in mind is that the shin armour is often attached to a cloth base that is wrapped around the leg and tied over the pants. So the back of the suneate can often be a different colour than the one you use for the pants. Cords and Sashes 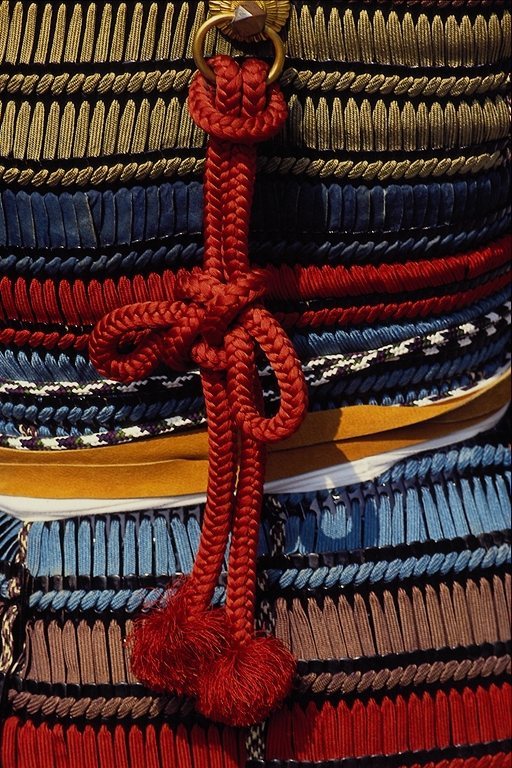 There are several cords used on a samurai armour – around the waist to hold the scabbards in place, the helmet chinstraps, and chords holding the various armour parts in place. For wealthy samurai these would be silk or fine leather, while lower ranking soldiers would use simpler cloth or rougher leathers to make belts and similar. This means that pretty much any colour goes. On top of single colour cords, striped cords often turn up. Since pretty much any colour goes for these, I try to go for something that complements the rest of the painting scheme: such as a light blue if the rest of the model is primarily red. If in doubt, you can always go for white, as it will stand out and make the rest of the colours more distinct. Back Banners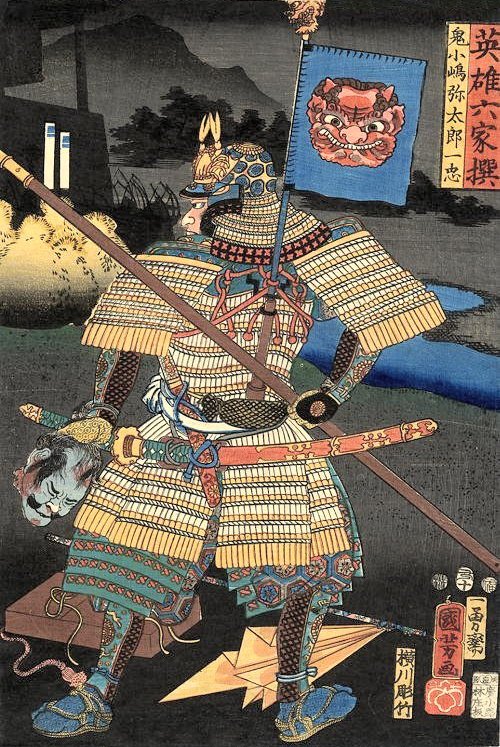 A samurai holding a head trophy while surveying the battlefield. This is an example of a back banner that doesn't have a family crest, and instead using a striking image of a demon. And he also has a very cute crab on his head! The back banners, or sashimono, saw their peak during the Sengoku period. These would be worn primarily by mounted soldiers and close combat troops, and less often by soldiers armed with bows or muskets for practical reasons. The purpose of the back banners were to distinguish friend from foe (remember the lack of uniforms) in the heat of battle, and for commanders to easily see formations. Usually these would be how you saw which army you belong to. The important part of the sashimono was usually not the colour, but the family crest or other design on it. Different parts of the same clan, and sometimes even soldiers following different members of the same family, could use colour variations of the same design. So within the Takeda clan, you could see many different versions of basically the same flag: 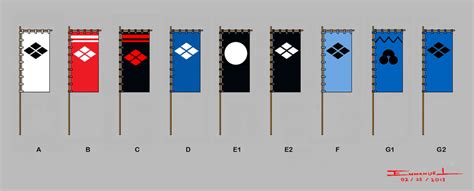 A selection of Takeda clan banners As you can see above, additional patterns such as stripes were often used to make variations of the basic heraldry to distinguish branches or members of the main clan. The flags of the samurai lords of Japan were only systematically written down in the O-umajirushi, published over a period that was 20 to 40 years after the Tokugawa clan had killed off a lot of their opposing clans, or a generational shift or two could have overturned previous designs. This means that you have a lot of lee-way in that there doesn't remain complete documentation for the sengoku period heraldry for a lot of clans. Was there a lesser known sub-branch of the Azai clan that used a purple version of their clan heraldry on their banners? It's probably hard to prove there wasn't, so go ahead and improvise if you want. The back banners would be strapped to wood, so paint these in whatever wooden colour you prefer. Then there are back banners that are not just flags, but that's another rabbit hole that we can cover later. WeaponsYou have probably seen a lot of samurai swords already, so I won't go too much into details of them. Sword hilts would preferrably be covered in ray or shark skin (samegawa) wrapped in a a tight pattern. These could be white or black, or dyed. Red and green seems to have been popular, but pretty much any colour is possible. Sword scabbards were usually laquered wood, so black or red would be most common similar to the armour laquer. While later sword guards would often have fanciful patterns and be made of exclusive materials, during the period when swords were actually used they would be more practical and made of steel.  A samurai wielding a yari spear. Spears/halberds Spears would be made out of hardwood or glued together strips of bamboo, and preferrably laquered to become water resitant. So basically any wood colour or the same colours as for the armour (red, black or rusty browns) will work. The fitting that keeps the blade in place can often be brass. 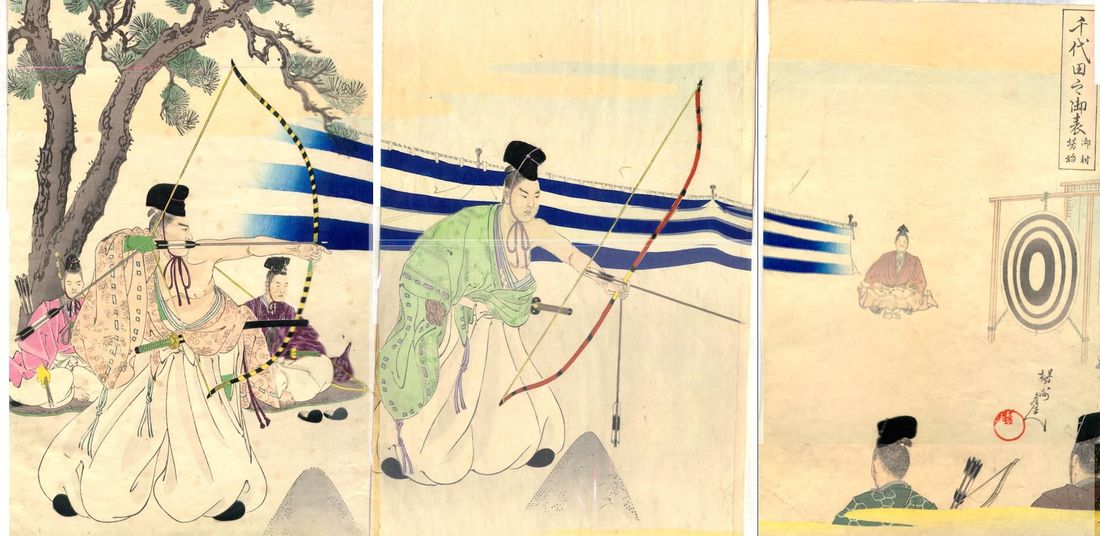 Two nobles practicing target shooting with bows. Bows The bows used for war in Japan were laminated and made of wood, bamboo and leather. The construction method makes for the iconic stripes, often in black, red or light leather colours. These stripes can be of different width, so just go with whatever width you prefer, and you can readily mix them as the picture above shows. 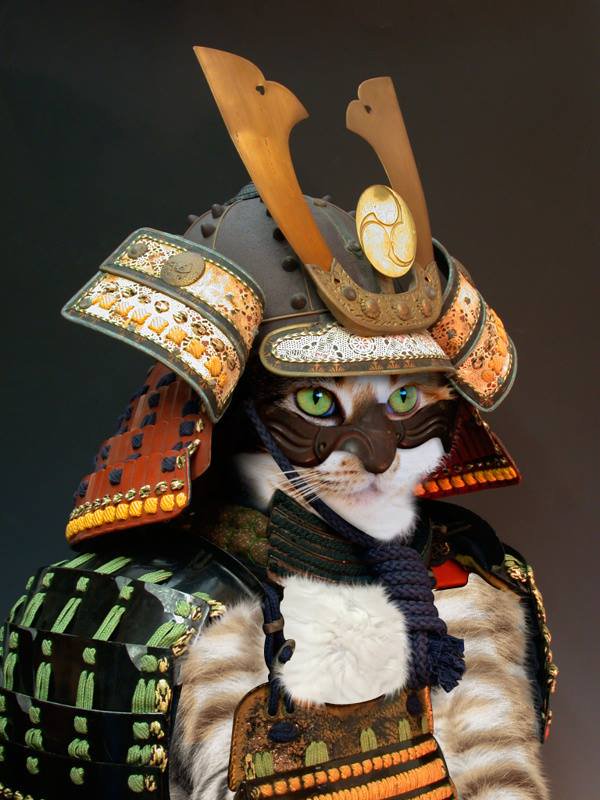 Famed samurai general Takeda Catsuyori That's it for now! As mentioned, this is far from a comprehensive guide. Instead, I hope it will be enough for you to tackle your first couple of samurai miniatures in case you were worried about getting it wrong.
And always keep this in mind: when in doubt, do a search online! There are tons of pictures out there of actual armour parts or clothes. Woodblock prints are a great source for inspiration as they are usually very colourful and makes it easy to see patterns. So if you don't find anything useful, add "ukiyo-e" to your search words. Cheers, Jonas |
The Renaissance BlogWhat started as a blog about Renaissance gaming in general quickly turned into a blog about samurai miniatures. Archives
March 2022
Categories |


 RSS Feed
